DIY Dried Flower Pumpkin Centerpiece (Step-by-Step Guide)
If you’ve been around WM Design House for a while, you know I can’t resist a good pumpkin project. Every fall, my love for all things seasonal and natural decor comes alive—and this year, I decided to combine my two favorites: dried flowers and pumpkins.
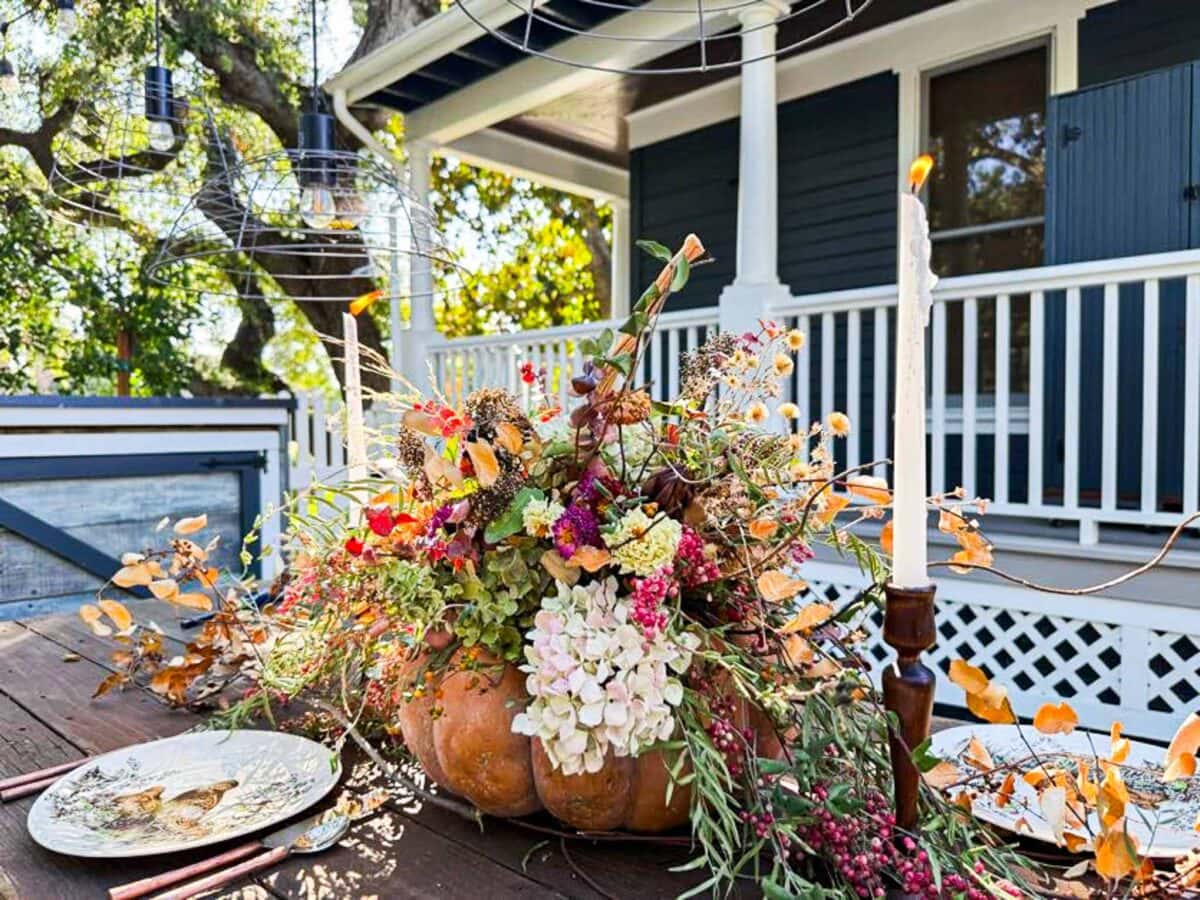
This DIY dried flower pumpkin centerpiece is elegant, sustainable, and easy to make. It’s perfect for your Thanksgiving table, coffee table, or entryway—and the best part? It will last all season long.
This dried floral pumpkin arrangement is a beautiful way to celebrate autumn’s textures and tones—one that feels cozy, creative, and timeless.
On my blog WM Design House, I may sometimes use affiliate links, which means a small commission is earned if you purchase via the link. The price will be the same whether you use the affiliate link or go directly to the vendor’s website using a non-affiliate link. Read my full disclosure policy here.
Pinterest Challenge for October
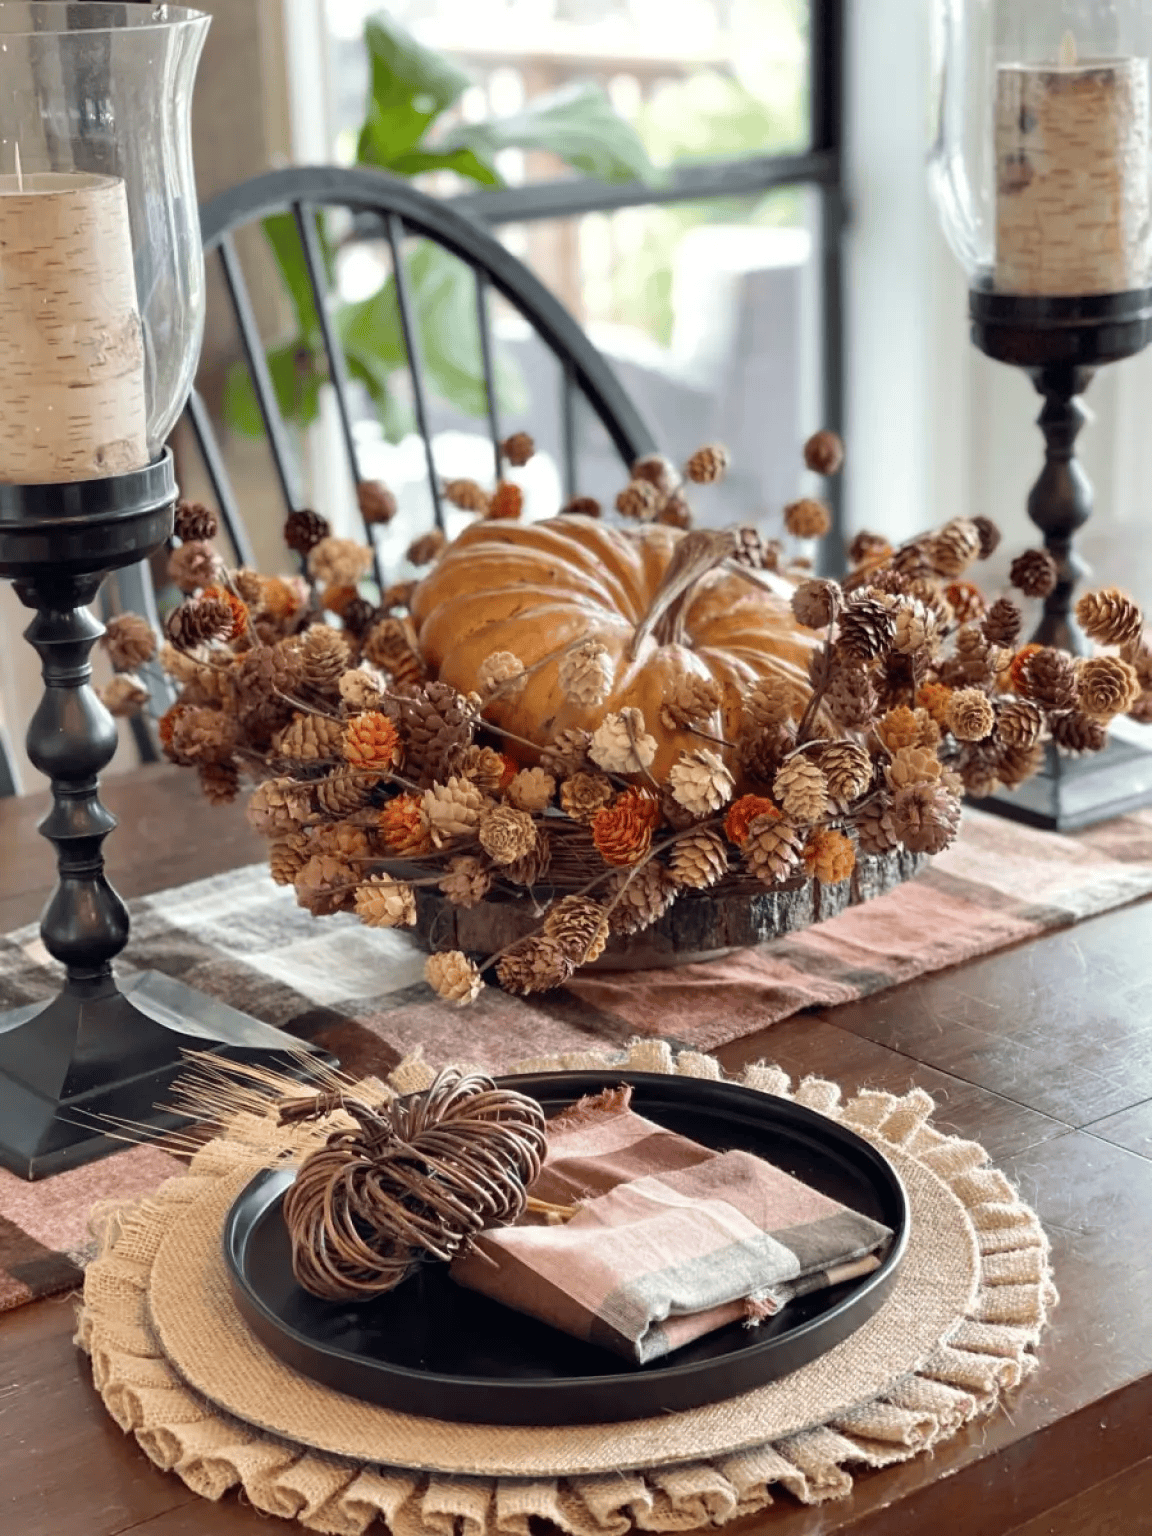
Welcome to the October Pinterest Challenge, hosted by my sweet friend Cindy from County Road 407! The inspiration photo she chose this month is from Deborah at Hip and Humble Style . It features a sweet and simple Thanksgiving centerpiece with a pumpkin, dried pinecones, a few candles, and minimal place settings — such a beautiful and simple look for fall entertaining.
If you came over from my friend Libby’s @alifeunfolding, welcome. I have no doubt you enjoyed her friendsgiving table.
If you’re new here, the Pinterest Challenge is all about turning inspiration into creativity — taking one lovely idea and making it your own. My dried flower pumpkin centerpiece ended up evolving into something a little larger than planned (no surprise there!). I adore the look of clean, simple styling, but I’ve learned to embrace my inner maximalist — more layers, more texture, and always a touch of whimsy.

The One Fall Centerpiece You Will Want to Make Every Year
Each year when I make one of these arrangements, it turns out a little different — unique in color, shape, and texture — just like the changing leaves outside. It’s such a beautiful way to bring the warmth of fall into your home.
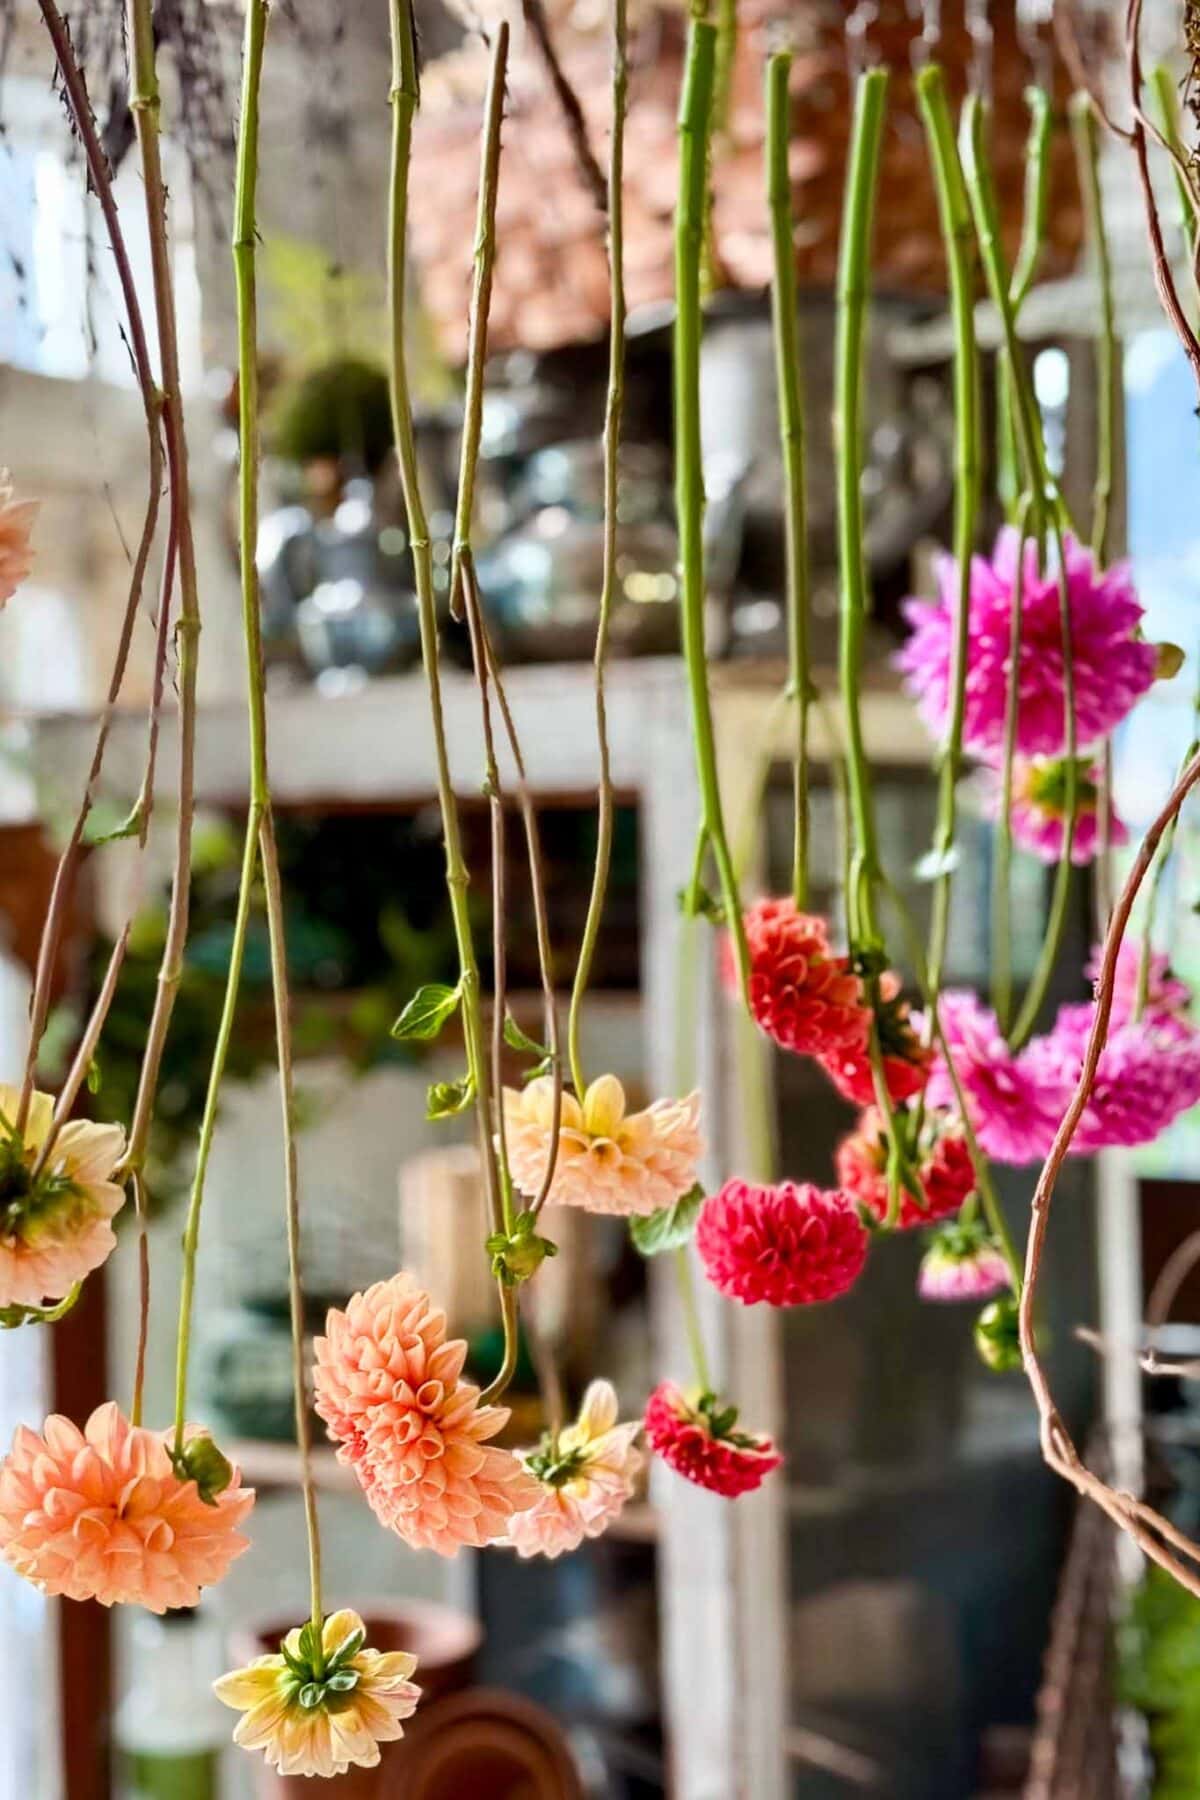
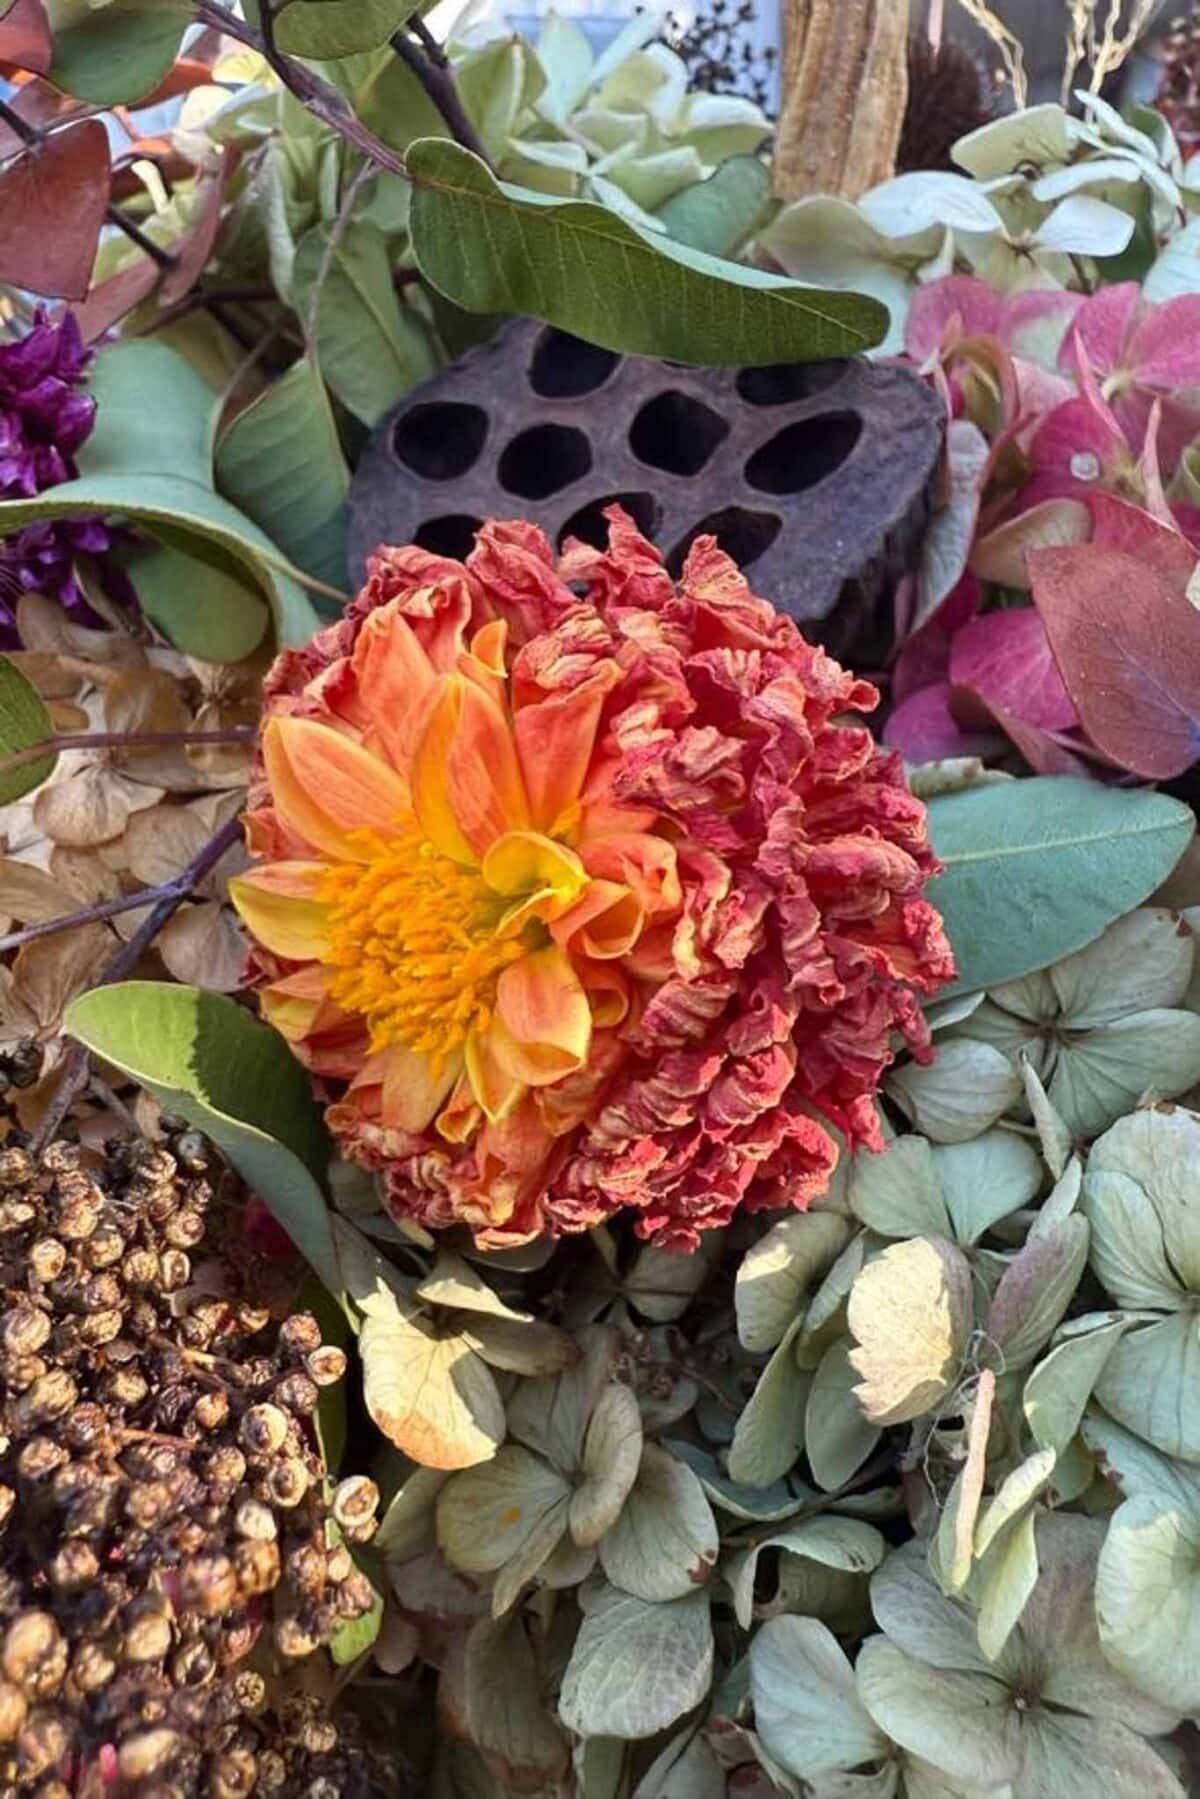
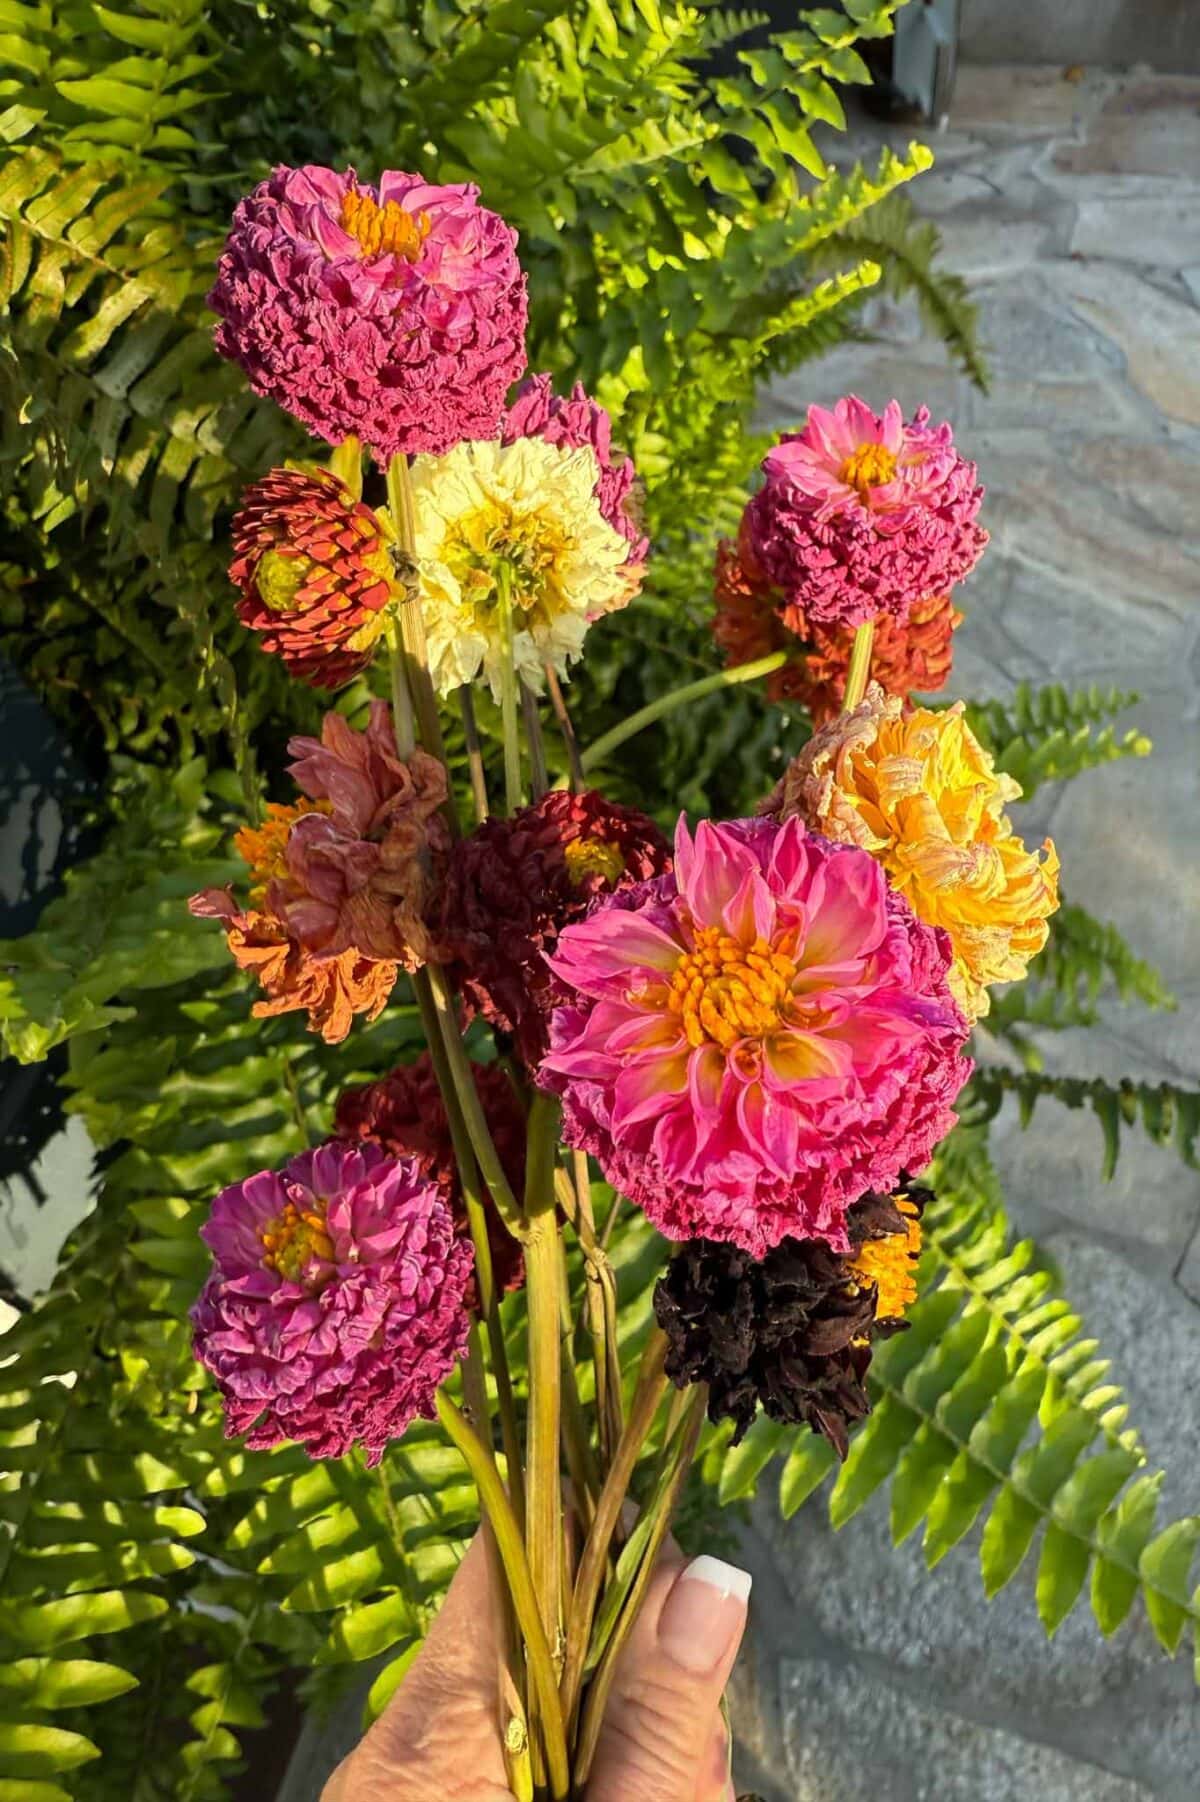
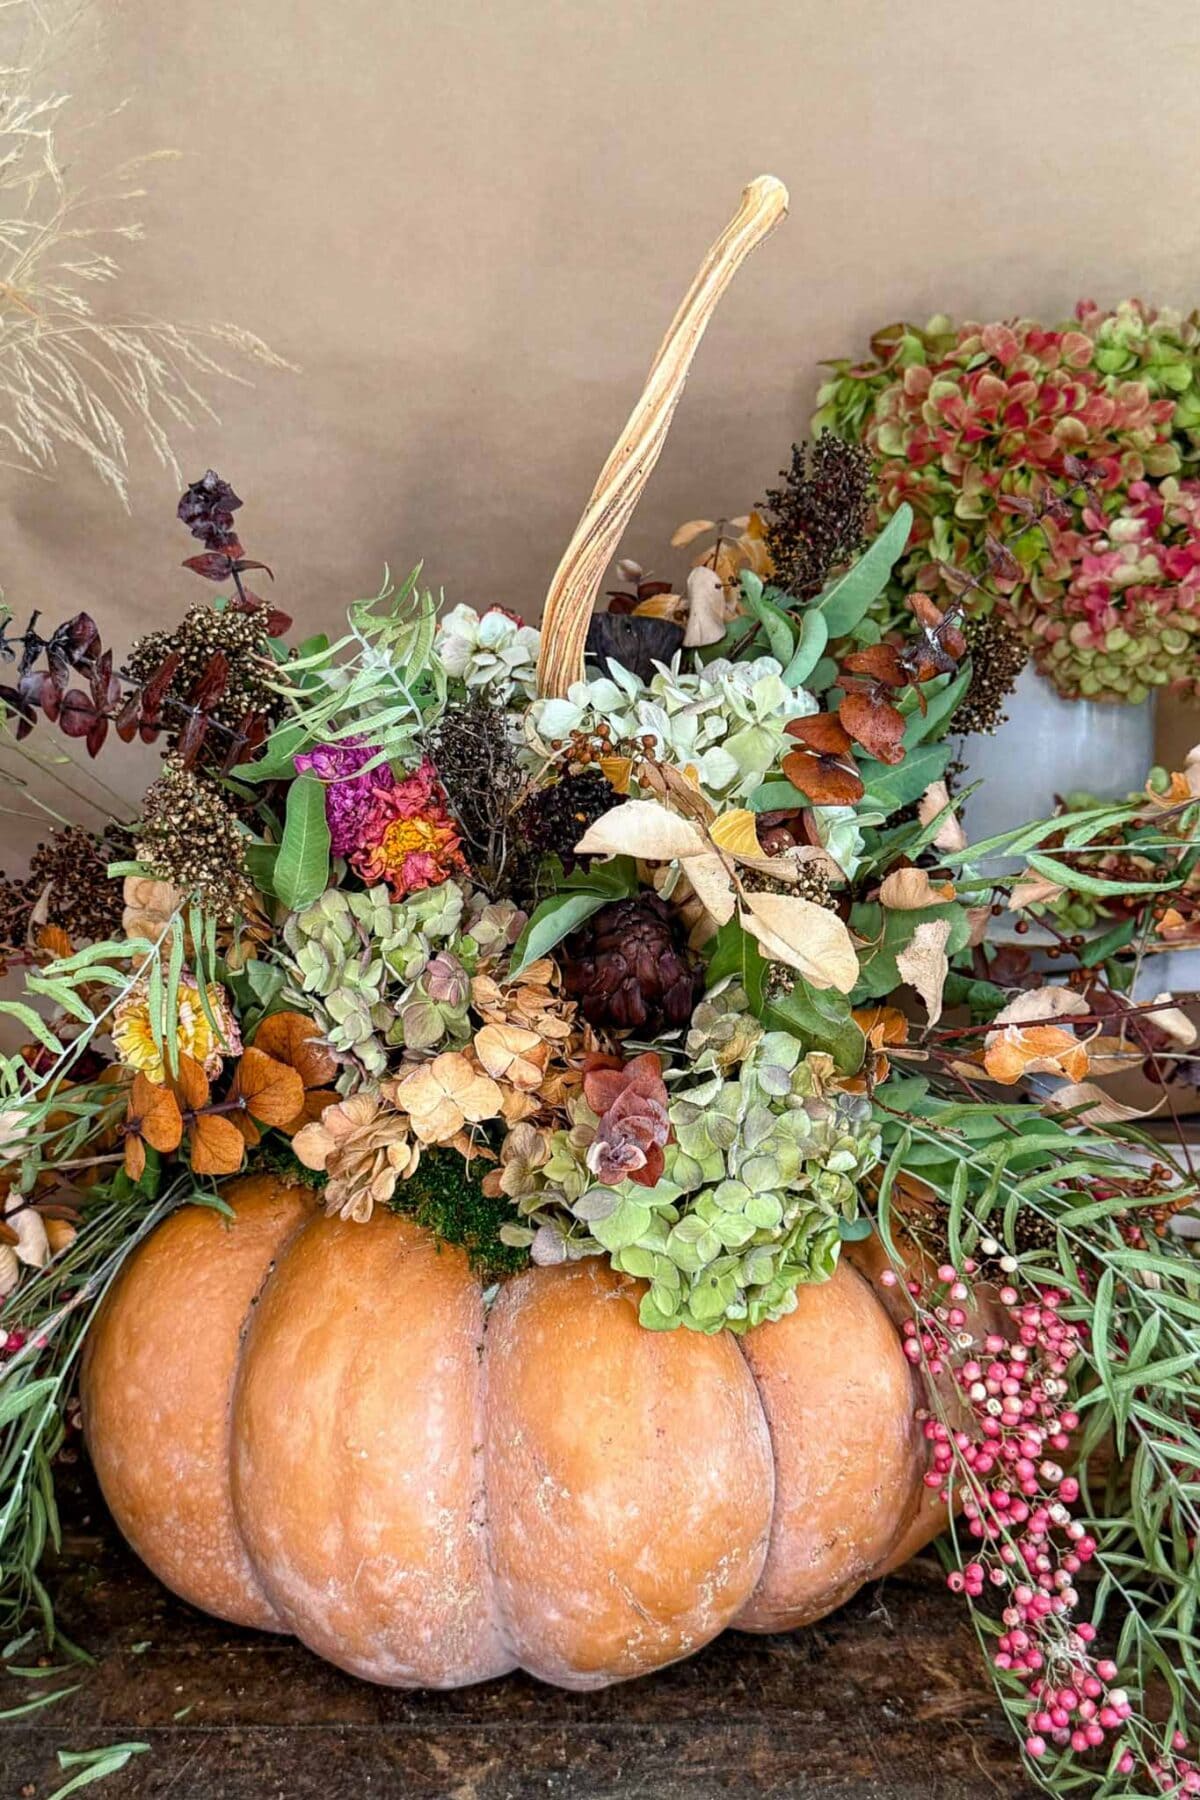
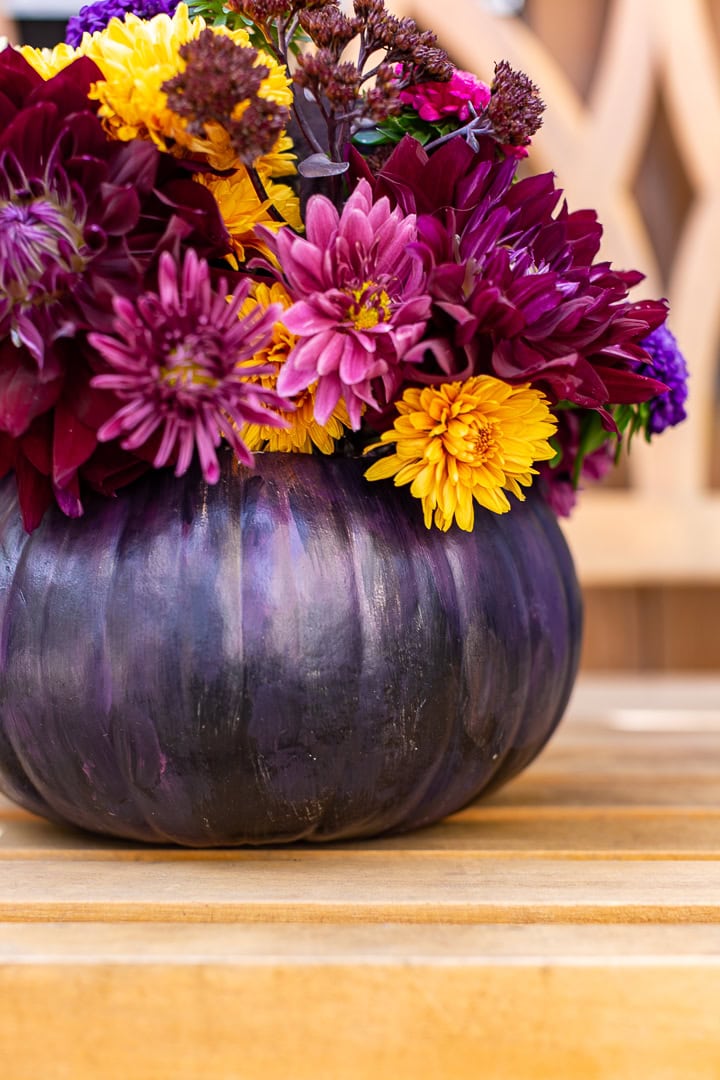
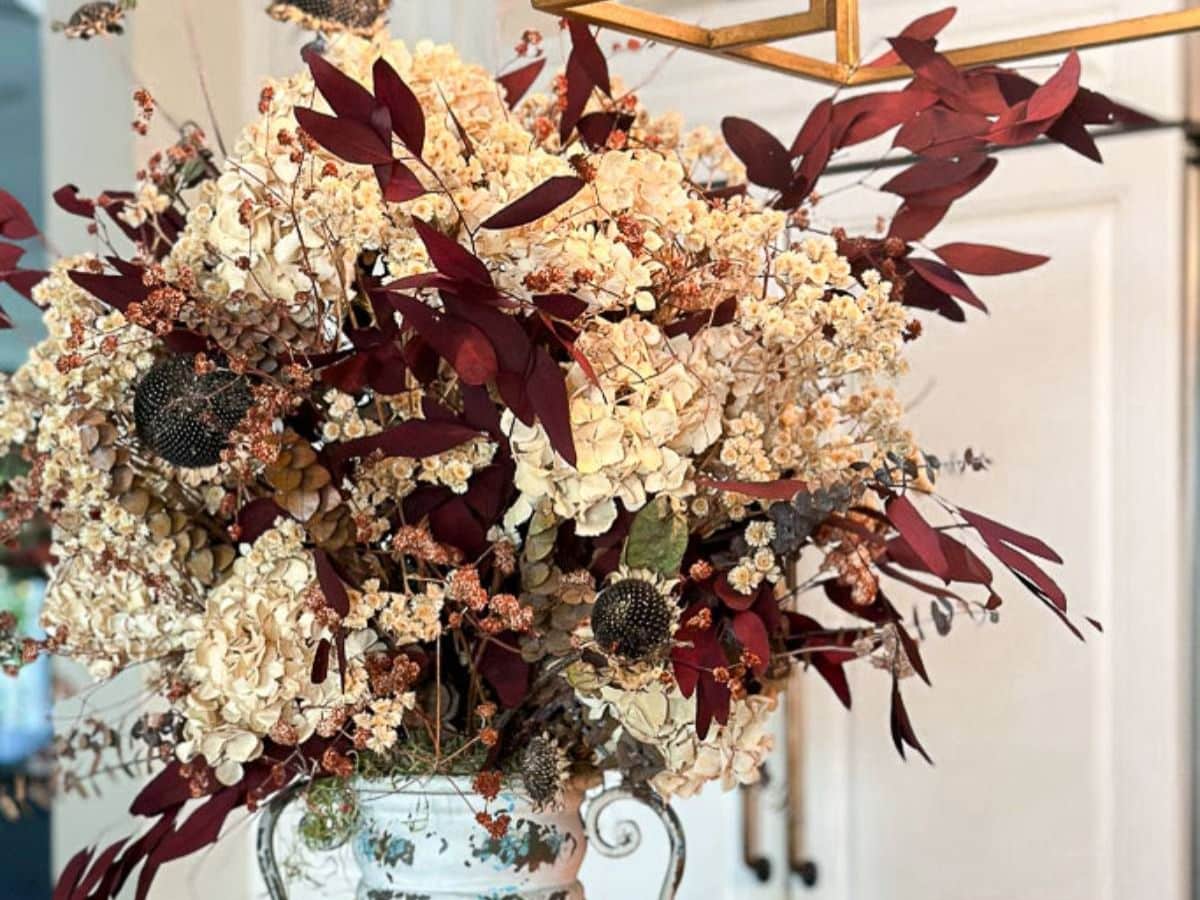
As the season came to an end, my garden was overflowing with dahlias — too beautiful to let go to waste. I dried them, and they turned out lovely! For this dried flower pumpkin centerpiece, I combined dried dahlias and hydrangeas, two of my favorite blooms to design with. Their soft, papery petals hold color beautifully and add the perfect texture to any fall arrangement.


How to Make a Dried Flower Pumpkin Centerpiece
Equipment
- 1 Hot glue gun
- 1 Pair of garden sheers
Materials
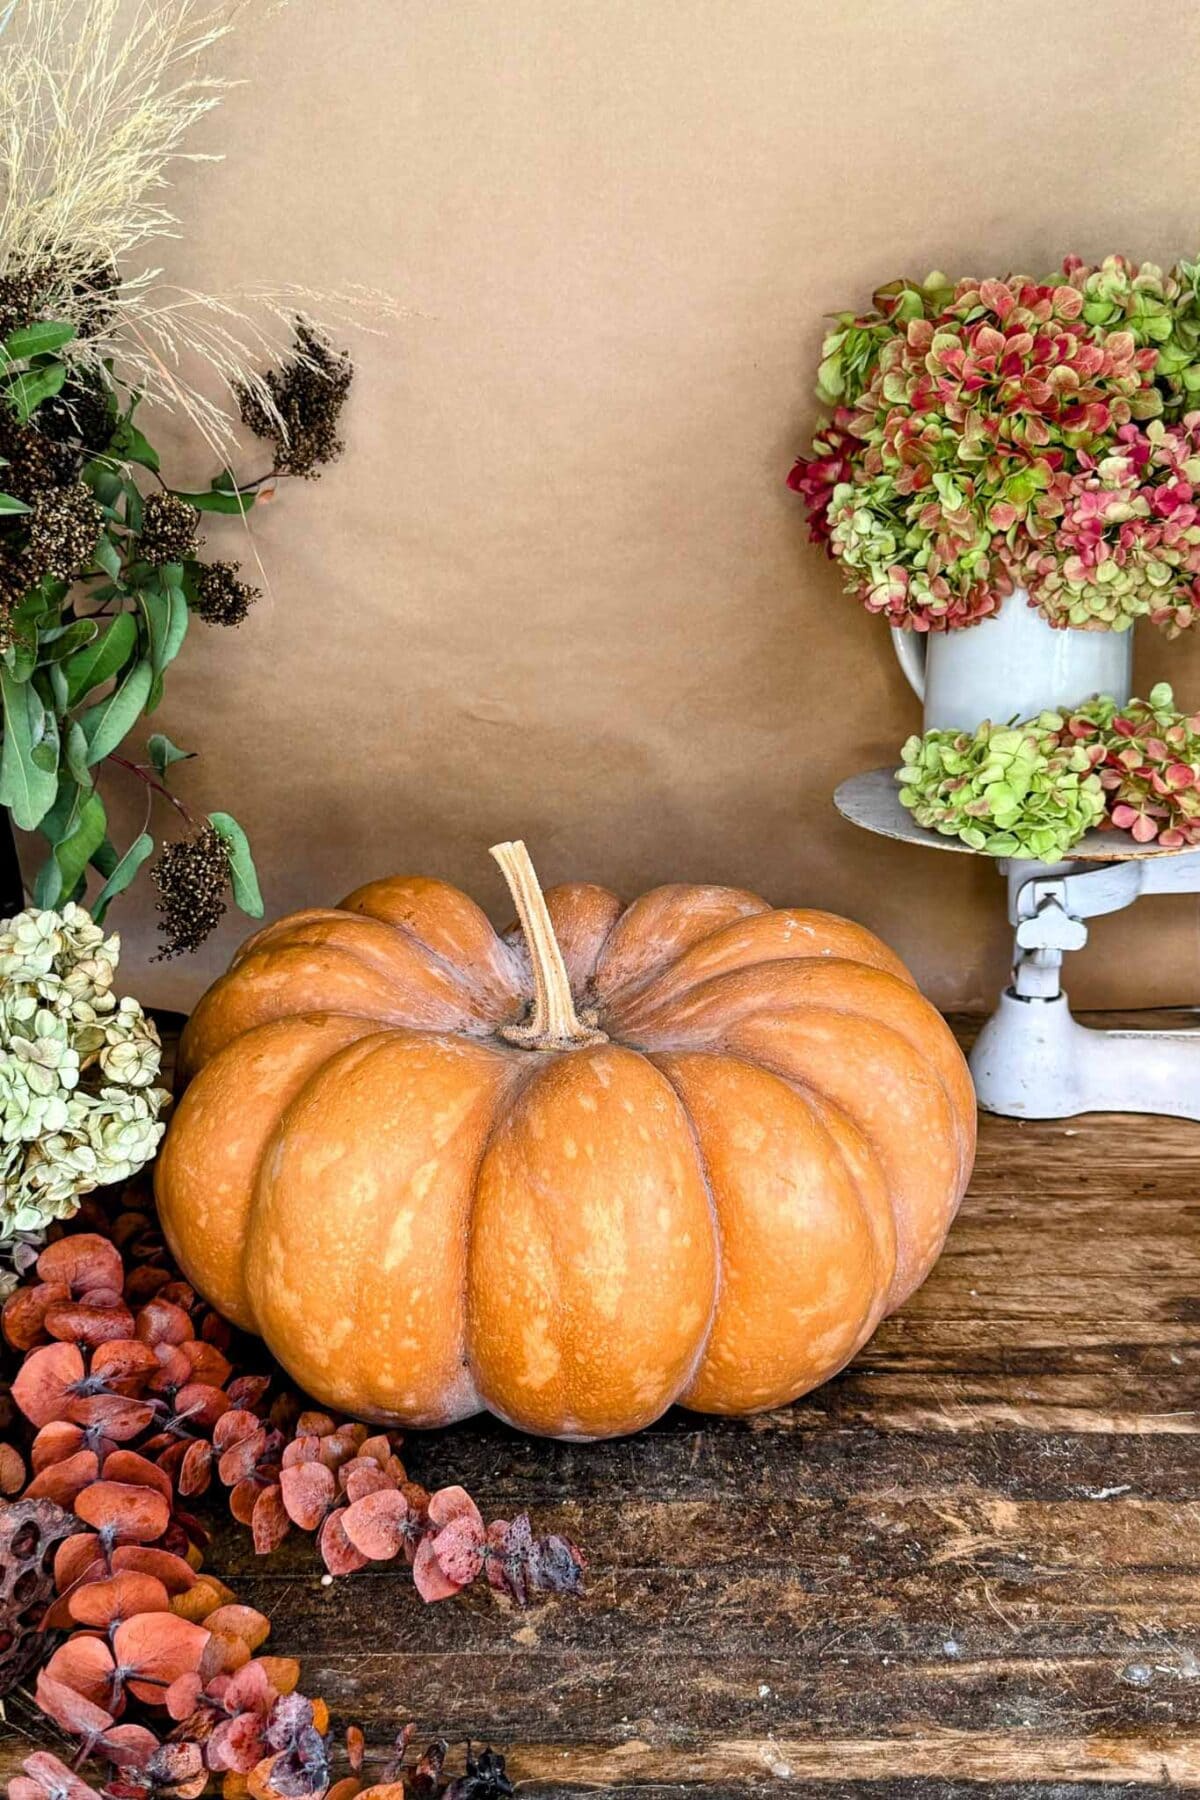
- 1 Pumpkin real or faux
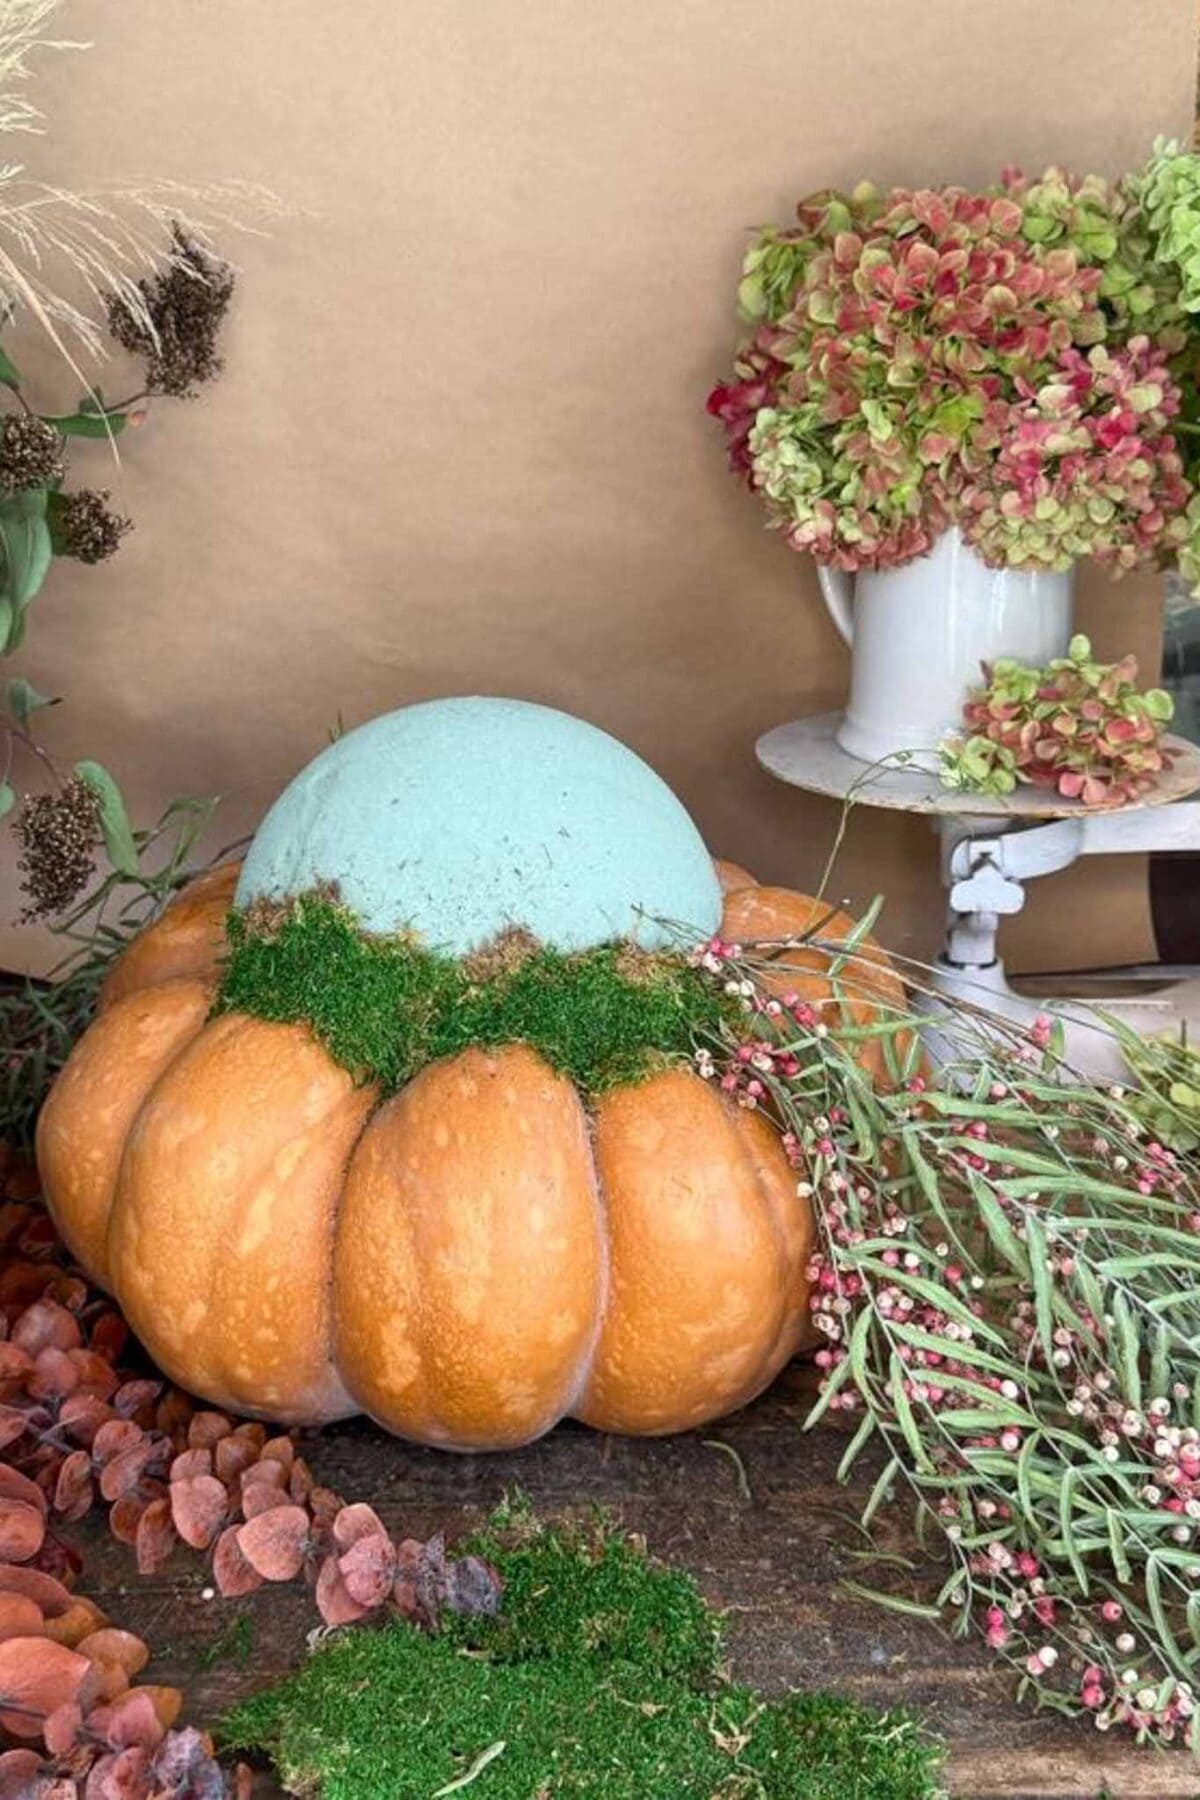
- 1 block Floral foam
- Assorted Dried and preserved flowers
- Green sheet moss
- Optional: clear floral sealer or hairspray
- 1 real Pumpkin stem
Instructions
- Remove the stem from a real pumpkin (or glue floral foam to a faux/ceramic pumpkin)
- Add dried pepperberry stems to both sides for a draping effect
- Glue green moss around the base of the foam to hide mechanics
- Add a base layer of dried greenery to build structure
- Glue the pumpkin stem to the top center as a focal point
- Add large dried florals like hydrangeas to form the main shape
- Layer in medium florals such as dahlias and eucalyptus
- Turn the pumpkin as you go to ensure full coverage
- Fill gaps with hops, seed pods, baby artichokes, or pinecones
- Let a few pieces trail over the edges for a natural look
- Style on a tray or wood slice and surround with candles or mini pumpkins

Step-by-Step: How to Make a Dried Flower Pumpkin Centerpiece
Now that you’ve gathered your materials, let’s walk through the easy steps to create your own dried flower pumpkin centerpiece.
Step 1: Prepare Your Pumpkin
If you’re using a real pumpkin, remove the stem (don’t throw it away) and clean the surface.
For faux or ceramic pumpkins, glue floral foam securely to the top center to create your base.

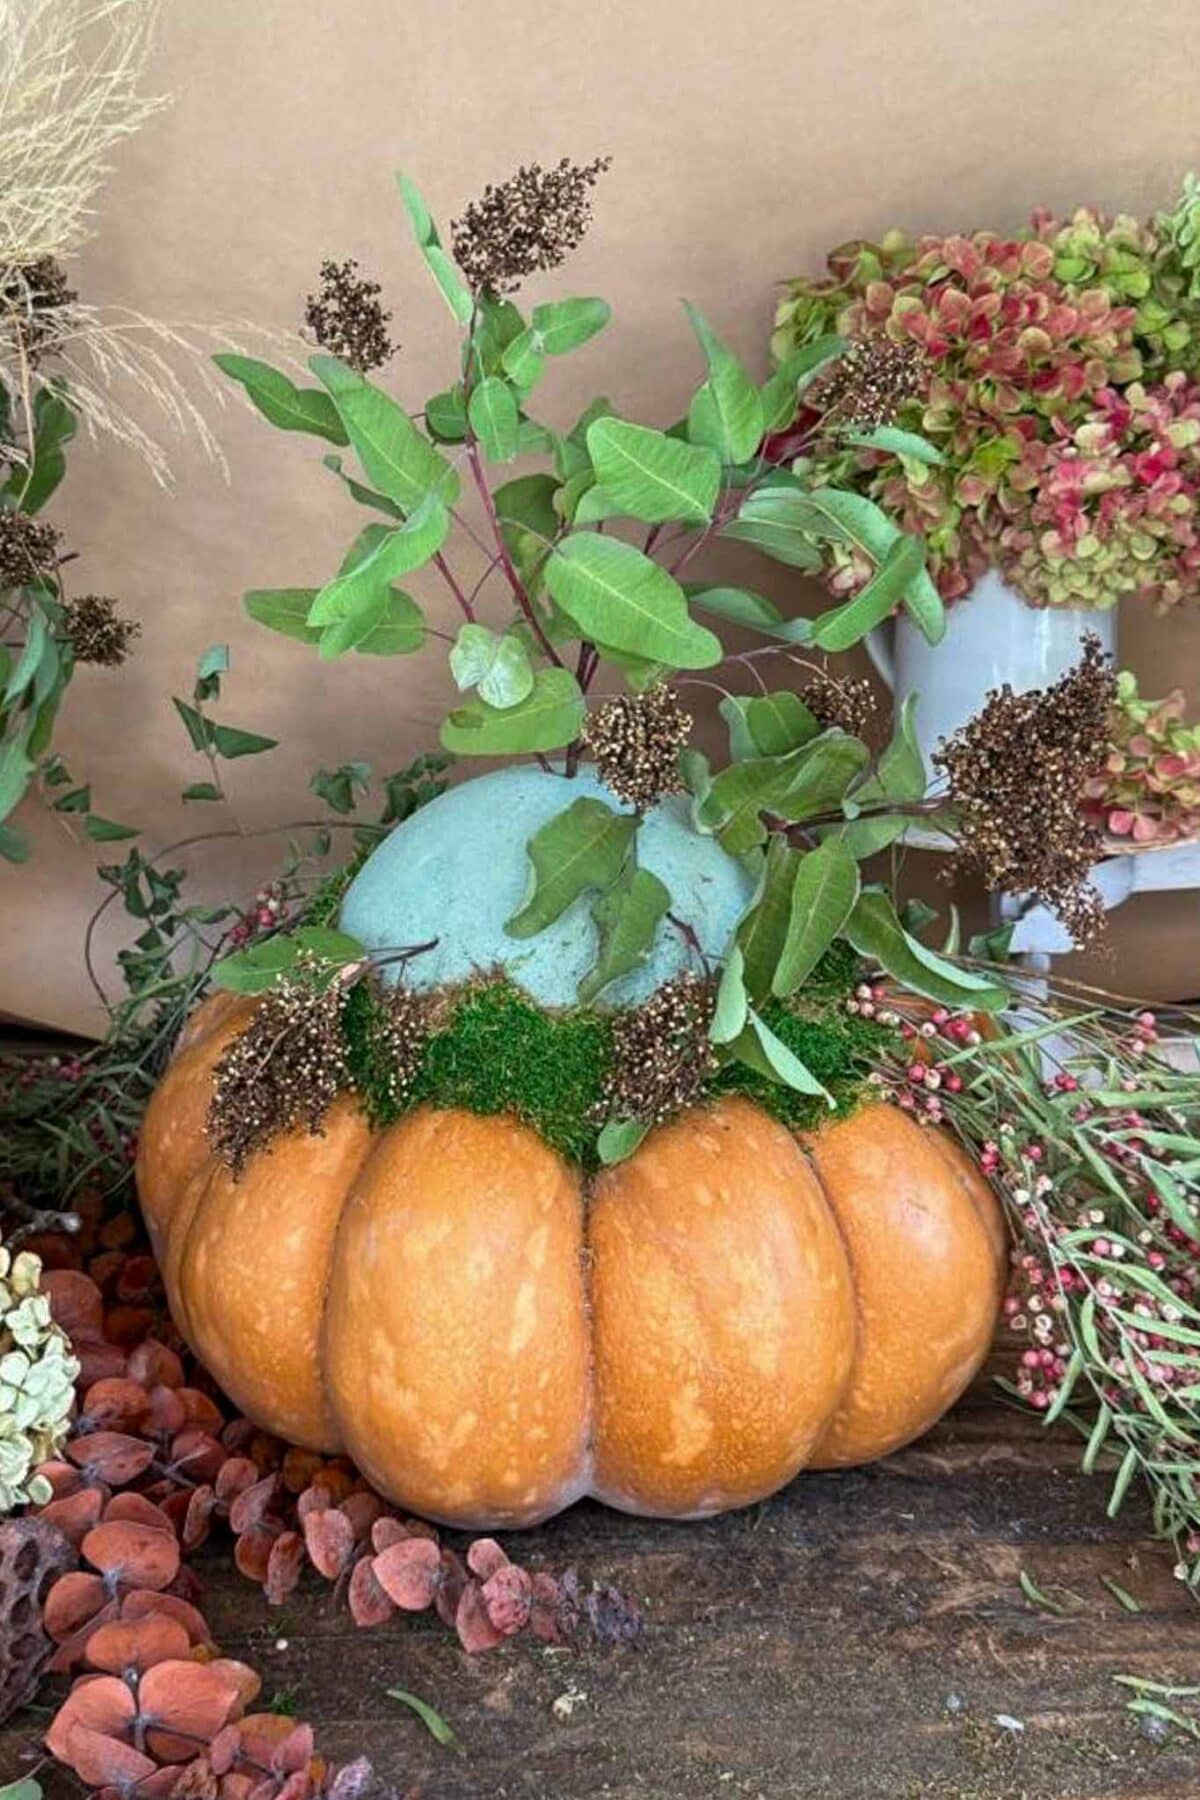
Step 2: How to Add Pepperberry, Moss and Greenery to Your Dried Flower Pumpkin Centerpiece
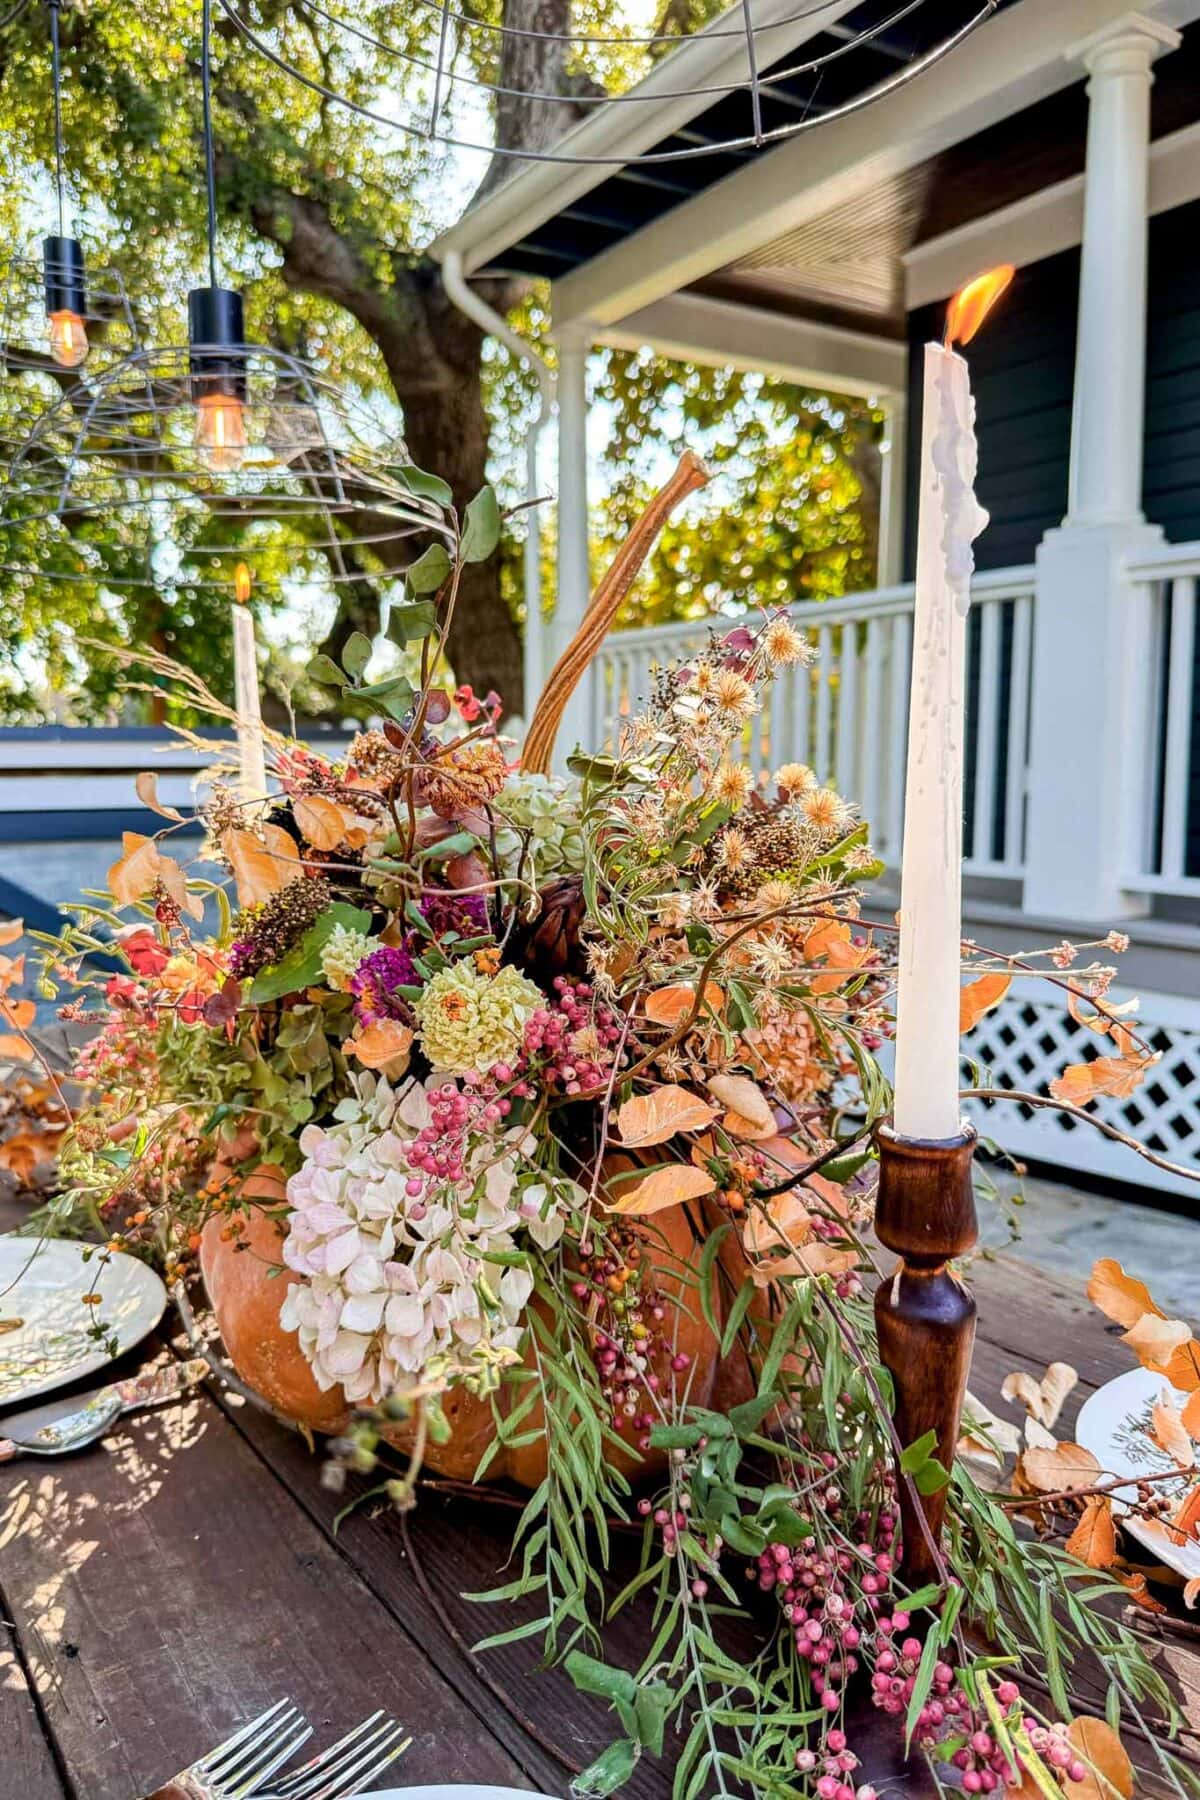
Add a few stems of dried, flowy pepperberry to each side of your arrangement at the bottom of the floral foam. It’s one of my favorite natural accents — and it grows abundantly here in Southern California. I clipped mine fresh and hung it in my sheshed for about a week to let it dry naturally before using it. If pepperberry isn’t available where you live, you can substitute any similar trailing stem that adds movement and texture. This touch creates a soft, organic draping effect that gently spills over the edge when your pumpkin is placed on the table.
Next, glue a bit of green moss around the base of the floral foam to conceal it. Don’t worry about perfect coverage — the remaining foam will be hidden once you begin adding your flowers.
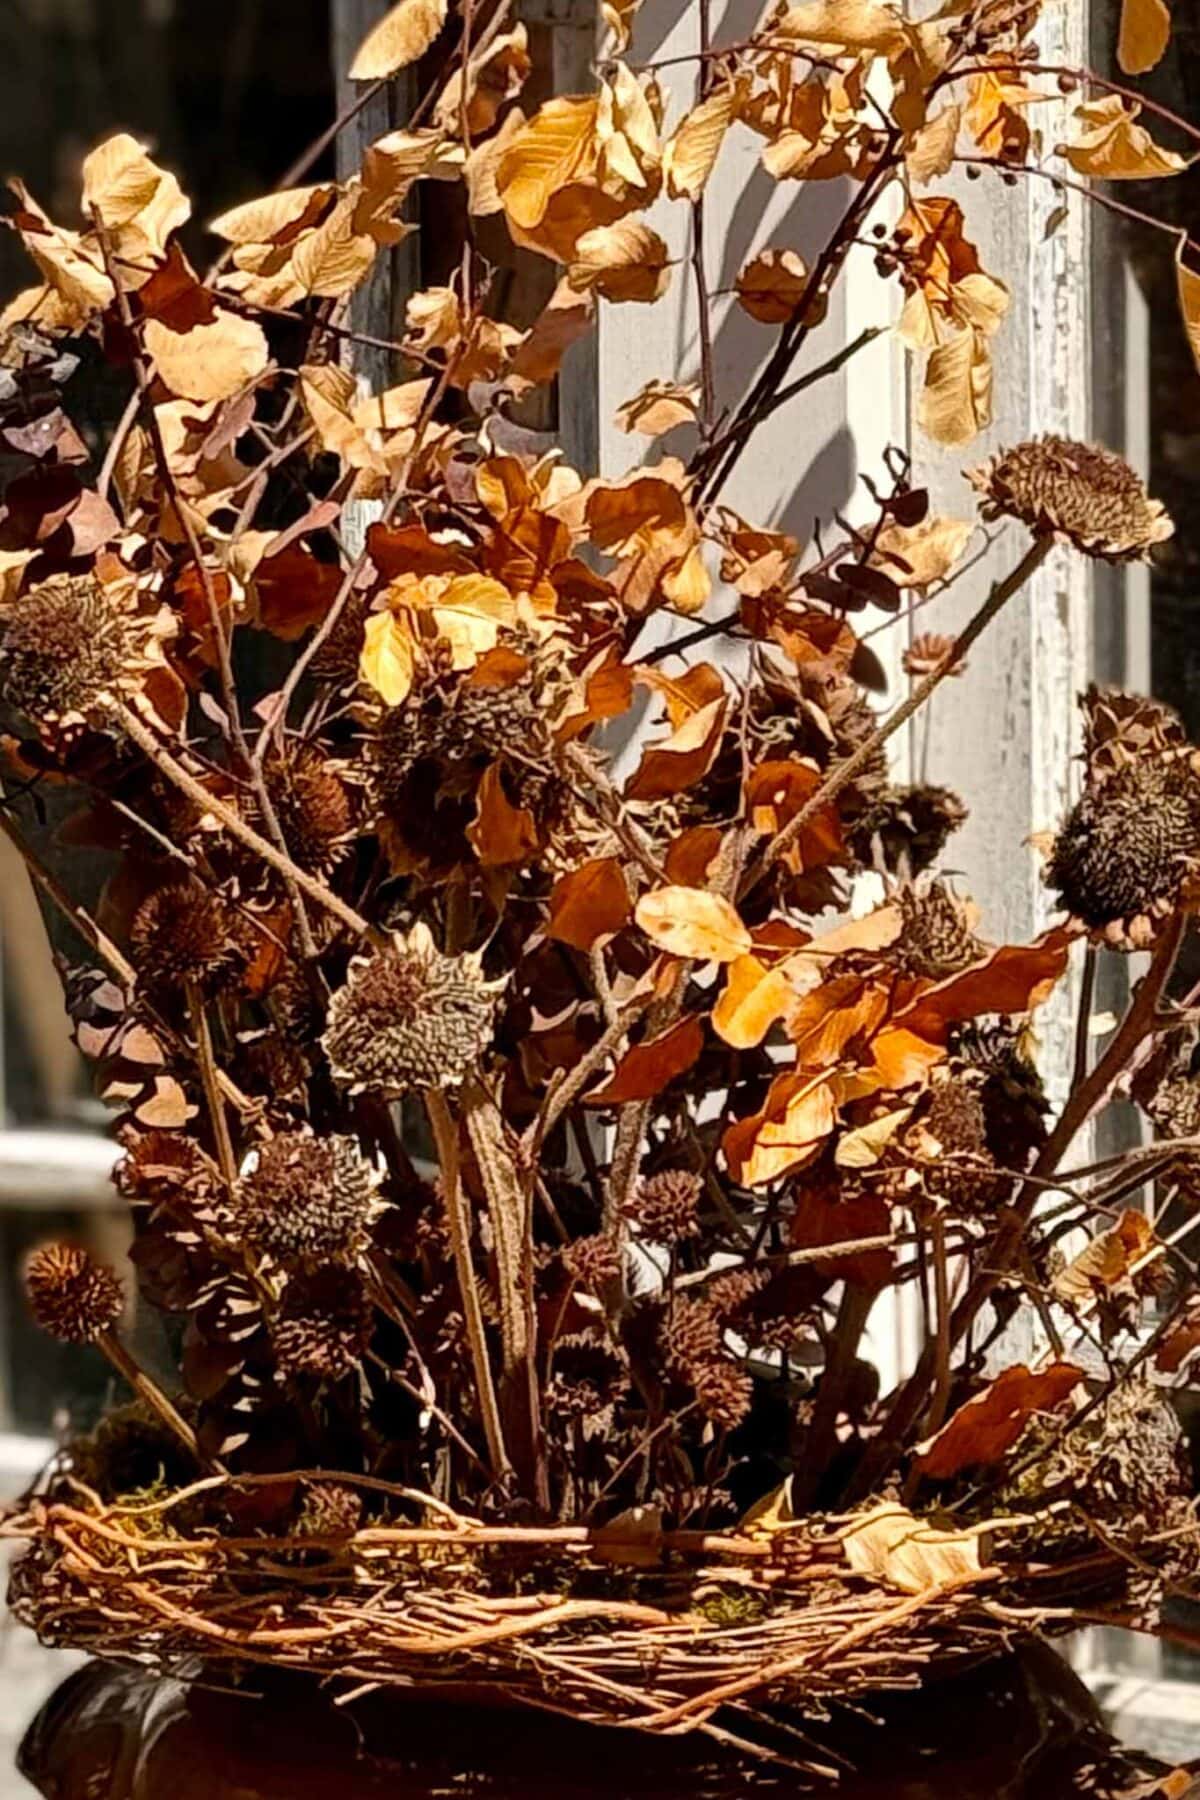
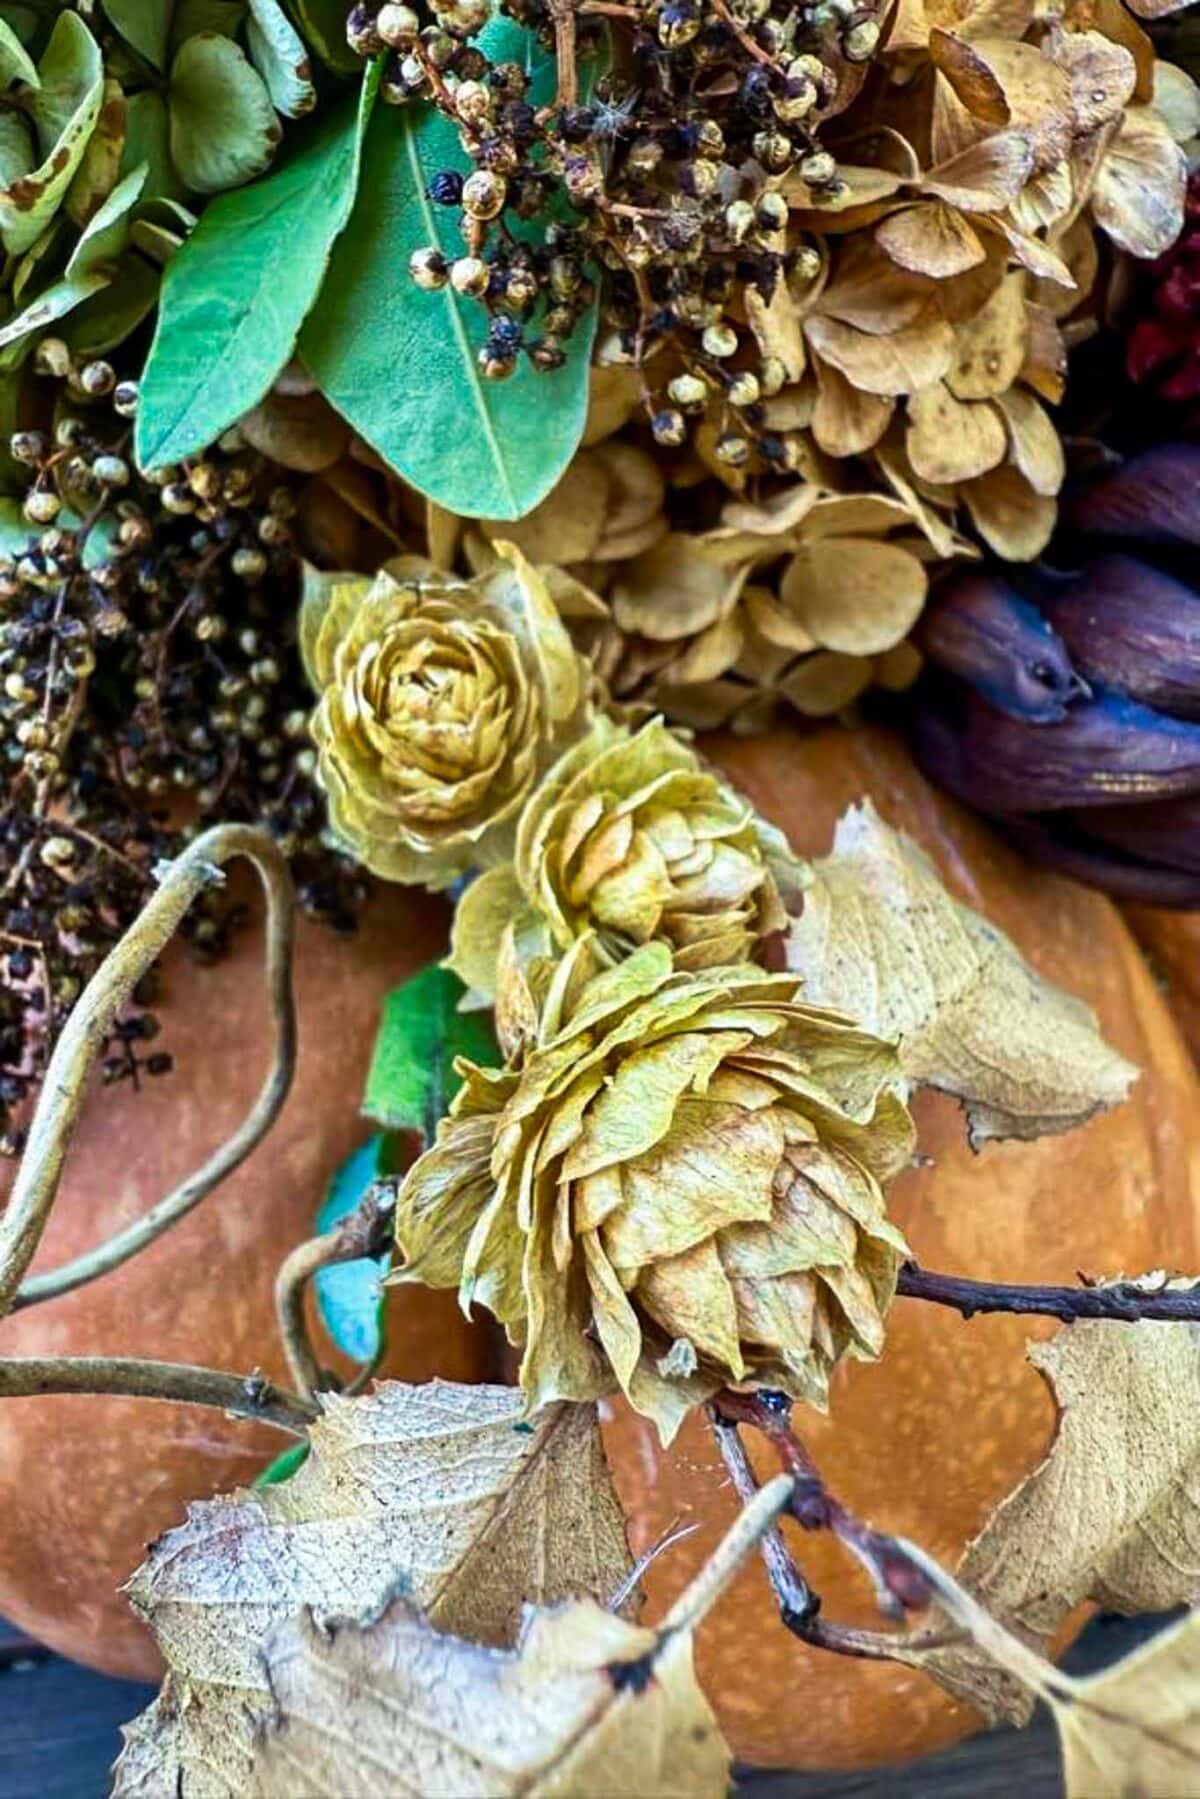
Add a base layer of greenery to build structure and depth in your arrangement. I foraged these small buds with vivid green leaves from my garden and let them dry in my She Shed for about a week before using them. The soft, natural greens create the perfect foundation for your dried florals.
Tip from wendy’s craft room:
When drying greenery, hang small bundles upside down in a cool, dry place away from direct sunlight. This helps the leaves retain their shape and color, giving your arrangement a fresh, natural look even after they’ve dried.
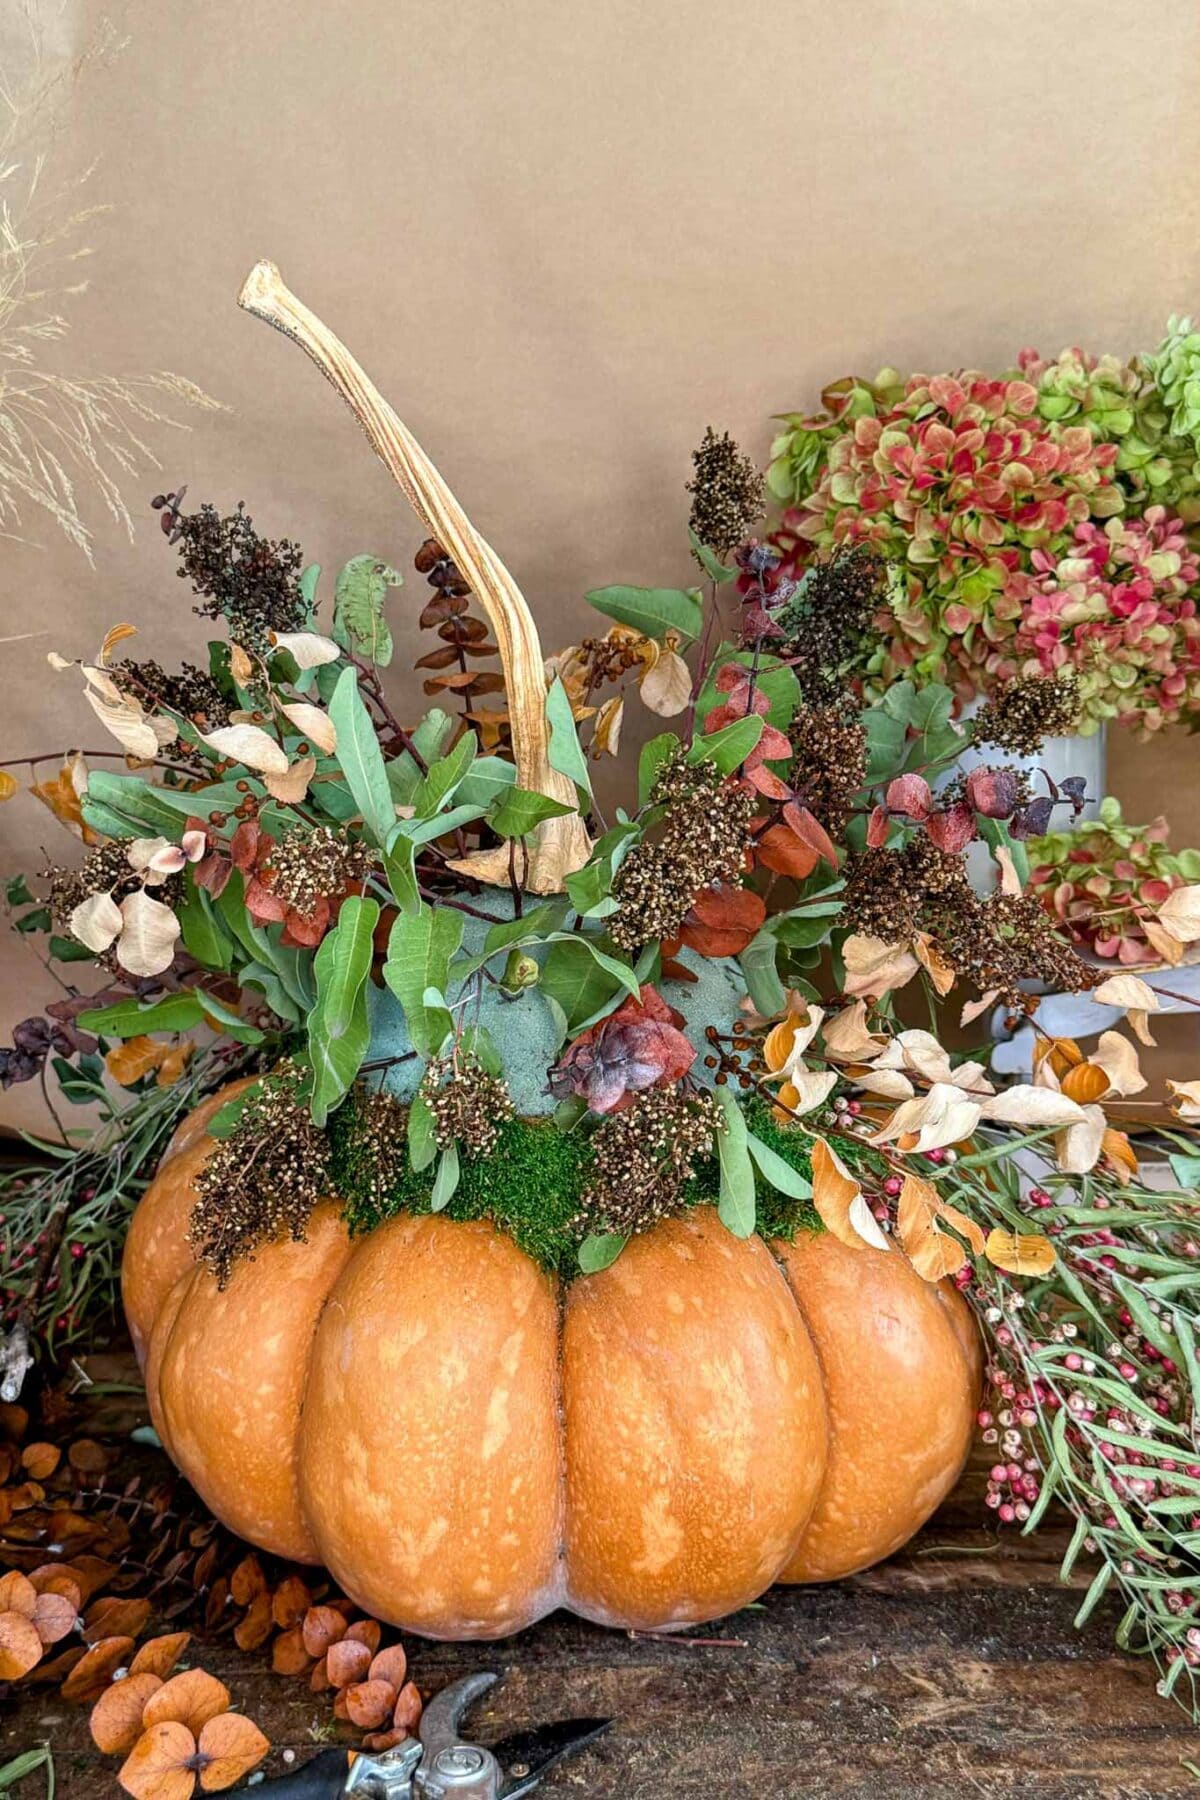
Step 3: Adding Large Florals and Stems
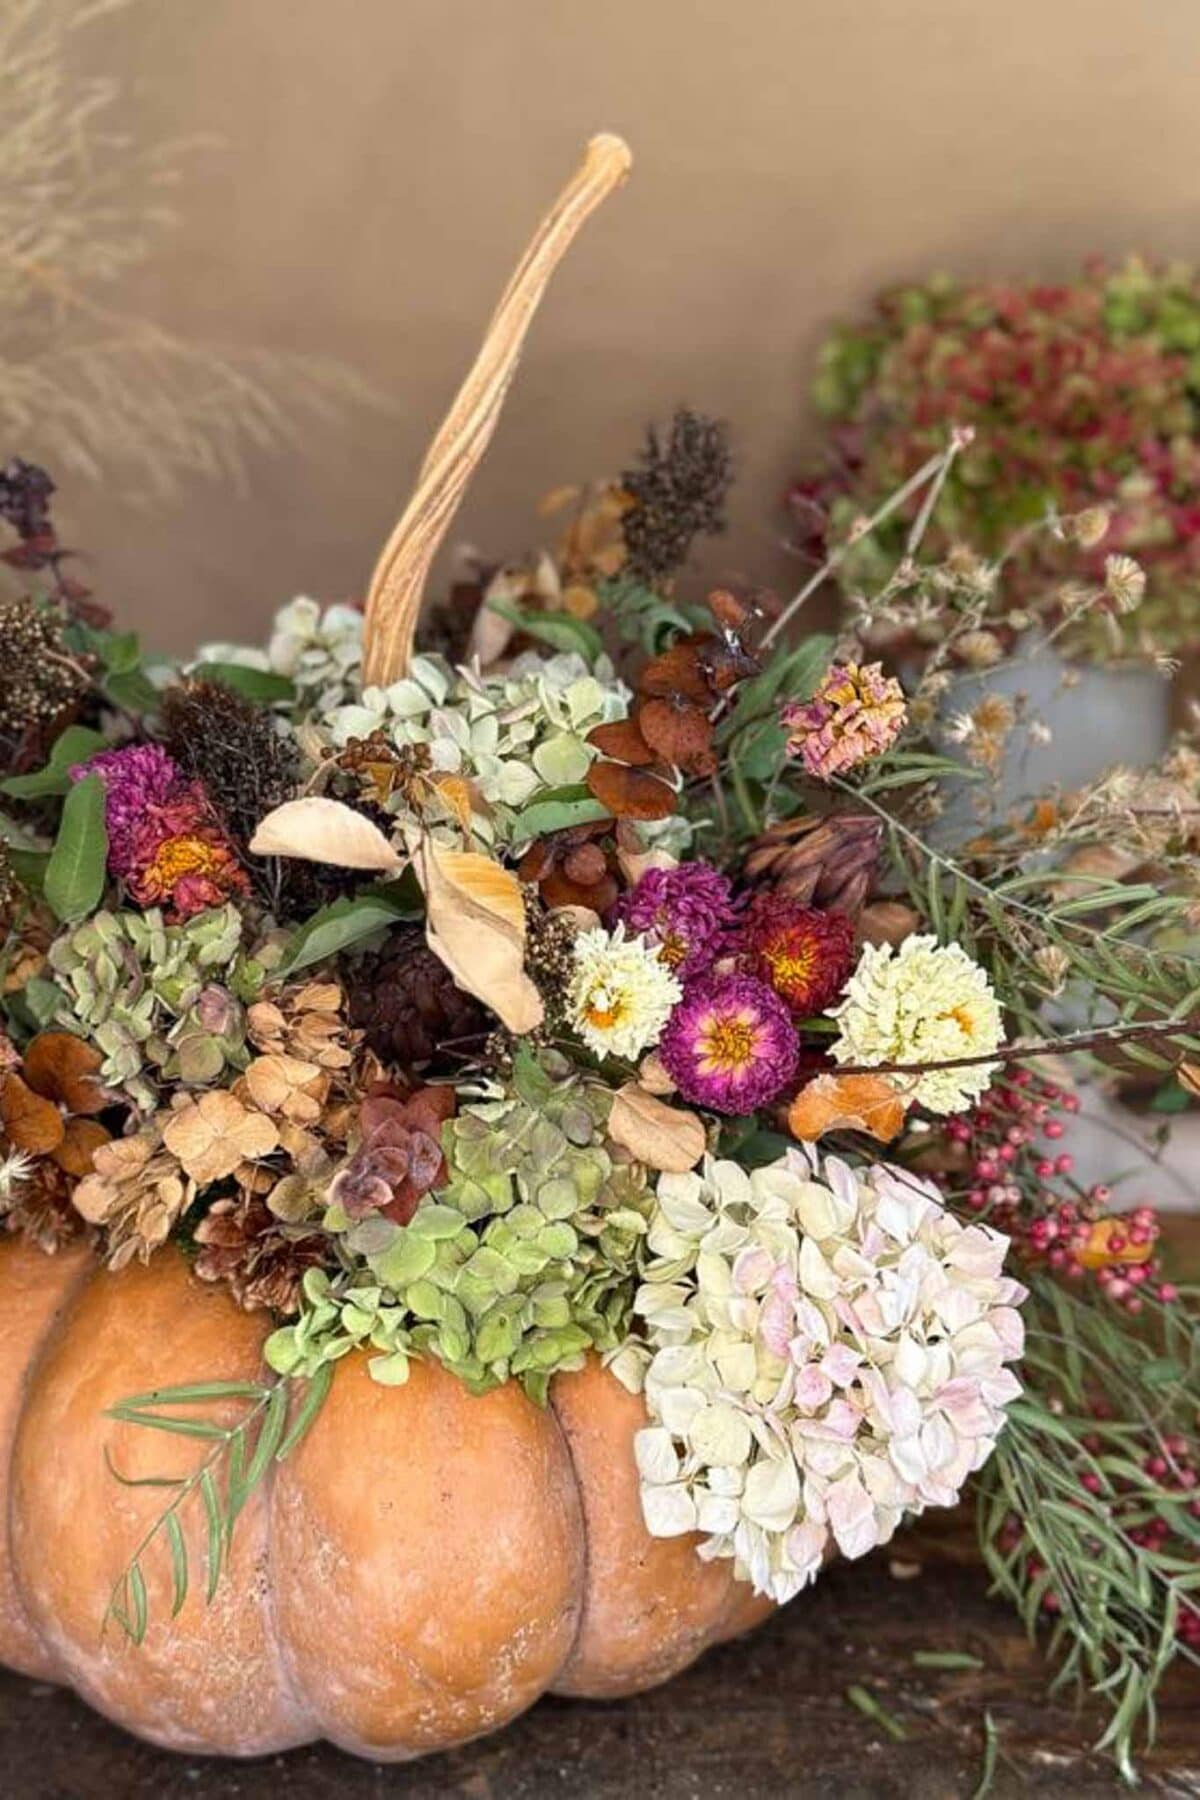
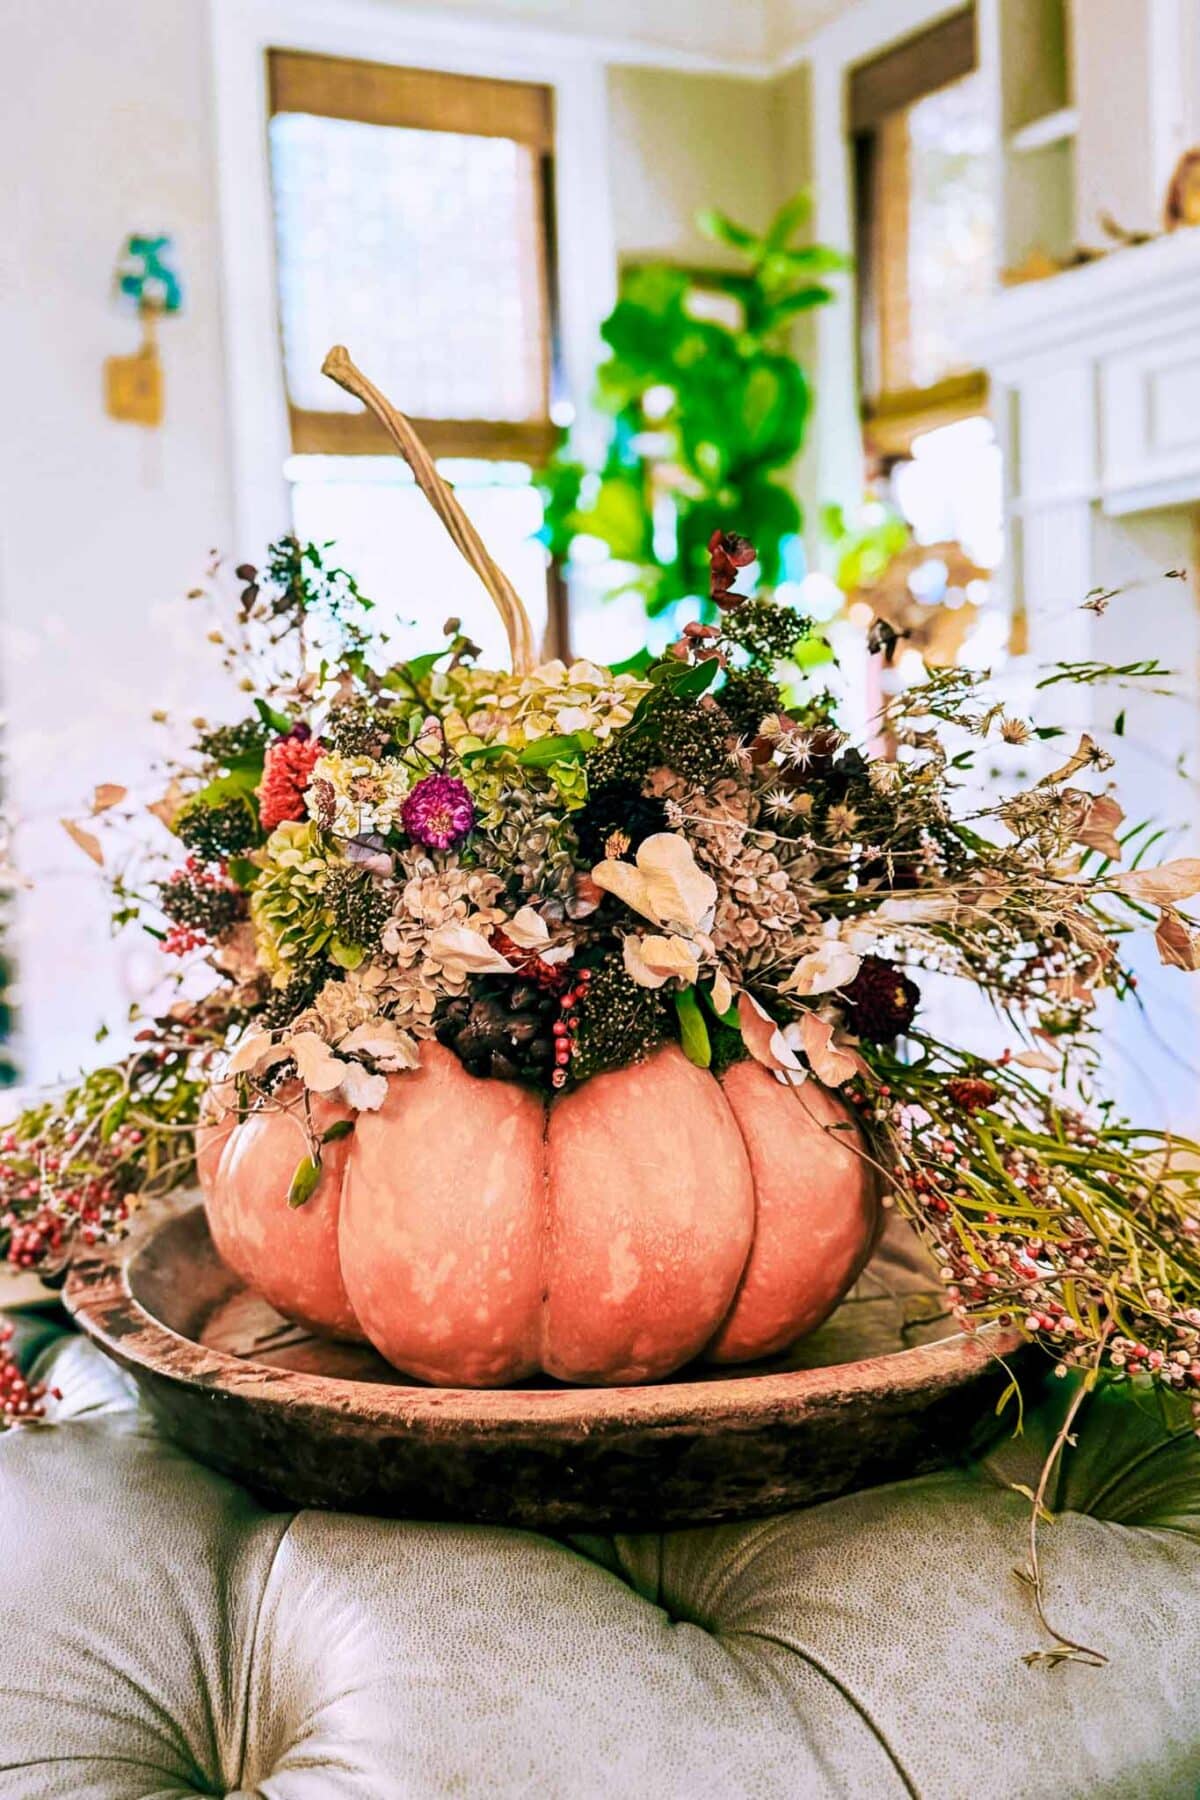
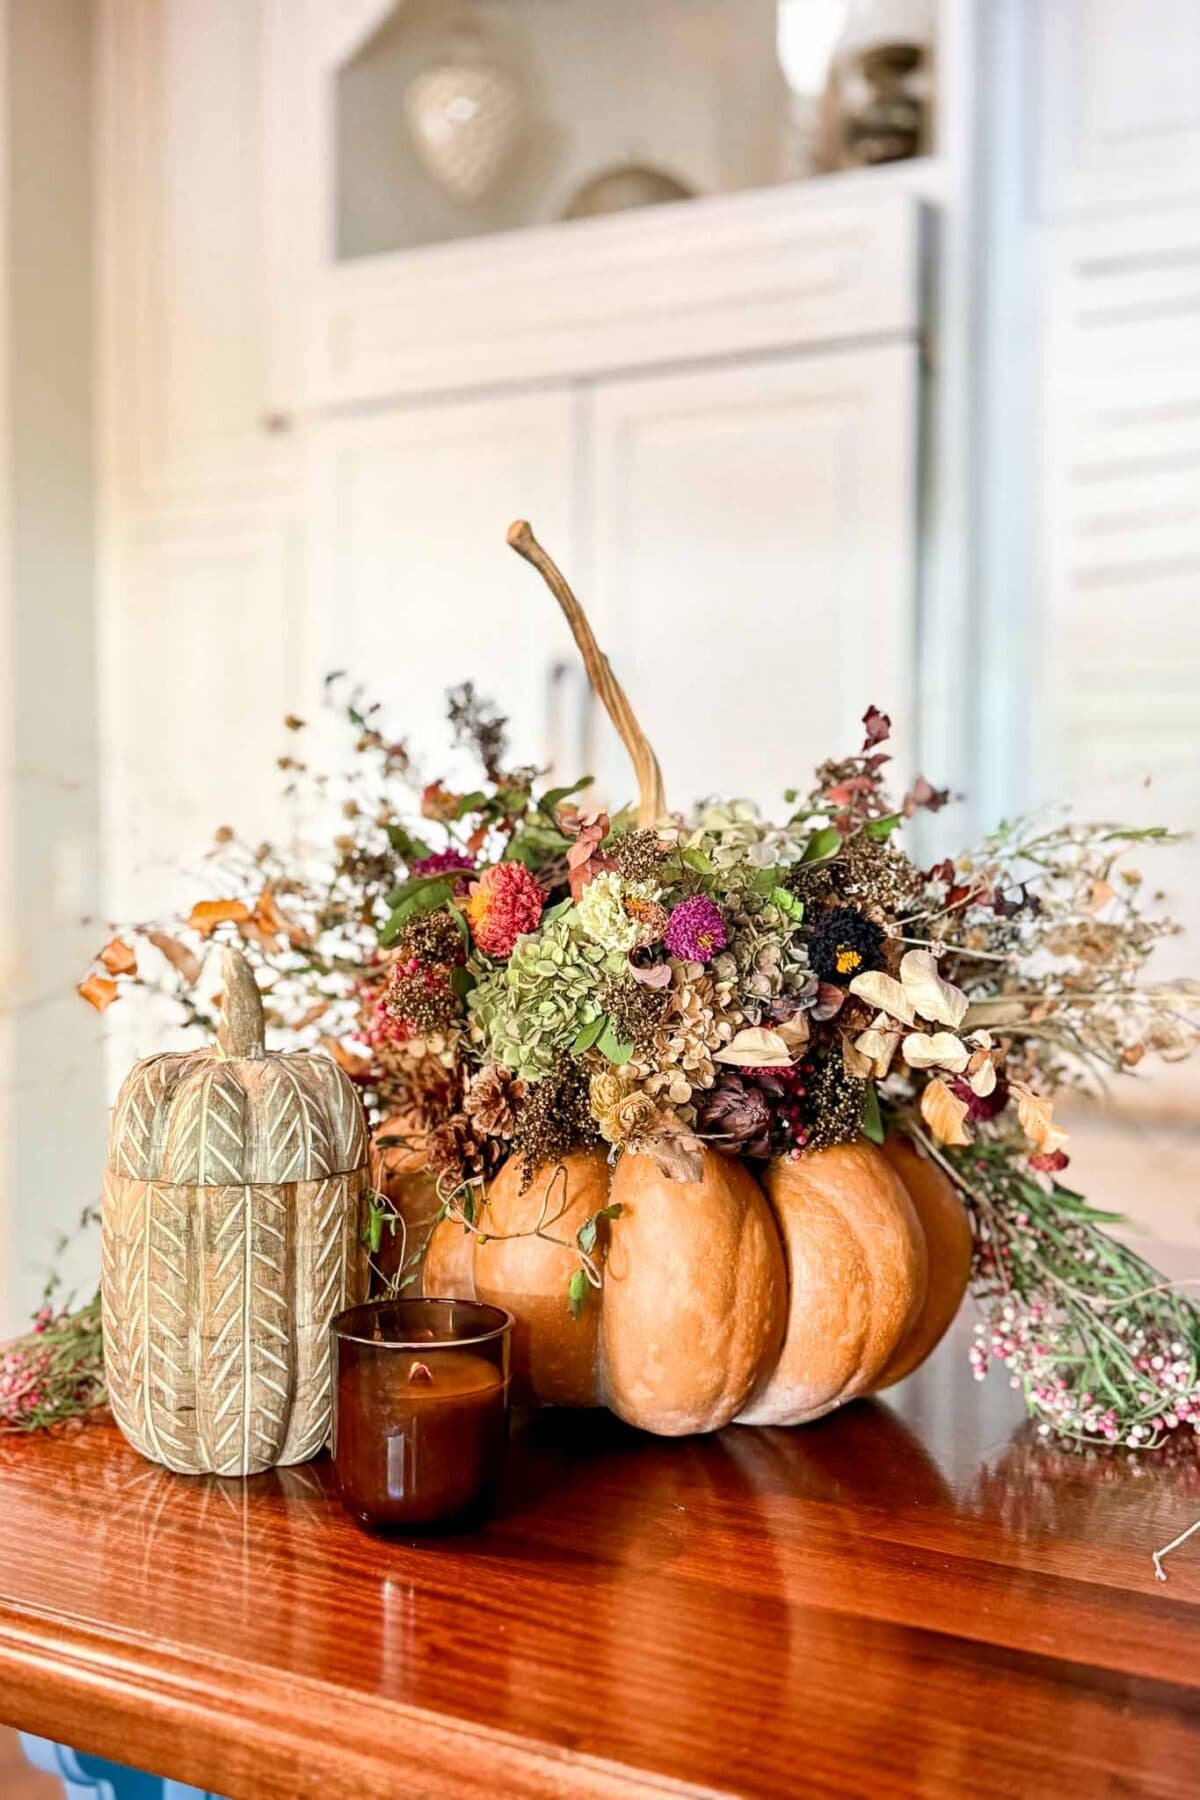
Next, I glued a large pumpkin stem to the top of the floral foam to create a natural focal point. Then, I layered in dried eucalyptus, a few fall foraged leaf branches, and my large dried hydrangeas to start building shape and texture.
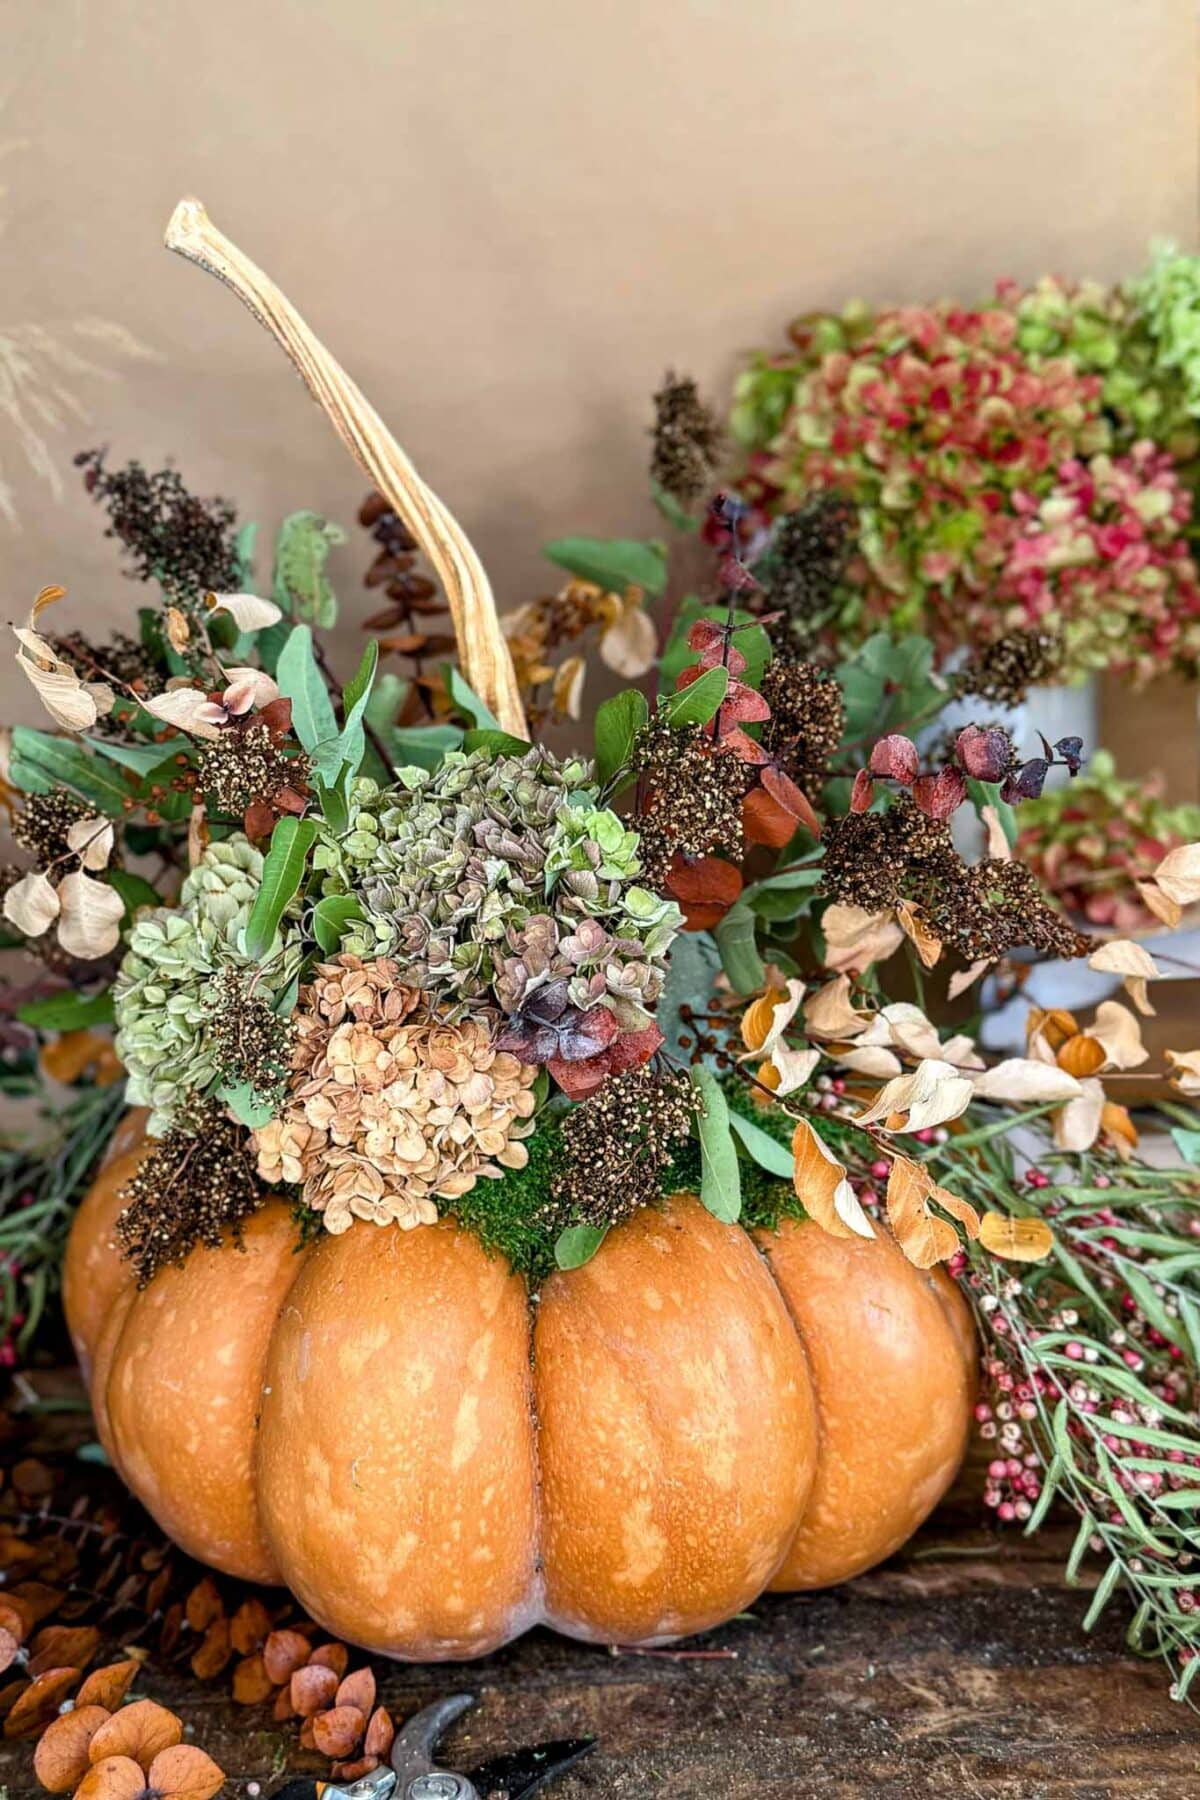
Step 4: Layer in Medium Stems
Add dahlias, greenery , or small flowers next. Turn your pumpkin as you go to make sure it looks full and beautiful from every angle.
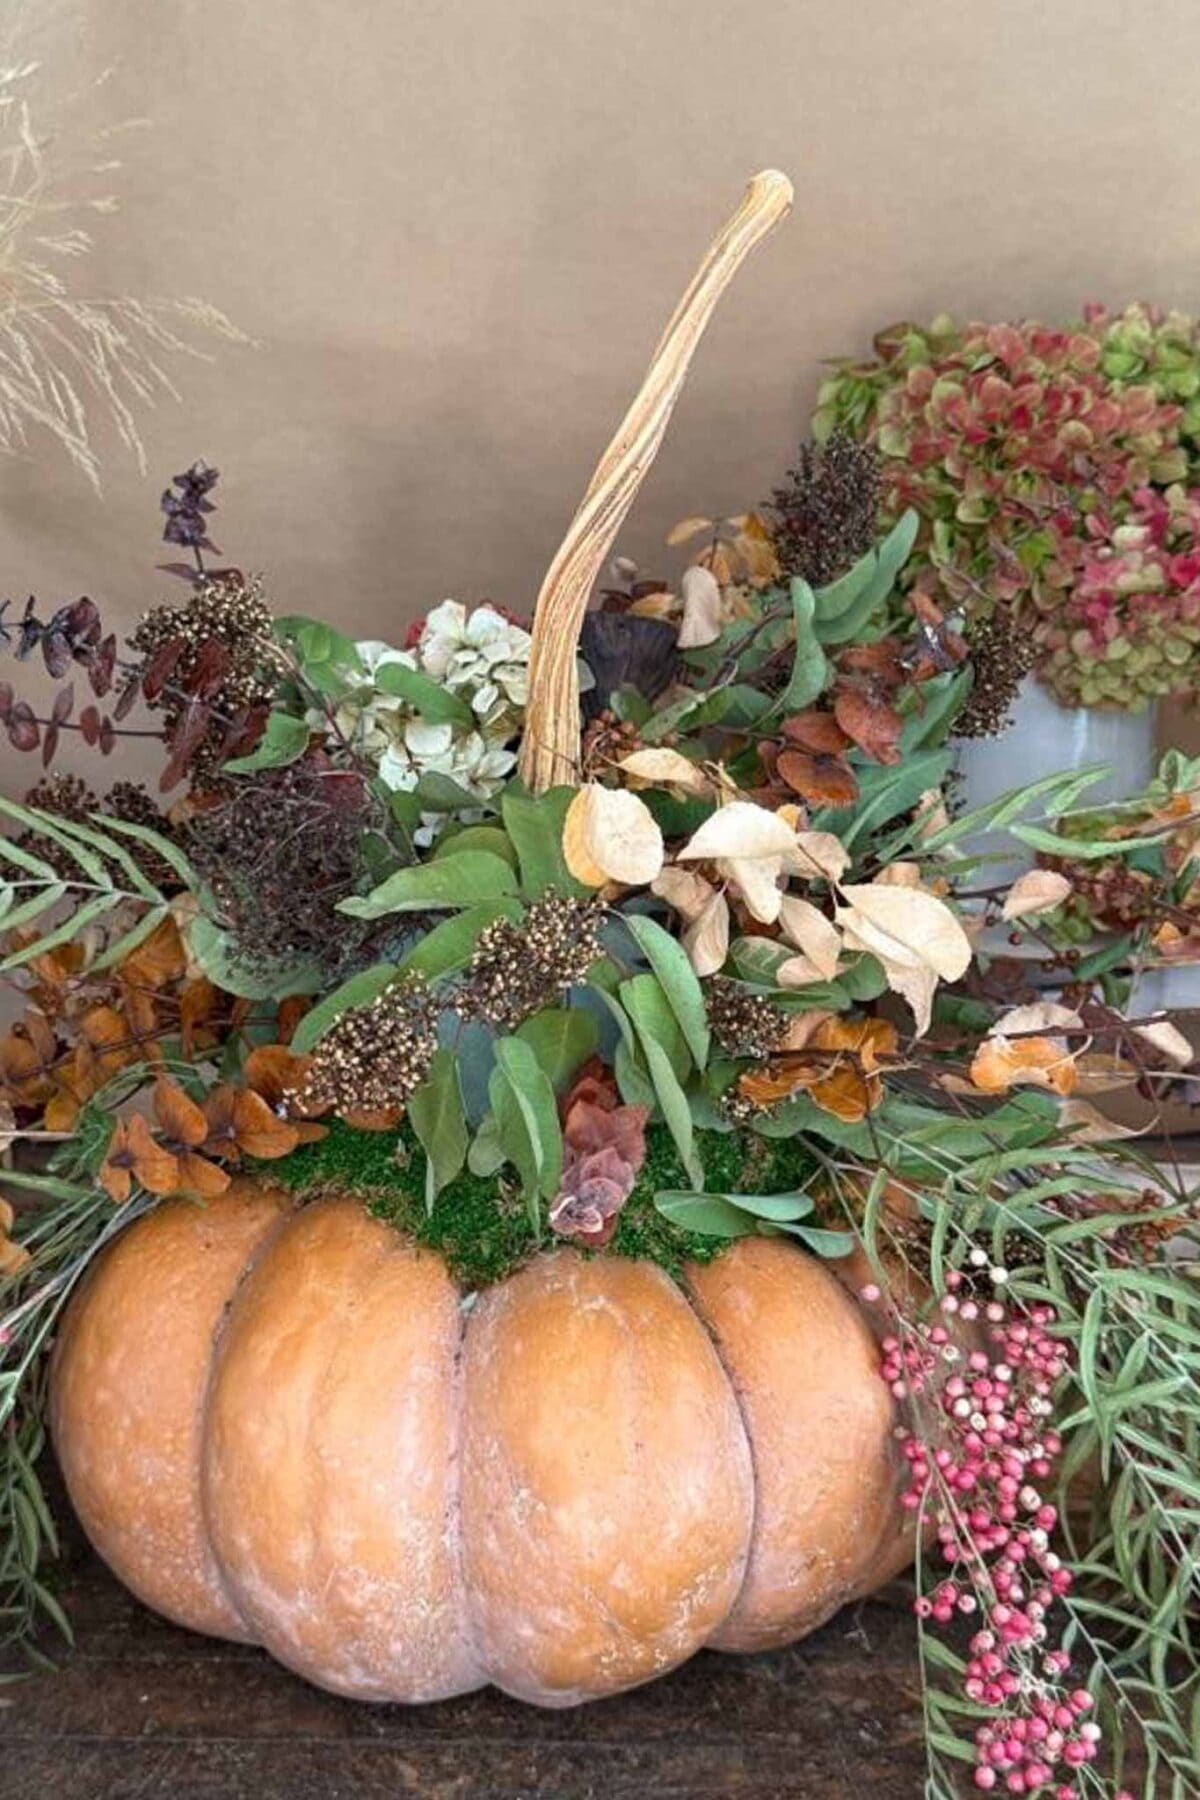
Step 5: Finish With Small Details
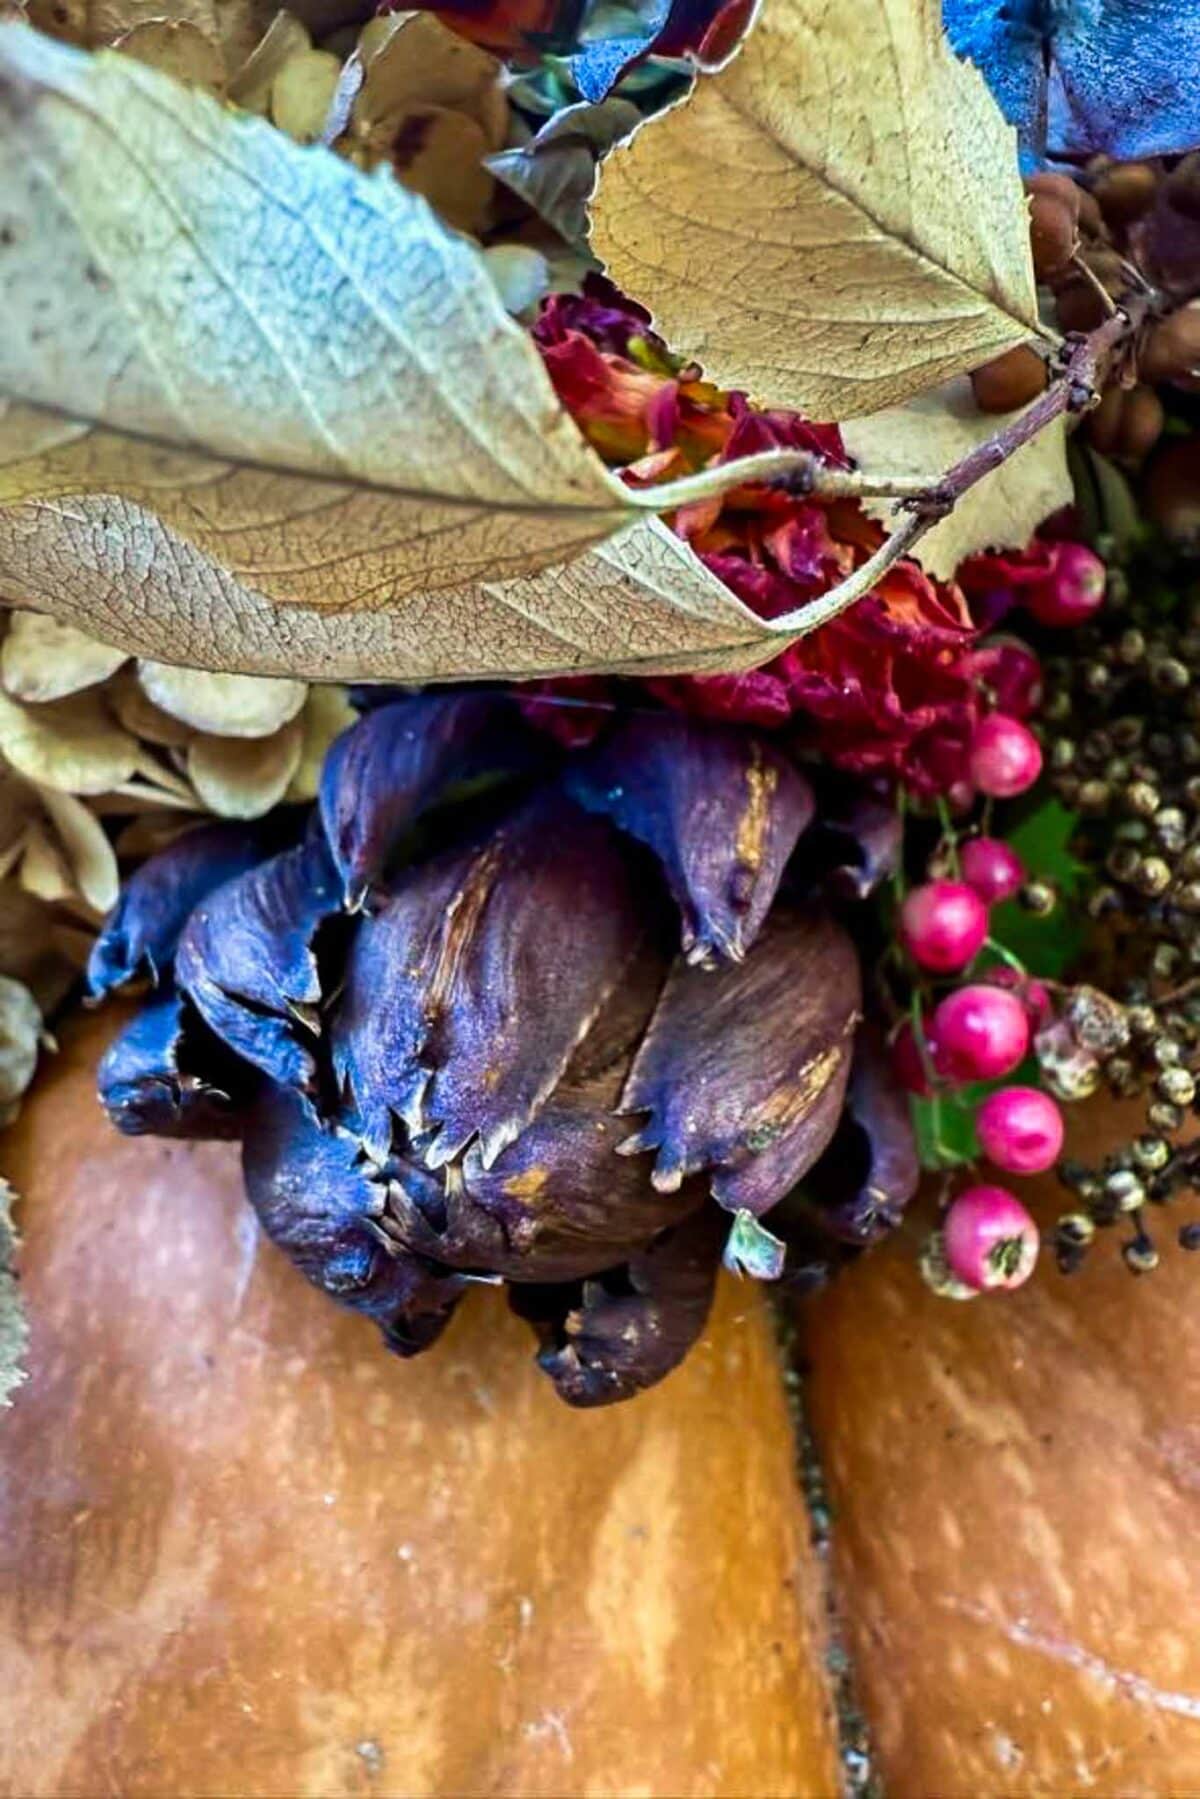
Tuck in hops, seed pods, small artichokes or pinecones to fill any gaps and add texture. Let a few pieces drape over the edges for a natural, gathered look.

Tip from wendy’s craft room:
Use a wooden skewer to secure the artichokes. First, poke a small hole in the bottom with the pointed end of the skewer, then add a dab of hot glue and insert it firmly. Trim the skewer to the length you need and insert it into the dry foam so the artichoke sits securely in place.
Step 6: Style and Display
Place your finished dried flower pumpkin centerpiece on a tray or wood slice. Surround it with candles, mini pumpkins, or dried leaves for a warm, layered fall display.
- Outdoor or Formal Dining: Create an inviting centerpiece for gatherings by styling it on your outdoor dining table or in a formal dining room setting.
- Coffee Table or Ottoman: Set the arrangement on a pretty wood tray in the family room for a cozy touch that’s easy to move when entertaining.
- Kitchen Island: Add a few candles or small pumpkins around the base to make a charming focal point in the heart of your home.

How to Make Your Dried Flower Pumpkin Arrangement Last
One of the best things about dried flower arrangements is how long they last. With just a little care, it will stay beautiful well through the fall season.
- Keep it away from direct sunlight to prevent fading
- Avoid moisture and humidity
- Dust gently with a soft brush or canned air once in a while
- If you’re using a faux pumpkin, store the arrangement carefully to reuse next year
Tip from wendy’s craft room:
A quick mist of clear floral sealer or even hairspray will help reduce shedding and keep delicate petals in place. In addition, If you use a real pumpkin, you can easily remove the arrangement from the top of the pumpkin and store it until next year.
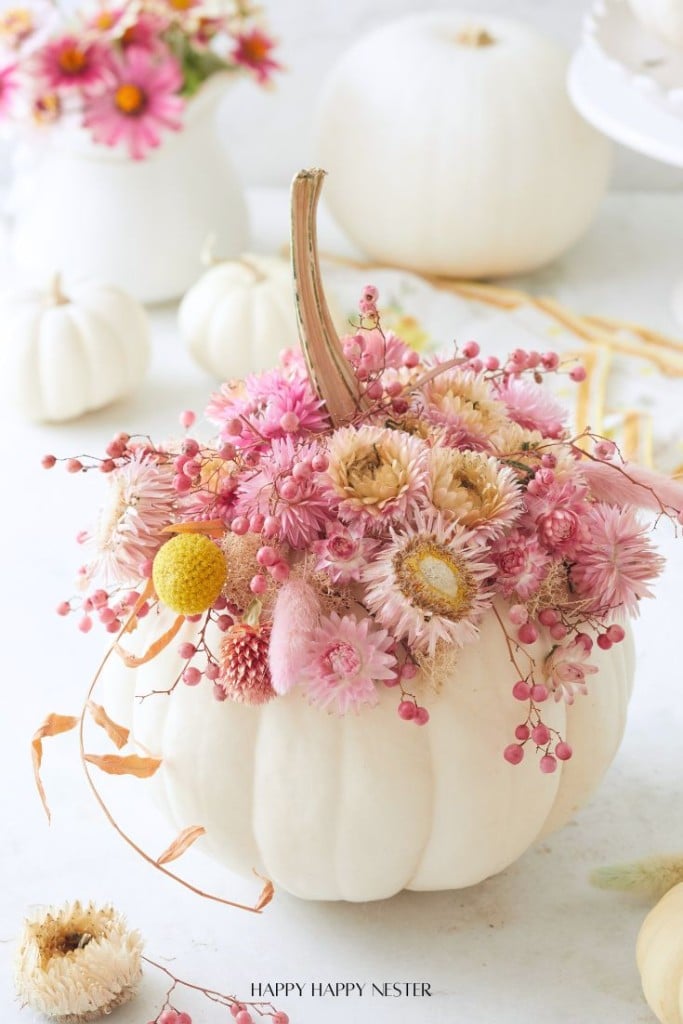
Variations to Try
Here are a few other gorgeous ideas from talented friends:
- Neutral Elegance: Whites, creams, and soft greens for a relaxed fall palette
- Rustic Harvest: Add wheat, berries, feathers, and natural elements
- Mini Pumpkin Trio: Create a collection for a tablescape or mantel display
- Vintage Vibes: Add dried roses or seed pods for a nostalgic feel
Play with scale, texture, and depth — every pumpkin tells a different story!

Frequently Asked Questions
Can I use fresh flowers instead of dried?
Yes, but they won’t last as long. Dried or preserved blooms are best for an arrangement that stays beautiful all season.
What if I don’t have floral foam?
If you have green moss, create a mound of moss on top of the pumpkin and use hot glue to insert and attach your dried flowers.
Can I make this ahead of time?
Absolutely! This is a perfect early-fall project since it maintains its beauty for weeks.
Wrapping Up
Creating with what nature gives us is one of my favorite joys — especially during the fall season. This dried flower pumpkin centerpiece brings warmth, texture, and a little bit of autumn magic into your home.
Whether you display it on your Thanksgiving table, in your entryway, or out on your porch, it’s a beautiful way to celebrate the harvest season and showcase your creativity.
I hope this project inspires you to gather a few blooms, pick your favorite pumpkin, and make something truly special this fall.
Now it is time to head over to Laura @decortoadore and enjoy her charming Sleepy Hollow inspired tablescape. You are going to love the creativity she brings to the story.


Did you make this craft?
We would love to see what you have created, so mention us @wmdesignhouse or tag us using #wmdesignhouse so we can see your creations!
More about me!

Welcome! I’m Wendy — a creator, gardener, and home stylist who believes that beauty lives in the details. Whether I’m arranging flowers from my garden, crafting something by hand, or styling a cozy corner, I’m always inspired by the joy of creating. I’m here to help you craft a home that feels warm, welcoming, and uniquely yours — one project at a time.


Oh, this is absolutely stunning! What a perfect centerpiece. I’ll be featuring this post at Thursday Favorite Things today. 🙂
Your pumpkin centerpiece is gorgeous! I love the variety of colors, shapes, and textures. Thanks for the helpful instructions and tips for assembling this beautiful arrangement.
Absolutely gorgeous, Wendy! I’m so jealous of your pepperberries. They used to be my favorite from the floral wholesaler.
Thank you Lora, The pepperberrie dries so beautifully!
Wendy, what I love most about your gorgeous pumpkin arrangement is the incredible variety of stems! Simply dreamy! Excellent tutorial too!
Thank you so much Michele, I tried a little bit of everything! It just kept growing! :)))
Wendy, WOW!!! Your pumpkin centerpiece is beyond stunning! I wish I could get hydrangeas to dry well here from my garden, but we just have too much humidity. I love how you’ve put the pepperberries into your centerpiece. We loved those trees when we were staying at Lake Skinner and fun to use on my statues.
Enjoy your pumpkin in all its glory! I hope it lasts quite a while or maybe you can move the dried florals over to a faux pumpkin, if needed.
Happy fall,
Barb 🙂
Every pumpkin should be so lucky to have you create such a beautiful hat. I love everything about your maxi-pumpkin, and if you had a storefront and I lived nearby, I’d be your biggest customer! Glad you could join us. Happy Fall! pinned
Thank you Cindy! minimal is just not a category in by brain! Maybe one day :)))
As always, Beautiful – Your foraging is next level 🙂
Wendy,
This is GORGEOUS! I love that your let the maximilist side run free. This is such a beautiful Fall statement. I would leave it up the entire season. 🍂🍁
Thank you, Libby! I’ve learned that this is simply part of my style and who I am :))) So it’s best to just go with the flow, right?!
Wendy
Your pumpkin arrangements always look so beautiful. I love the dried flowers you used for this years. Stunning.
Thank you so much Rachel, I always enjoy creating a new idea on top of a pumpkin and enjoyed learning how to dry some dahlias this year.