How to Make DIY Seed Paper for Handmade Cards and Stationery
There’s something deeply satisfying about a gift that keeps giving long after it’s opened, and that’s exactly what DIY seed paper is. This pretty, plantable paper, sometimes called wildflower seed paper, looks like a beautifully textured handmade page, but tucked inside the fibers are real wildflower seeds. Once your recipient is finished admiring it, they can plant the paper directly into a pot or garden bed and watch flowers bloom.
There was a learning curve with this project (more on that in a minute), so read on for everything I learned along the way.
On my blog WM Design House, I may sometimes use affiliate links, which means a small commission is earned if you purchase via the link. The price will be the same whether you use the affiliate link or go directly to the vendor’s website using a non-affiliate link. Read my full disclosure policy here.
It’s part DIY craft project, part garden gift, and entirely on-trend for the cottagecore-stationery moment we’re all currently swooning over. Whether you’re making Mother’s Day cards, wedding favors, gift tags, or thank you notes, this tutorial walks you through every step of making your own beautiful, plantable seed paper at home, using materials you probably already have.
What Is Plantable Seed Paper?
Plantable seed paper is handmade paper made from recycled paper pulp with flower or herb seeds pressed right into the fibers. When you plant the paper in soil, the paper biodegrades while the seeds sprout and grow into wildflowers or herbs.
It’s a beautifully eco-friendly craft that turns scrap paper into something truly magical: a card or stationery piece that becomes a living garden. And because every sheet is handmade, no two ever look exactly alike.
Supplies You’ll Need for DIY Seed Paper
Best Paper Types for Seed Paper
Different papers create different results, so don’t be afraid to experiment:
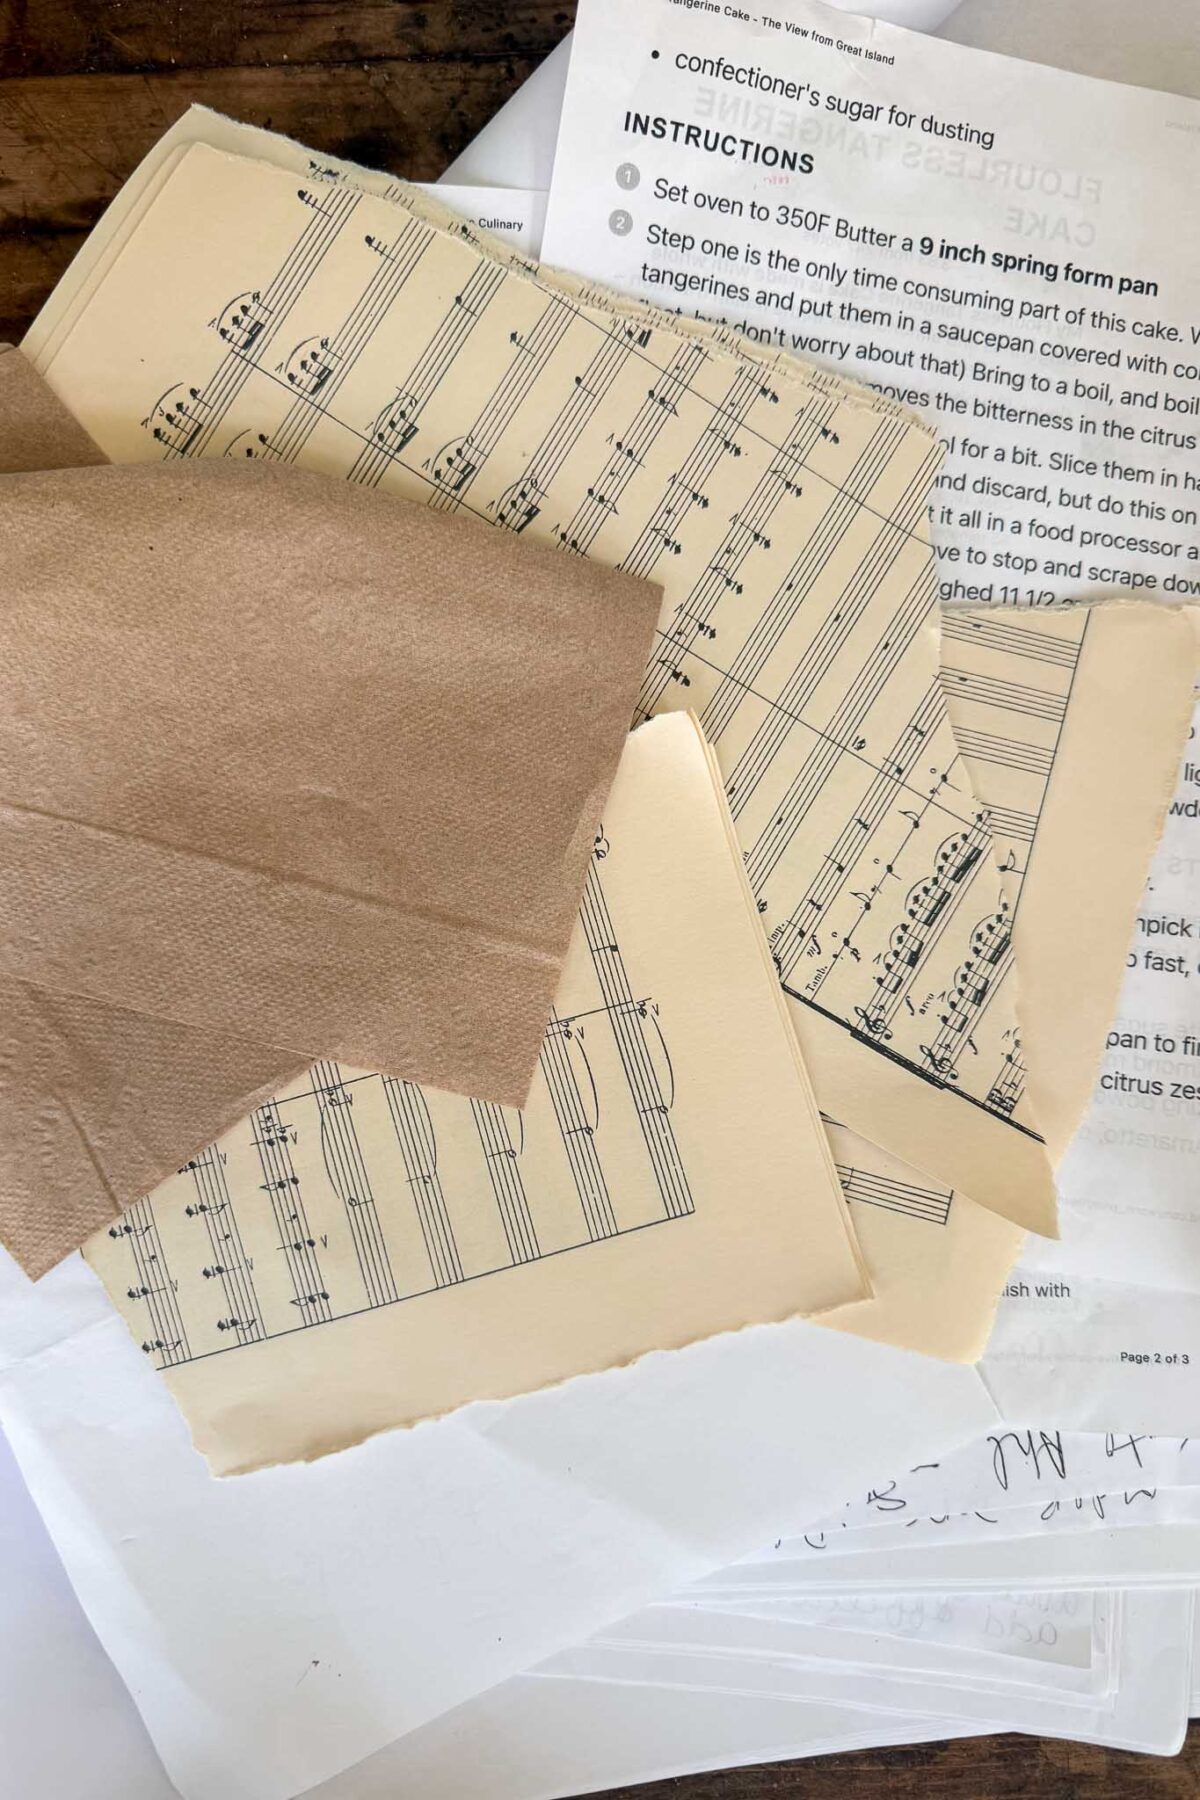
- Printer paper: the most reliable starting point, with a clean, neutral base that takes color beautifully
- Construction paper: gives you the richest, most saturated color (great for warm earth tones or soft pastels)
- Tissue paper: produces the most delicate, almost translucent sheets, lovely for layering
- Newsprint: creates a soft gray, vintage-feeling paper with subtle text flecks
- Brown kraft paper or paper grocery bags: gives a beautiful natural, rustic tone that feels very botanical.
For my favorite stationery look, I like to mix two parts printer paper with one part construction paper or colored napkins. The blend gives you a paper that’s sturdy enough to write on but still has that handmade, slightly variegated character.
How to Make Seed Paper at Home (Step-by-Step)
Step 1: Tear Your Paper
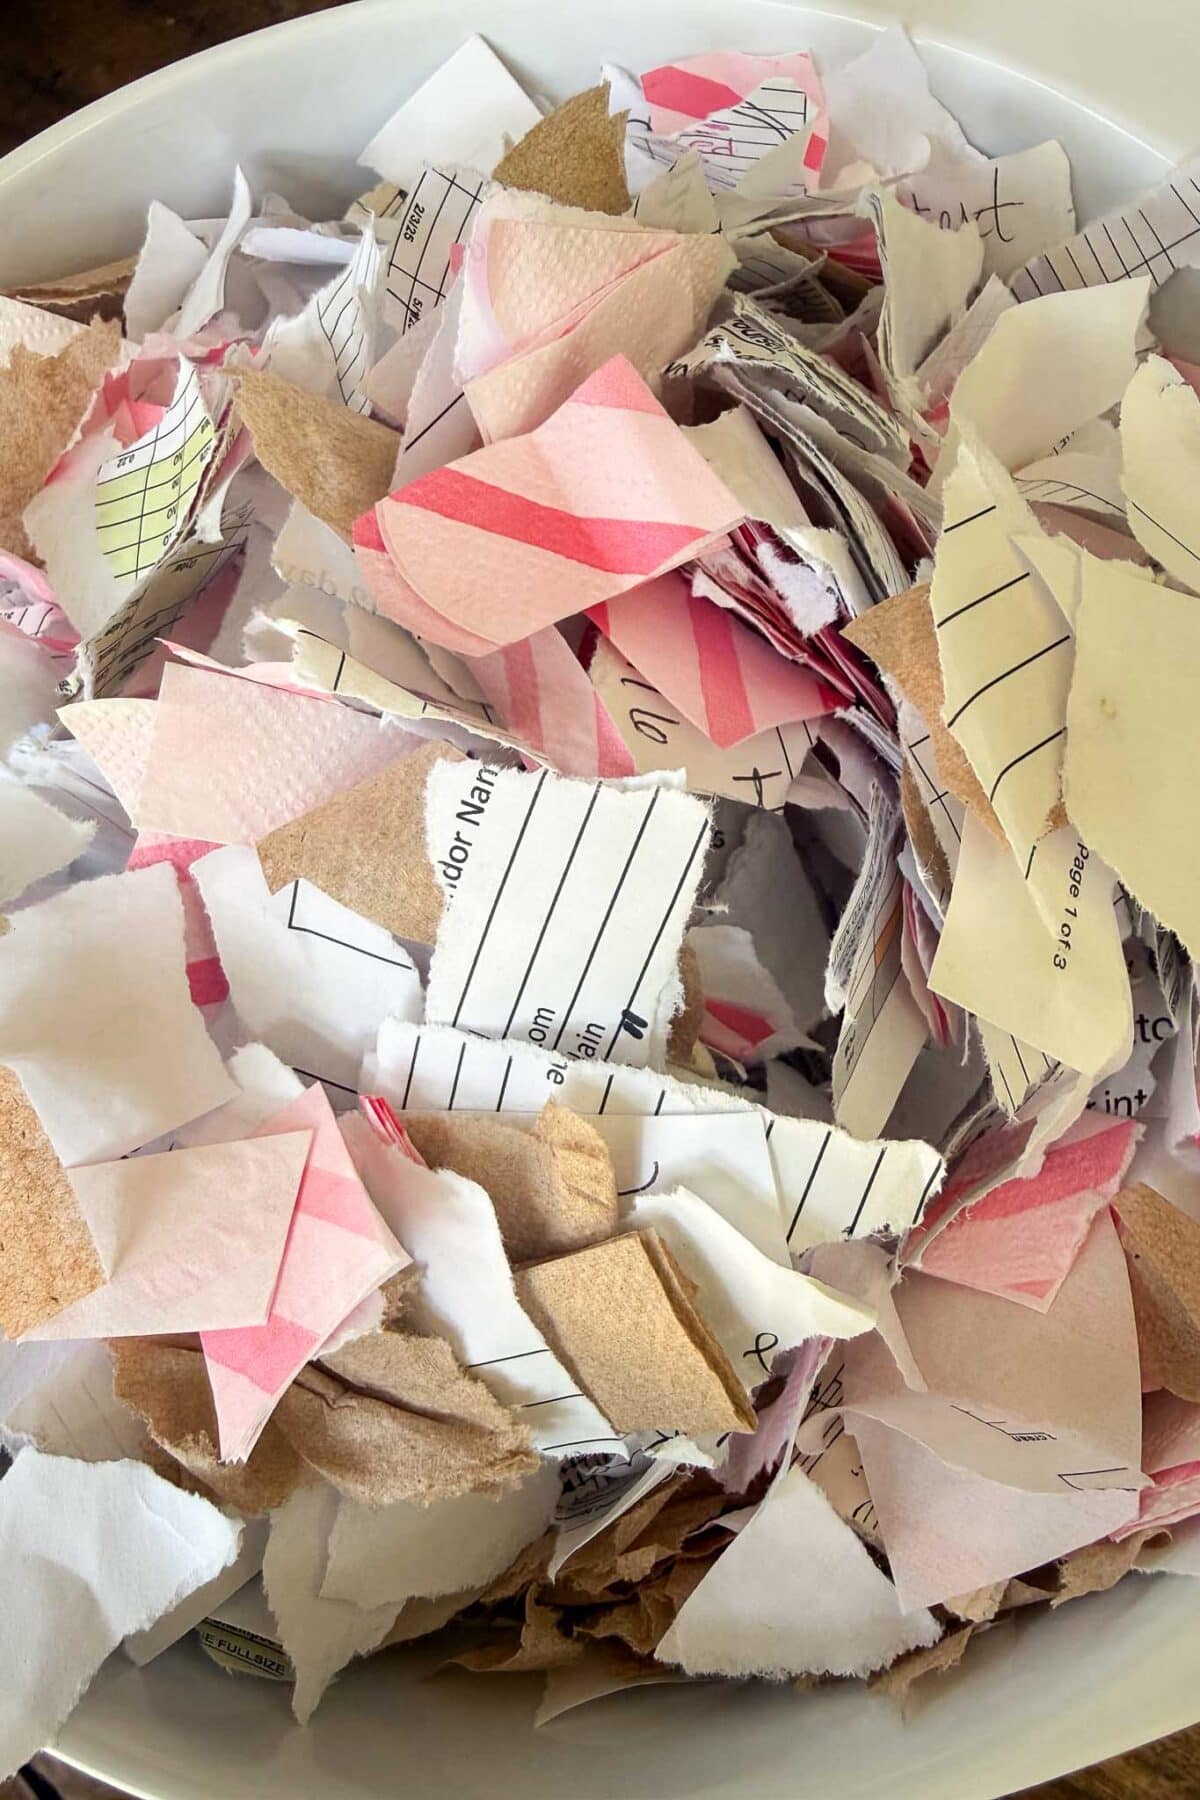
Tear your recycled paper into small pieces, roughly one-inch squares. The smaller the pieces, the easier they’ll blend into a smooth pulp.
Tip from wendy’s craft room:
A quick note: avoid glossy magazines or anything with a slick coating. Those don’t break down well and won’t give you that beautiful, soft, deckle-edged look we’re after.
Step 2: Soak the Paper
Place the torn paper in a bowl and cover with warm water. Let it soak for at least two hours, or overnight if you can plan ahead. The longer it soaks, the silkier your pulp will be.
Step 3: Blend the Paper Mixture Into Pulp
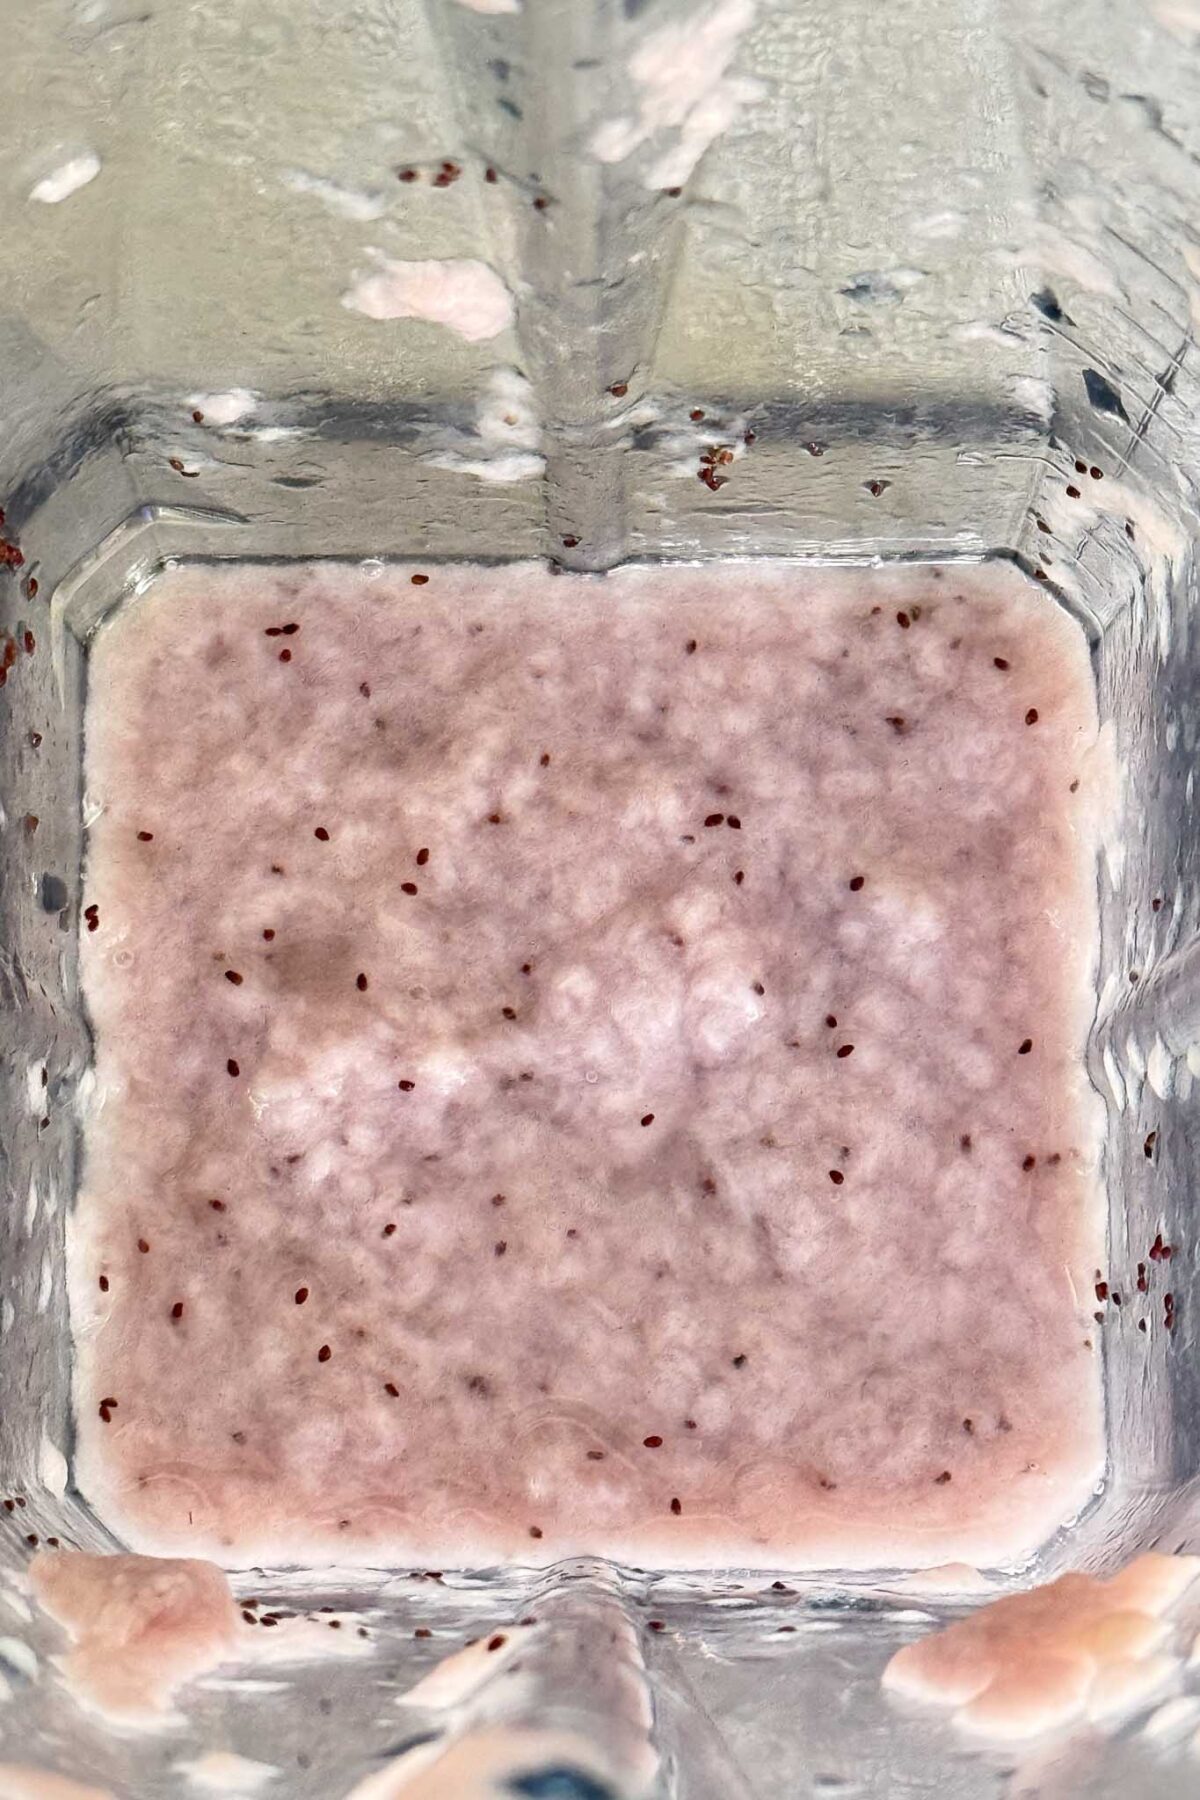
Don’t be discouraged if this step takes a couple of attempts — it definitely took me a few tries to get the hang of it! Add your soaked paper and water to the blender, filling it no more than two-thirds full. Blend on high until the mixture turns into a smoothie-like slurry. Too thick? Add a splash more water and pulse again until it’s just right.
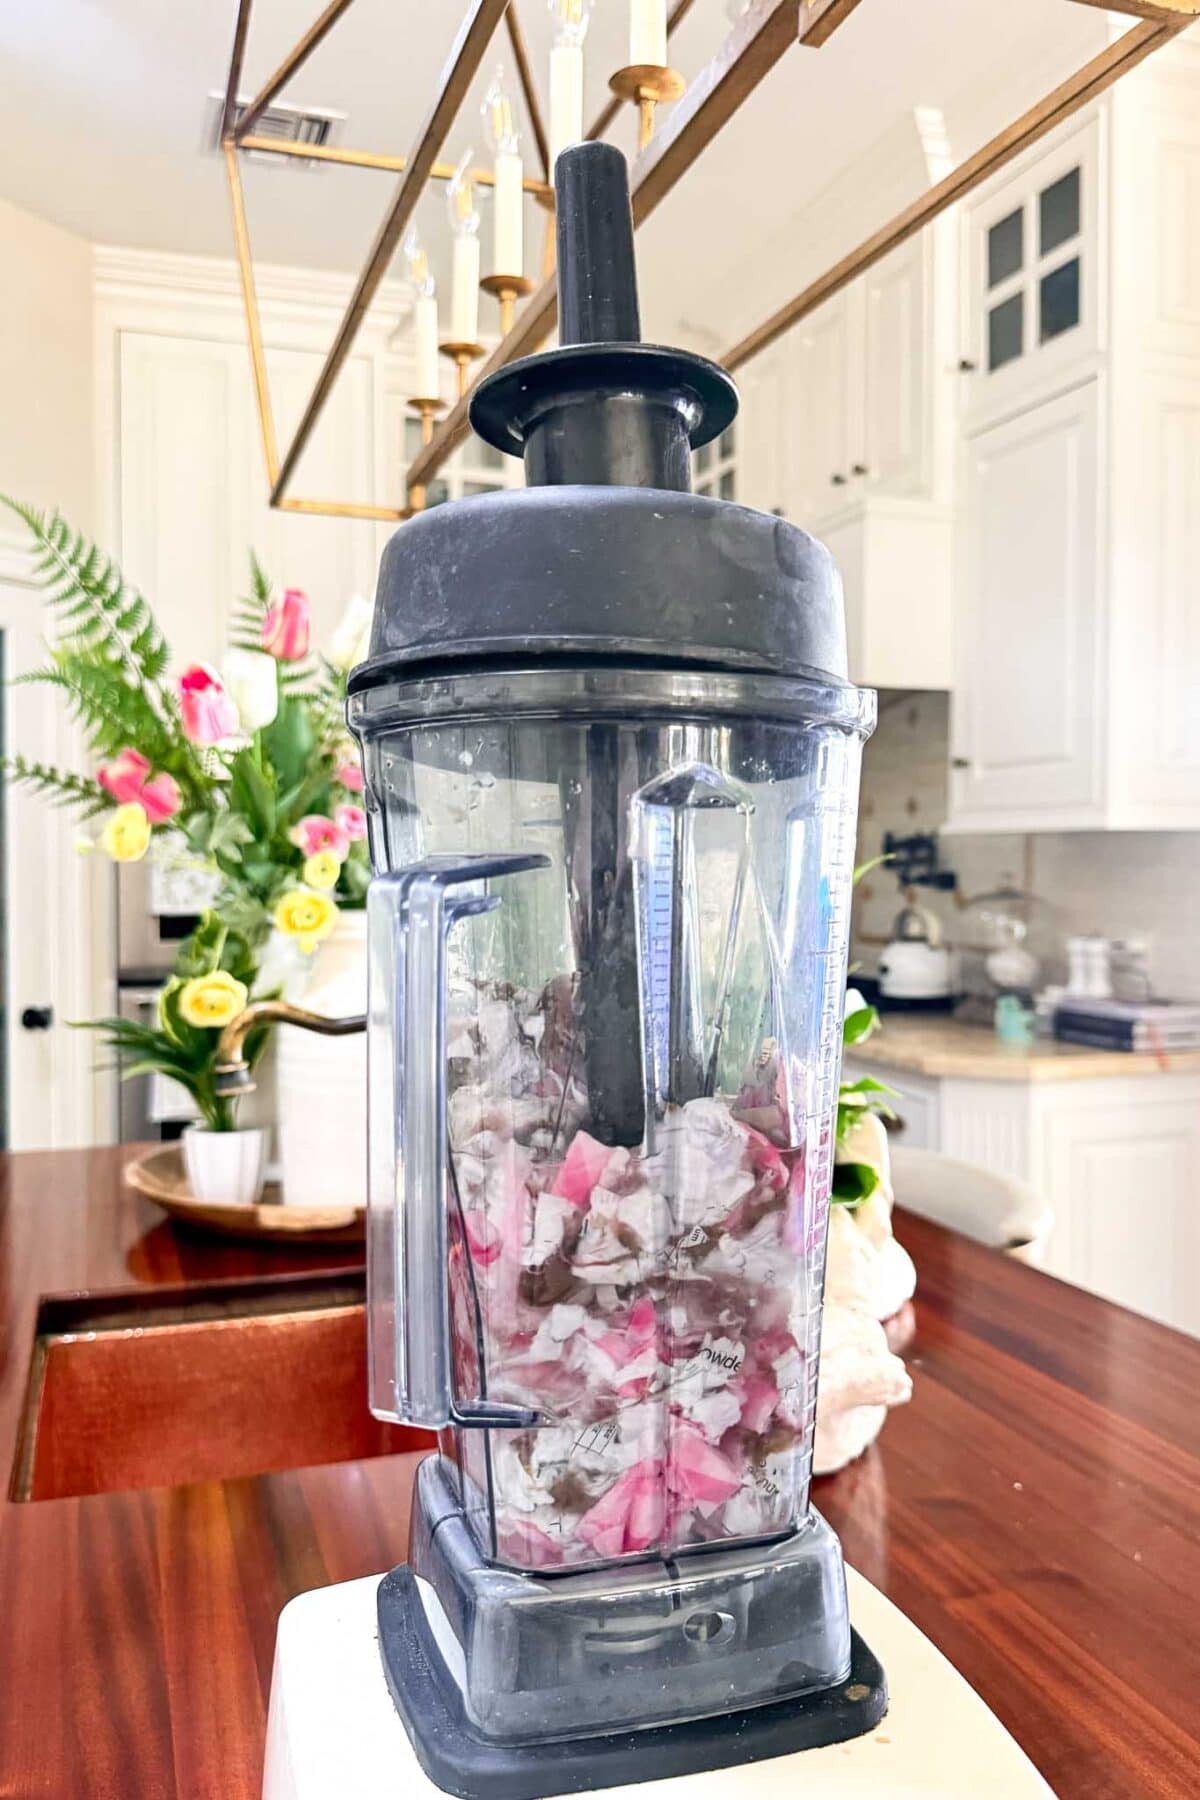
Tip from wendy’s craft room:
Wetter is better! the image above is too thick, you want it to look like the image below. You should be able to pour it out of the blender onto your deckle.
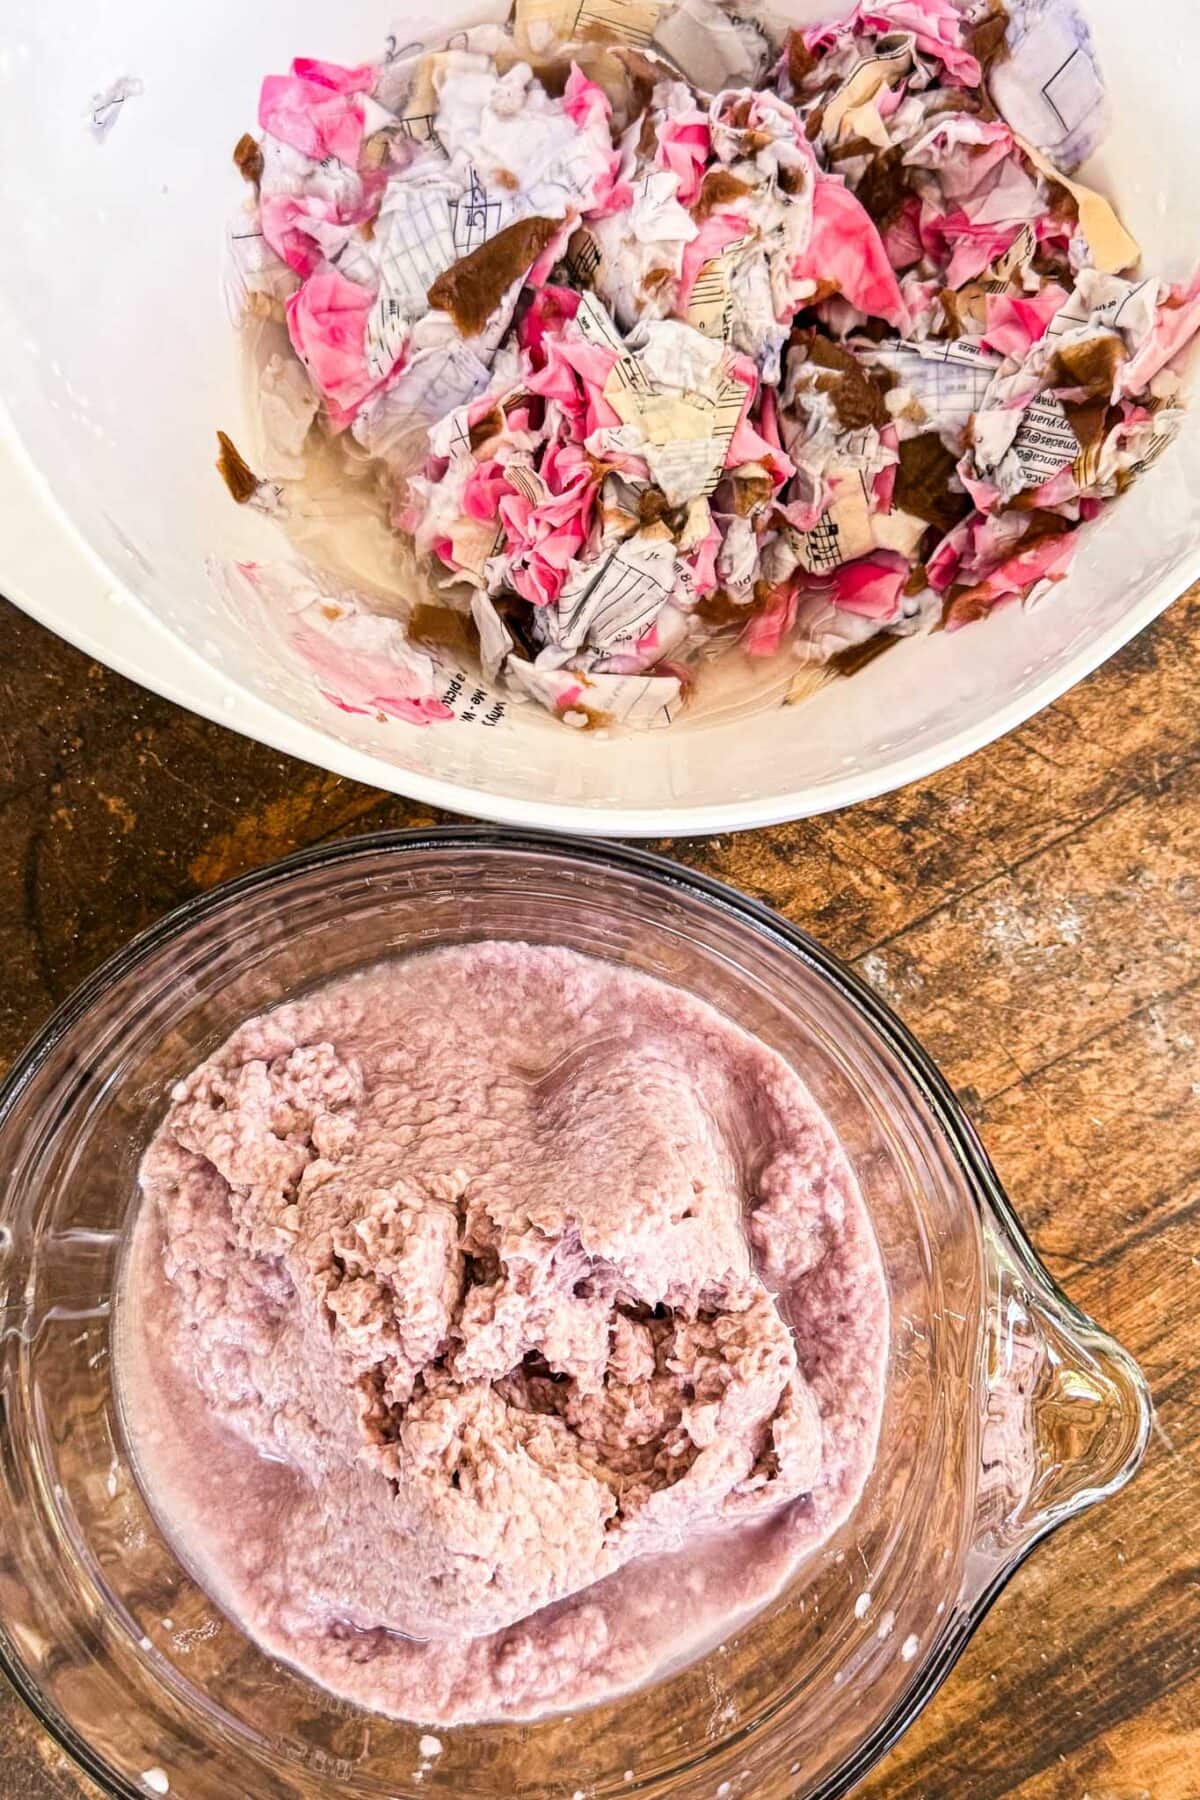
Step 4: Strain the Pulp Slightly
Pour your pulp into a measuring cup with a spout. If it’s too watery, drain off some of the excess. If it is too thick, add some water until you reach the consistency of a thick smoothie. You want a thick but pourable consistency.
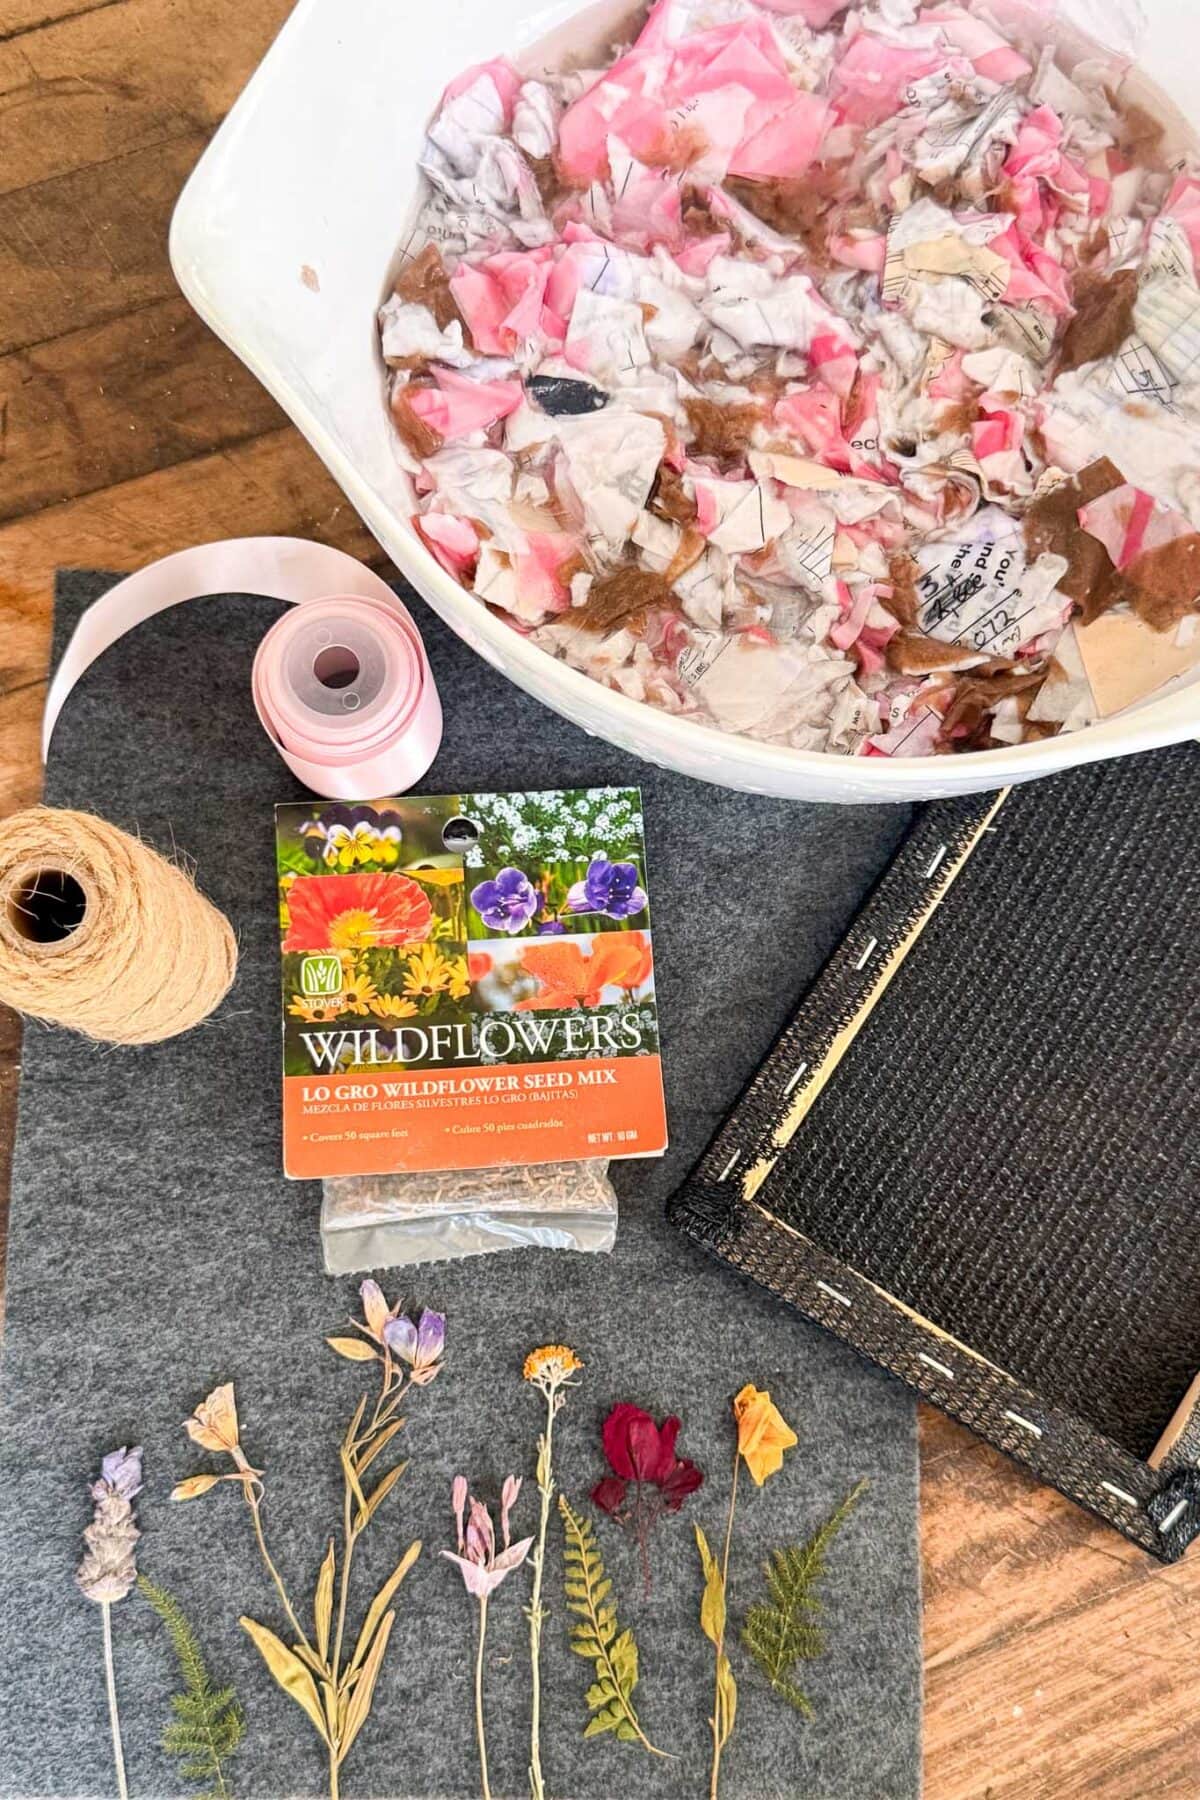
Step 5: Add the Wild Flower Seeds
Gently stir your wildflower seeds into the pulp by hand, about one to two tablespoons of seeds per cup of pulp.
Here’s the most important rule of seed paper: never blend the seeds. Blending breaks them and they won’t germinate.
Tip from wendy’s craft room:
A lot of people worry that mixing the seeds into wet pulp will cause them to start sprouting. It won’t. Seeds need consistent, prolonged moisture and warmth over several days to germinate, and the brief contact with damp pulp followed by air-drying is too quick to trigger them. Once your paper is fully dry, the seeds simply go dormant until they’re planted.
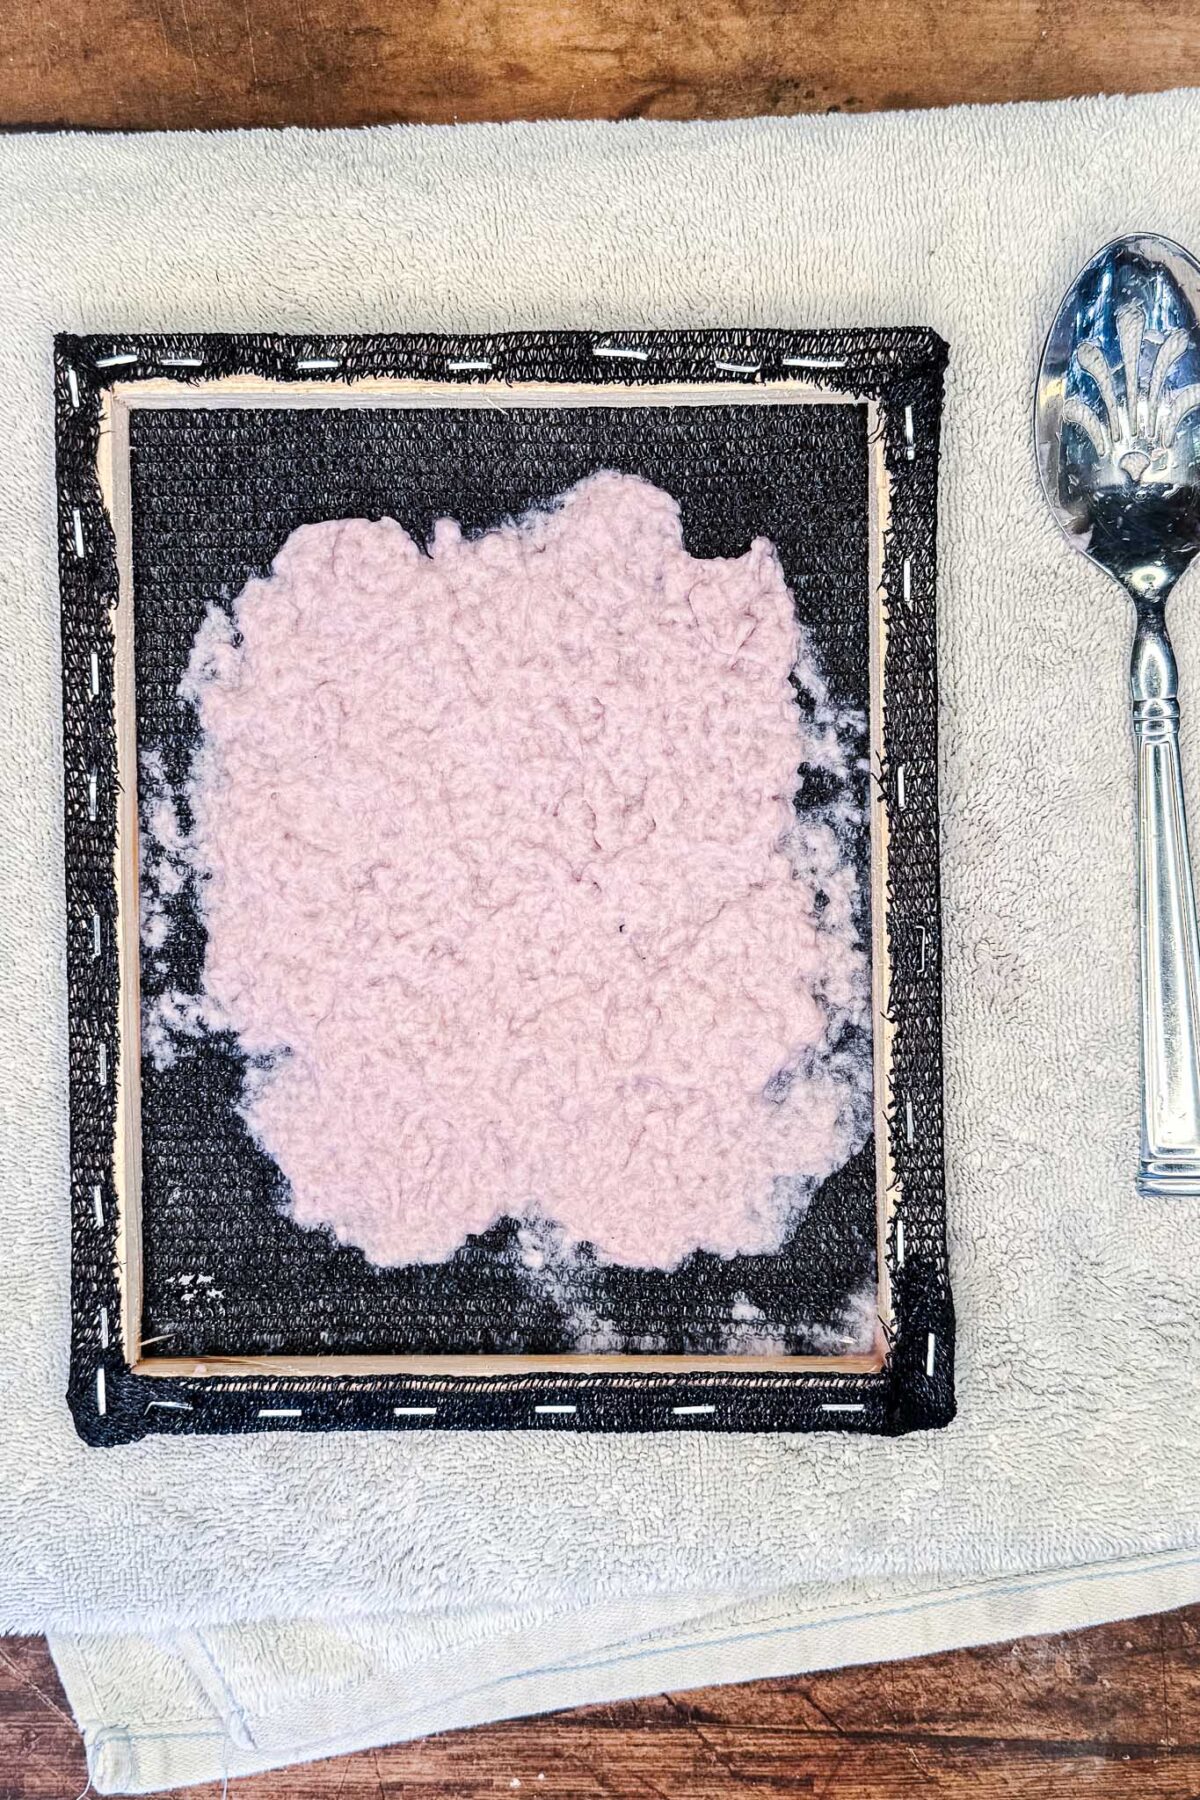
Step 6: Form the Paper
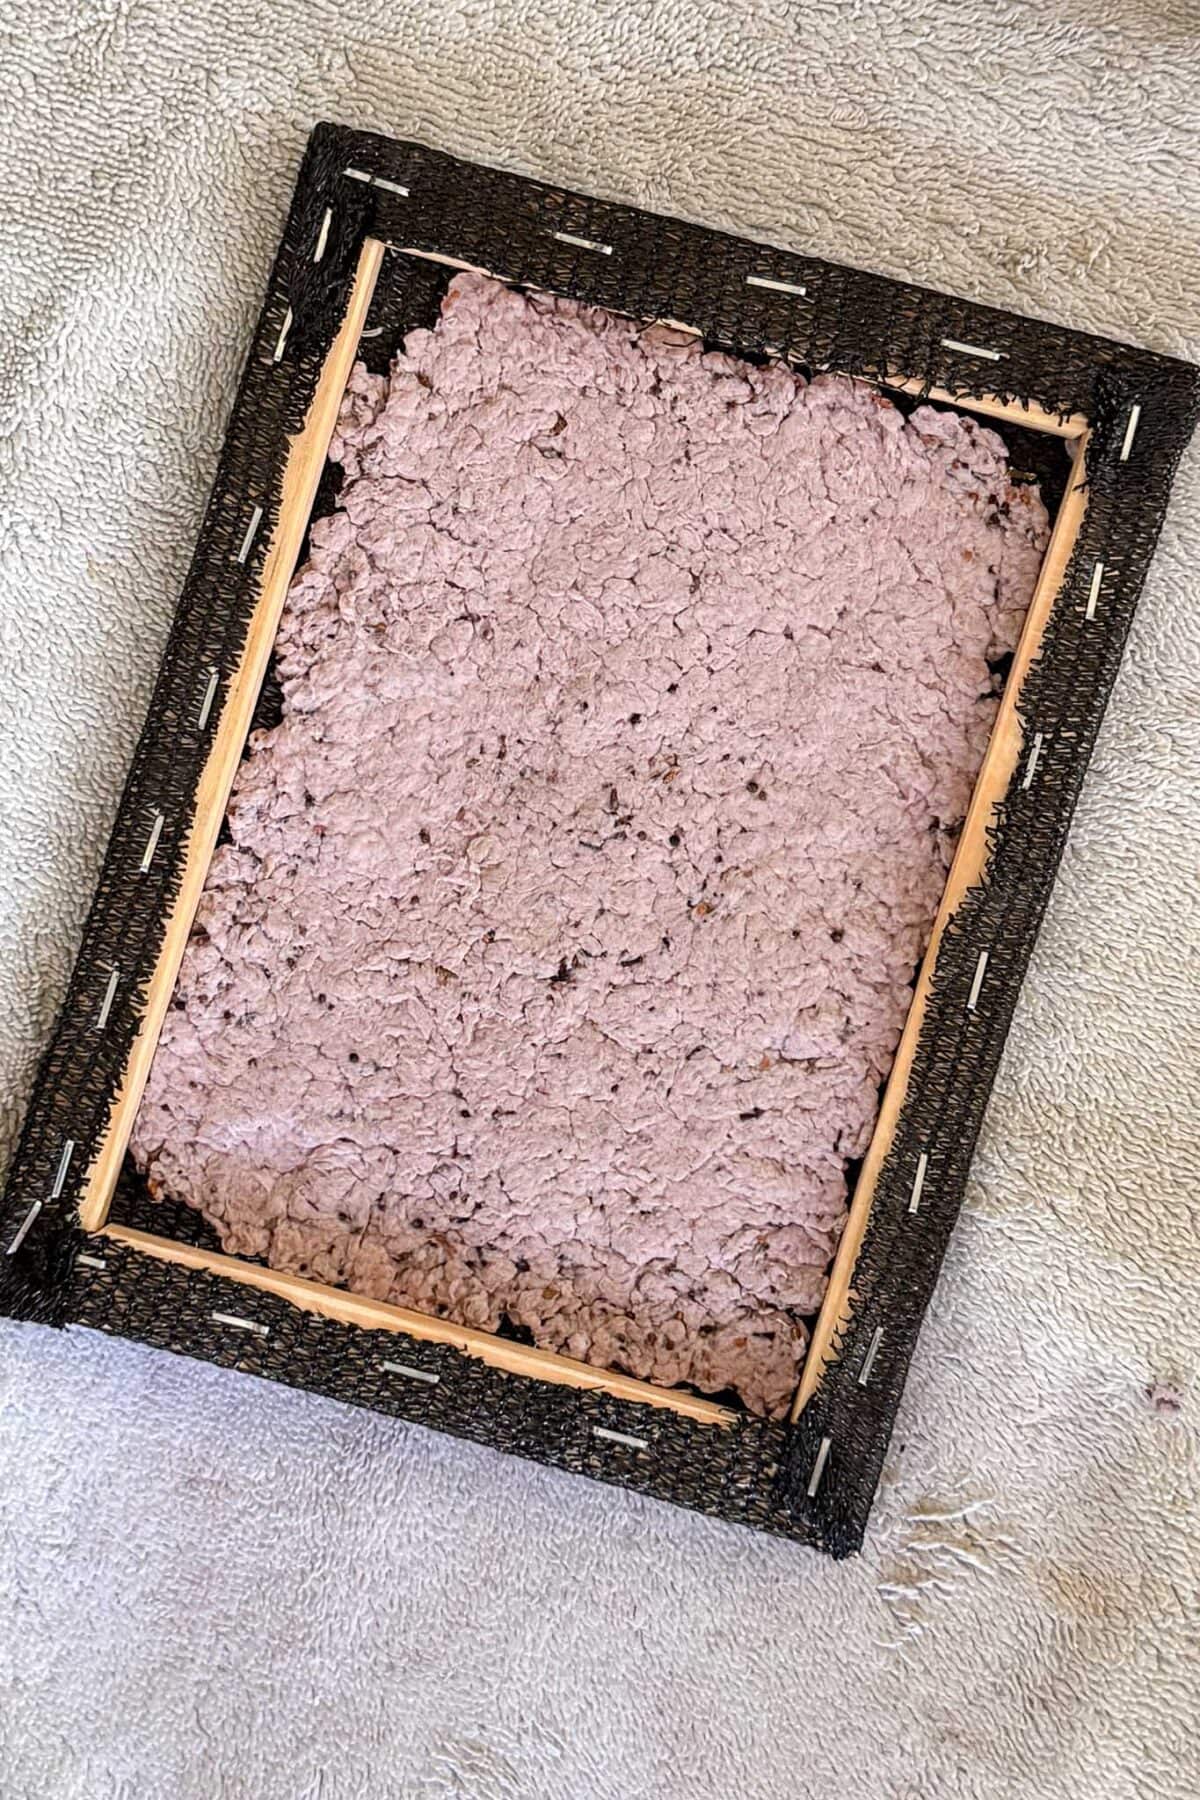
Pour a scoop of paper pulp directly onto your screen and deckle, spreading it out as evenly as possible with your hands or a spoon. Once the surface is covered, hold it over a towel, shaking it slightly to level the pulp and let the excess water drain away. This method is simple, beginner-friendly, and gives you a beautiful sheet of handmade paper.
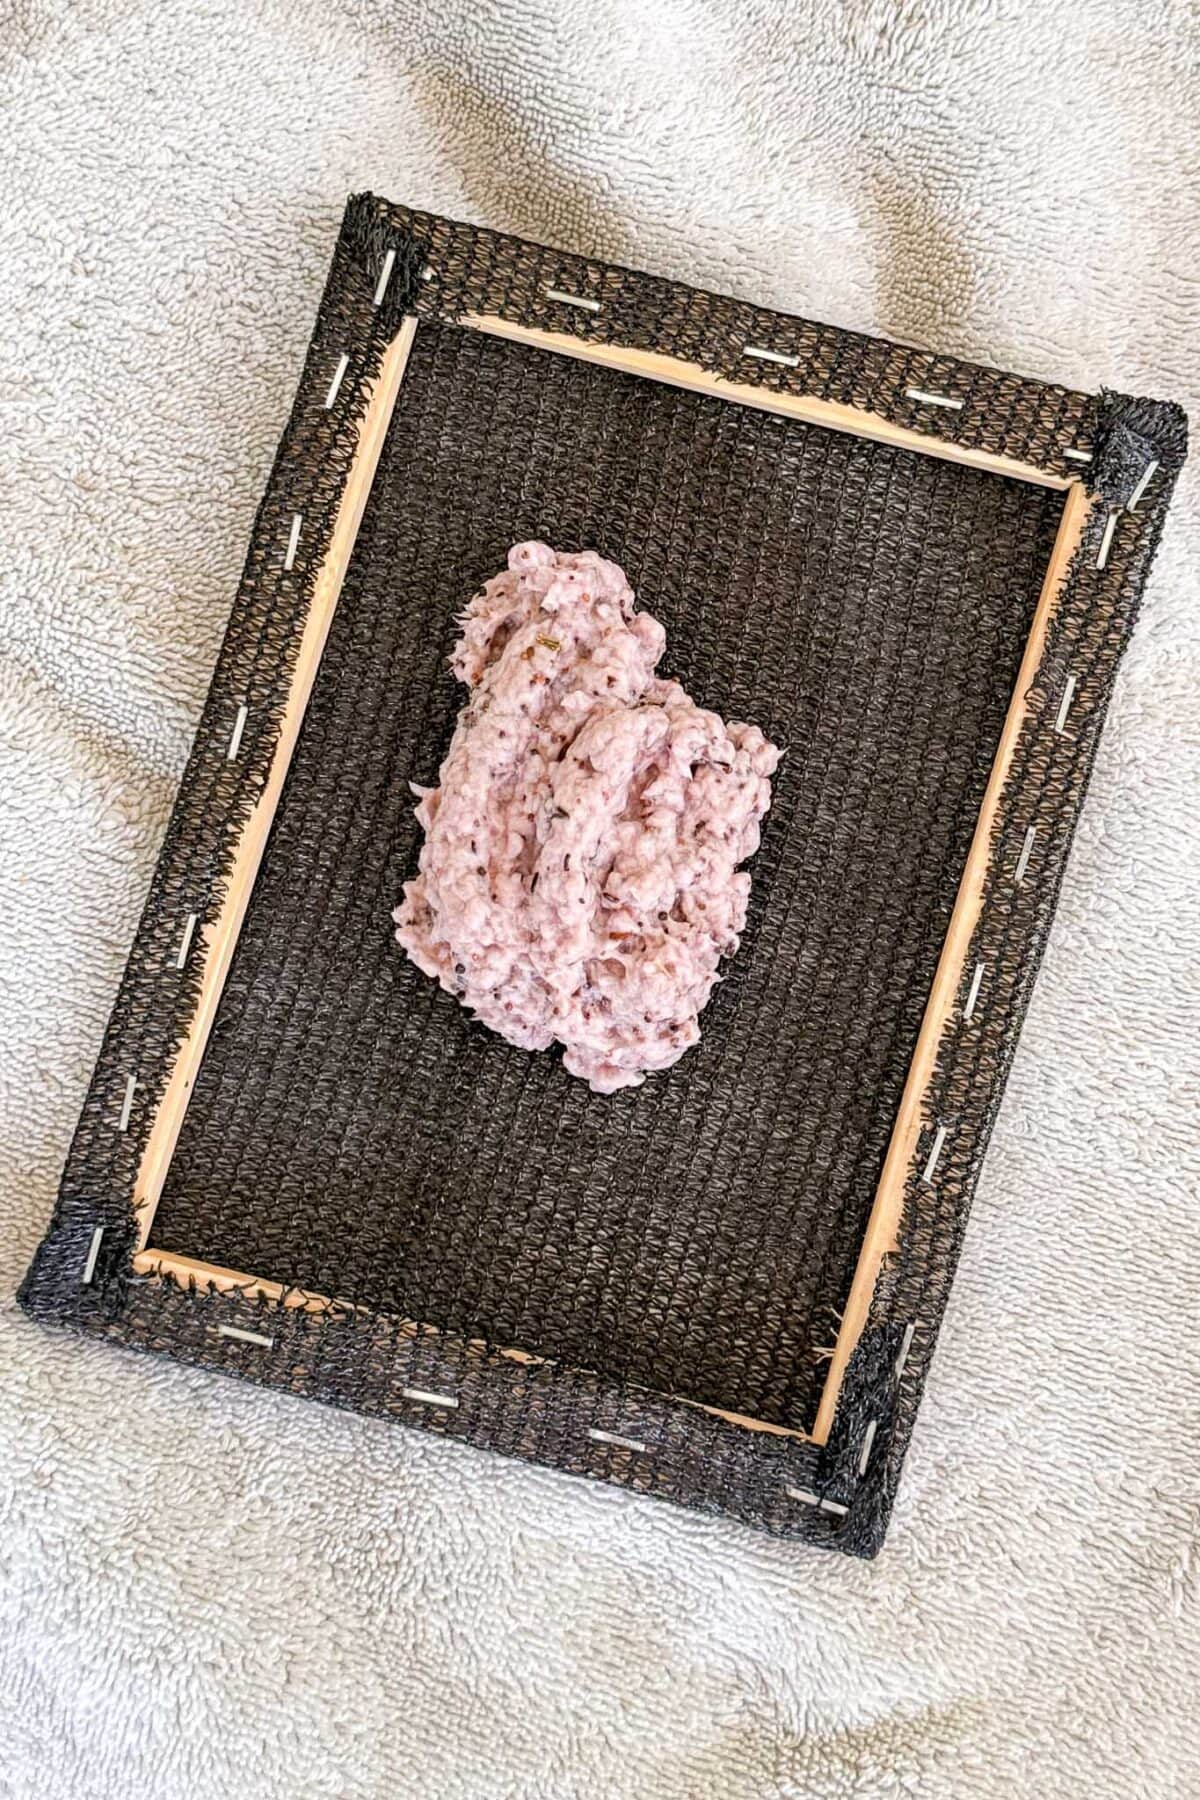
Learn from my first try!
Your pulp should be loose and slurry-like, closer to a smoothie than a thick batter. The first time I made seed paper, my pulp was way too thick. It clumped up on the deckle, refused to spread evenly no matter how much I coaxed it, and ended up looking more like cottage cheese than a smooth sheet of paper (see photos below for what NOT to do!). If your pulp is sitting in lumps or won’t spread out, just add more water to your bowl, stir it well, and try again. You want it to pour and settle naturally across the screen, not mound up in the middle.
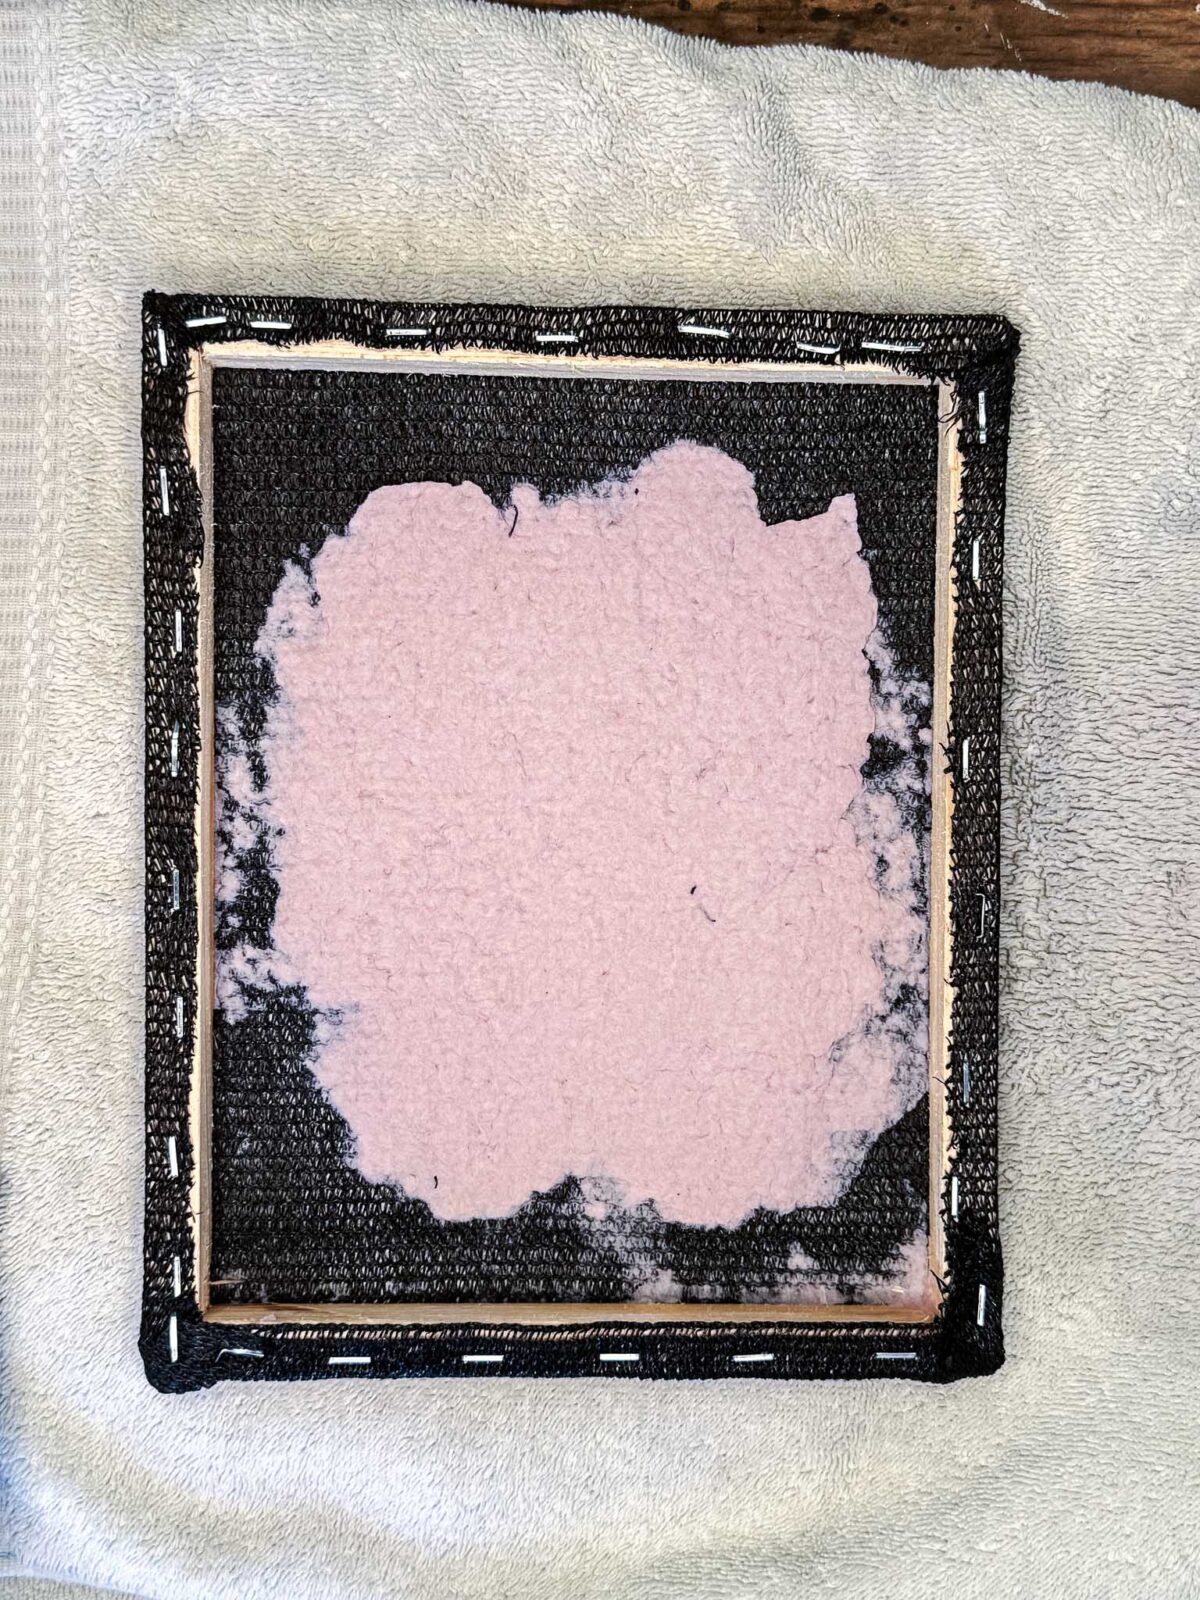
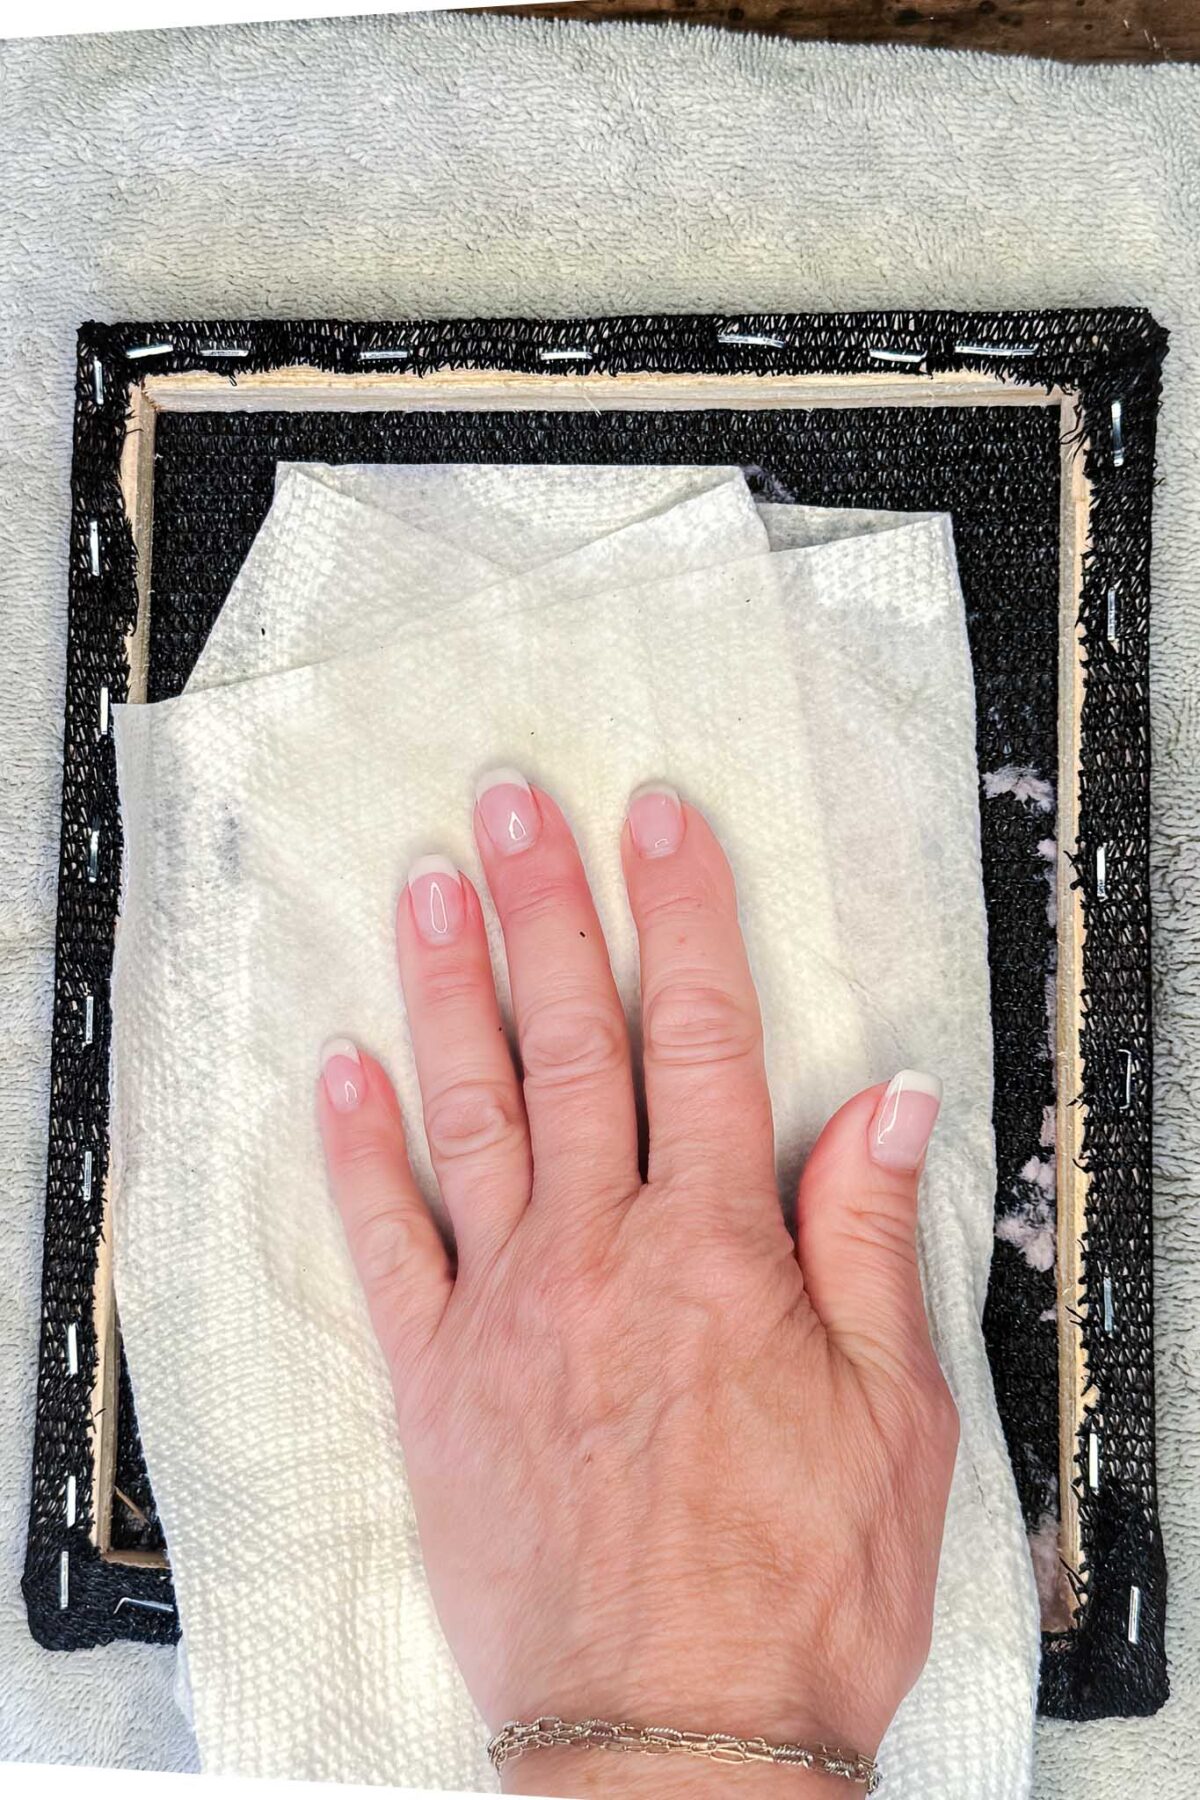
Step 7: Press Out the Water
Place the screen on a stack of towels. Use a sponge or paper towels to gently press out as much water as possible. Don’t rub the paper. Just press straight down.
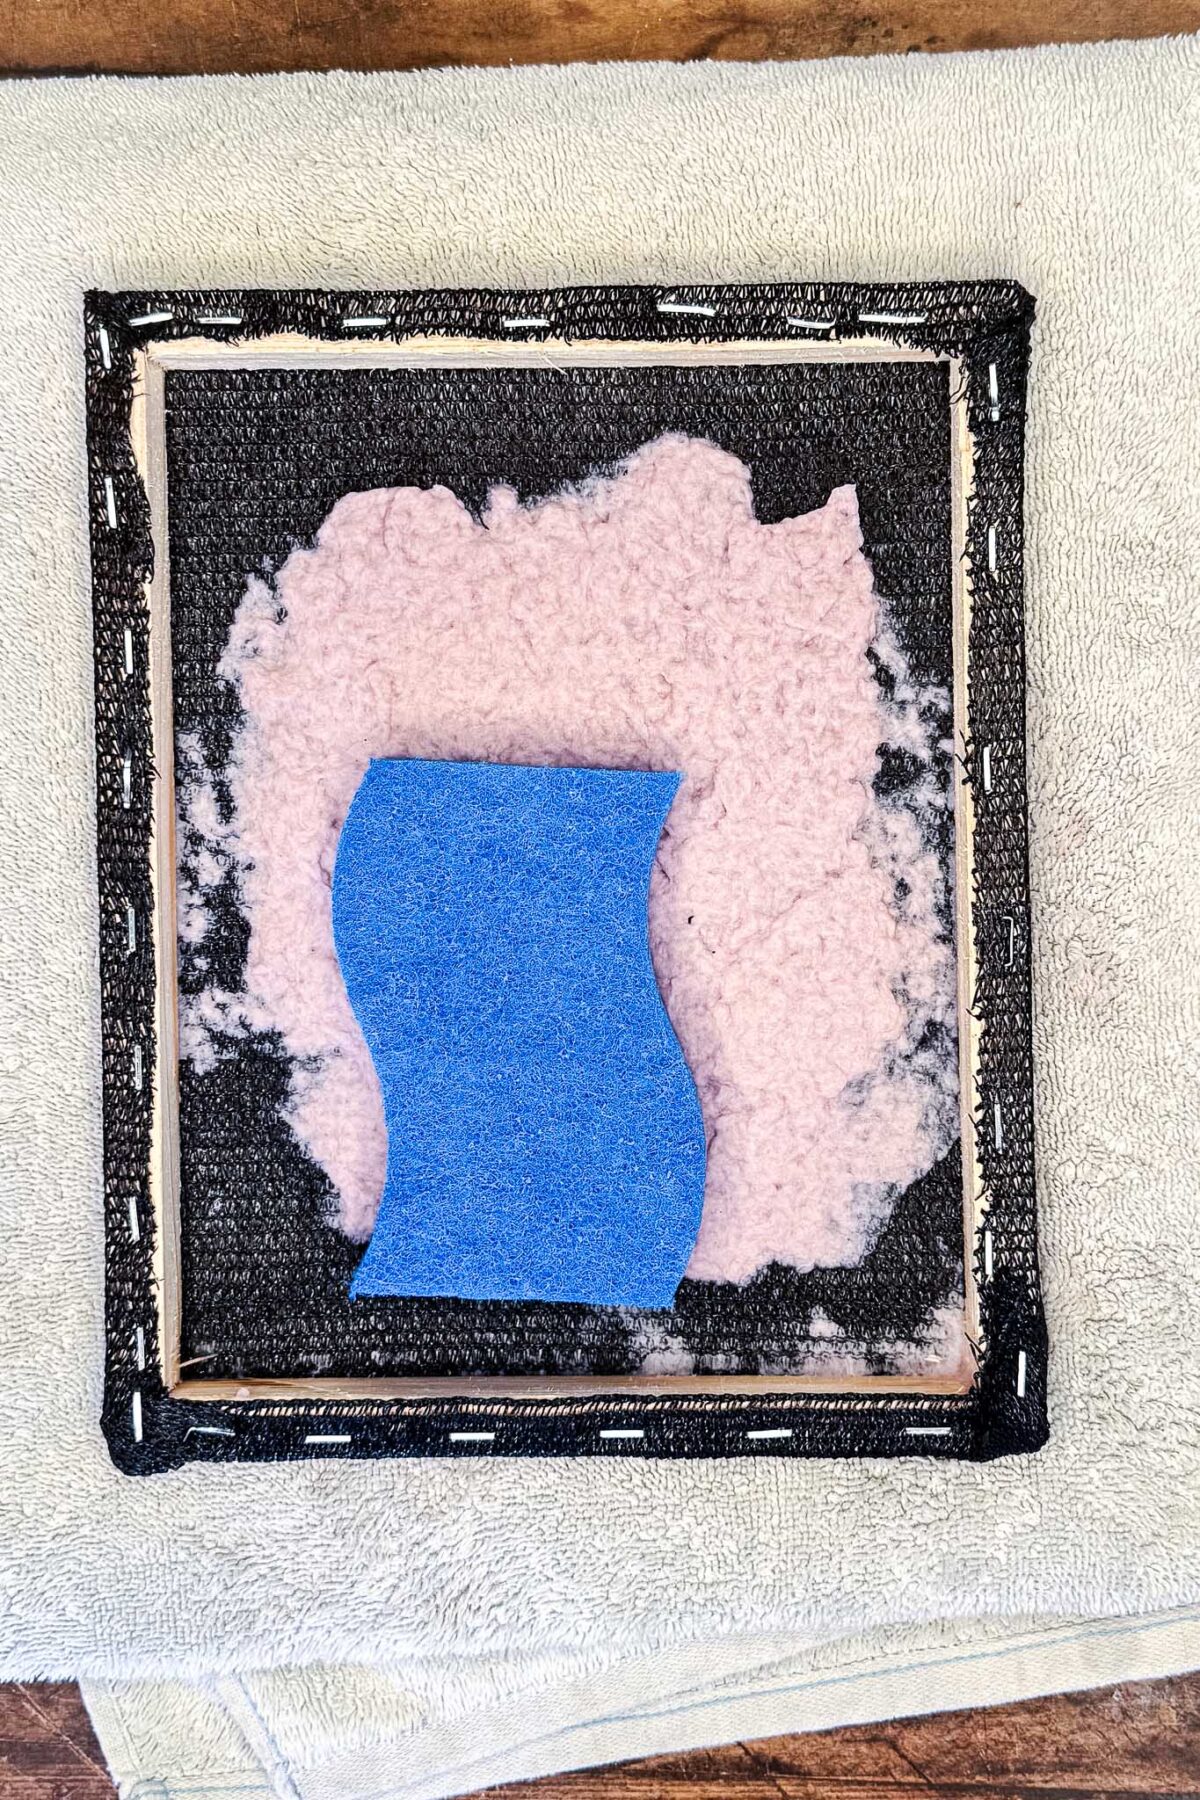
Step 8: Decorate (Optional, but So Pretty)
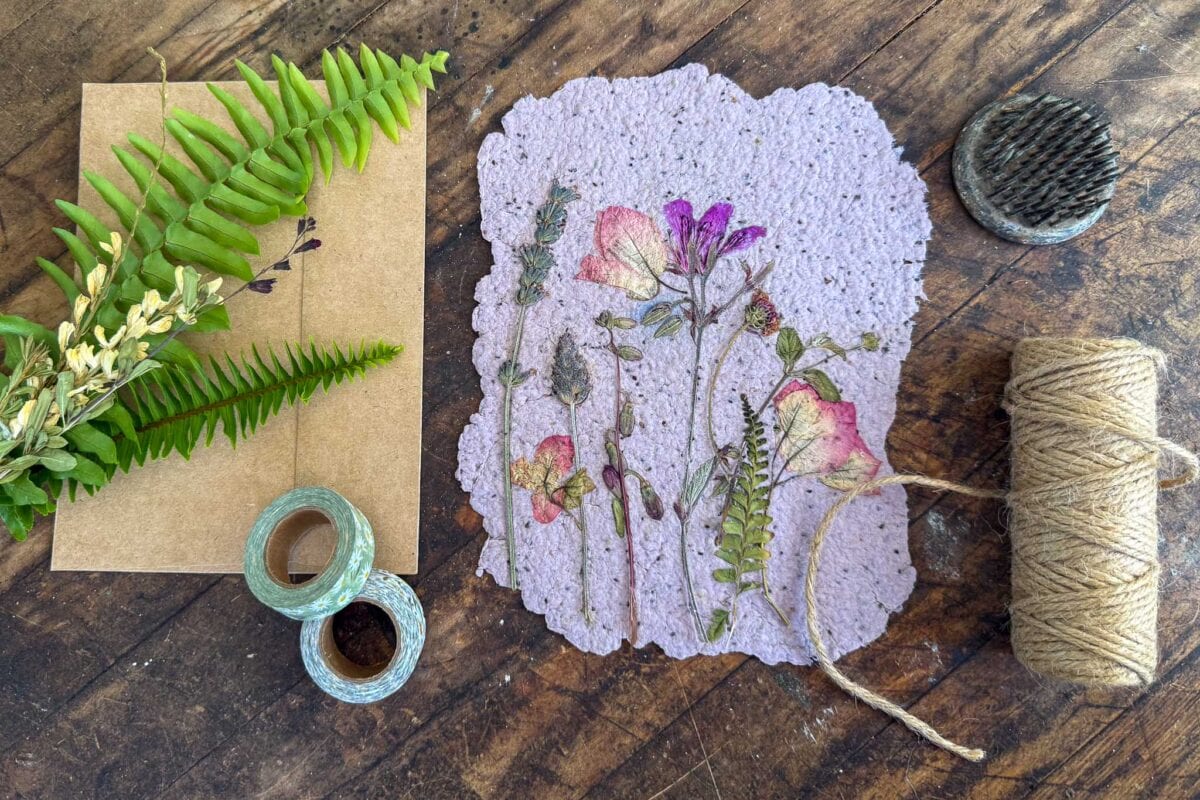
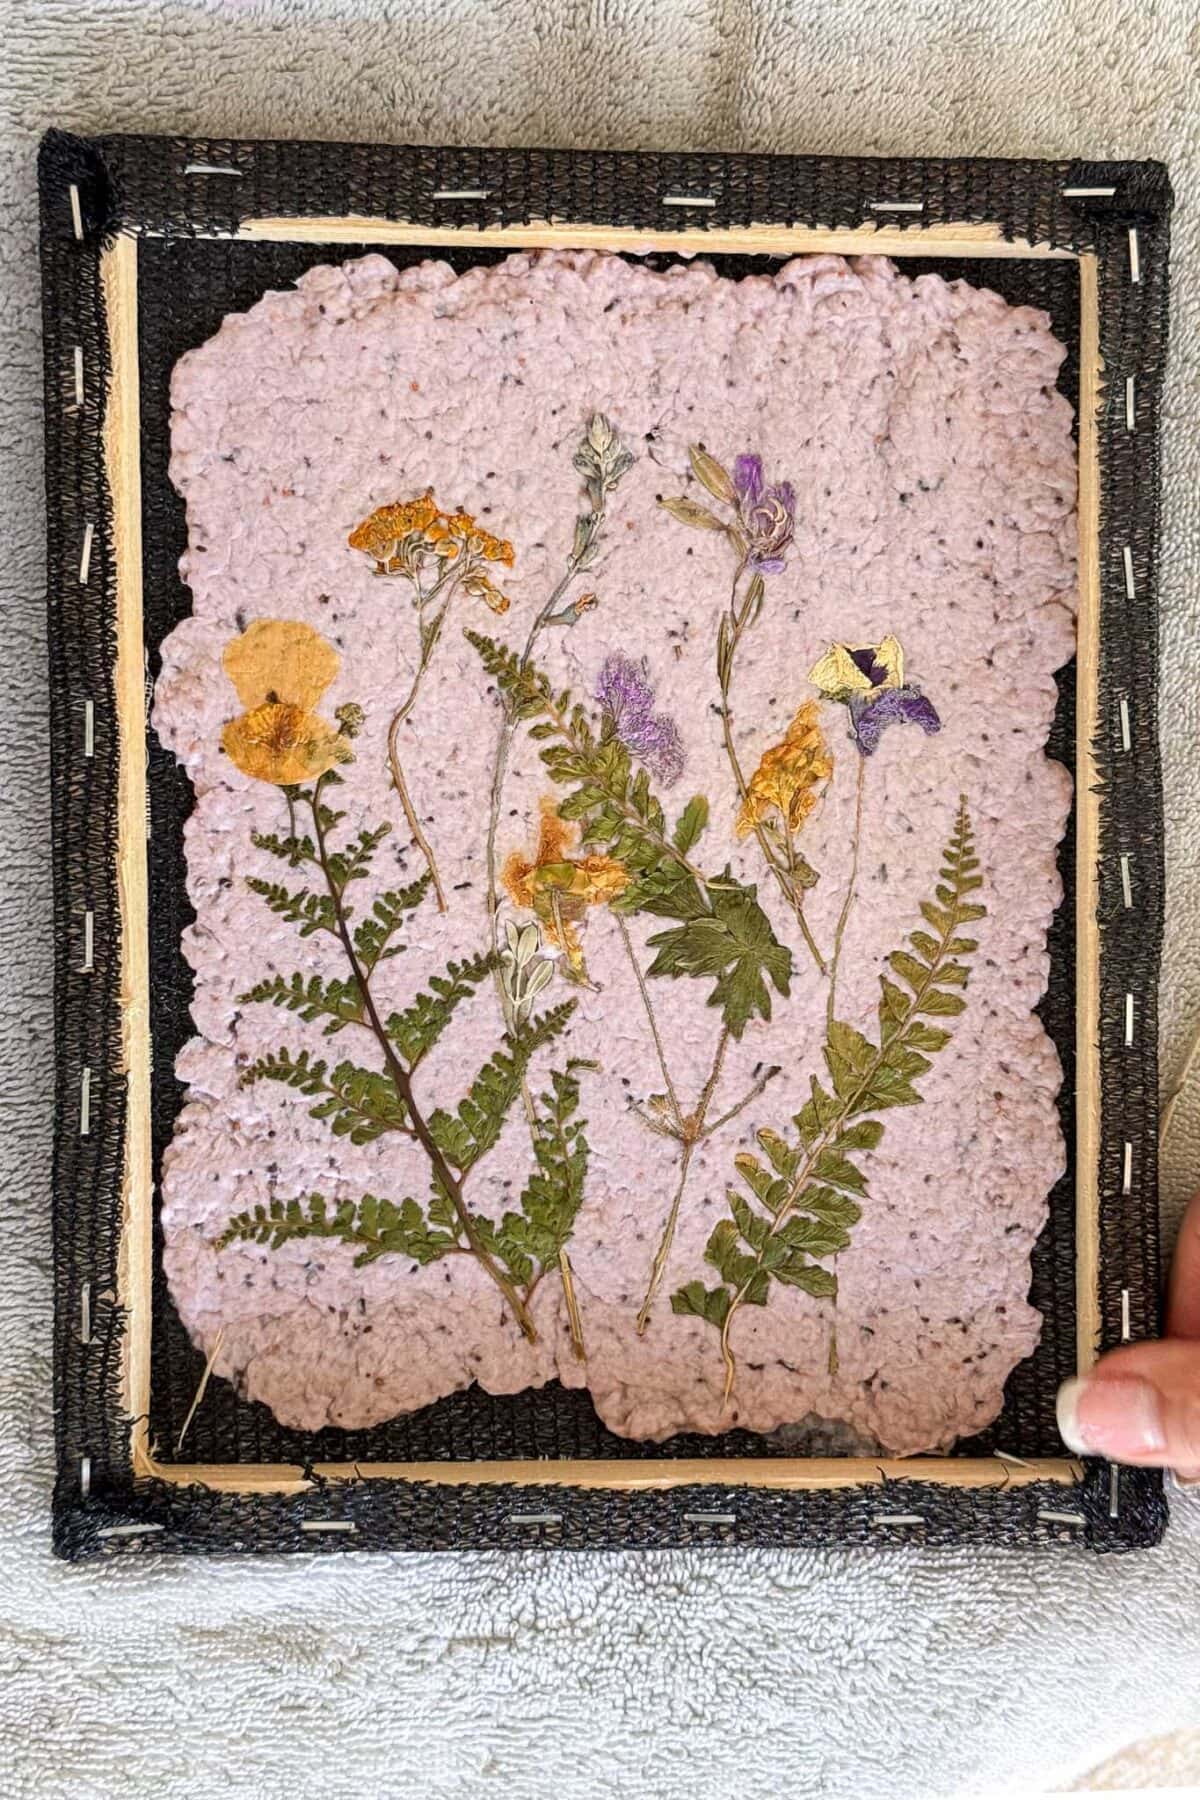
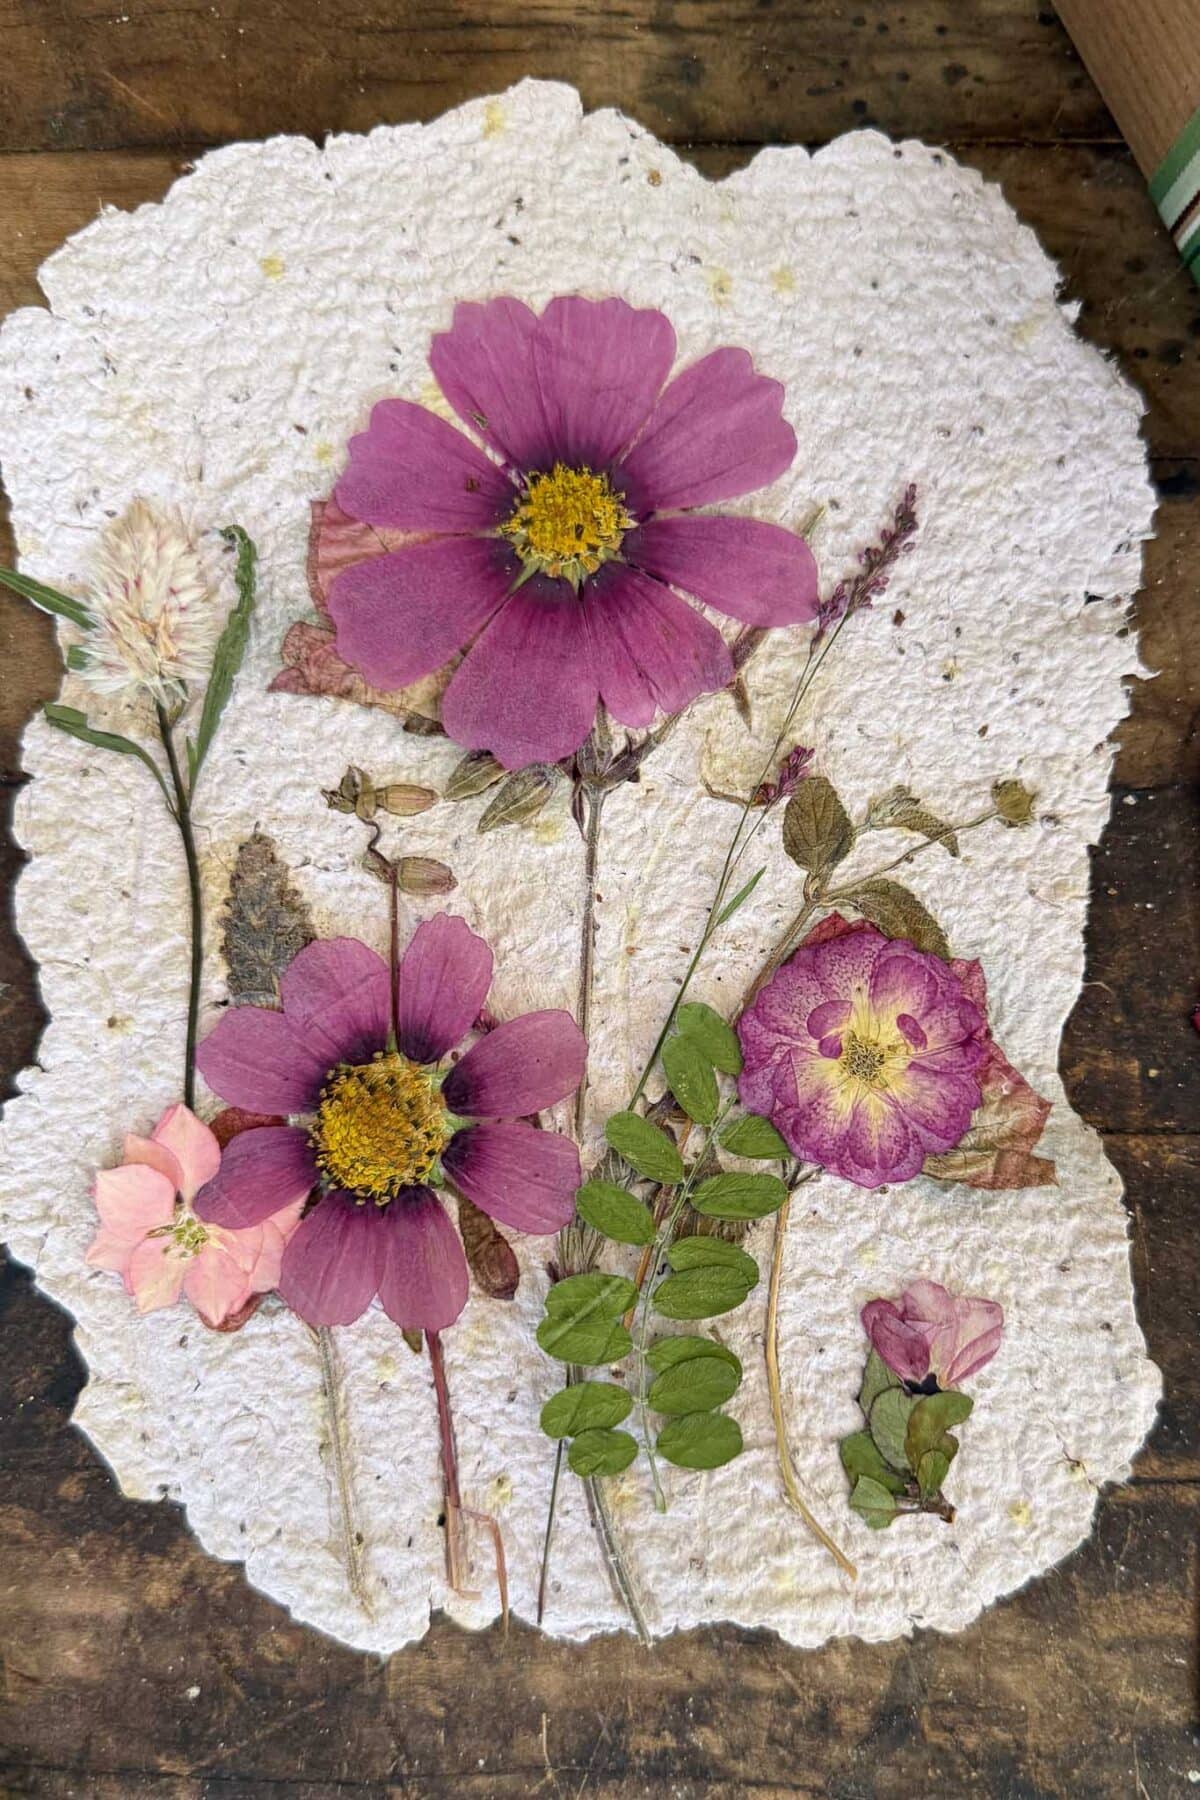
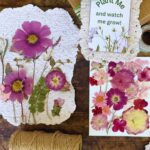
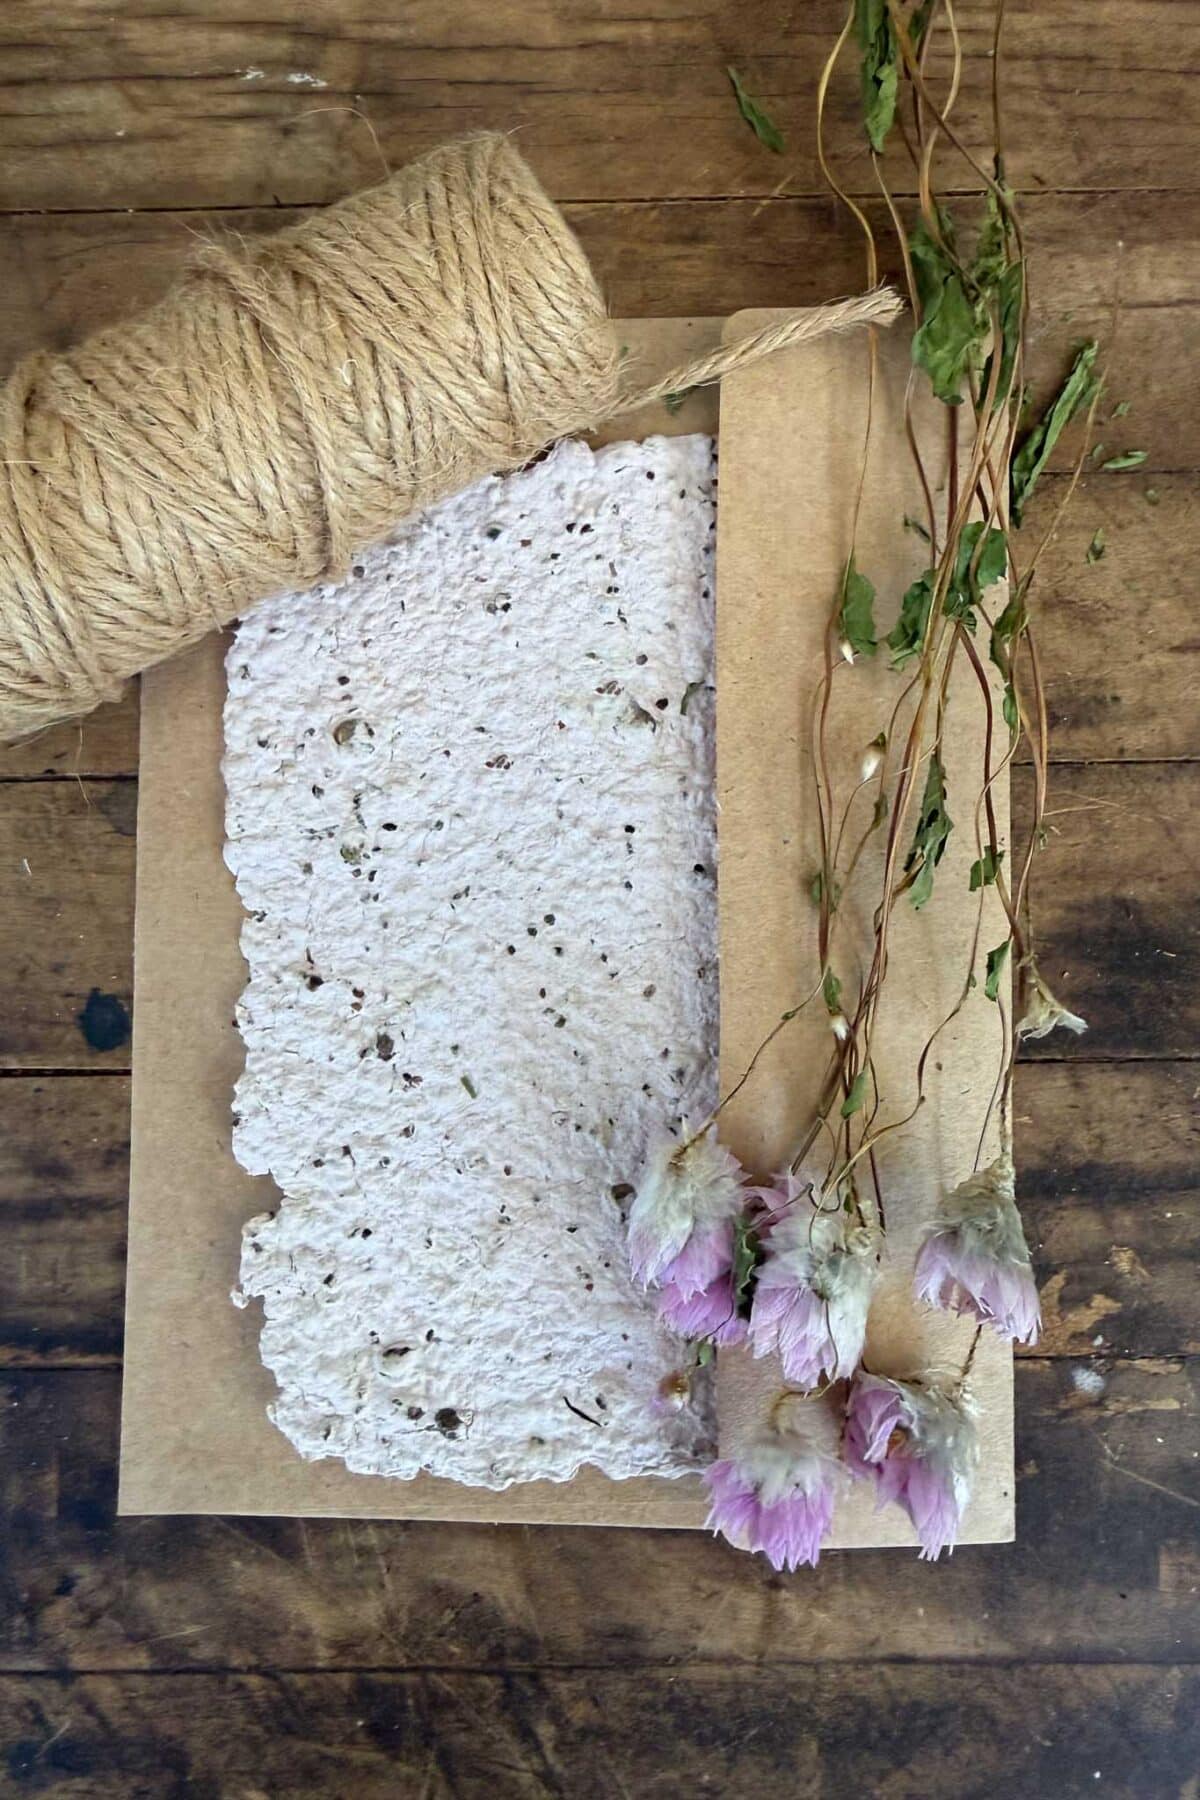
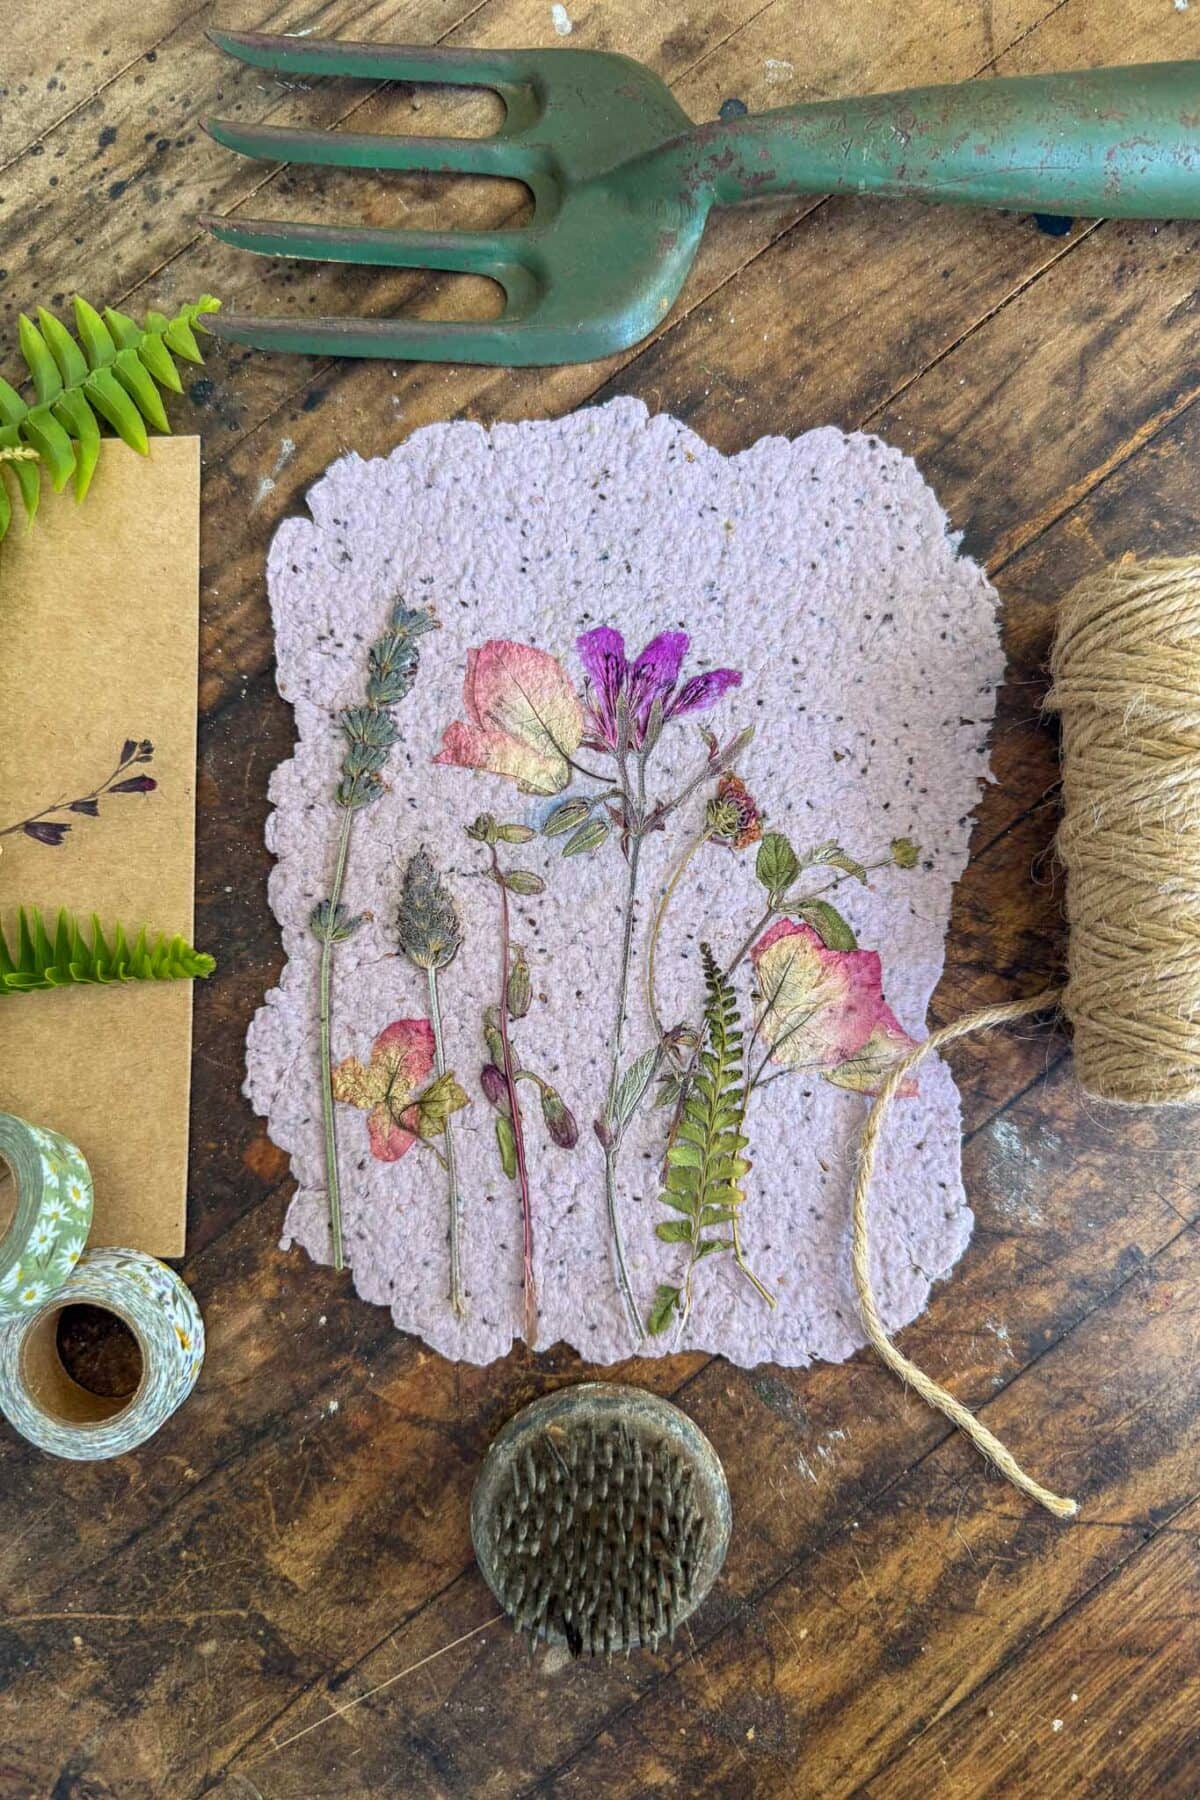
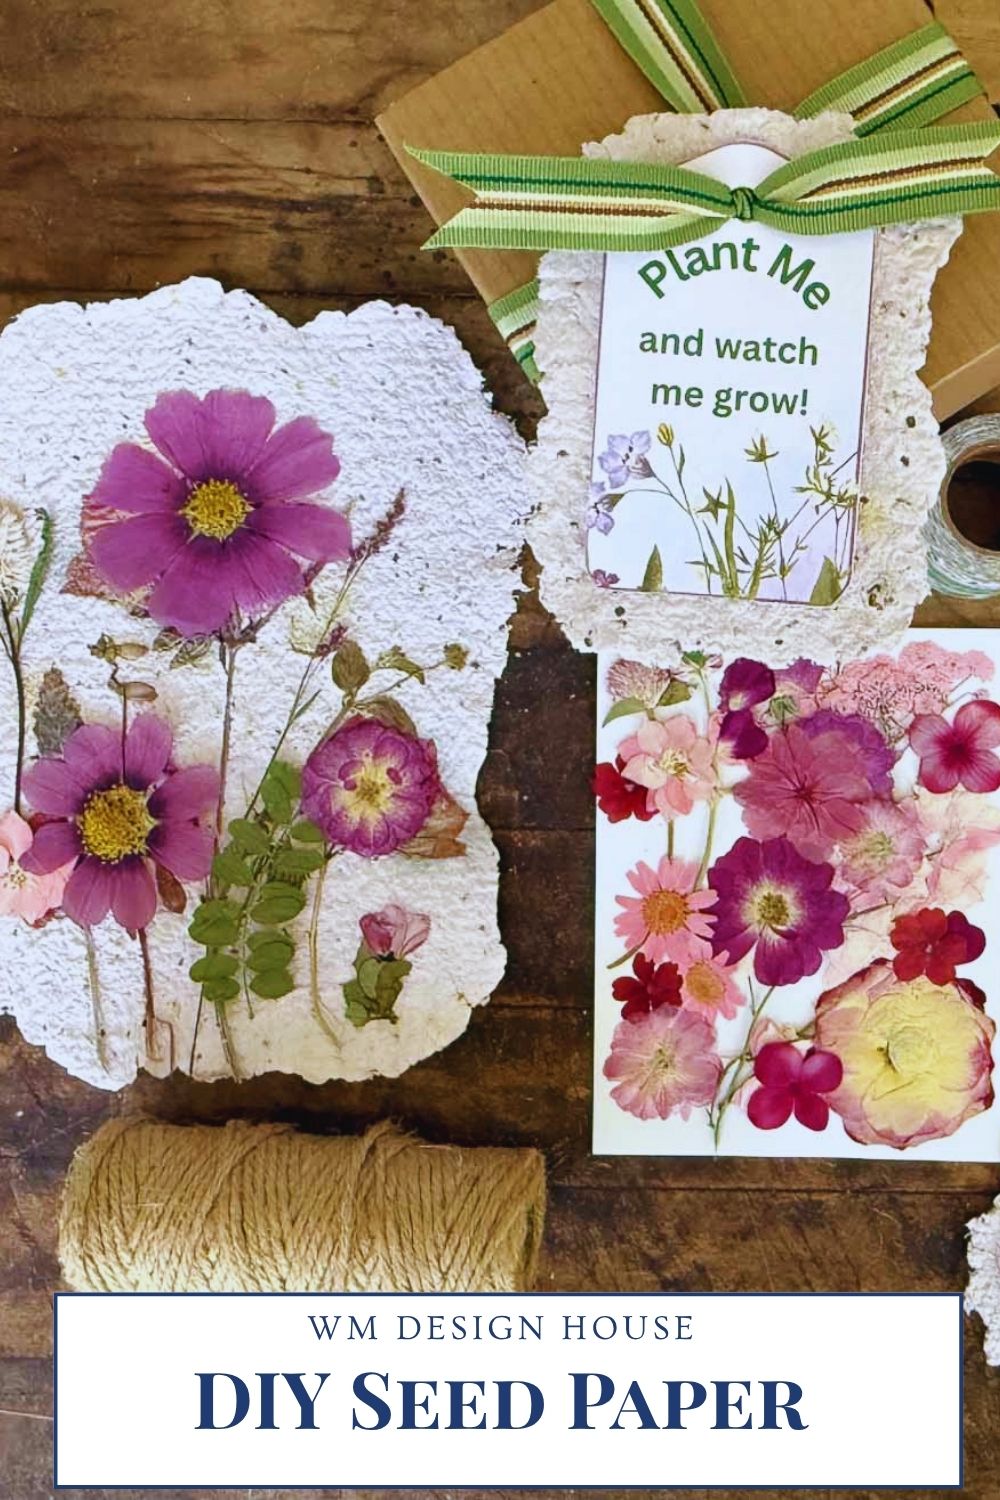
This is where the magic happens. Press a few dried flowers, leaves, or petals onto the surface of the wet paper. They’ll dry right into the fibers for that gorgeous botanical look that photographs beautifully. If you need a refresher on how to press flowers, this tutorial walks through several easy methods. Or, you can add them after with a little hot glue.
Step 9: Transfer and Dry the Paper
Carefully flip the paper onto a clean towel or piece of felt. Let it air-dry for 24 to 48 hours on a flat surface.
Tip from wendy’s craft room:
Do not iron seed paper or use a hair dryer. Heat will kill the seeds and ruin all your hard work.
Step 10: Trim or Tear the Paper to Size
Once fully dry, you can use scissors for clean edges or tear the paper by hand for a soft, deckled edge that’s perfect for handmade cards and stationery. The torn-edge look is my favorite. It has that lovely vintage paper-mill feel.

You might also love:
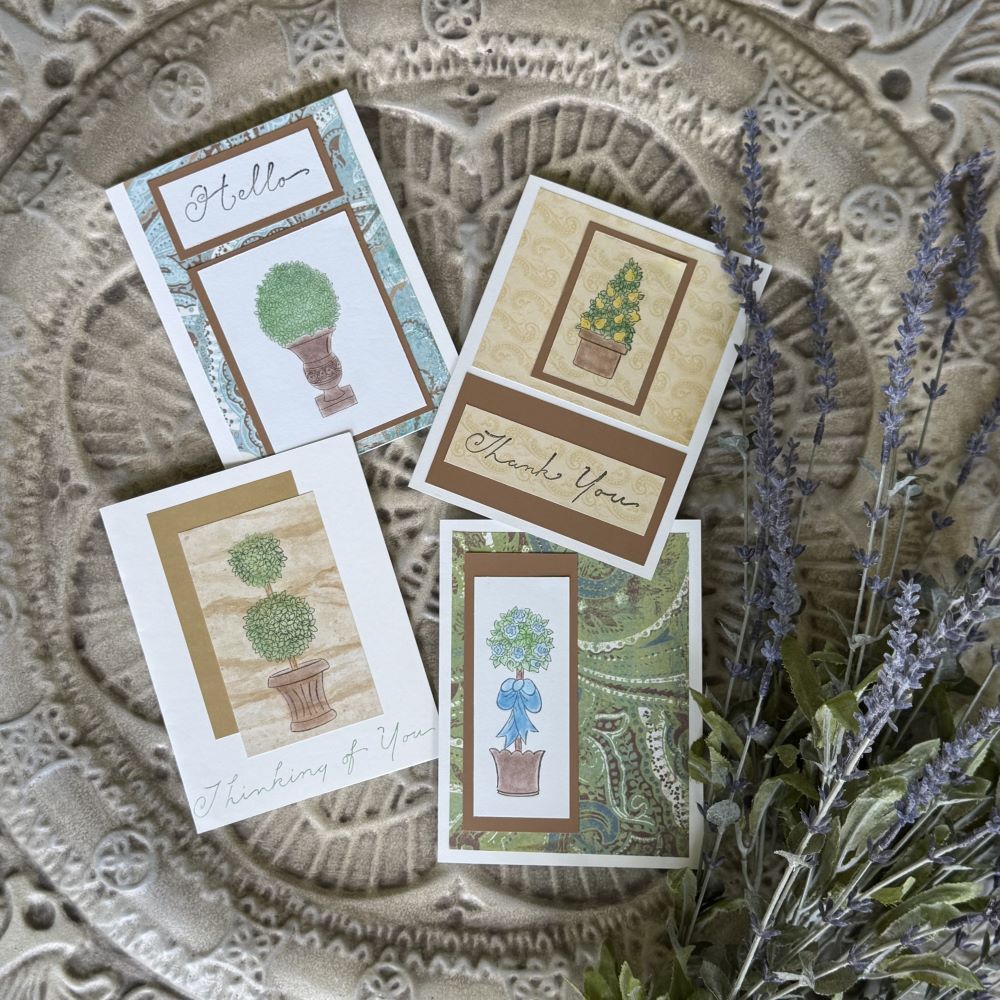
For another way to elevate your handmade cards, An Organized Season shares a stunning tutorial on Easy Handmade Cards with Stamps (That Look Like Art). She uses stamps and blending chalk to create cards so pretty they look more like framed artwork than greeting cards. Try the technique on your finished seed paper sheets for cards with that soft, textured background, worth saving long after the message is read.
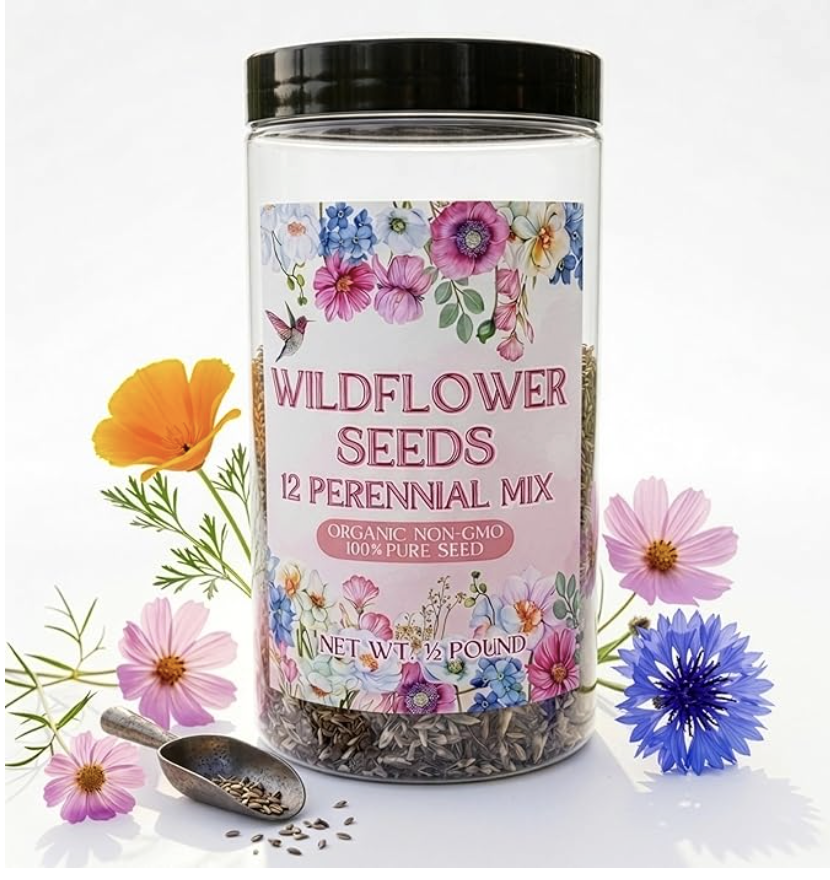
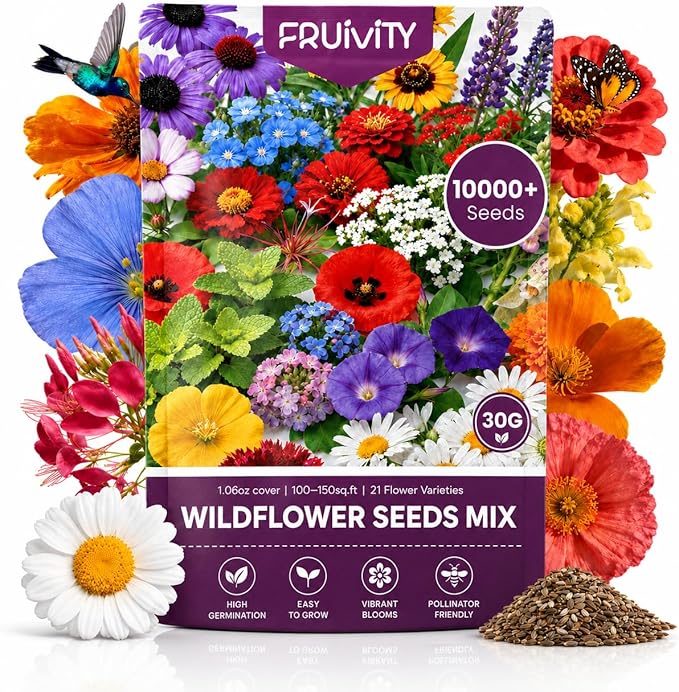
How to Choose Wildflower Seeds for Seed Paper
The type of seed you choose matters more than you might think. Small, easy-to-germinate seeds work best for wildflower seed paper. Large seeds like sunflower or zinnia are too heavy and won’t sprout reliably through the paper fibers.
Best wildflower seeds for seed paper:
- Forget-me-not
- Alyssum
- Snapdragon
- Poppy
- Chamomile
- Columbine
- Cosmos (small varieties)
- Bachelor’s button
If you’d rather make herb stationery, basil, dill, thyme, and oregano are all small enough to work beautifully, and make such a thoughtful gift for the cooks and gardeners in your life. For more flower variety inspiration, browse my list of the best perennial cut flowers for a cutting garden
Where to find good seeds for seed paper: Any garden center will carry small wildflower mixes. Look for blends labeled for pollinators or “container-friendly,” since those tend to have the smaller, lighter seeds you want. Bulk seed packets from nurseries or online seed companies are a more affordable option if you’re making a lot of paper. Just check the seed packet date. Fresher seeds give you better germination.
DIY Seed Paper
Equipment
- 1 Blender
- 1 Bowl
- 1 Mold and deckle (or a screen attached to a wooden frame)
- 1 Shallow tub or rimmed baking sheet
- 1 Sponge
- 1 Clean towels or felt squares
- 1 Roll of paper towels
Materials
- 1 cup recycled paper scraps torn into small pieces
- 3 to 4 cups warm water
- 1 to 2 tablespoons small wildflower seeds
- Pressed flowers or petals optional, for decoration
Instructions
Instructions
- Soak the torn paper scraps in warm water for at least 2 hours, or overnight.
- Add the soaked paper to a blender with fresh water. Blend on high until smooth and slurry-like.
- Pour the pulp into a shallow tub. Gently stir in wildflower seeds by hand. Never blend the seeds.
- Scoop or pour the pulp onto your screen, spreading it evenly. Shake gently to level the surface.
- Press firmly with a sponge to remove excess water. Add pressed flowers or petals on top if desired.
- Carefully transfer the paper to a clean towel and air-dry flat for 24 to 48 hours. Do not use heat.
- Once fully dry, tear or trim into cards, tags, or stationery shapes.
To Plant
- Place the seed paper on top of moist soil, cover with a thin layer of soil, water well, and keep moist. Sprouts appear in 7 to 14 days.
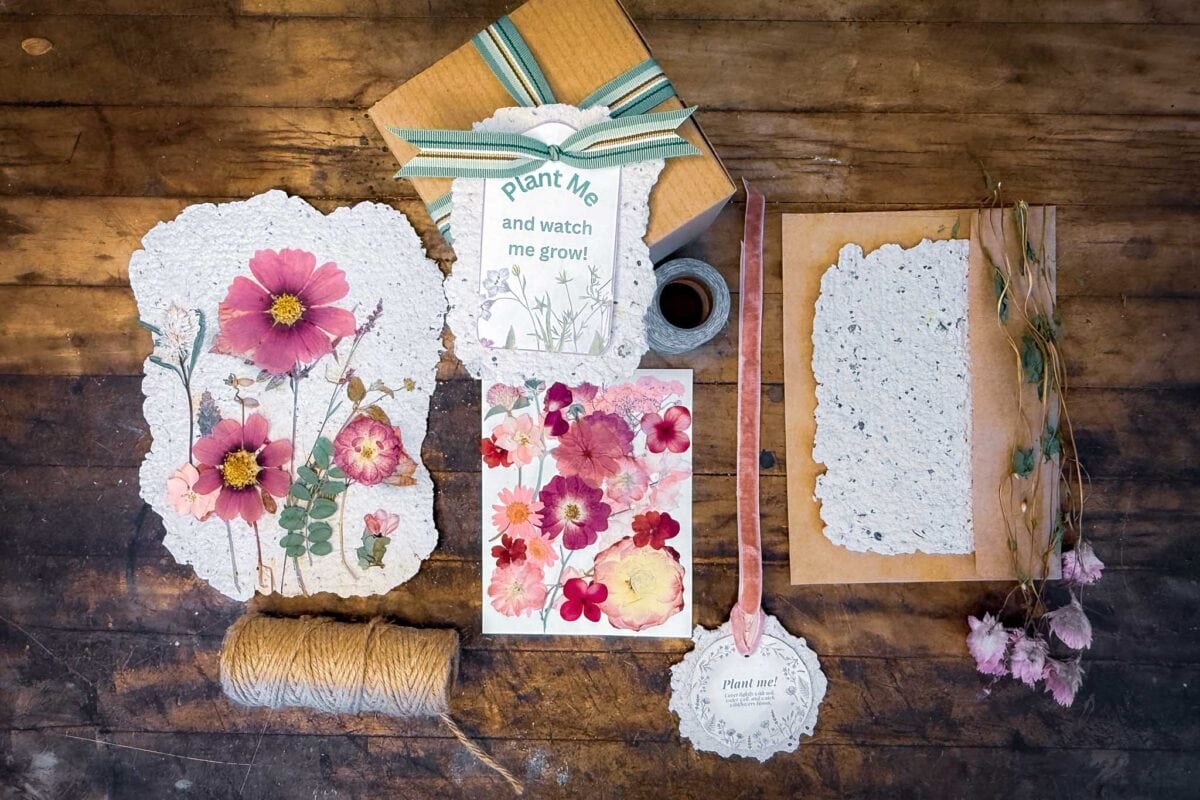
Creative Ways to Use Your Handmade Seed Paper
This is where seed paper gets really fun. Once you have a stack of beautiful sheets, the possibilities are endless:
- Handmade greeting cards: birthdays, thank-yous, just-because notes
- Gift tags: cut into small rectangles and punch a hole for twine
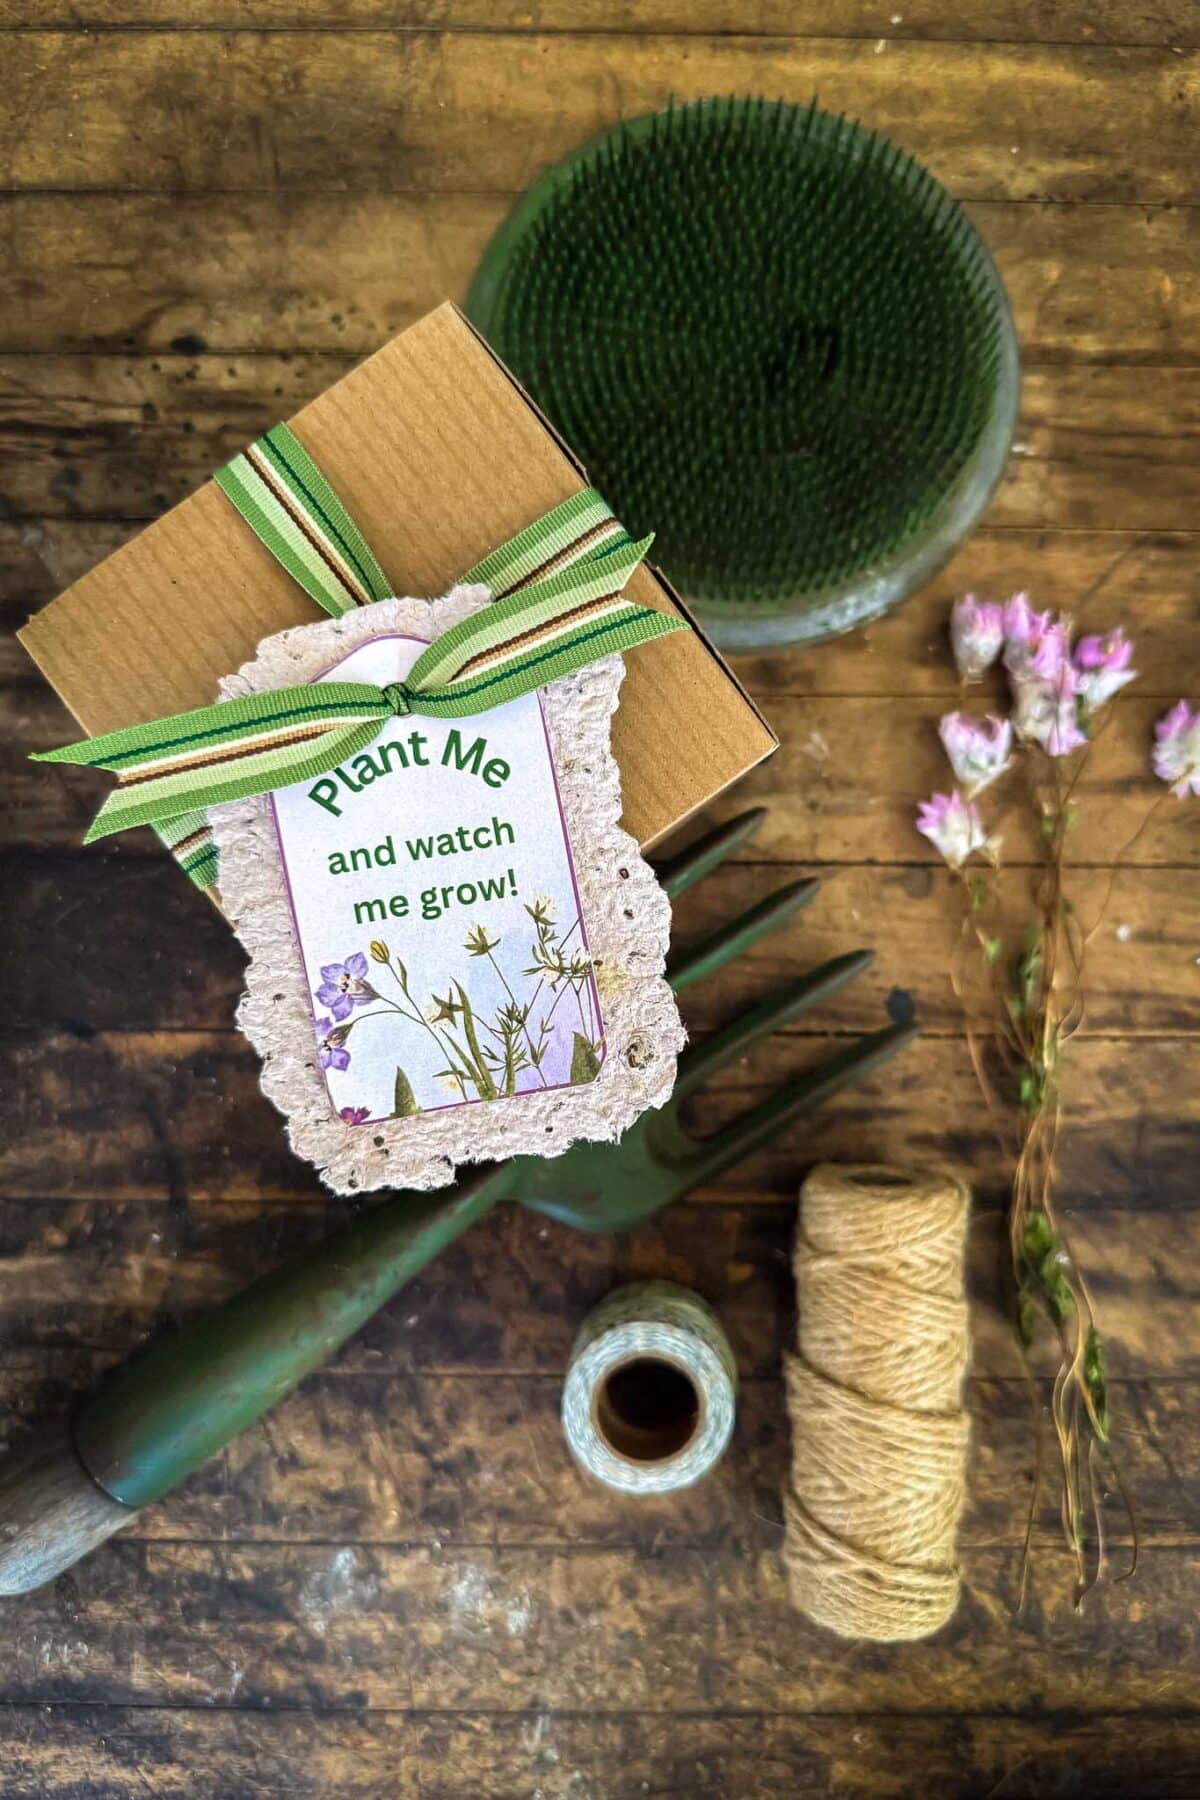
- Wedding favors: tie a small piece with ribbon and a “plant me” tag
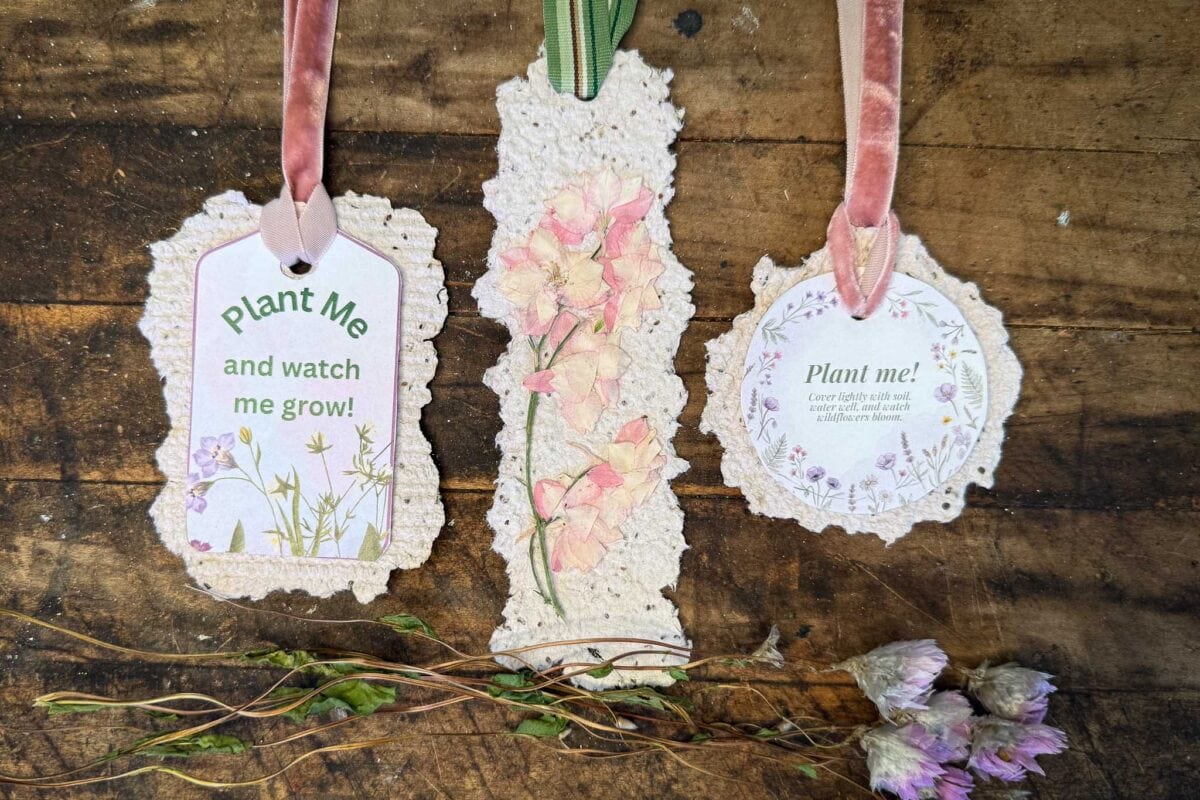
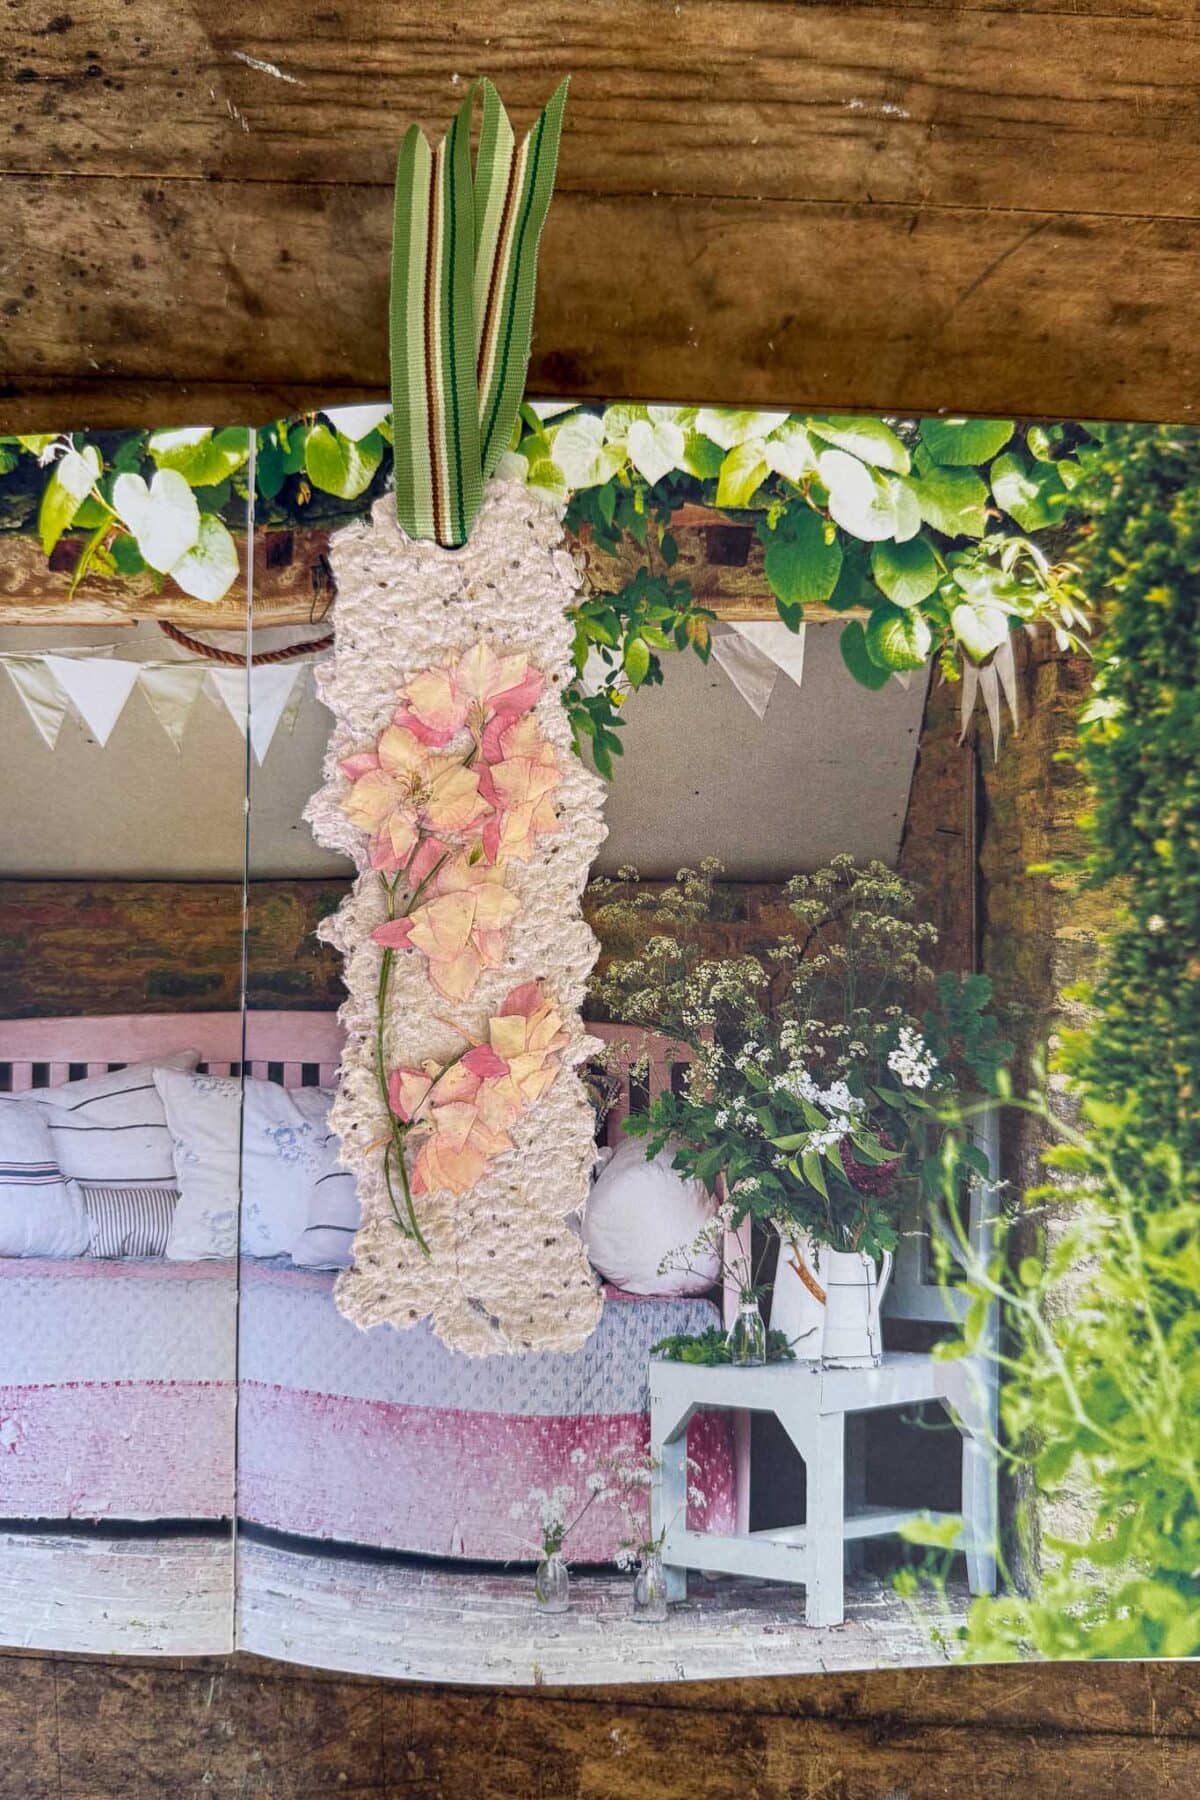
- Bookmarks: long rectangular pieces with pressed flowers
- Place cards: for dinner parties, bridal showers, or holiday tables
- Journaling ephemera: layer into junk journals and scrapbooks
- Thank you notes: especially lovely after garden parties or showers
- Botanical stationery sets: bundle a stack with twine and brown paper for a beautiful, giftable set
The deckled edges, soft texture, and visible flecks of pressed flowers make seed paper look effortlessly elevated, exactly the cottagecore-meets-vintage aesthetic that feels so right for handmade gifting.
You might also love:
If you want to take your handmade cards even further, South House Designs has a stunning tutorial on Handmade Cards to Hold Art. The card itself becomes a little frame around a tiny piece of original artwork or favorite photo, so your recipient gets both a card and a tiny keepsake to display. Pair this technique with seed paper as a textured backing layer behind the art for a card that gives twice: something beautiful to keep, and wildflowers to plant later.
DIY Seed Paper Mother’s Day Cards
If there’s one occasion practically made for plantable paper, it’s Mother’s Day. A handmade seed paper card gives twice: once when she opens it, and again when the flowers bloom in her garden weeks later.
To make a seed paper Mother’s Day card:
- Cut or tear a sheet of seed paper into a 5×7 rectangle.
- Decorate the front with vintage rubber stamps, hand-lettering, or a small pressed flower like I did.
- Pair with a kraft paper envelope and tie with twine for that botanical-stationery look.
- Write your message on a smooth liner sheet tucked inside (writing directly on seed paper can be tricky because of the texture).
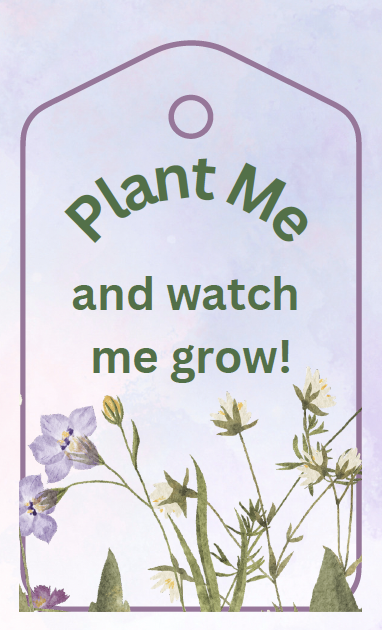
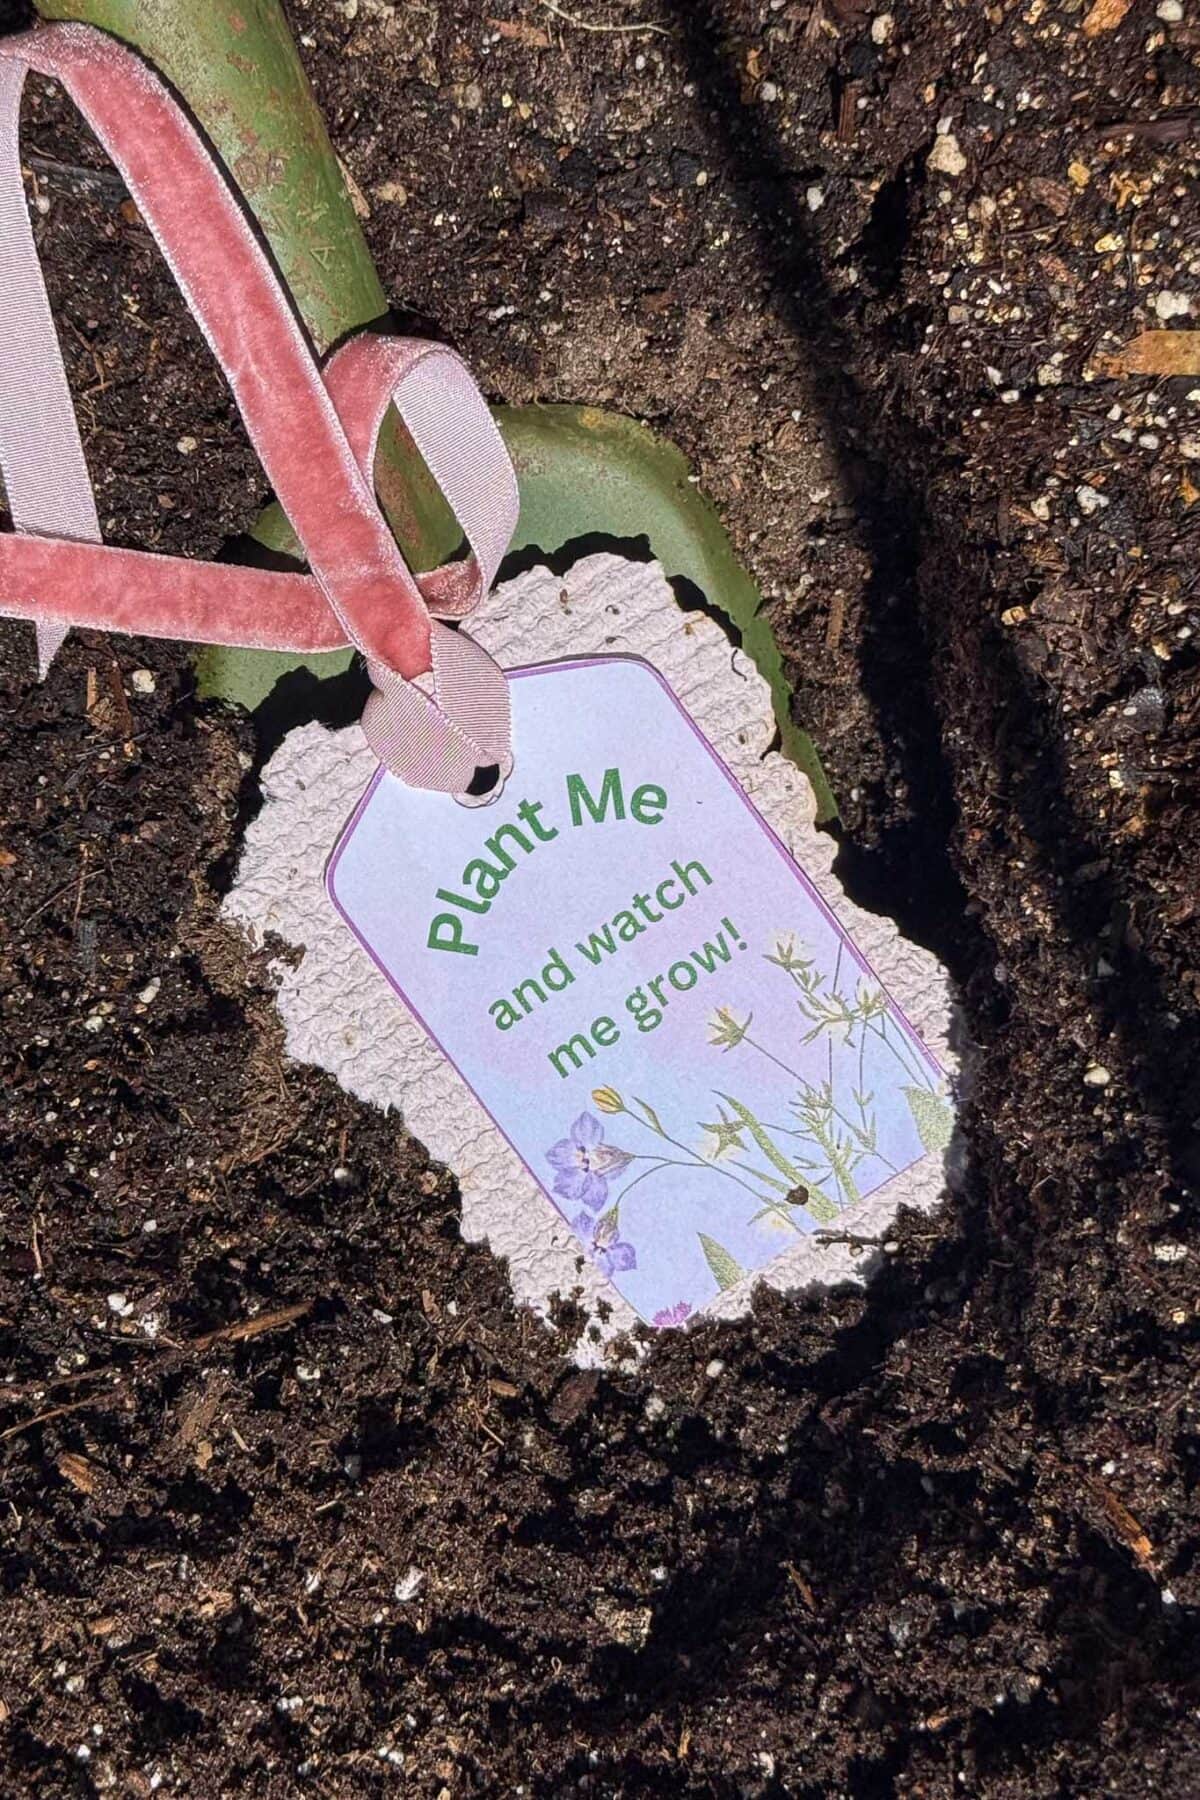
- Add a tiny tag with planting instructions: “Plant me! Cover lightly with soil, water well, and watch wildflowers bloom.”
It’s the kind of card that gets photographed before it gets opened, and remembered long after.
Free Download: Vintage “Plant Me” Gift Tags
To make your seed paper gifts even more thoughtful, I designed a set of free printable “Plant Me” tags in soft botanical colors. They’re perfect for tying onto Mother’s Day cards, wedding favors, gift tags, or stationery bundles.
You might also love:
For another thoughtful way to present a handwritten note, Sonata Home Design has a stunning tutorial on an Origami Envelope: The Flower That Holds a Handwritten Note. The cardstock folds into a beautiful paper flower that opens to reveal the message inside. Tuck a seed paper note into the envelope for a gift that unfolds twice: first into a flower, then into a garden when planted.
Making Seed Paper with Kids
This is genuinely one of the loveliest crafts to do with little ones, and a sneaky way to teach them about recycling, gardening, and patience all in one project.
A few tips for crafting with kids:
- Let them tear the paper. Kids love this part, and smaller hands actually do a great job of getting the paper into tiny pieces.
- Skip the mold and deckle. For little ones, scoop pulp into cookie cutters on a tea towel for fun heart, star, or flower shapes.
- Use brightly colored paper. Pink and yellow construction paper makes the finished sheets feel especially magical.
- Plant a piece together a few weeks later. Watching the sprouts come up is the best part, and the moment that turns the project into a real memory.
It’s a craft that easily stretches across two afternoons (one to make, one to plant) and gives kids something to look forward to.
You might also love:
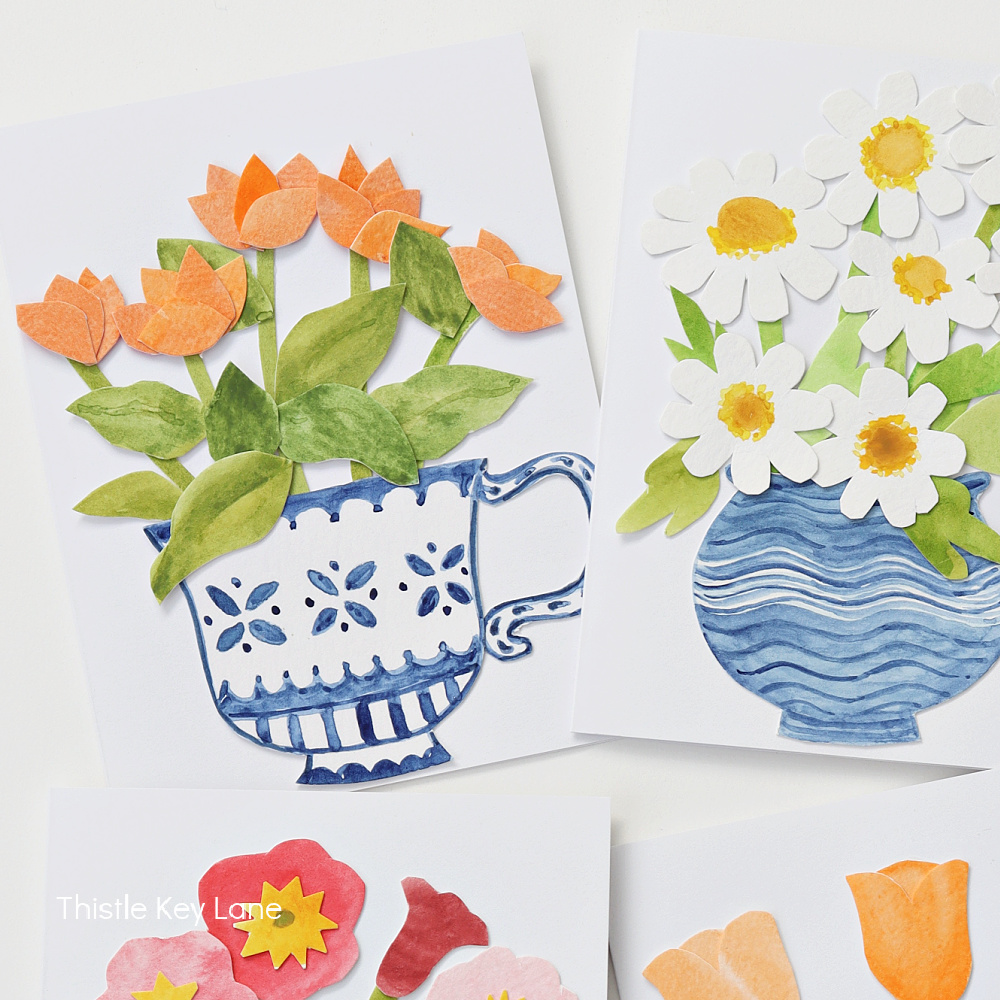
For another sweet way to dress up your handmade cards, Thistle Key Lane has a charming tutorial on Handmade Collage Note Cards. She layers cut paper flowers and leaves onto painted vases for arrangements that look like fresh-picked spring blooms. Cut your dried seed paper into petal and leaf shapes to try this technique with a plantable twist. The whole card becomes a tiny garden waiting to bloom.
How to Plant Seed Paper
When your recipient is ready to plant their paper, the process is similar to starting any seeds at home and couldn’t be simpler.
- Place the seed paper on top of a layer of potting soil, either in a pot or directly in a garden bed.
- Cover with a thin layer of soil, about an eighth of an inch.
- Water generously until the paper is thoroughly damp.
- Keep moist for the first one to two weeks while the seeds germinate.
- Place in a sunny spot and watch for sprouts in seven to fourteen days.
It’s such a sweet little ritual to share, especially with kids or grandkids who love watching things grow.
Storing Your Homemade Seed Paper
Seed paper is best used within six months for the highest germination rate. To keep your paper fresh:
- Store flat in a cool, dry place
- Avoid humid spots (skip the bathroom or sunny windowsills)
- Keep in an envelope or between sheets of parchment paper
- Don’t laminate or seal in plastic. The seeds need to breathe
You might also love:
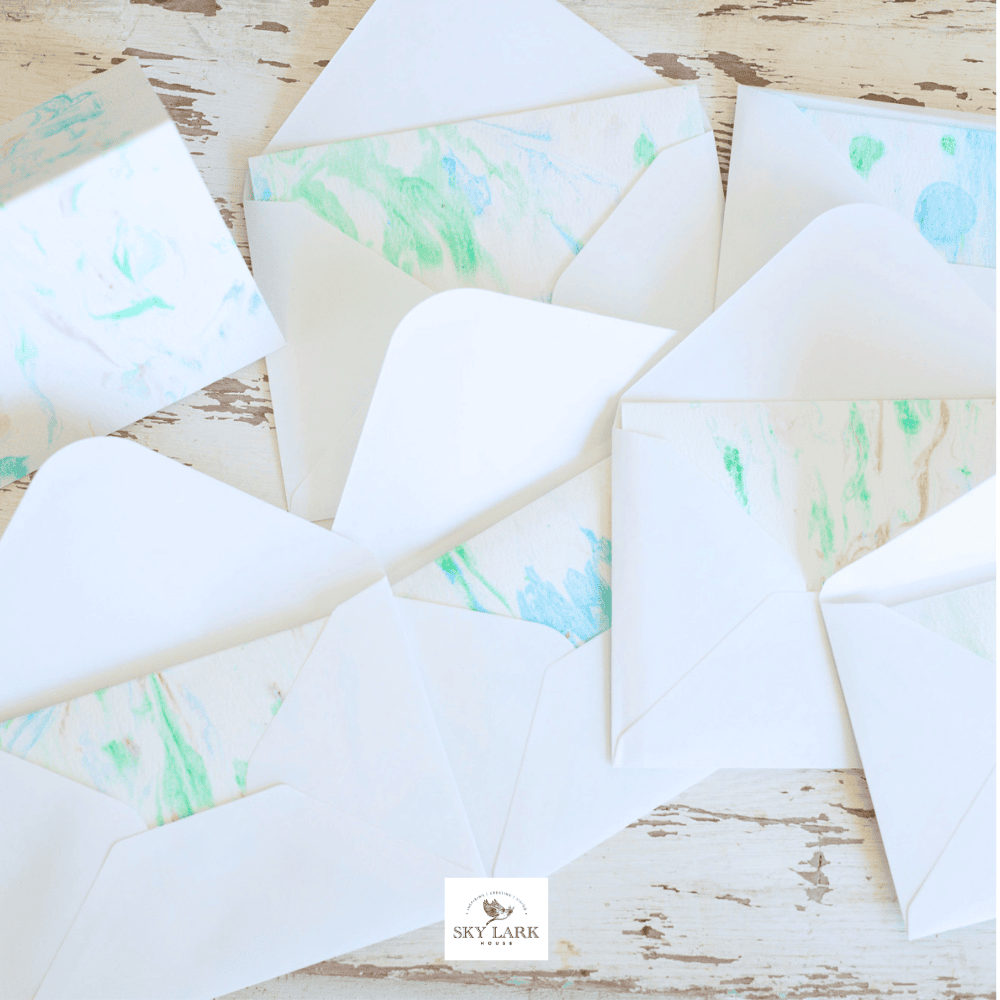
For another simple way to make beautiful handmade paper, Skylark House has a lovely tutorial on How to Make Handmade Marbled Cards Using Shaving Cream. The technique creates one-of-a-kind swirled patterns in any color palette using ingredients you already have on hand. Pair the marbled cards with your seed paper sheets for a giftable stationery bundle full of handmade character.
FAQ’s
Does soaking the paper start the seeds germinating?
This is the question I get most often. The short answer is no. Seeds need consistent moisture and warmth over several days to start germinating. The brief contact with damp pulp followed by air-drying happens too quickly to trigger that process. Once the paper is fully dry, the seeds go dormant again and stay viable until planted. Just be sure to dry your paper at room temperature with good airflow rather than letting it sit damp for days.
Can I write on seed paper with a pen?
Yes, but the texture is bumpy, so a felt-tip pen or marker works better than a ballpoint. For longer messages, I always write on a smooth liner sheet tucked inside the card.
Can I tint the paper with color?
Absolutely. Add a small amount ofnatural plant-based color to the pulp before pouring. Beet juice, turmeric, and red cabbage all create soft, lovely tones that feel beautifully vintage.
Why didn’t my seed paper sprout?
There are three usual culprits: the seeds were blended, the paper was exposed to heat (ironing or hot sun), or the paper is older than six months. Always air-dry and use your paper within half a year for best results.
Can I sell handmade seed paper?
Yes, it’s actually a popular small-shop item. Just be sure to label your paper with the seed variety and clear planting instructions.
What kind of paper works best?
Soft, uncoated papers blend into the prettiest pulp. Construction paper gives you the richest color, tissue paper makes a more delicate sheet, and printer paper produces a clean, neutral base. Mix and match for different effects.
Closing Thoughts
There’s something so lovely about making something with your hands that’s meant to grow. Whether you’re tucking these into Mother’s Day cards, dressing up a dinner party with botanical place cards, or building a stack of handmade stationery just because, this is one of those projects that feels just as good to make as it does to give.
And don’t forget to grab the free printable “Plant Me” gift tags to finish off your seed paper bundles. They take the whole project from sweet to swoon-worthy.
Happy crafting, friends.


Did you make this craft?
We would love to see what you have created, so mention us @wmdesignhouse or tag us using #wmdesignhouse so we can see your creations!
More about me!

Hello, I’m Wendy – a dedicated homemaker with a deep passion for decorating, gardening, cooking, and crafting. I find joy in harmonizing beautiful elements to fashion a space that is both comfortable and inspiring. I will help you create a beautiful home, one project at a time.

This is great! I’m pinning it for a grandkid project later.
Thank you also for including my marbled stationary post in the “You might also like” section of your post!
Hi Wendy – I love this idea for wedding invitations. It’s such an environmentally friendly idea AND can result in beautiful flowers the following spring. I also love how you pressed real flowers into the seed paper. Super creative and inspiring!
Thank you so much Anna! It was a very fun project even though it took me a while to get the hang of it. But once you do, it is easy sailing.
Wendy, your seed paper is so beautiful! I wish I was hosting a party just so I could turn the paper into favors. What a fascinating project. I can’t wait to try it!
Thank you Michelle! It was so fun to make, and I cant wait to plant some and see the seeds bloom!
Hi Wendy! I love learning new things, and I had no idea there was such a thing as seed paper that you can plant! Each creation is so pretty, and you are so nice to include the printable tags! Such a unique and fun project that makes a perfect gift!
Thank you Donna! Its a great way to re purpose a lot of paper that goes into the trash! and the seeds add that extra special touch.
These handmade seed papers are SO pretty! Anybody, gardener or not, would be thrilled to receive such a pretty gift. I love all of the beautiful flower designs that you created and am obsessed with the bookmarks! Great project, Wendy!
Thank you, Missy! I had so much fun dreaming up different ways to use the seed paper. I think I may need to host a little party and invite all of you over so I can send everyone home with a piece of seed paper to plant in your garden. 🌱💕
Sooo beautiful! And who better to share seed paper than you!!!!
I’m embarrassed to admit, I’ve never thought about planting seed paper I’ve received in a pot. That would be perfect!
Thank you Diane, you know I have gardening on my mind this time of the year! :)))