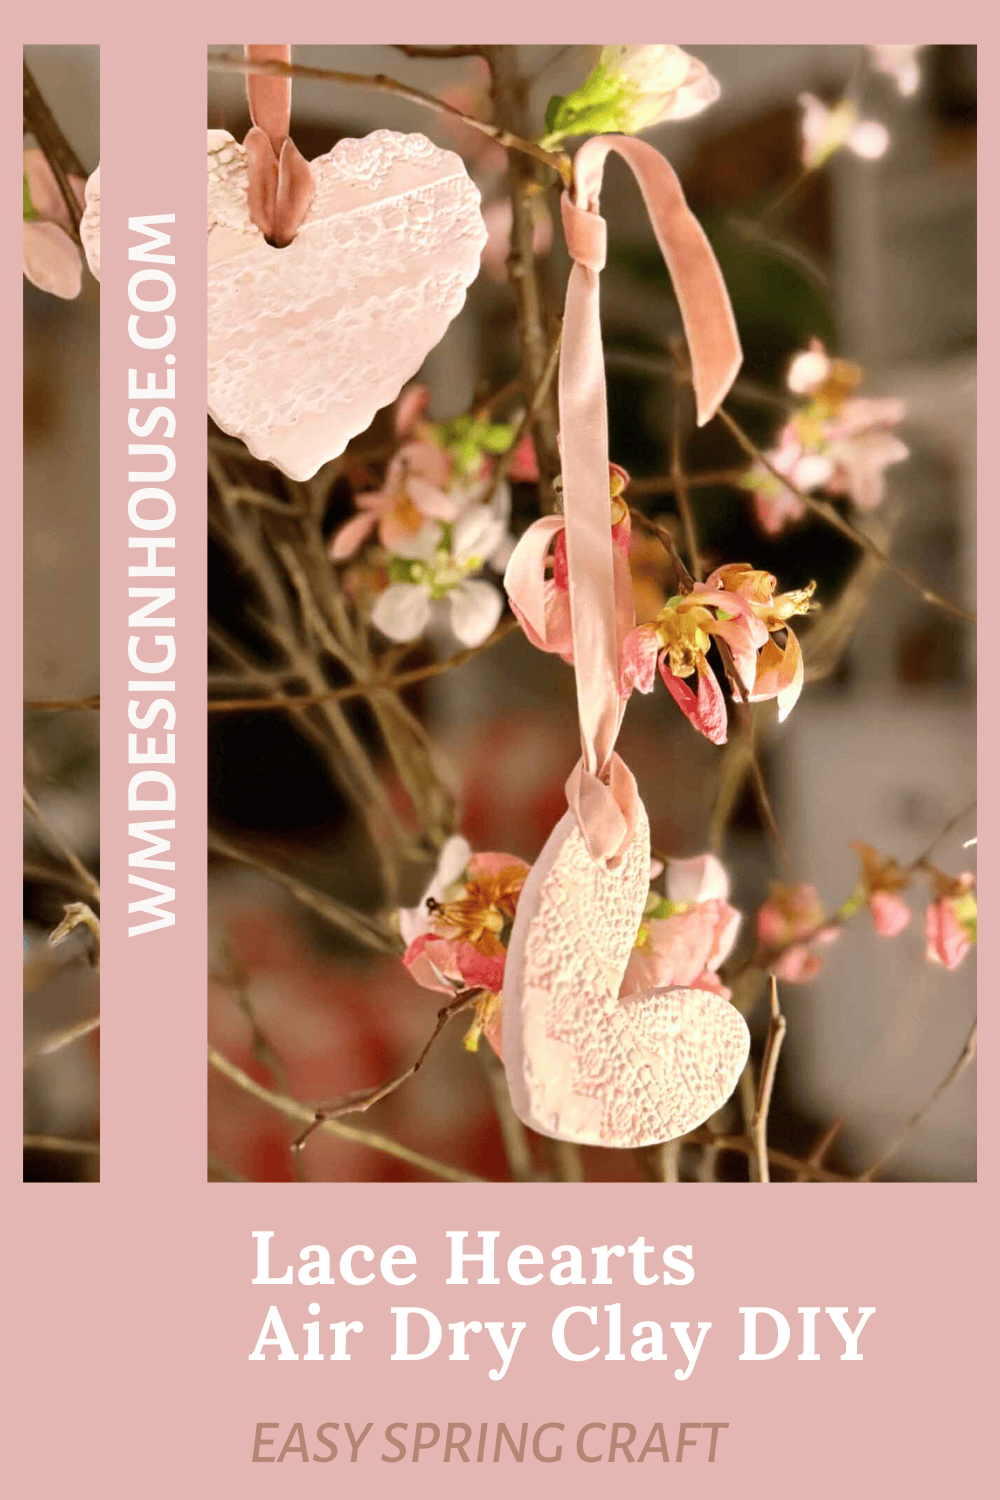
Lace Hearts: Air Dry Clay with a Vintage Imprint
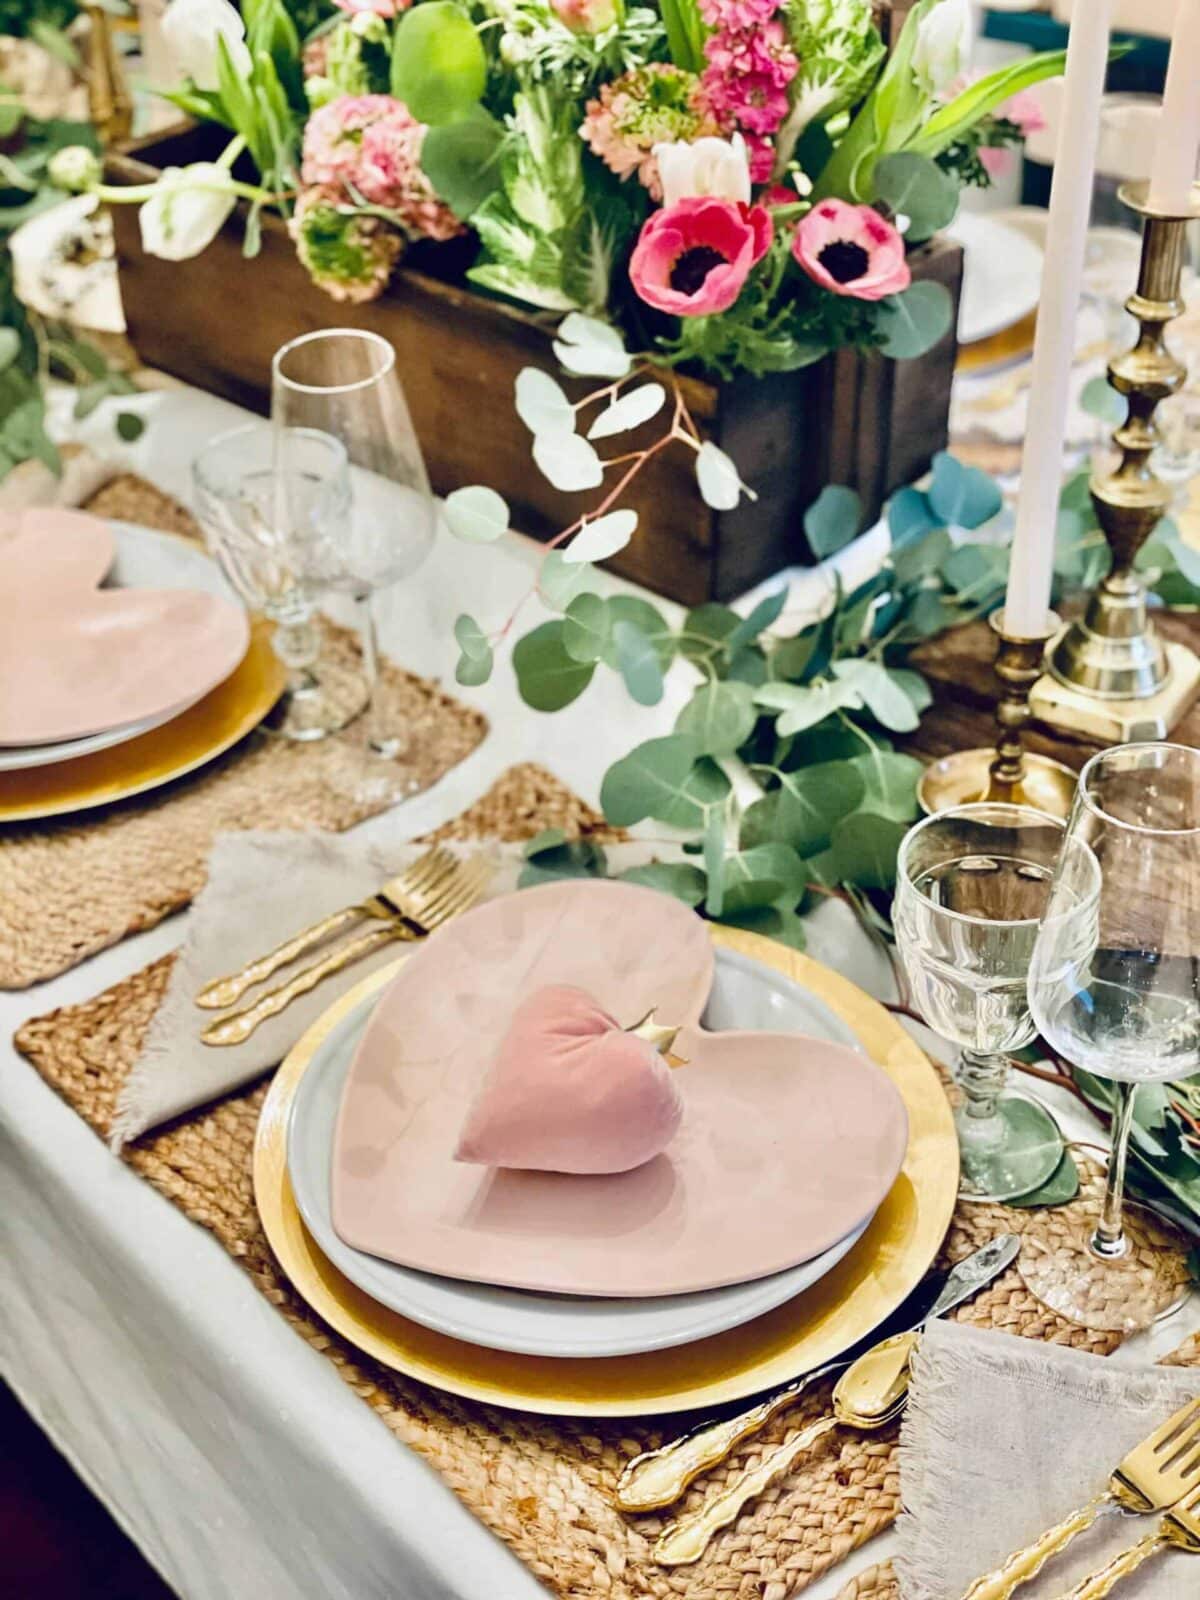
I’ve been thinking about my Valentine’s Day table lately and realized I didn’t want anything overly glittery this year. I kept coming back to something soft, neutral, and a little bit vintage — so I decided to make lace hearts using air dry clay and pieces of vintage lace.
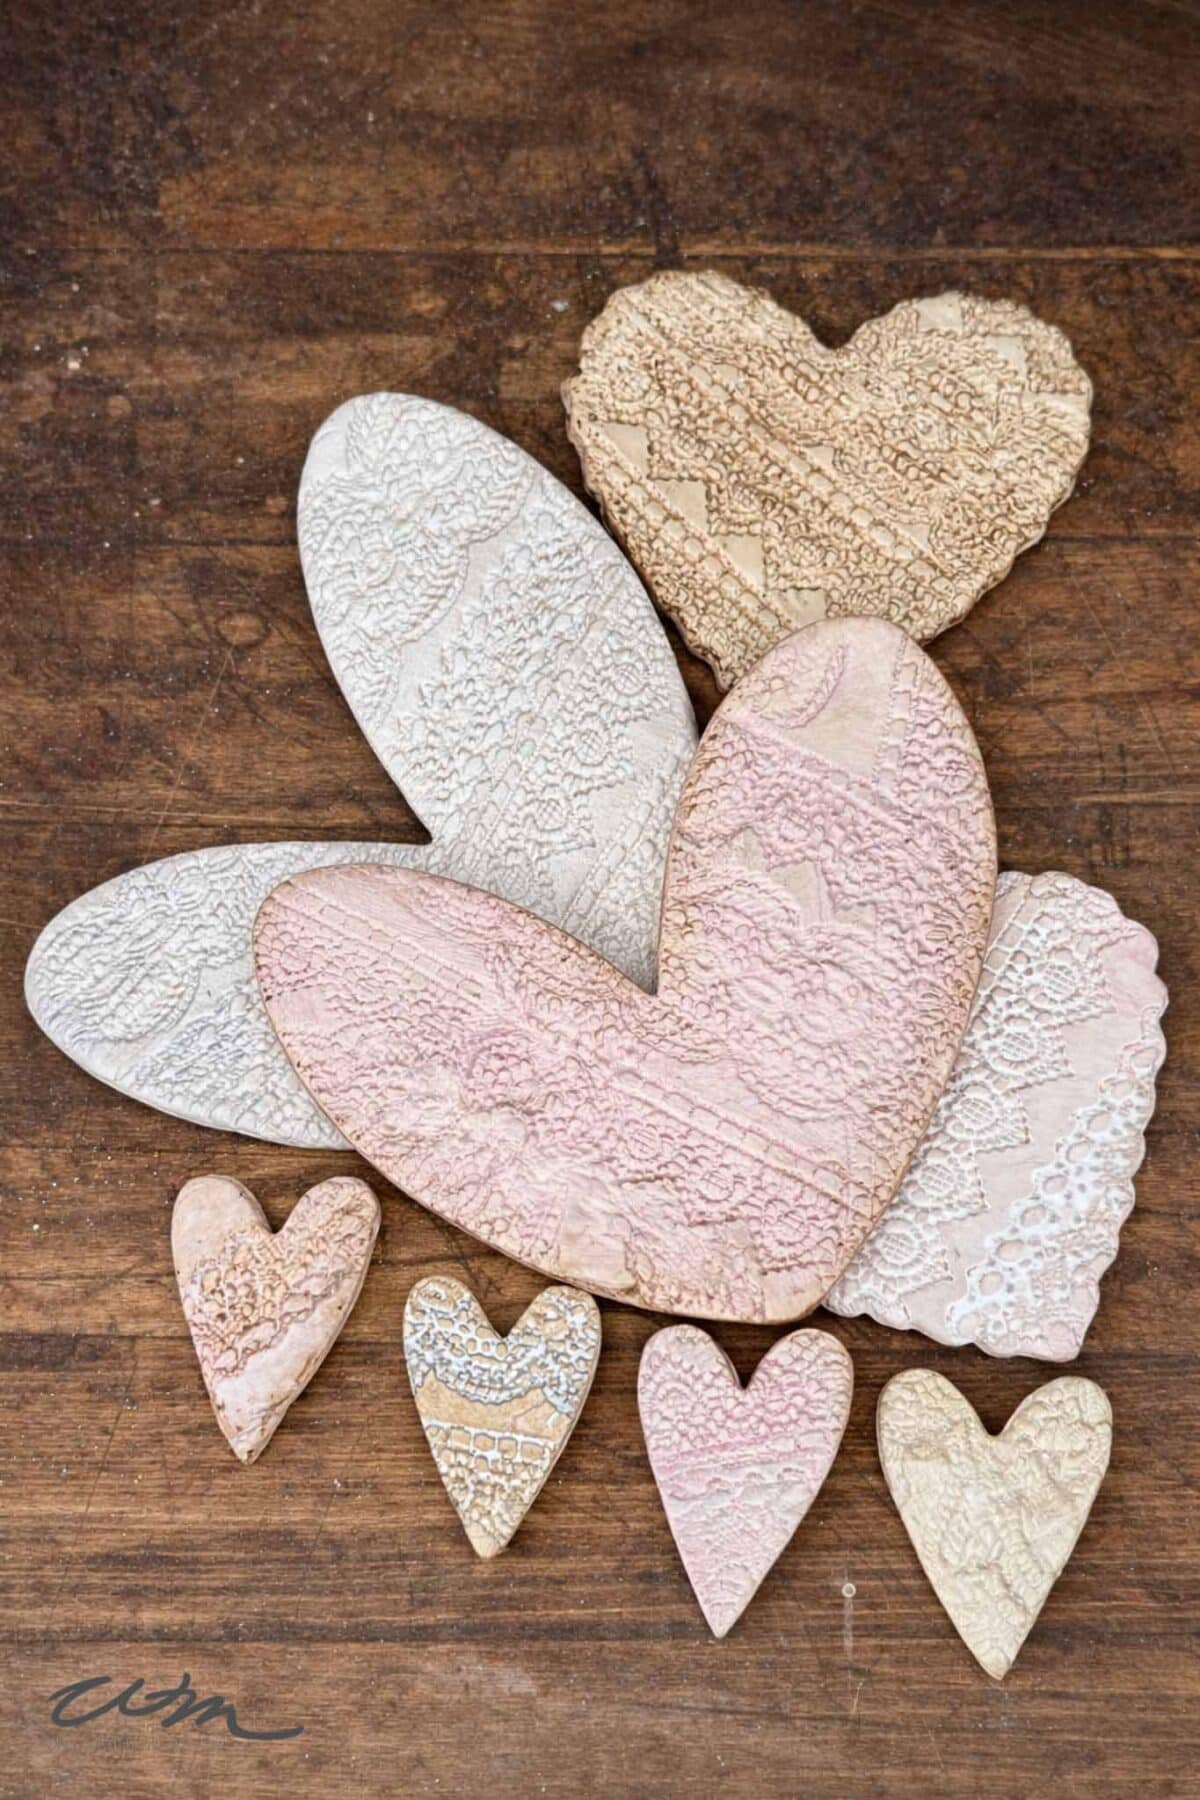
These lace hearts are simple clay hearts embossed with lace, and they add just enough texture to make a table feel thoughtful without being overdone.
This month’s Handcrafted Society theme is lace, and that felt like the perfect excuse to experiment. One little test turned into a whole collection of textured lace hearts drying on my counter.

On my blog WM Design House, I may sometimes use affiliate links, which means a small commission is earned if you purchase via the link. The price will be the same whether you use the affiliate link or go directly to the vendor’s website using a non-affiliate link. Read my full disclosure policy here.
Today is our very first Handcrafted Society post of 2026, and I’m so happy to be back sharing creative ideas with you again.
At the end of this post, you’ll find all of the other Handcrafted Society projects. I hope you’ll take a minute to visit each one and see the beautiful ways everyone used lace this month.
Why I Love Decorating with Lace Hearts
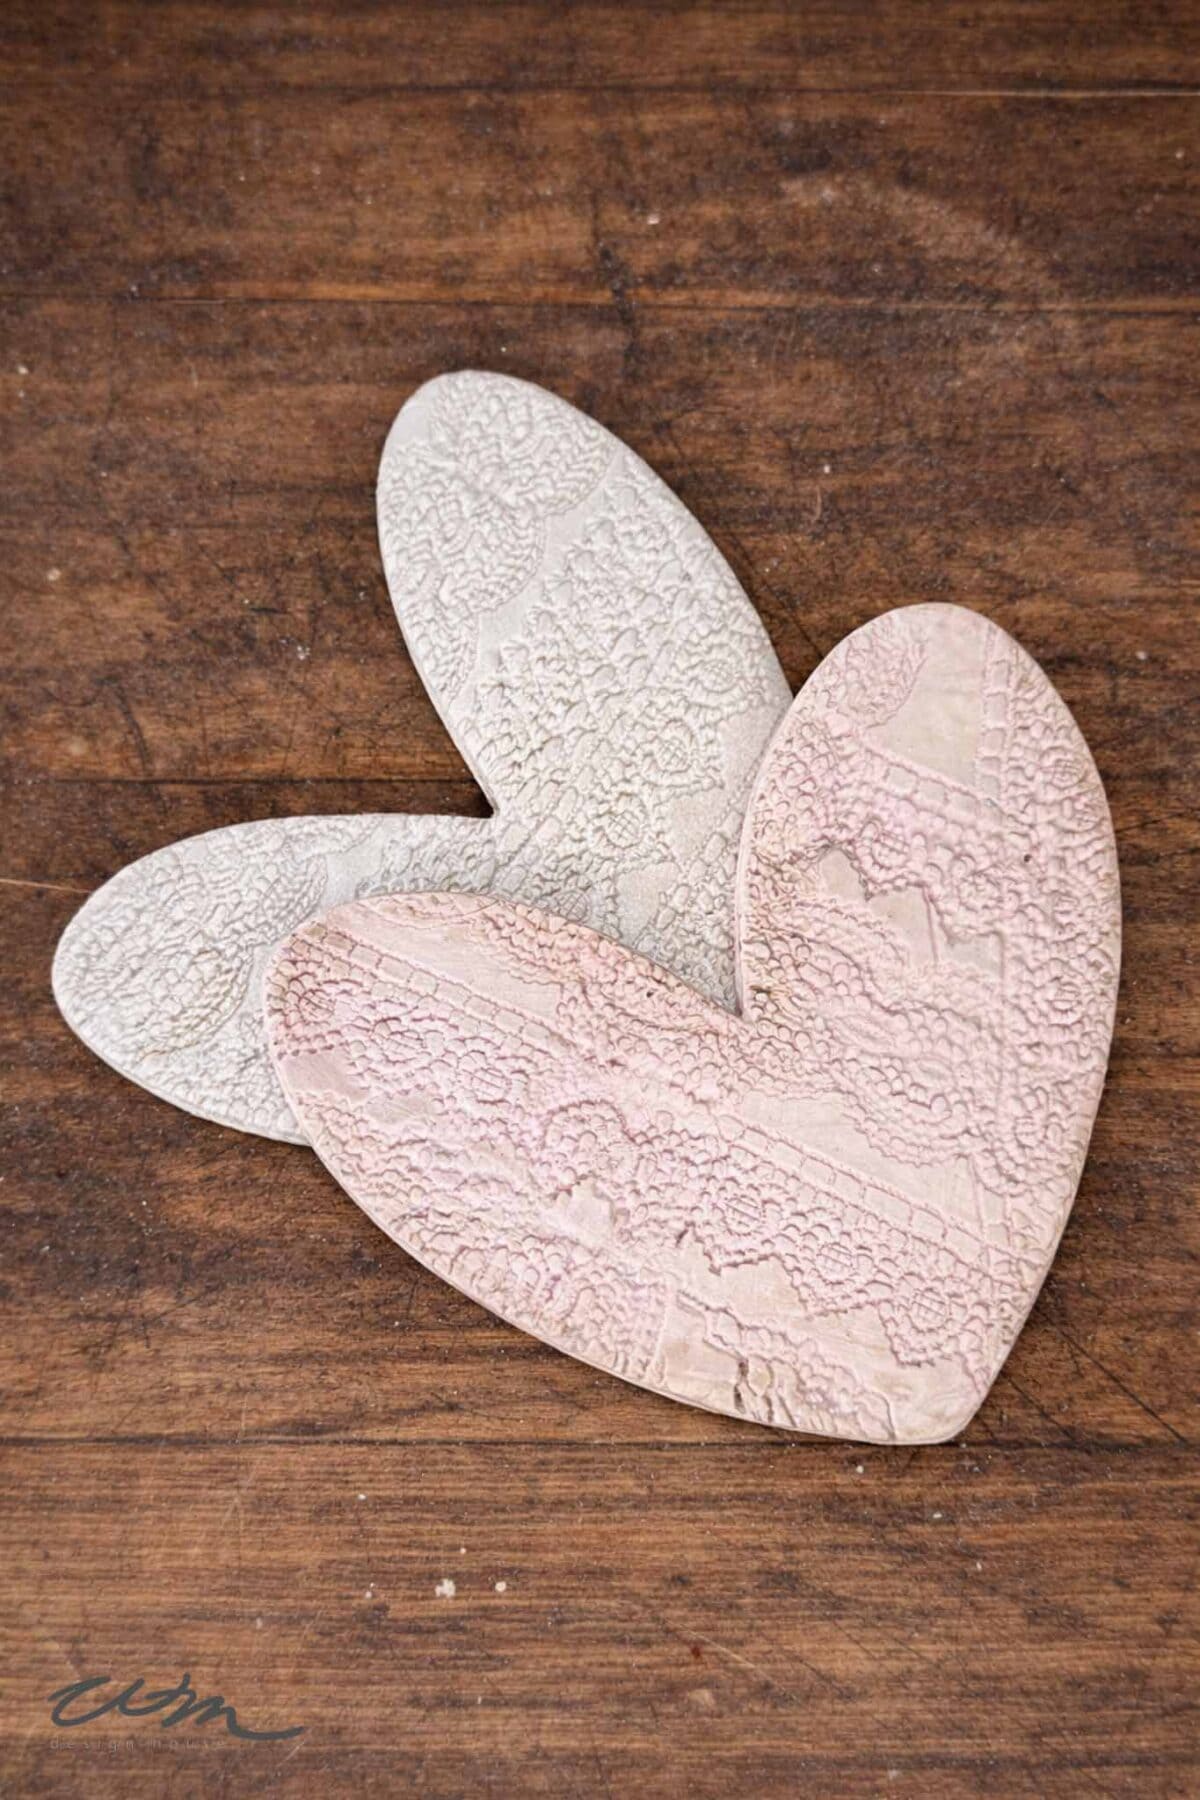
There’s something special about combining clay and vintage lace. The clay gives you that soft, chalky finish, and the lace imprint adds detail without being fussy.
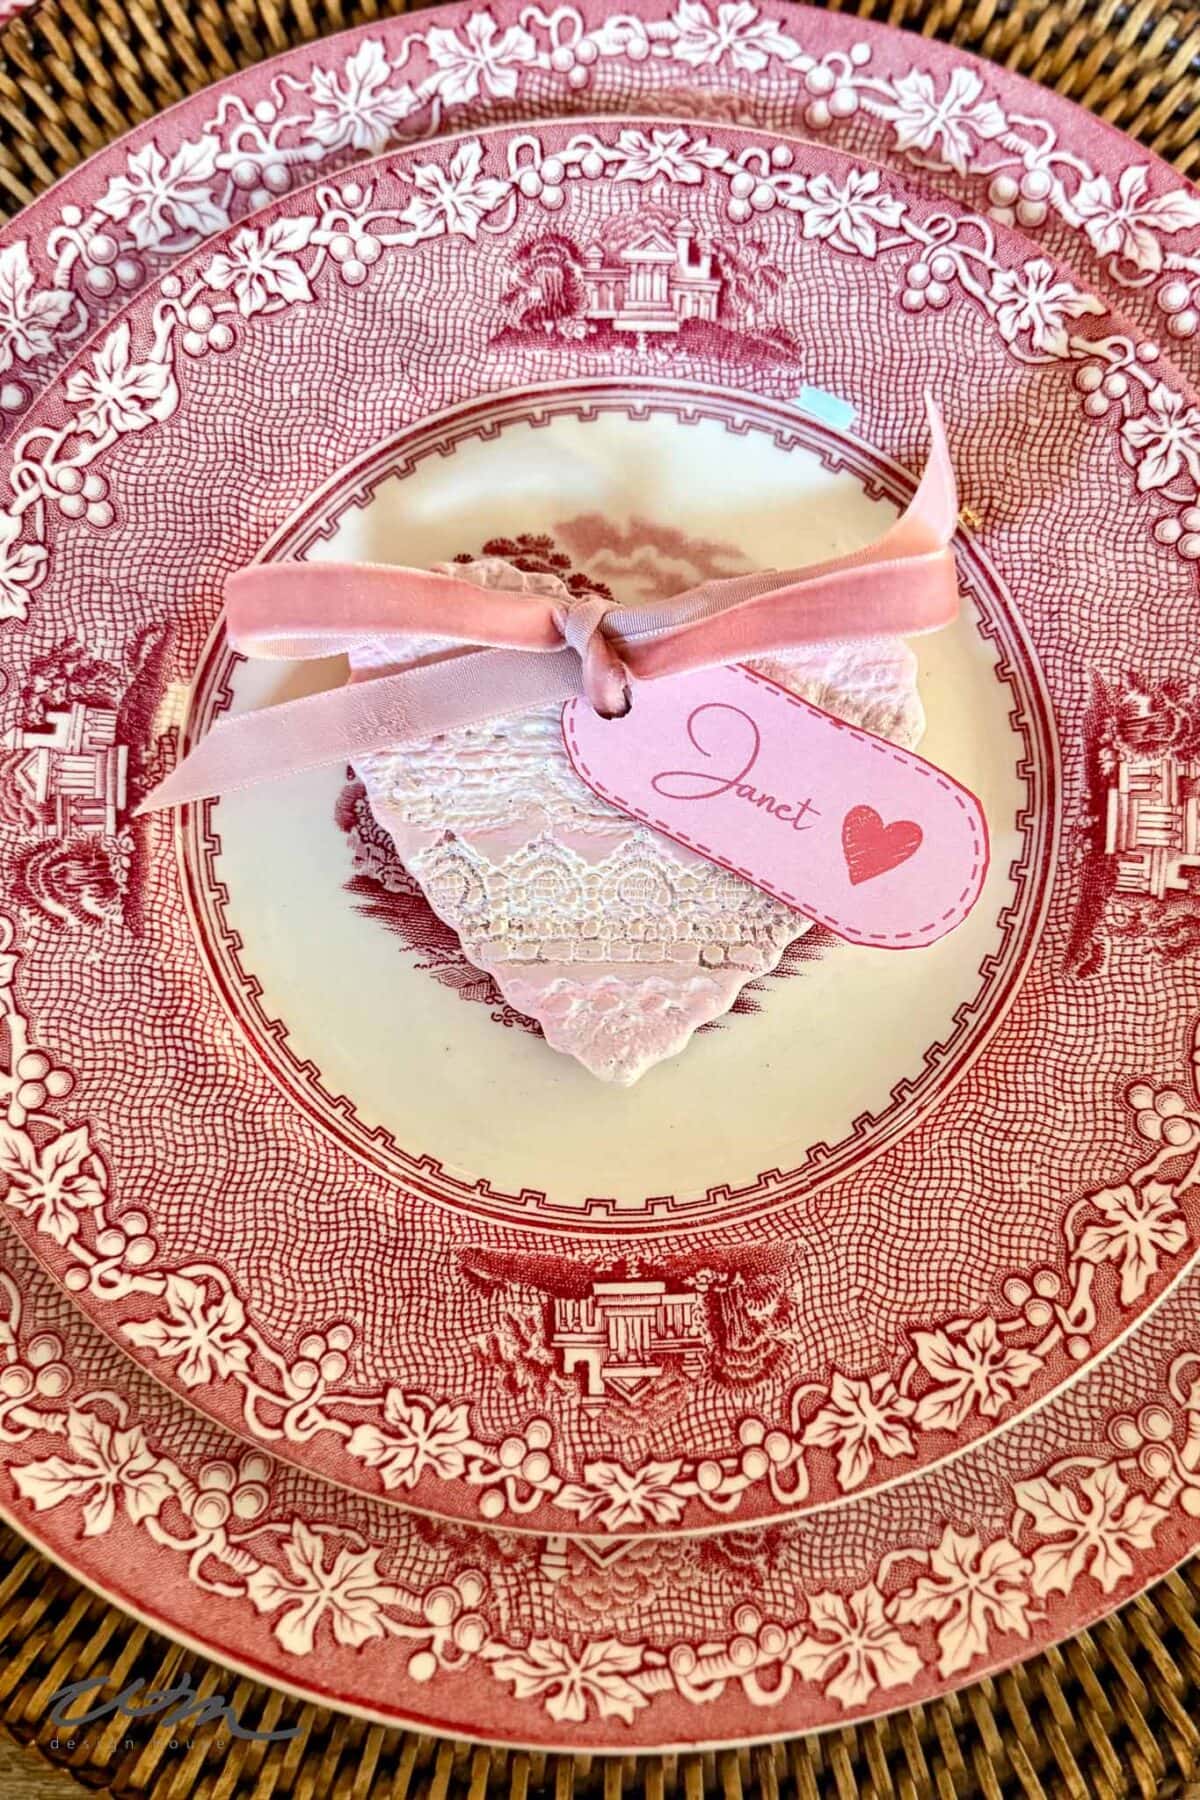
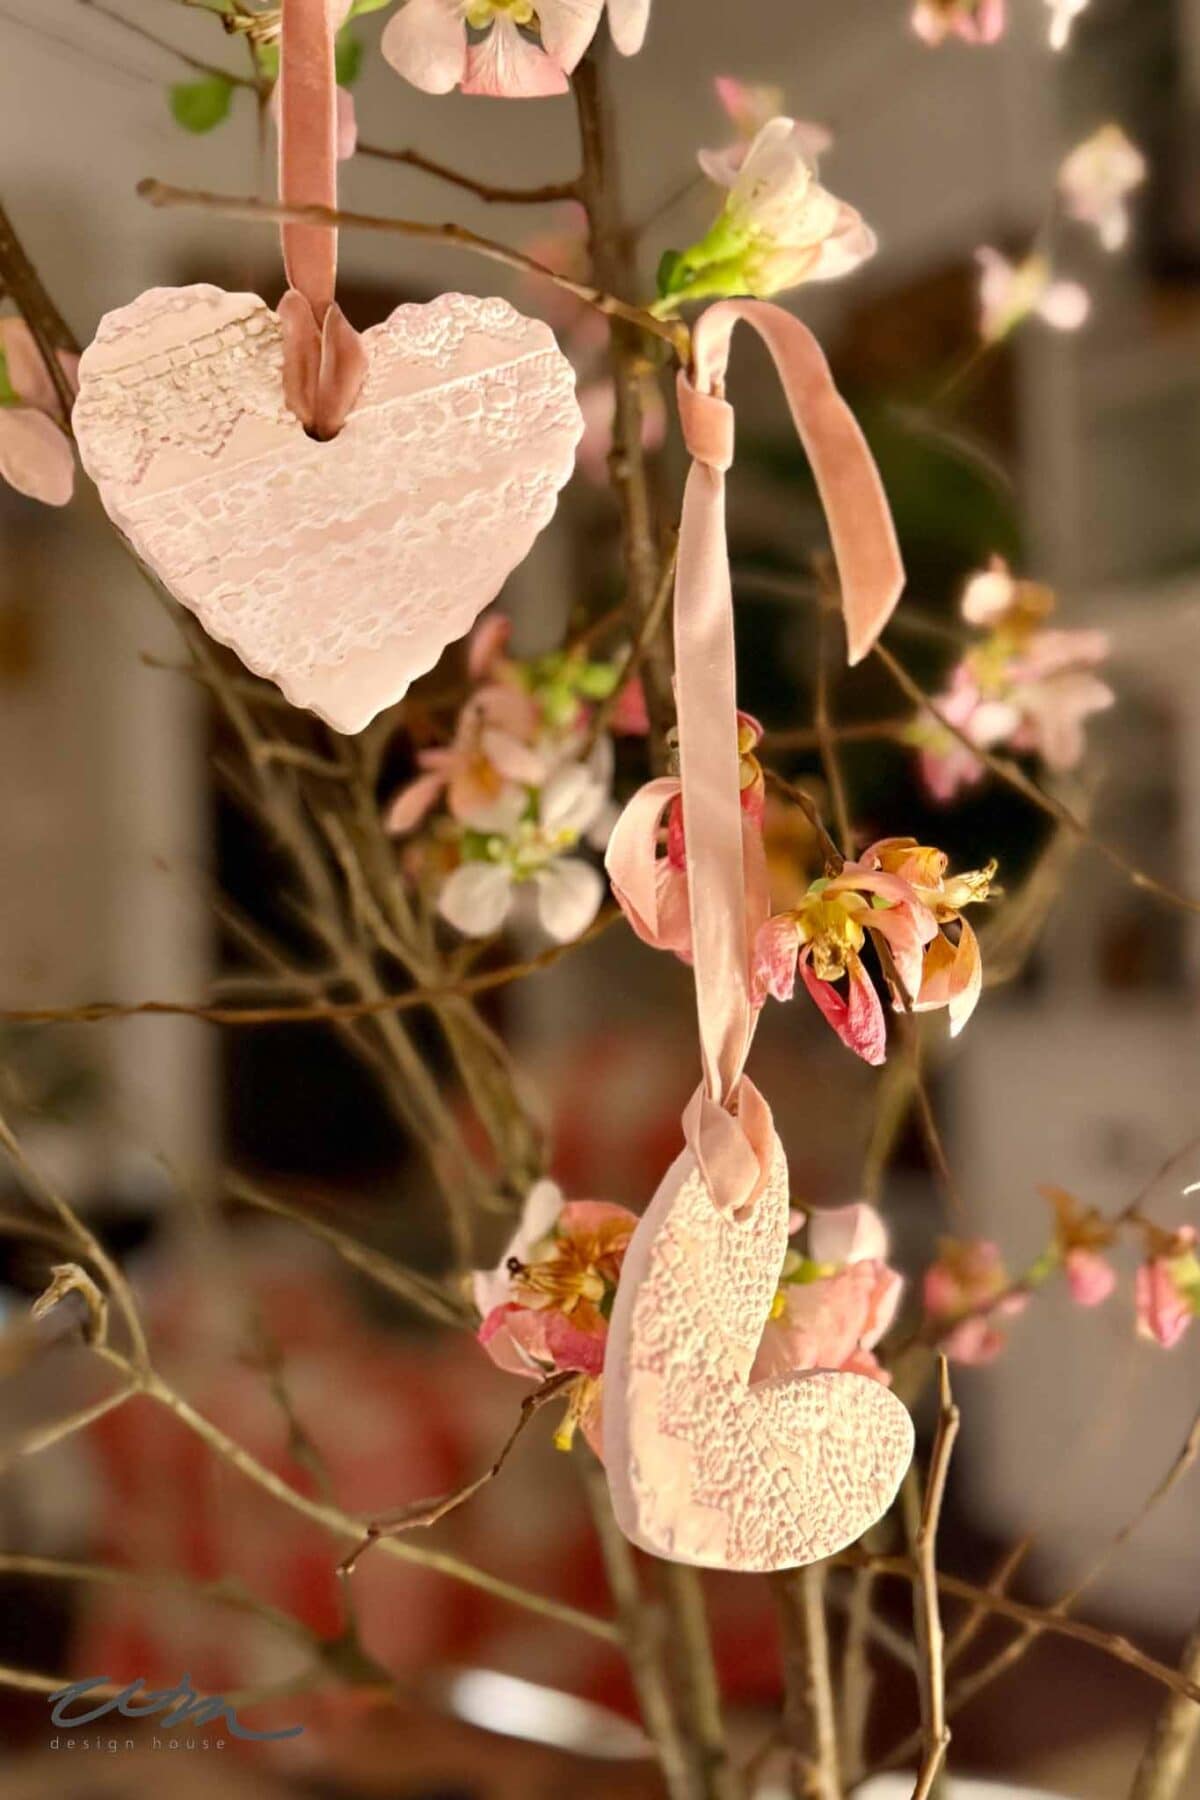
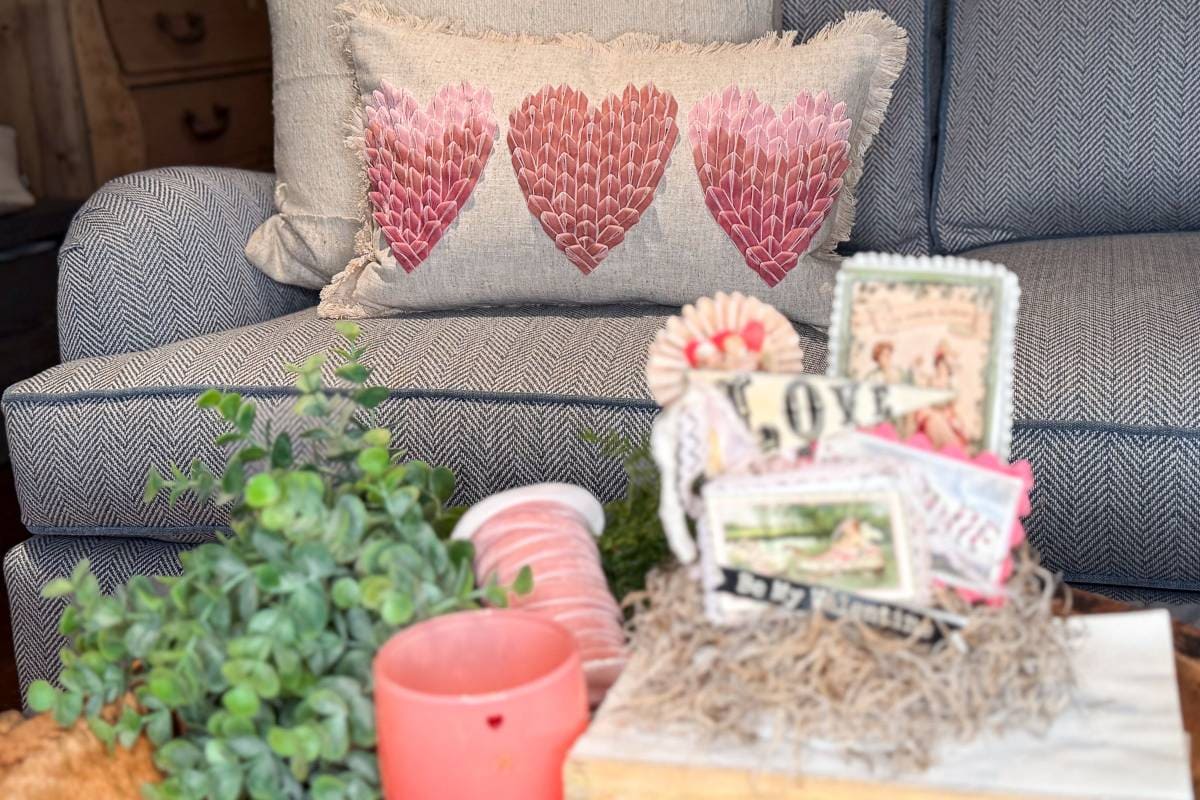
These aren’t flashy Valentine decorations. They feel more collected — almost like something you’d find tucked inside an old sewing basket. That’s exactly the look I wanted for my table this year.
They were the perfect handmade detail to add to my Valentines tablescape without making it feel overly styled.
If you’re looking for a more traditional dinner table setup, I shared a simple and easy Valentine table decorating idea here.
Because they’re neutral, they work beyond Valentine’s Day too. You can use lace hearts in spring decor, for bridal showers, or even as handmade gift tags.
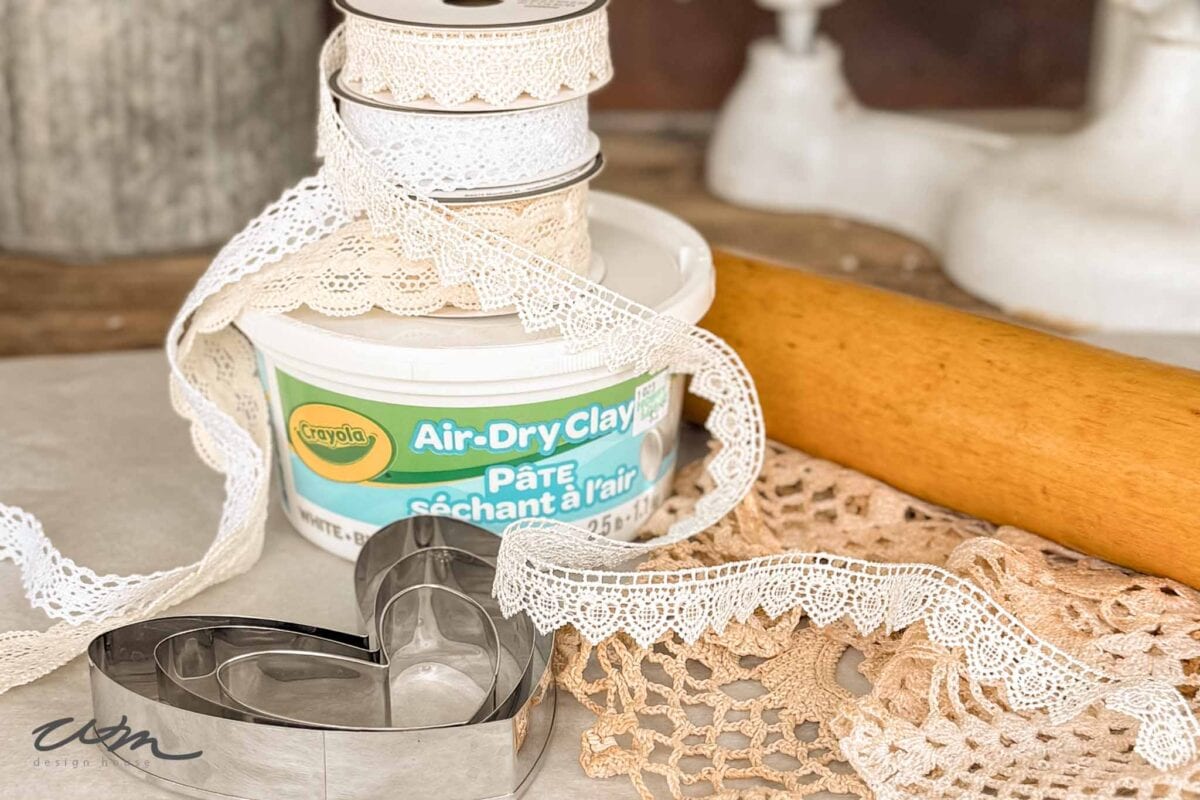
What You’ll Need to Make Air Dry Lace Hearts
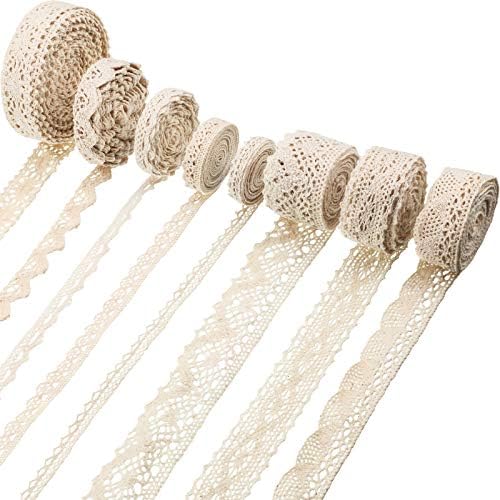
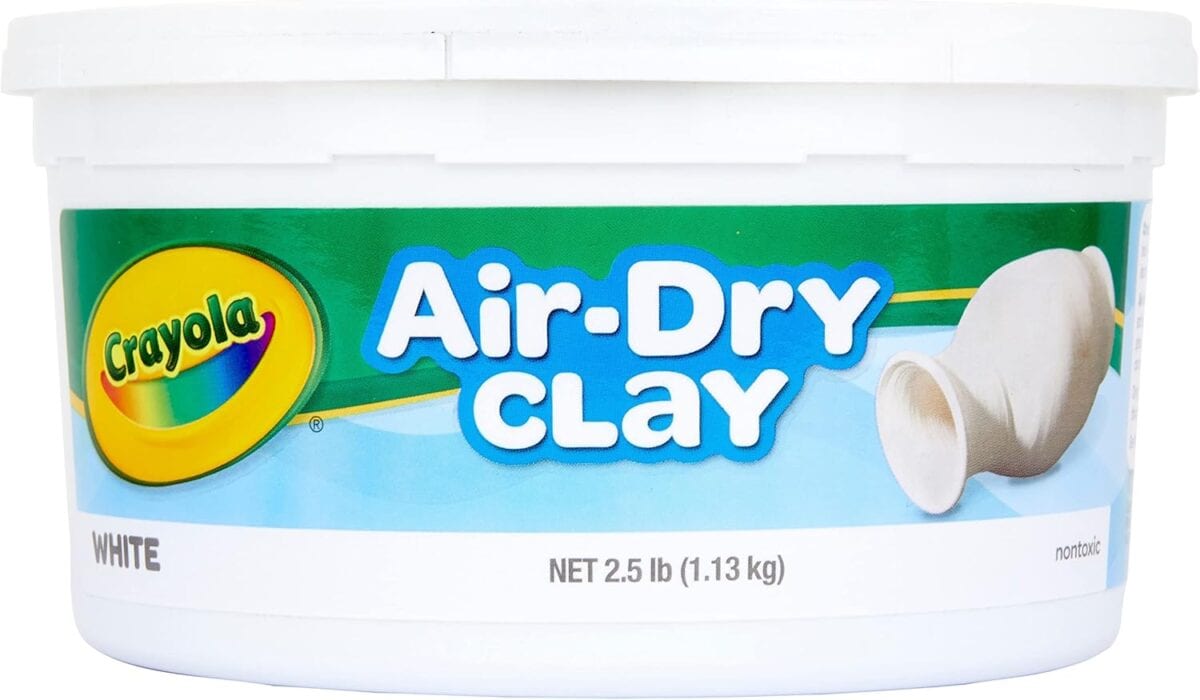
To make these lace hearts, you only need a few simple supplies and some lace you may already have on hand. I used a 2.5 lb tub of Crayola air dry clay, but any white air dry clay will work. The lace is what gives these hearts their beautiful texture, so pull out vintage doilies, lace ribbon, or even small scraps of heart lace fabric.
Supplies:
- White air dry clay (2.5 lb tub makes plenty)
- Lace ribbon or vintage lace doilies
- Heart-shaped cookie cutters
- Rolling pin
- Parchment paper
- Pen or straw (optional, for hanging)

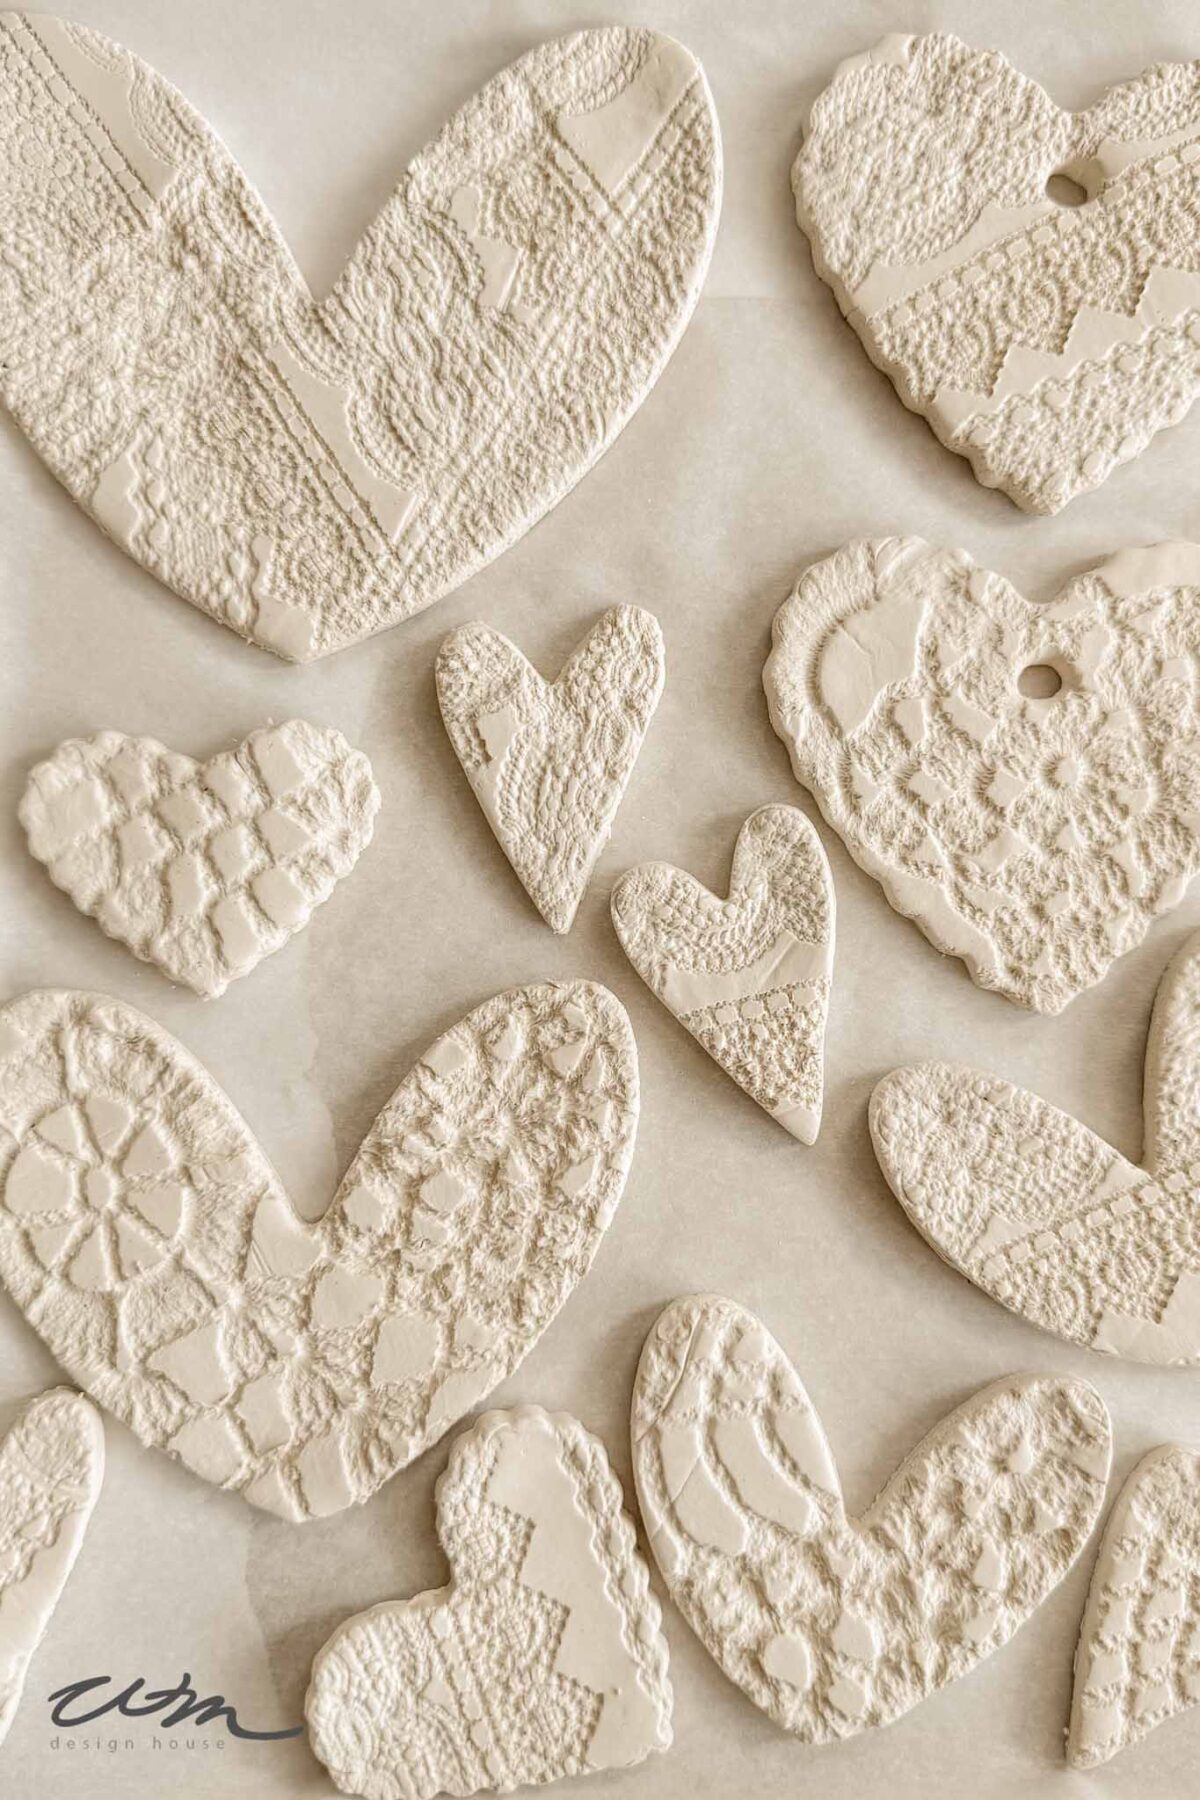
How to Make Lace Hearts with Air Dry Clay
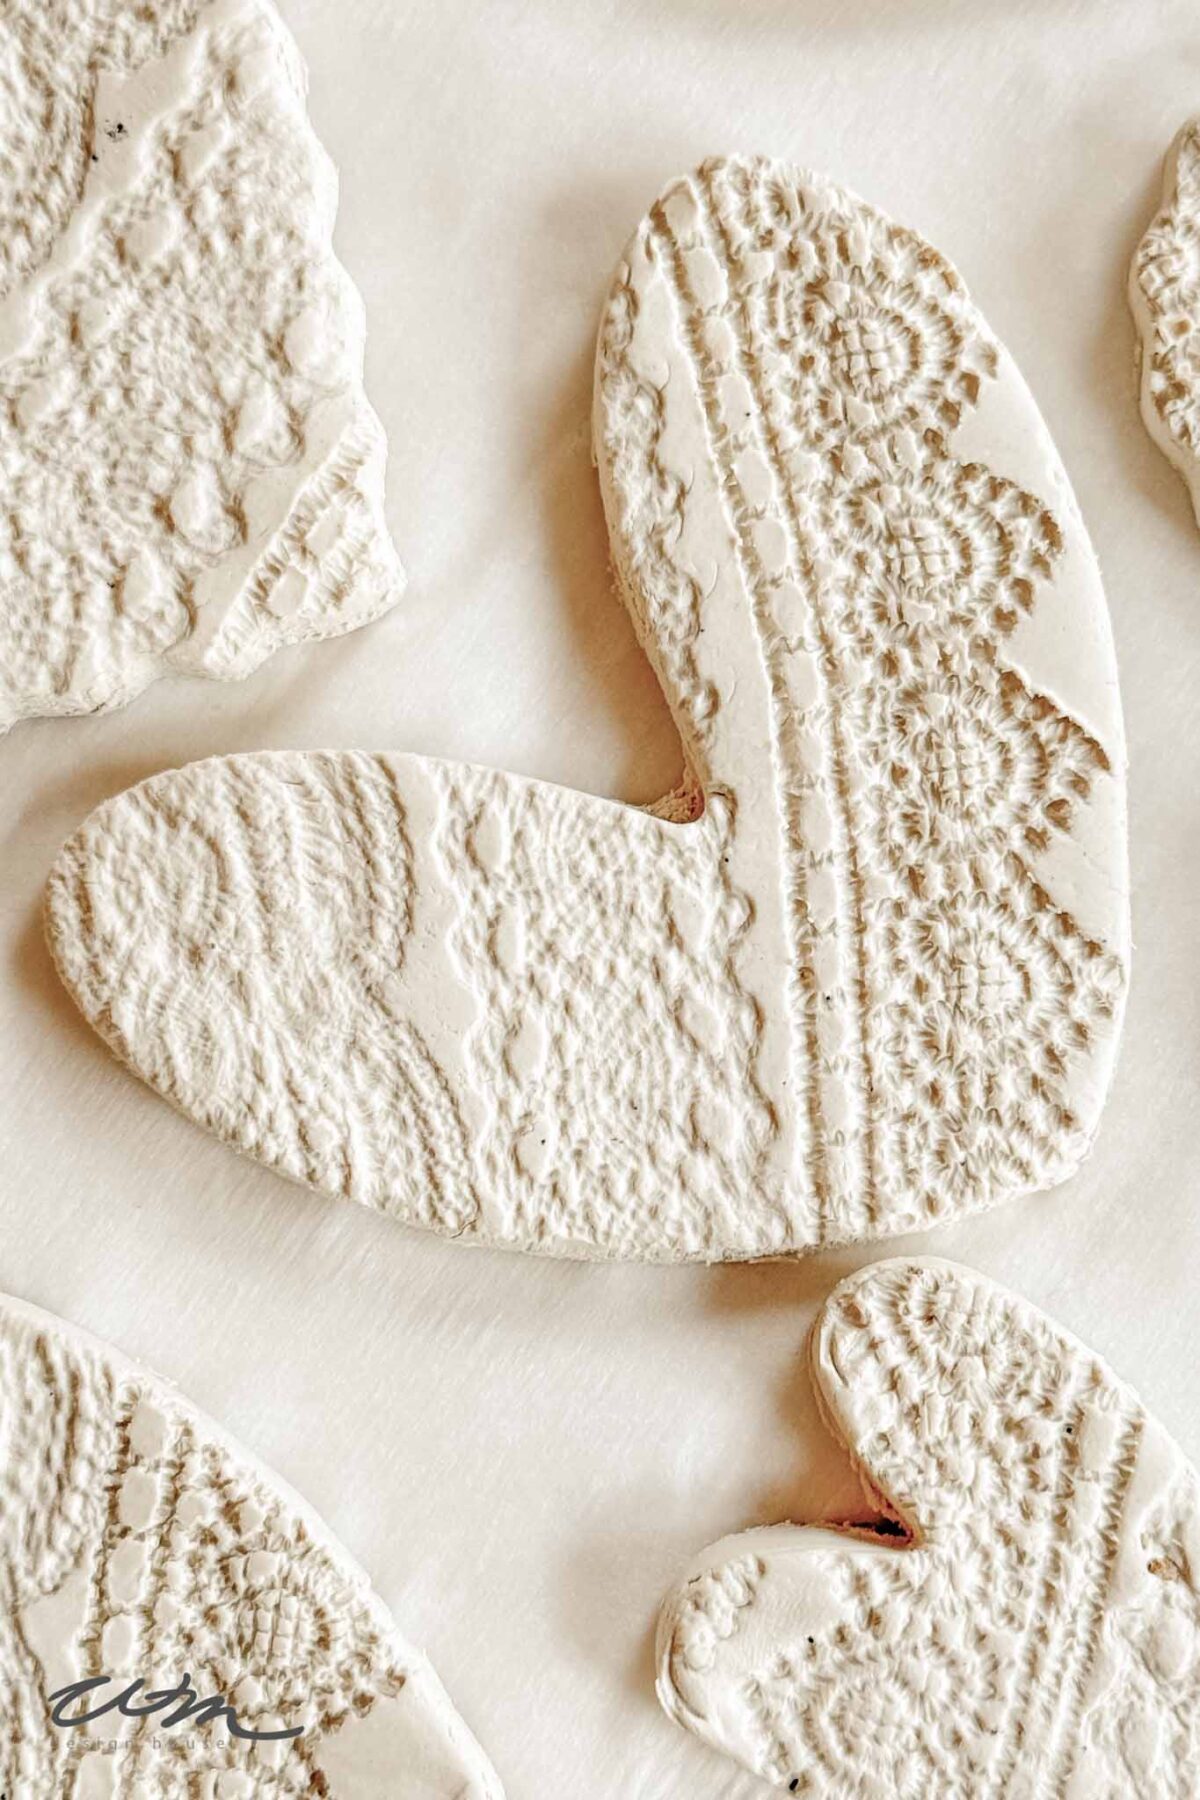
Lace hearts are simply air dry clay hearts pressed with lace to create a delicate, vintage-inspired texture.
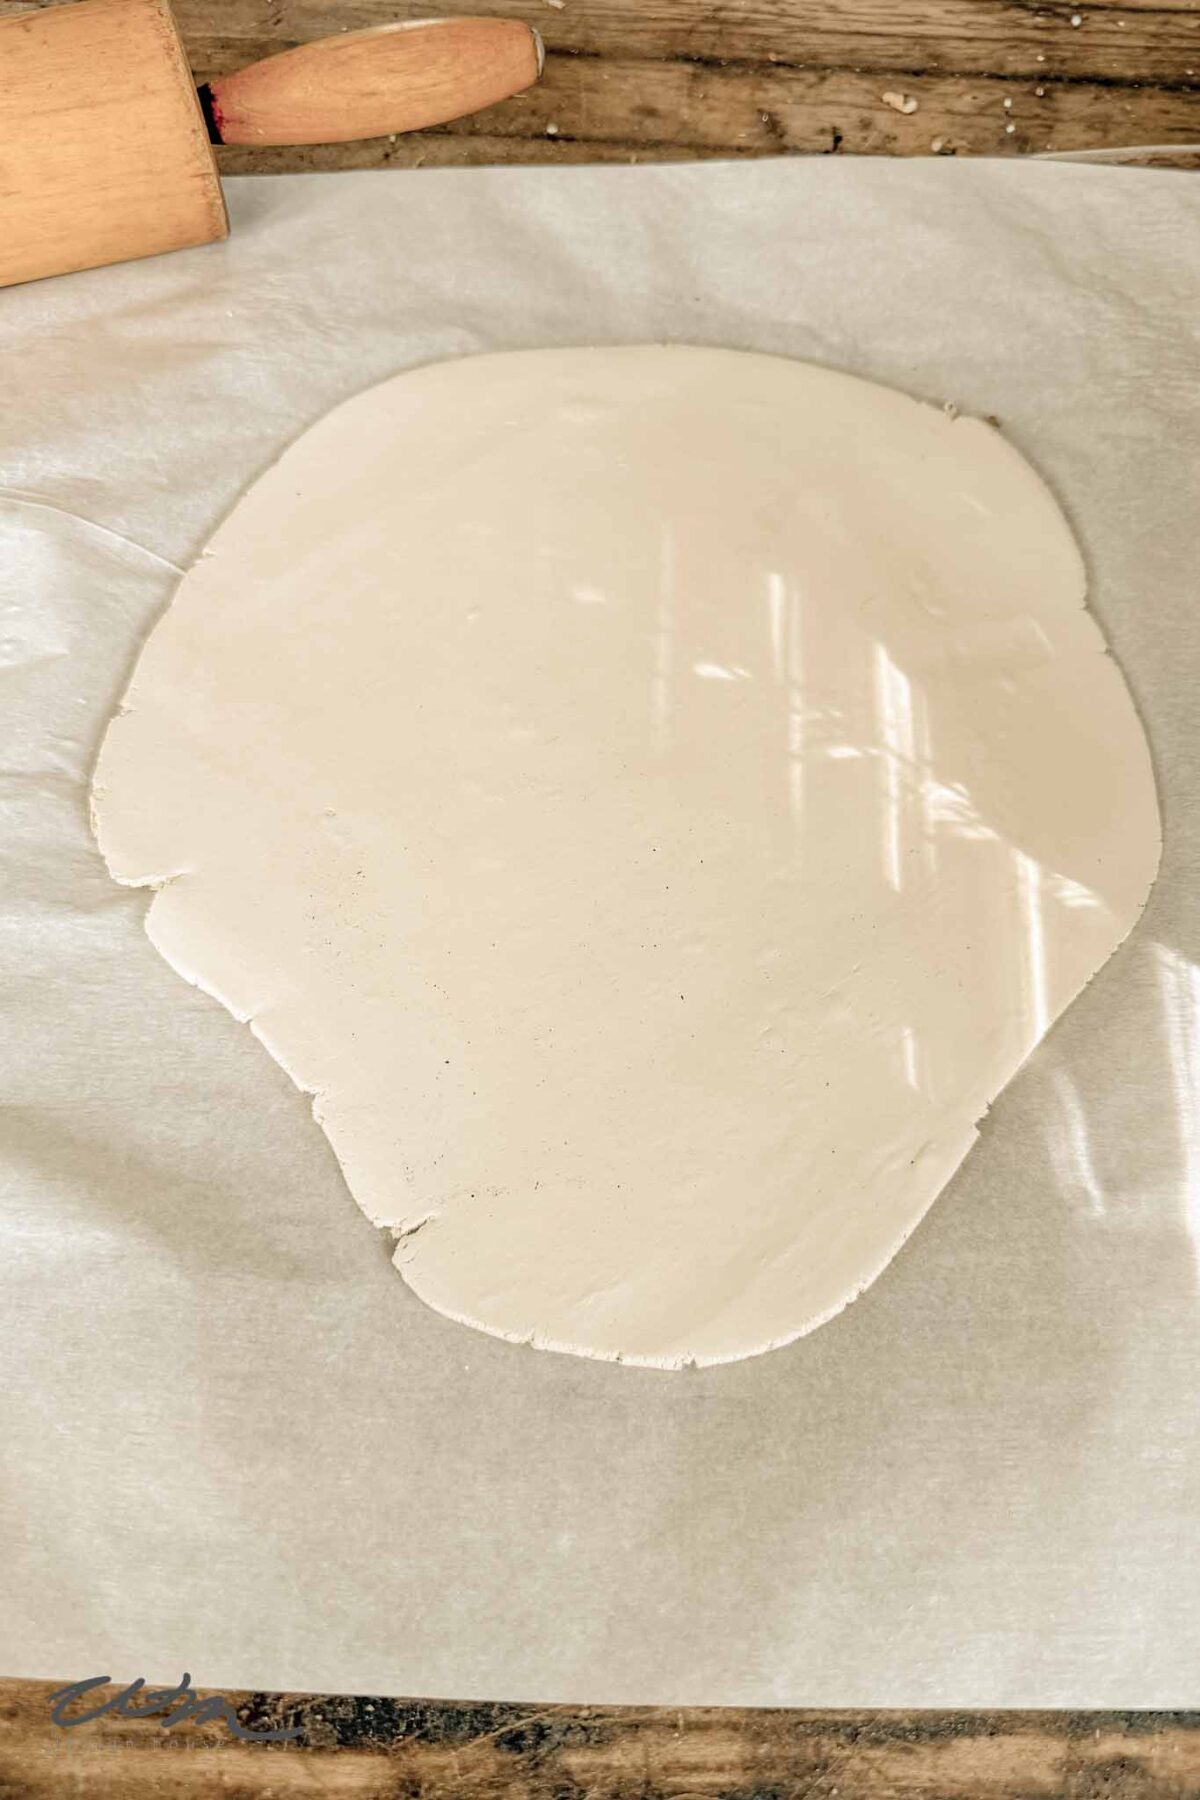
Step 1: Roll Out the Clay
I used a 2.5-pound tub of Crayola air dry clay for this project and worked with about ¼ of the clay at a time. Trying to roll out the entire tub at once can feel heavy and harder to manage, so dividing it into sections makes the process much easier.
Roll the clay out directly on parchment paper using a rolling pin. This keeps it from sticking and makes cleanup simple.
Aim for about ¼ inch thick — thick enough to hold its shape but not overly bulky.

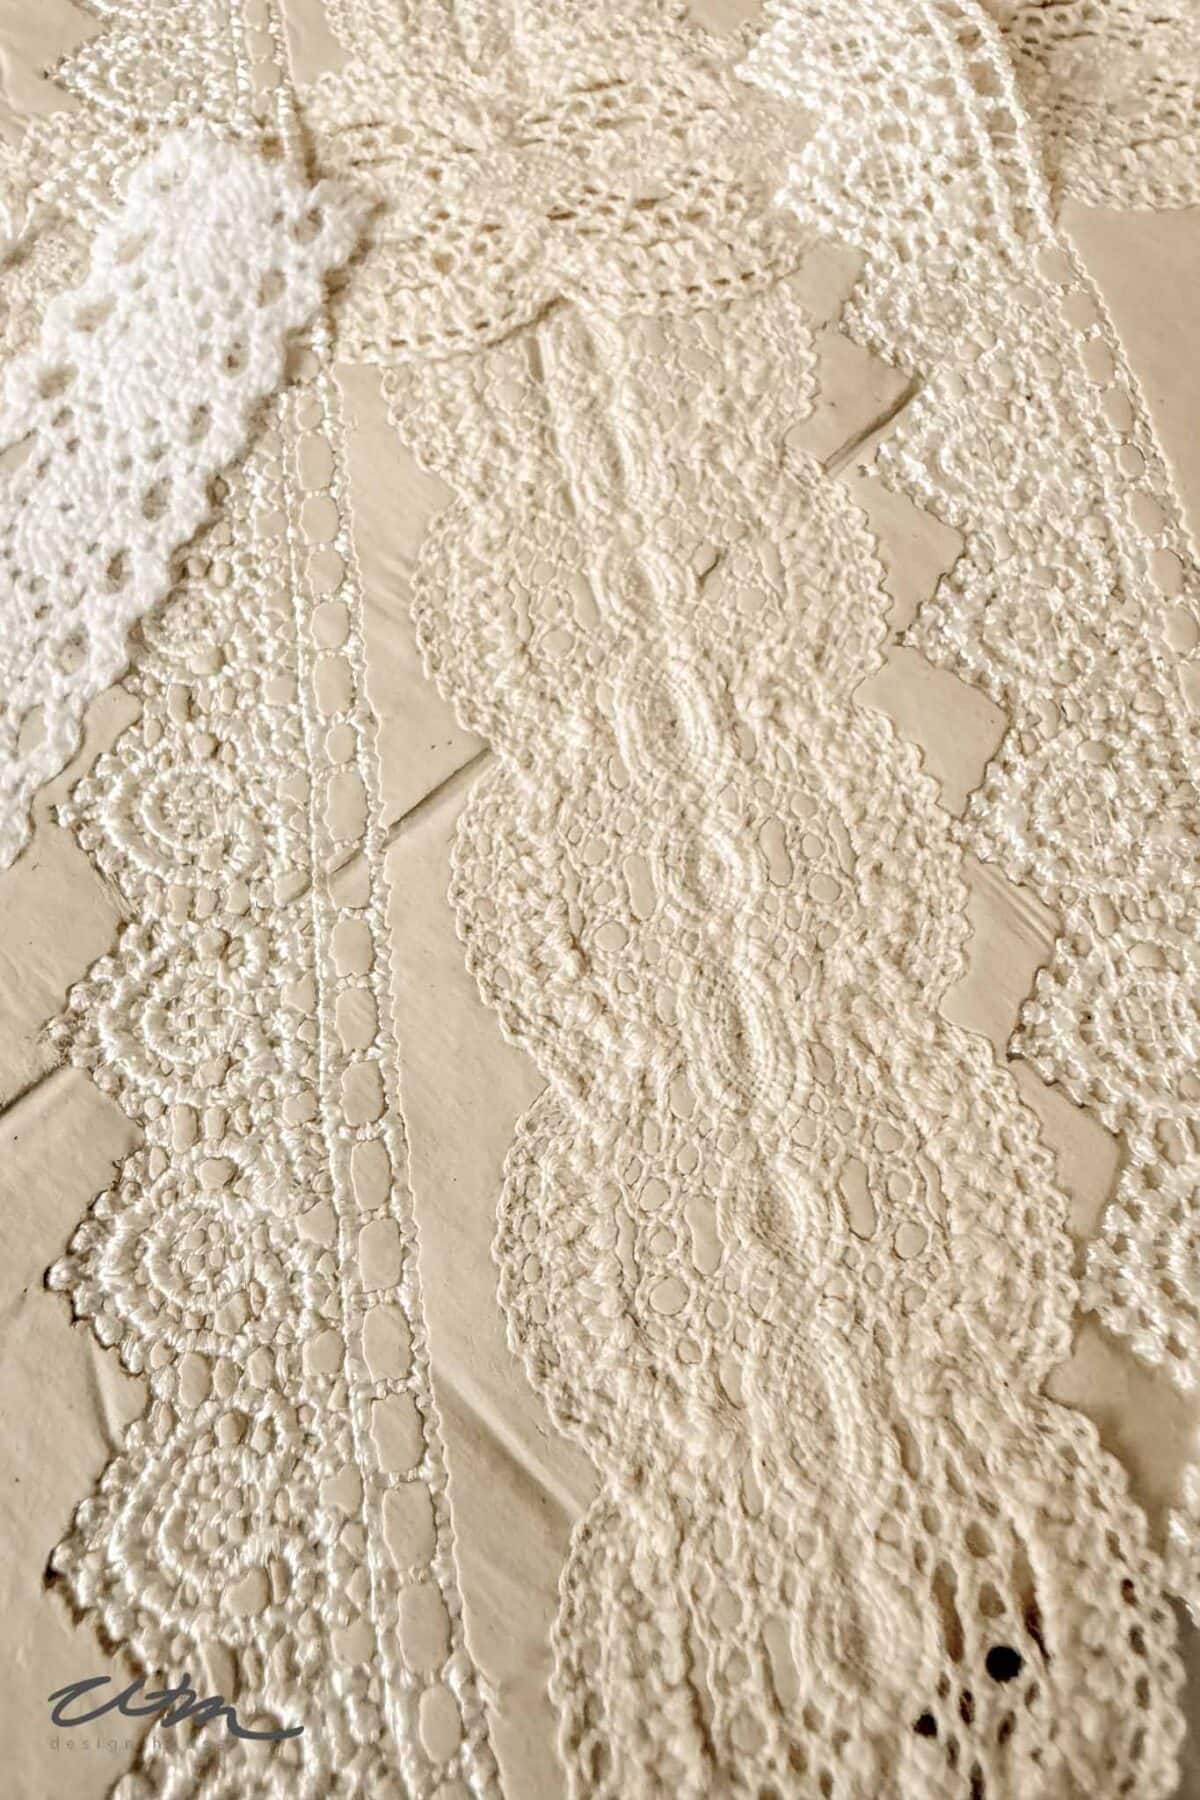
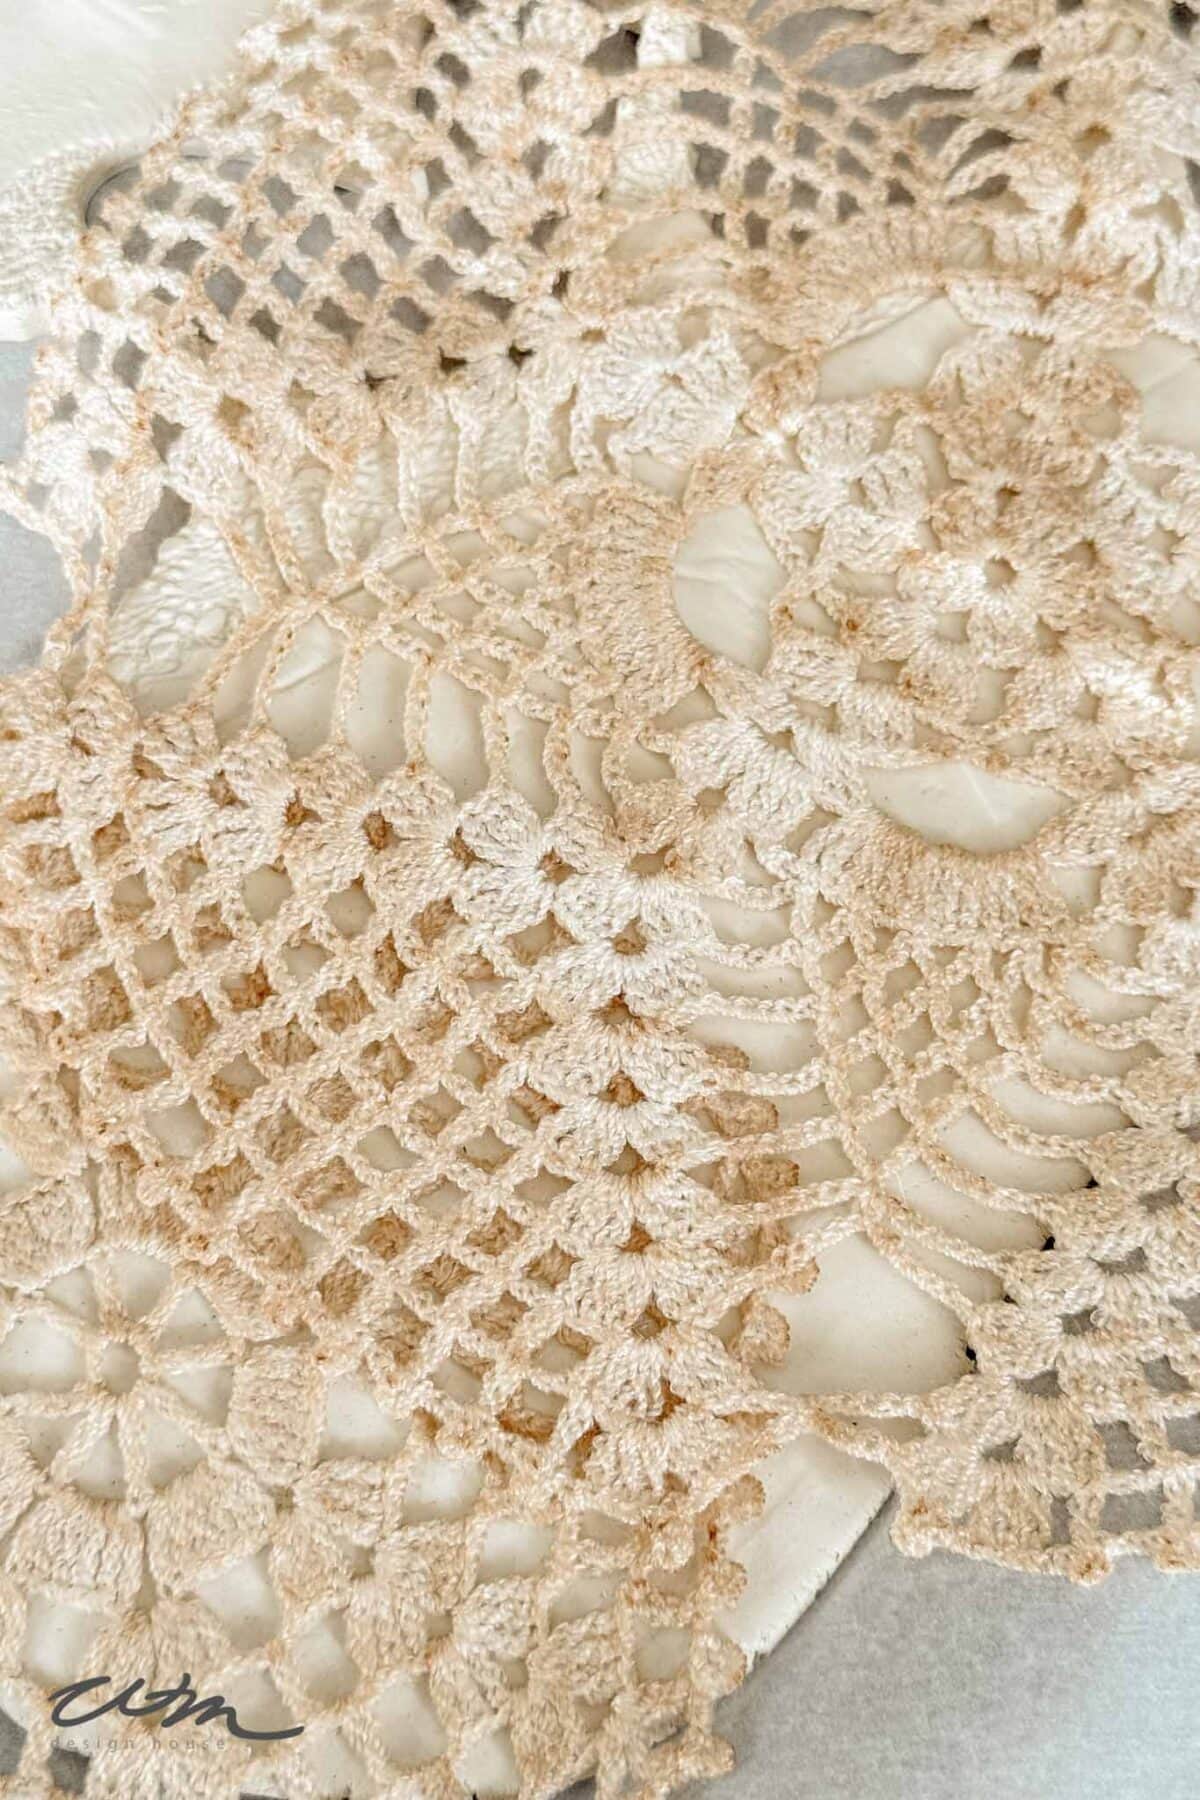
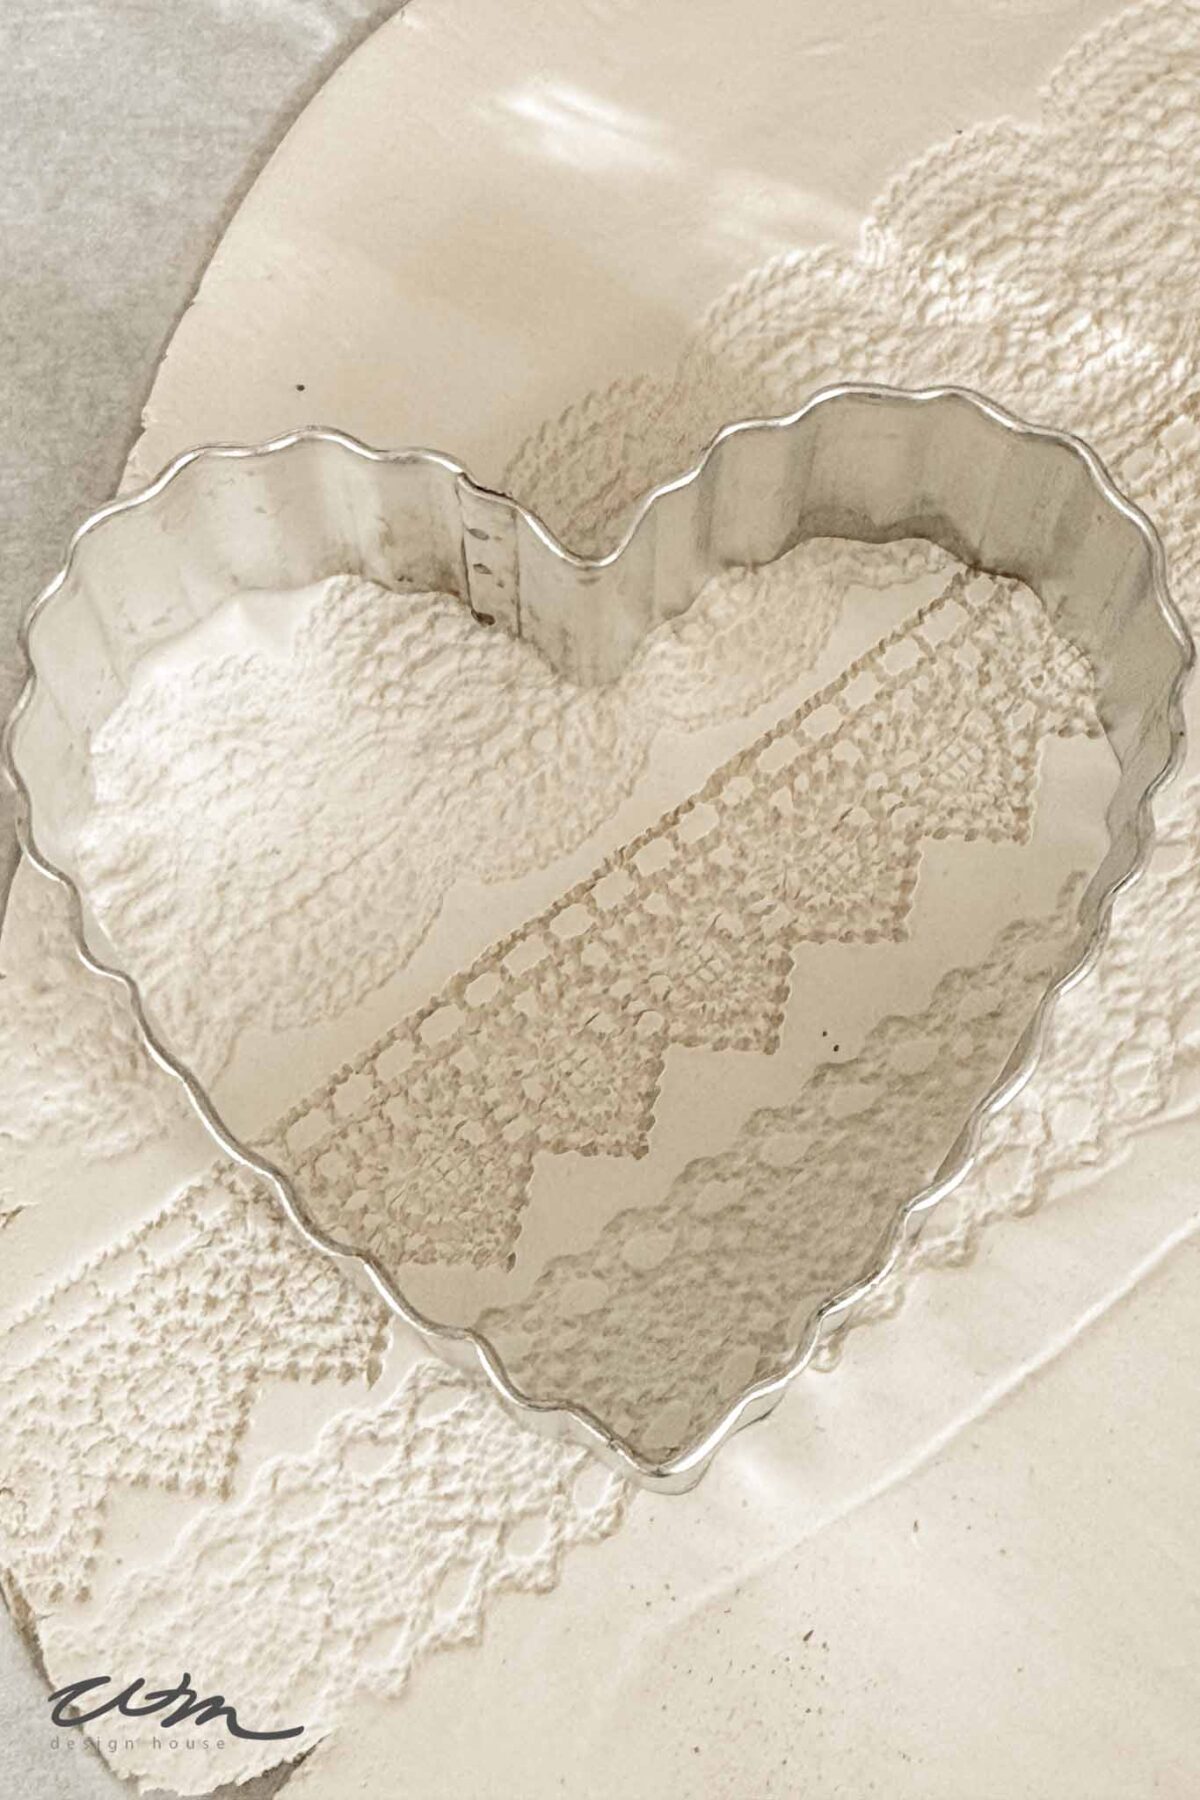
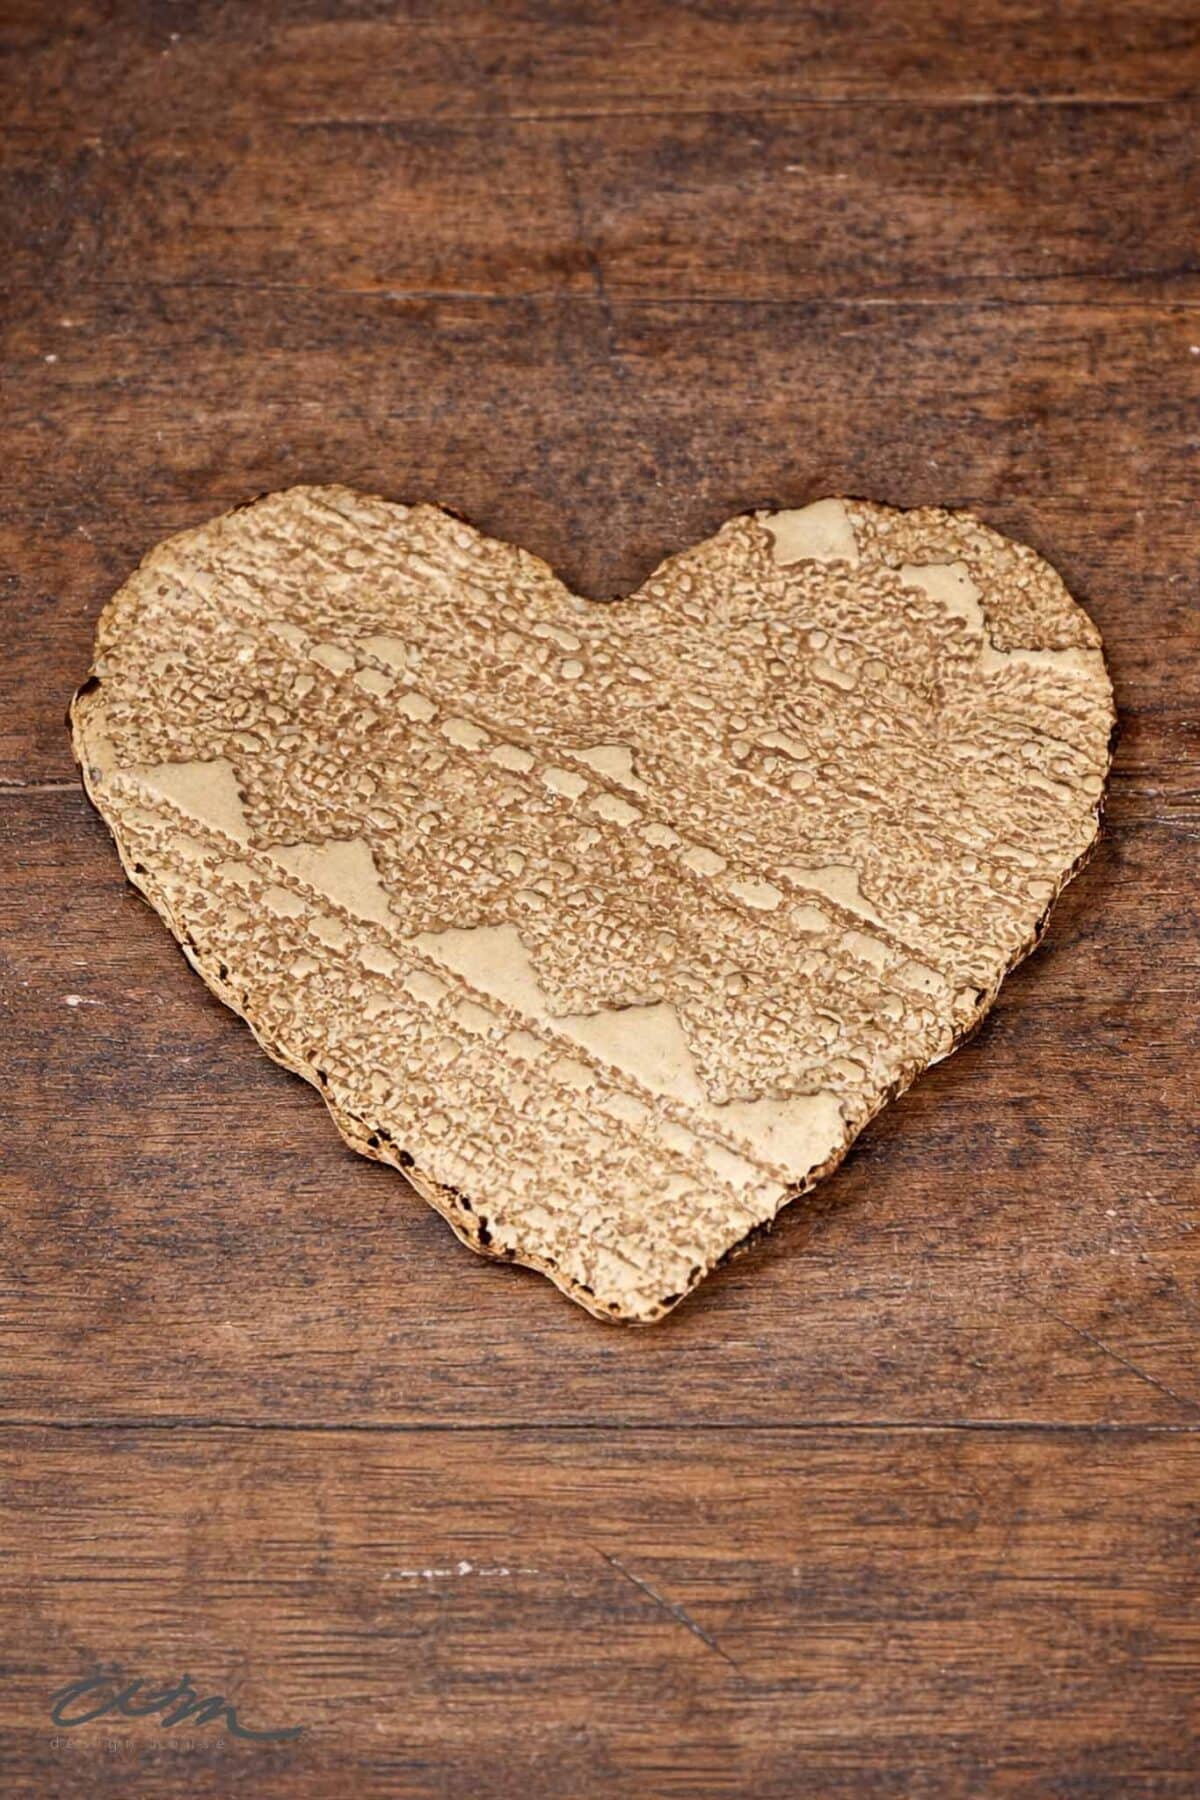
Step 2: Press the Lace into the Clay
Lay your lace ribbon or vintage lace doily across the rolled-out clay. Gently roll over the lace again so the pattern presses into the surface.
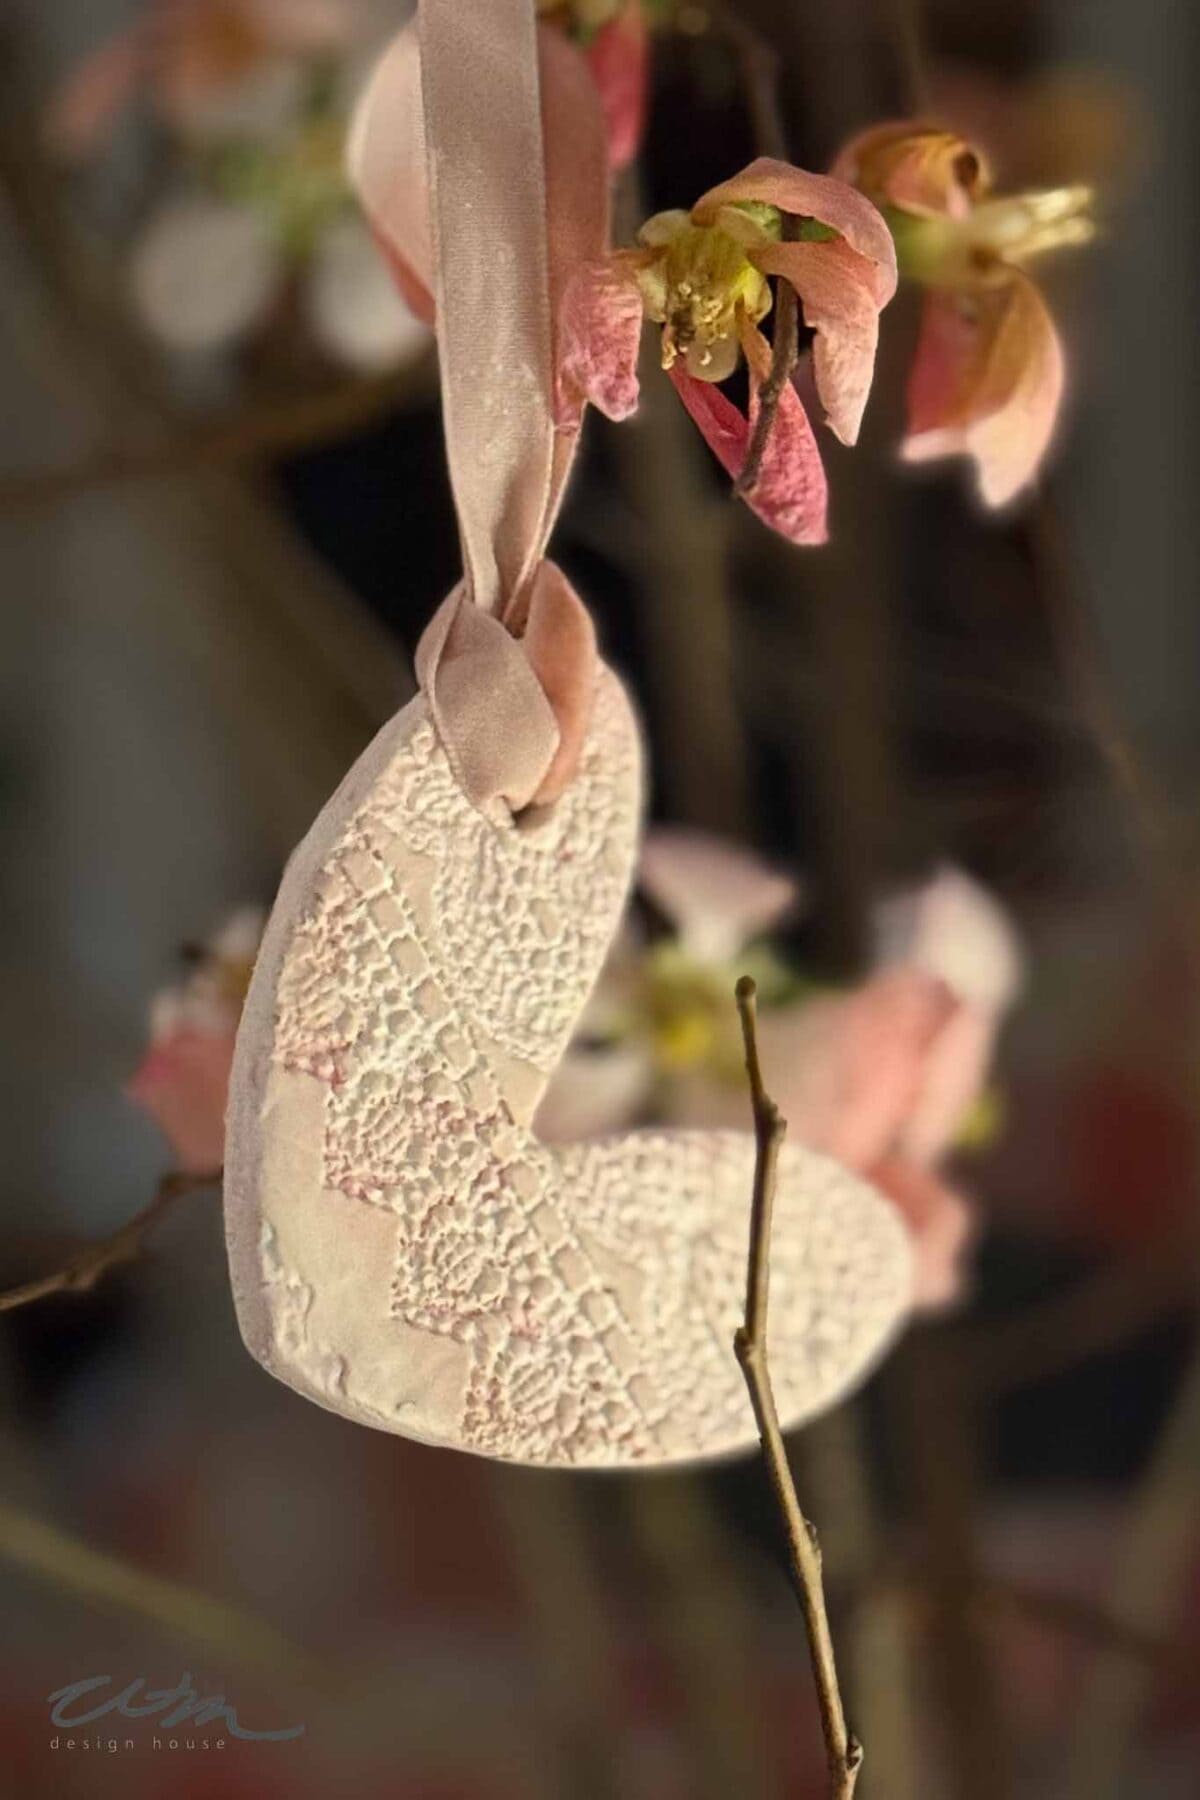
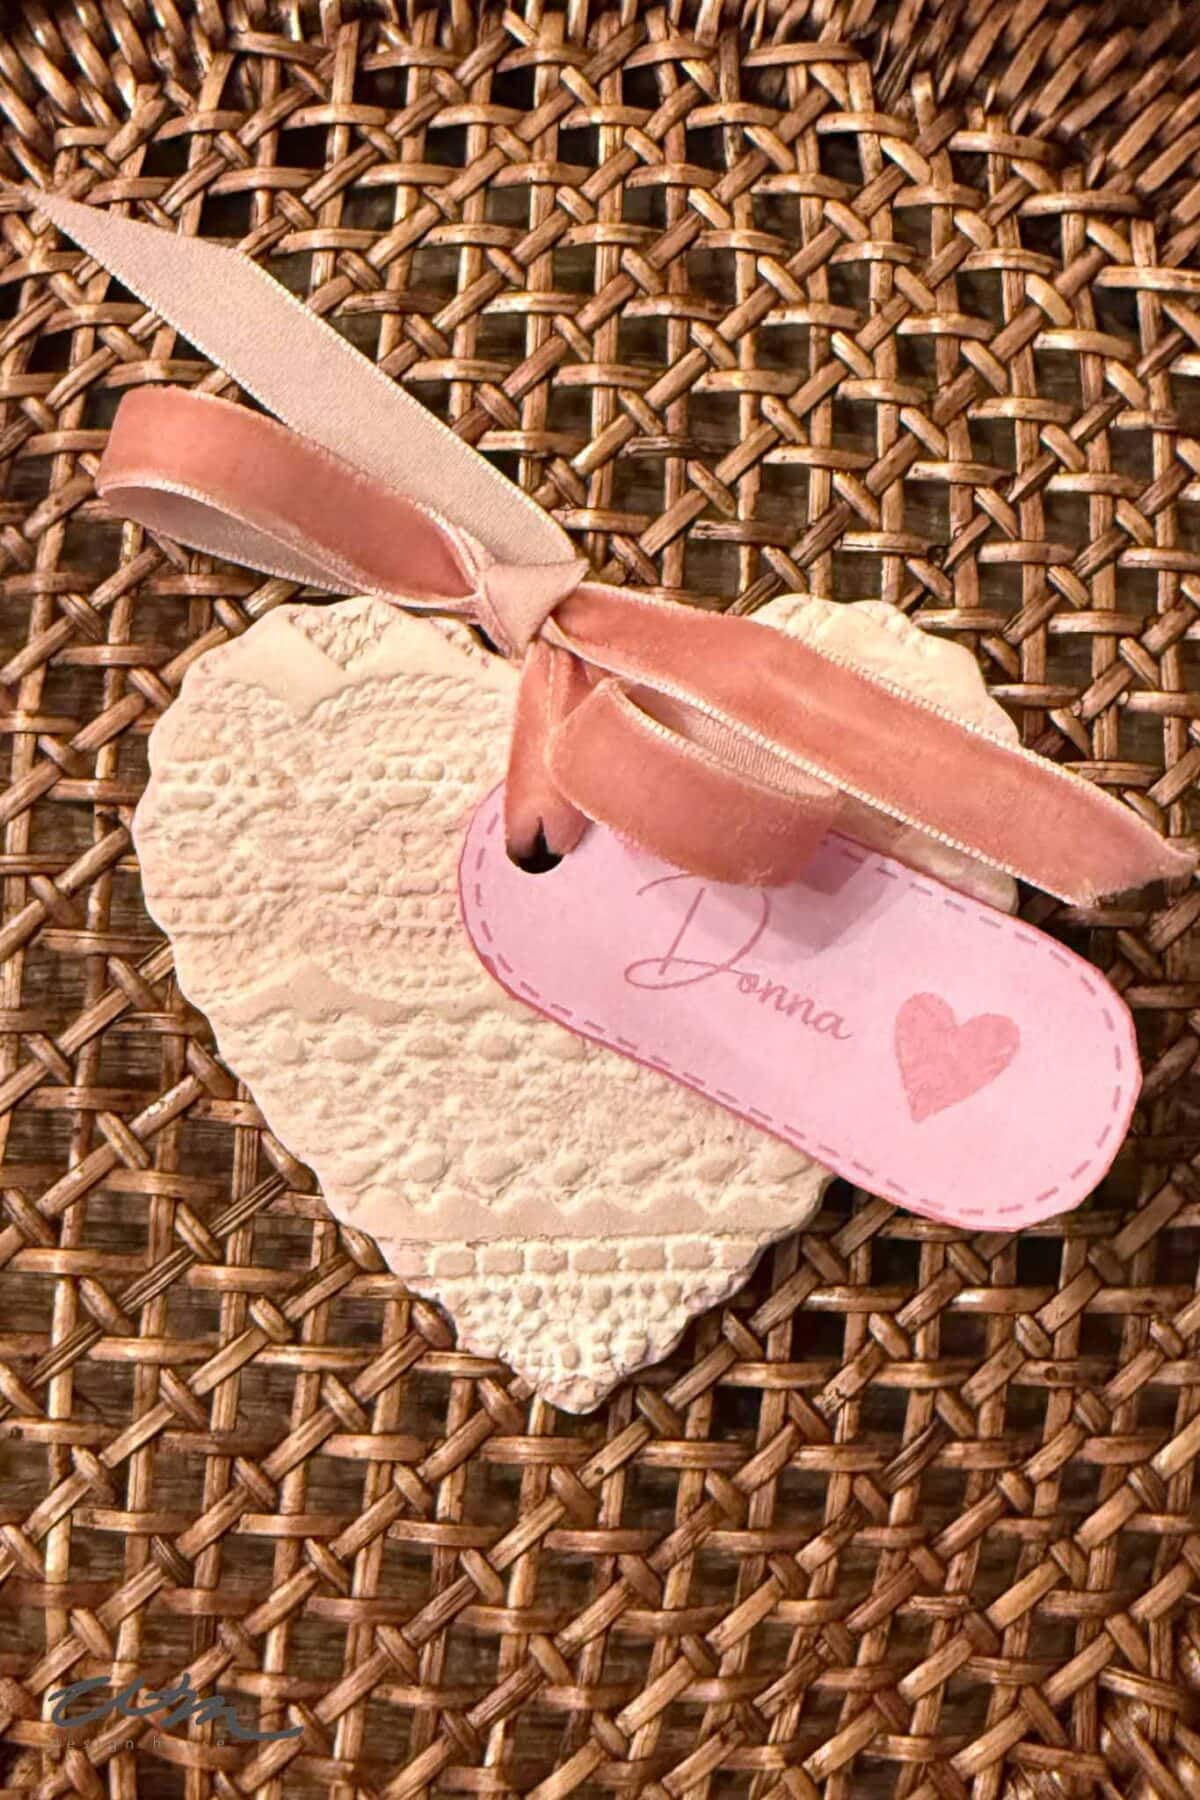
Carefully lift the lace away to reveal the imprint. You’ll see the delicate texture left behind — almost like a lace heart appliqué pressed right into the clay.
If you’re using doilies, the pattern will be more intricate and may even create a subtle heart lace border depending on the design.

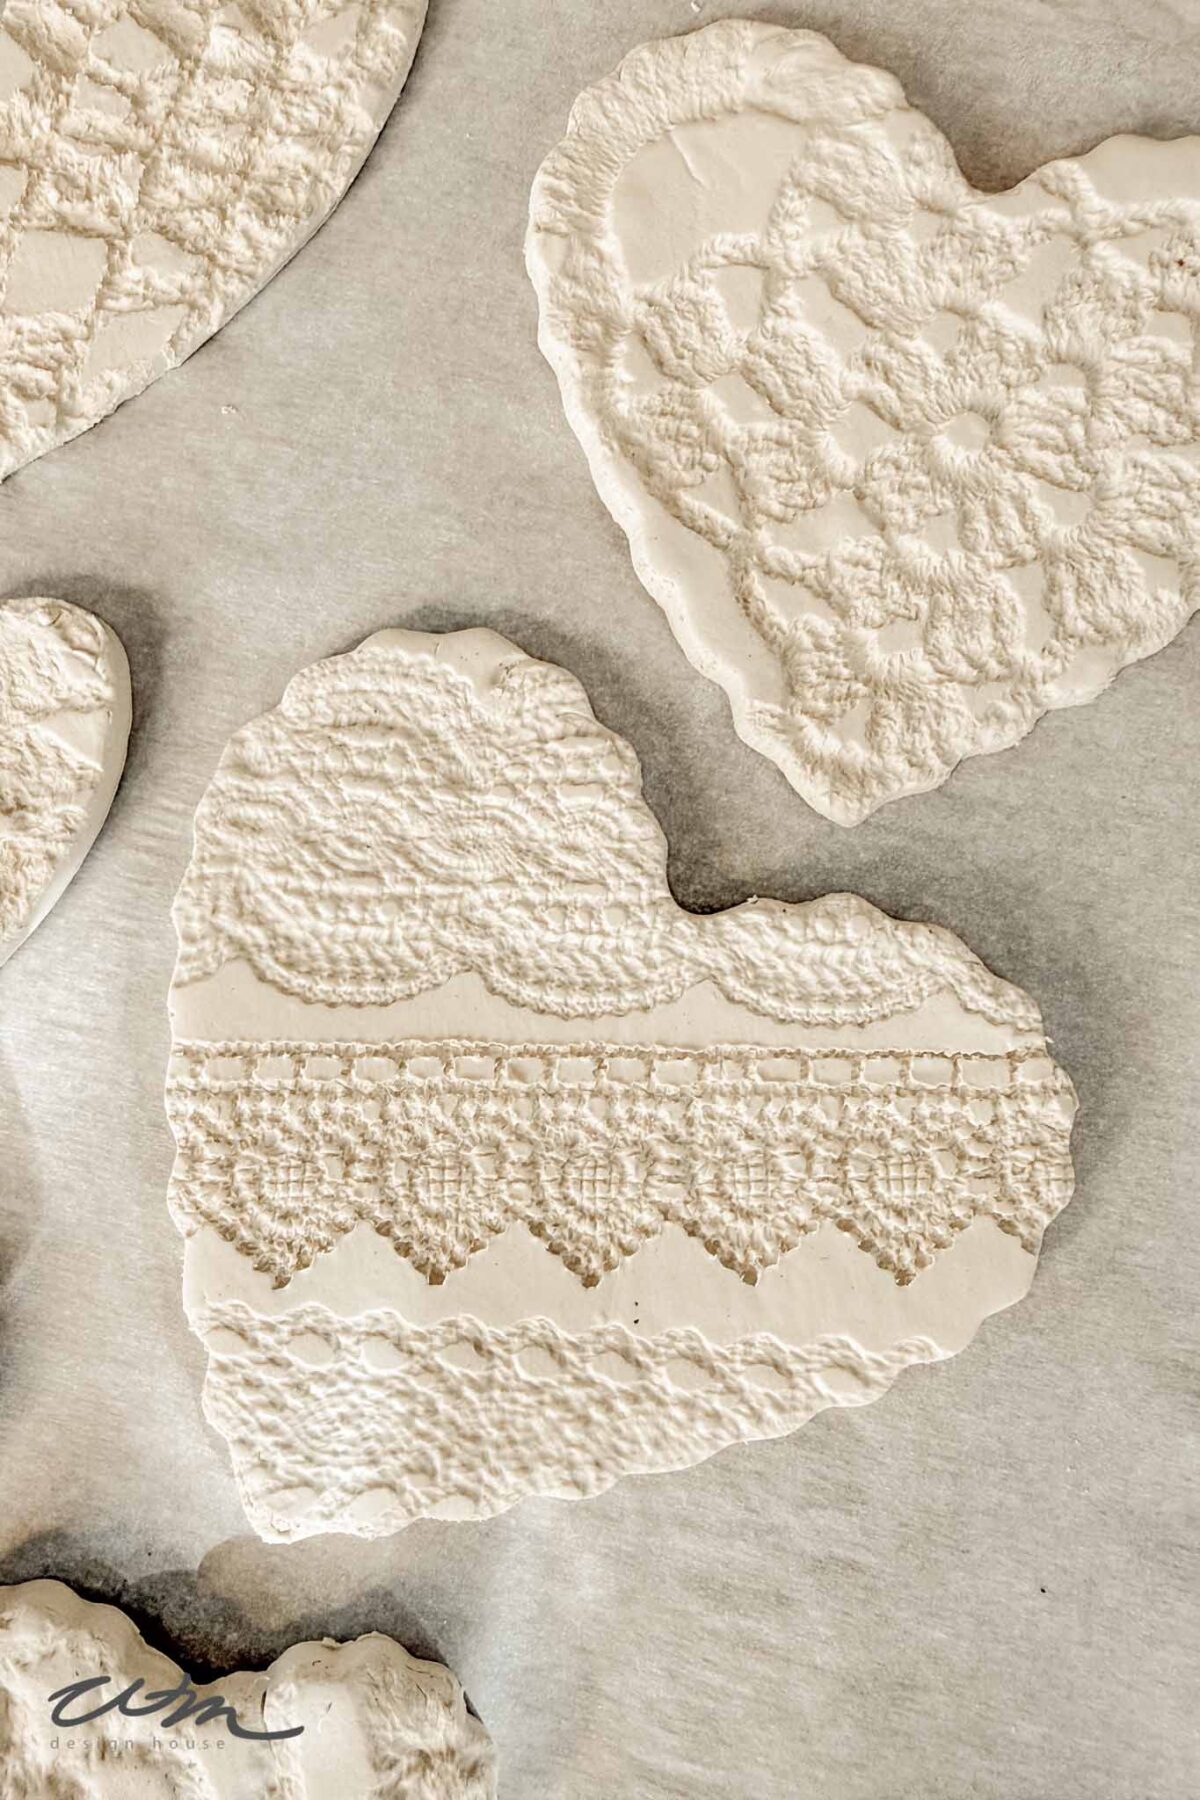
Step 3: Cut Out the Hearts
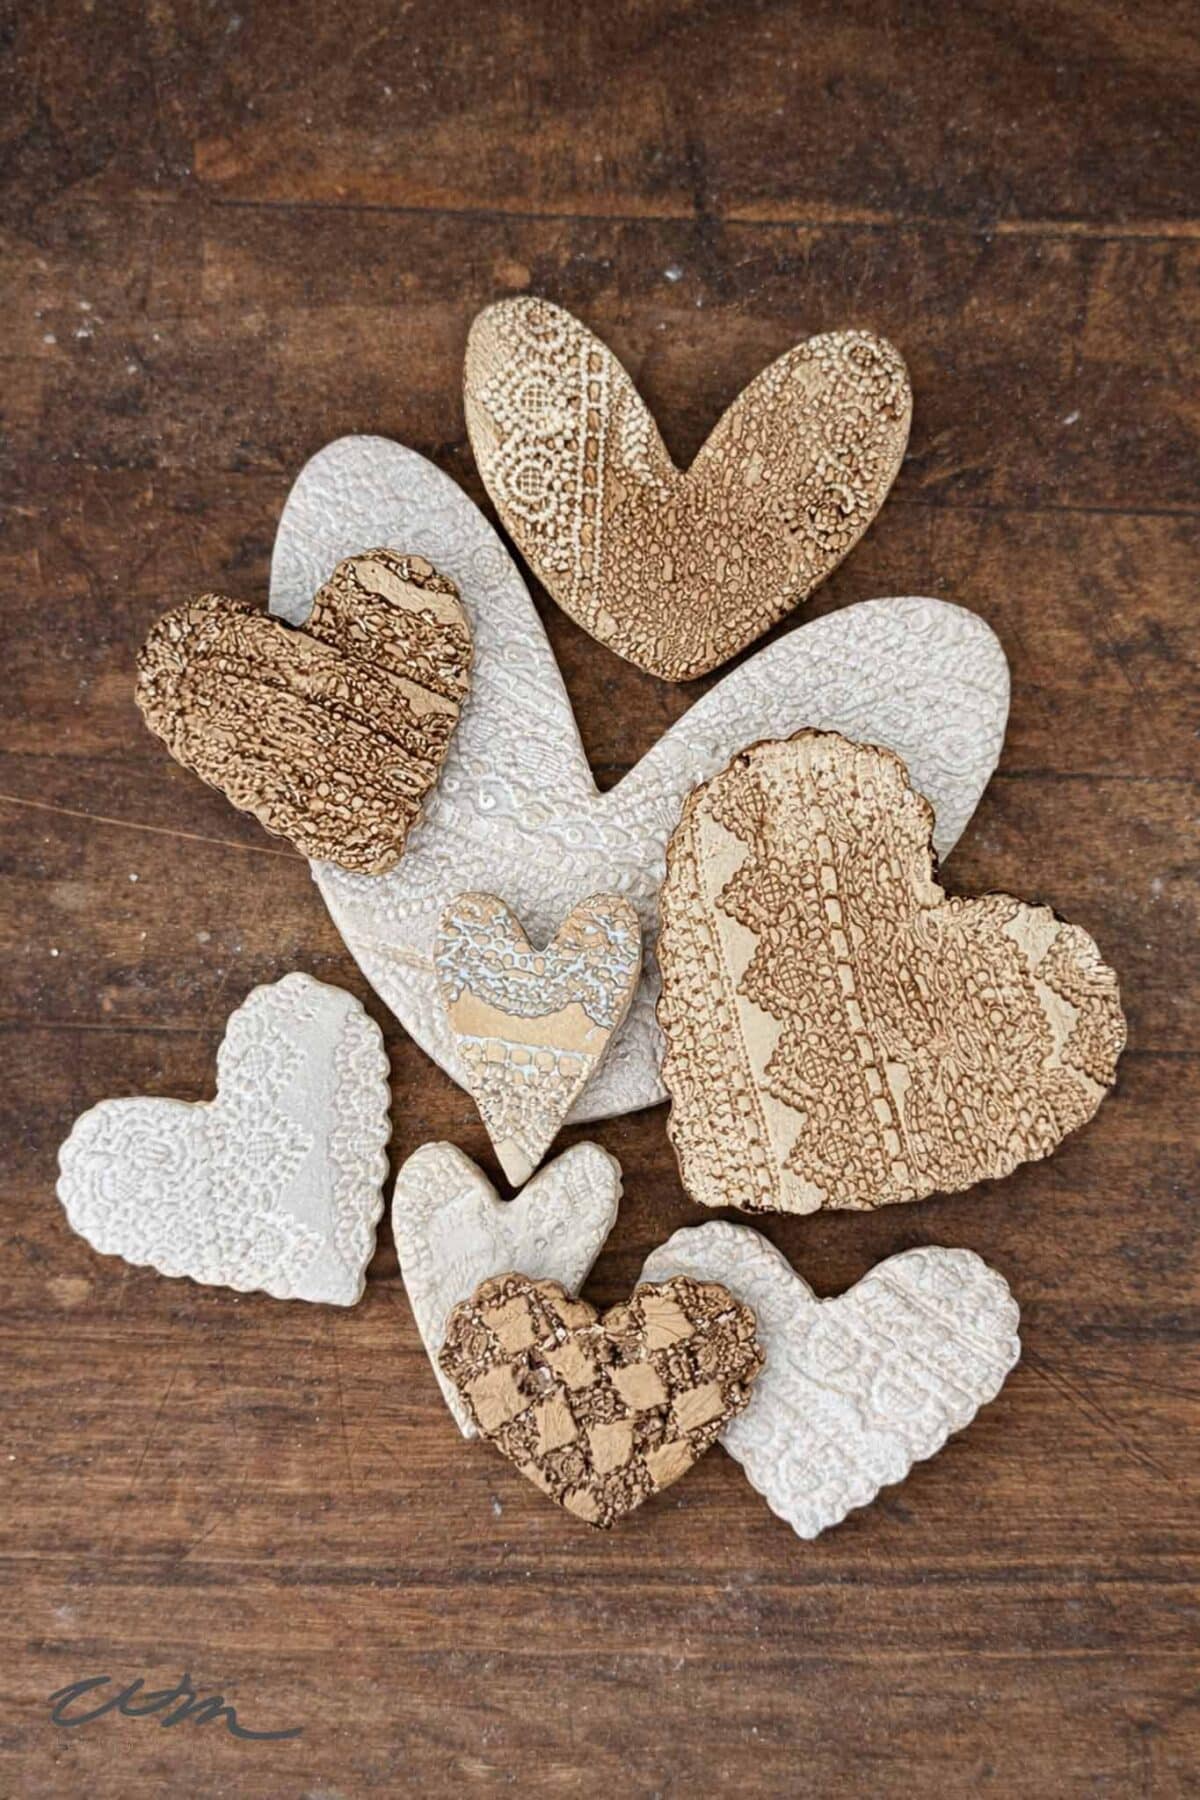
Once the lace texture is in place, use a heart-shaped cookie cutter to cut out your lace hearts. Use a variety of shapes and sizes for interest.
Press straight down and lift carefully to keep the edges clean.
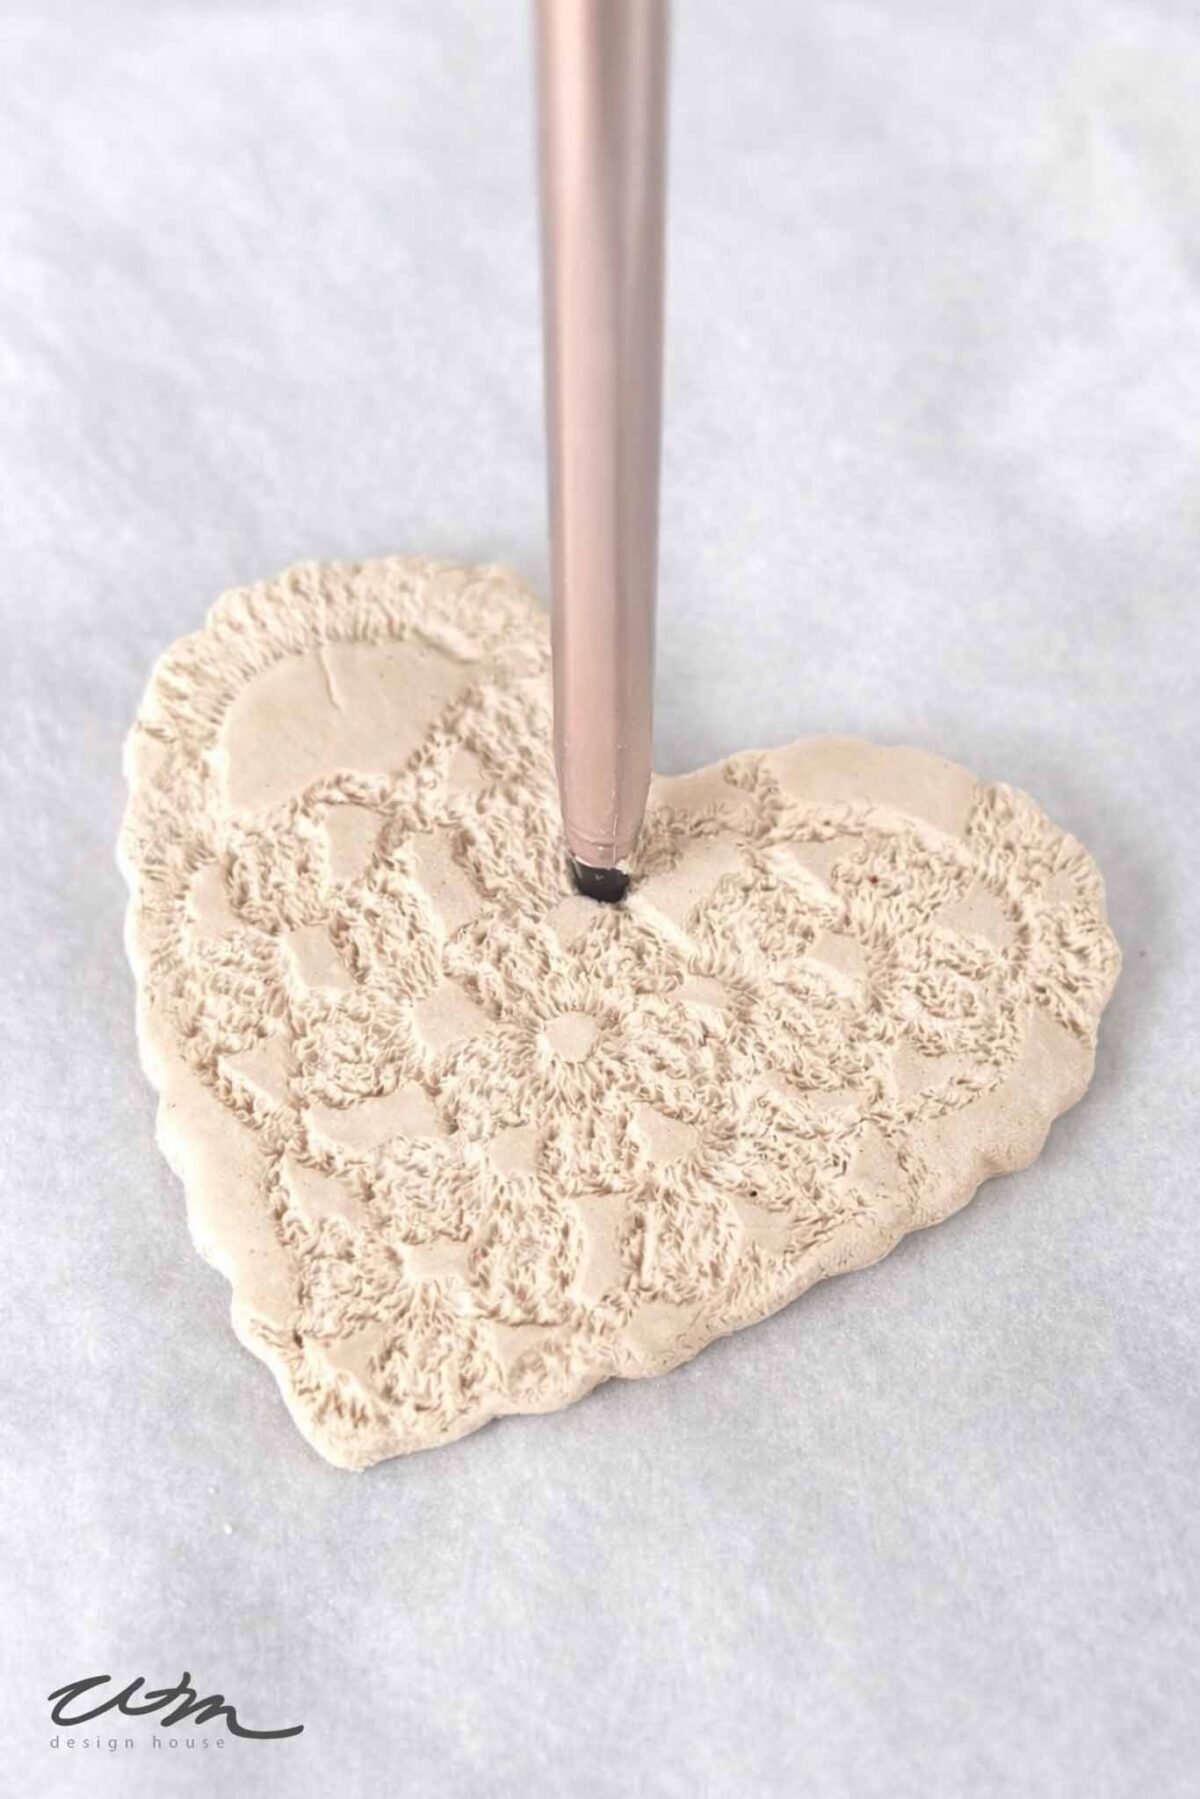
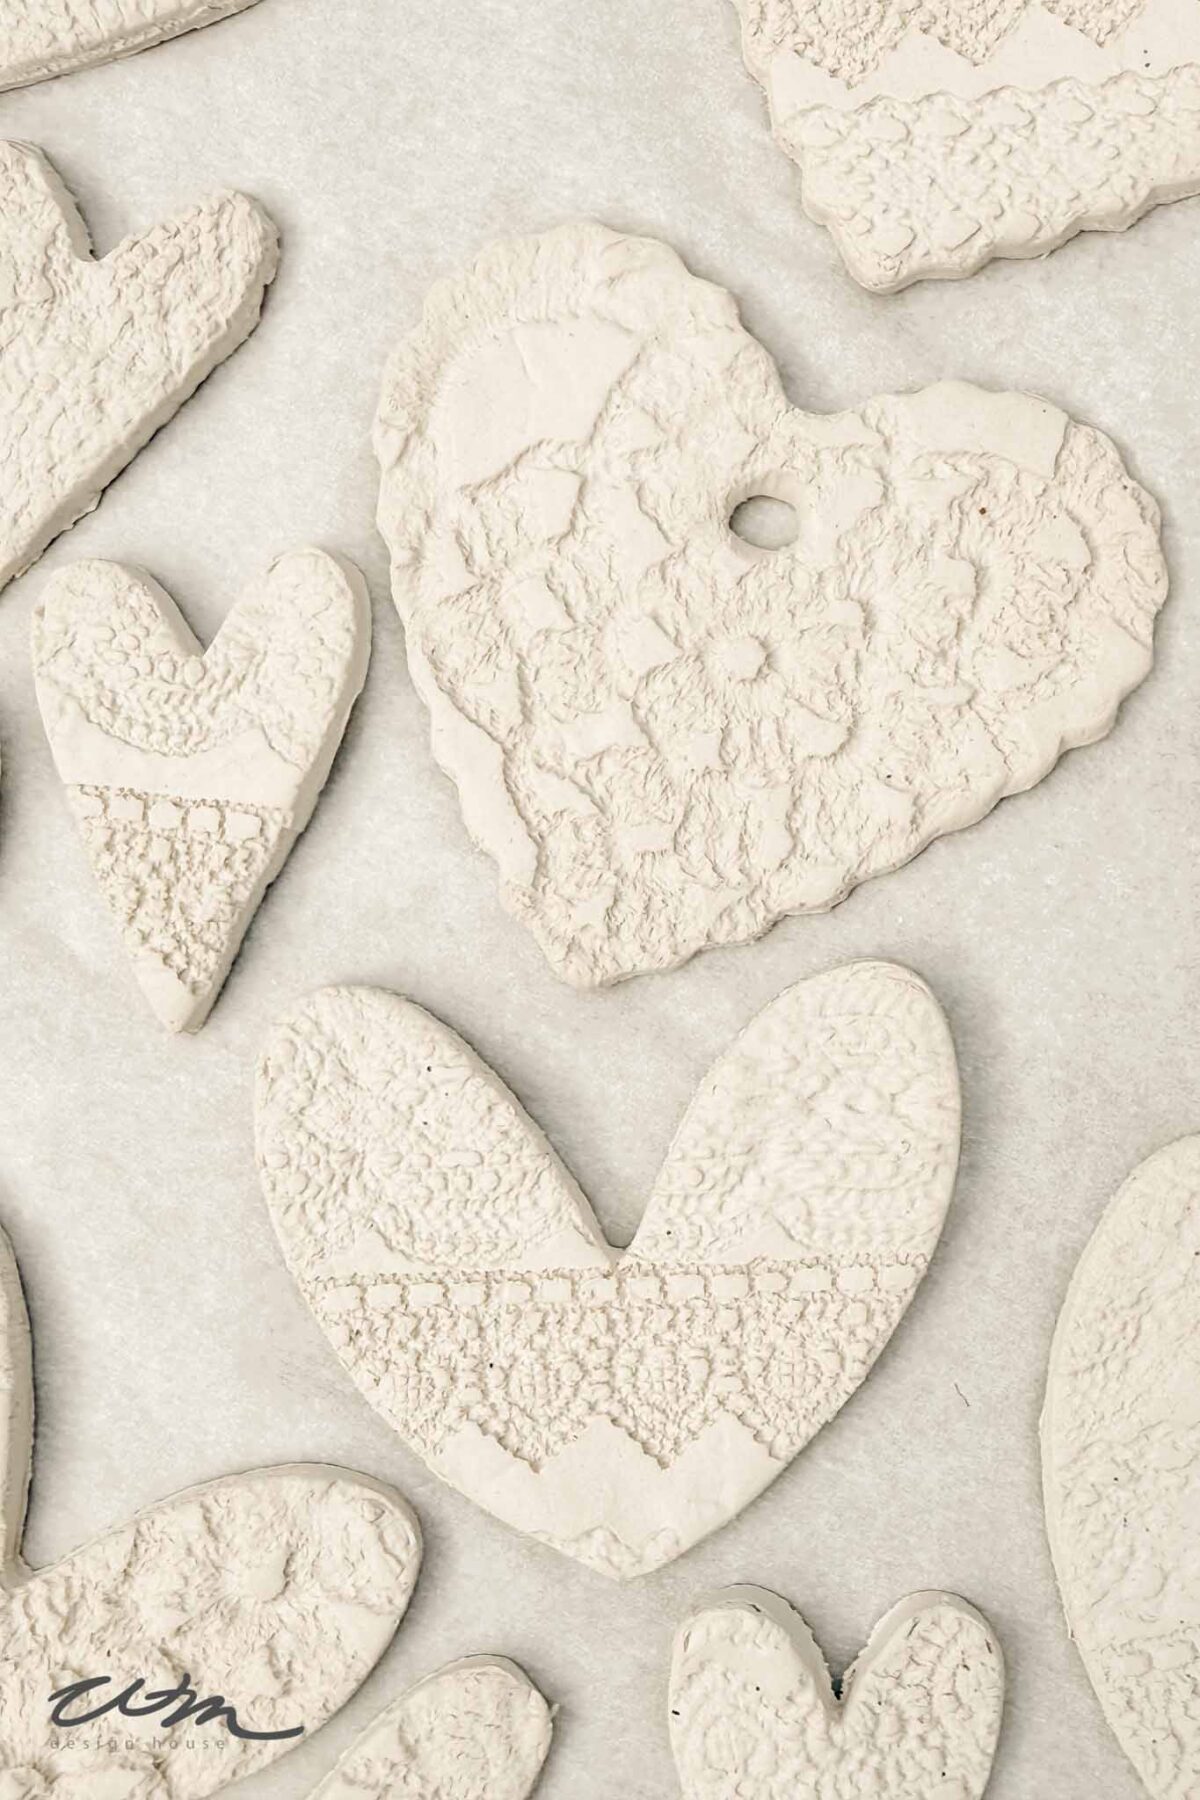
Step 4: Add a Hole (Optional)
If you plan to use your lace hearts as ornaments or Valentine place cards, create a small hole near the top using a pen, straw, or chopstick before they dry.
Step 5: Let the Lace Hearts Dry
Leave the hearts on parchment paper and place them on a cookie sheet to dry naturally. Avoid moving them too much while they set.
Air dry clay usually takes 24–48 hours to dry completely, depending on how thick your hearts are and the humidity in the room. As they cure, you’ll see the color slowly lighten, turning from a soft gray tone to a more chalky white finish.
Quick Fix for Cracks
If small cracks appear as the clay dries, don’t worry. Lightly dampen your fingertip with water and gently smooth over the crack. You can also mix a tiny bit of water with a pinch of clay to create a soft paste and fill the area before letting it dry again.
Tip from wendy’s craft room:
If the lace hearts begin to curl slightly as they dry, gently flip them over after several hours to help them dry evenly. Never put them in the oven to dry. If you want to speed up the drying process, use a fan.
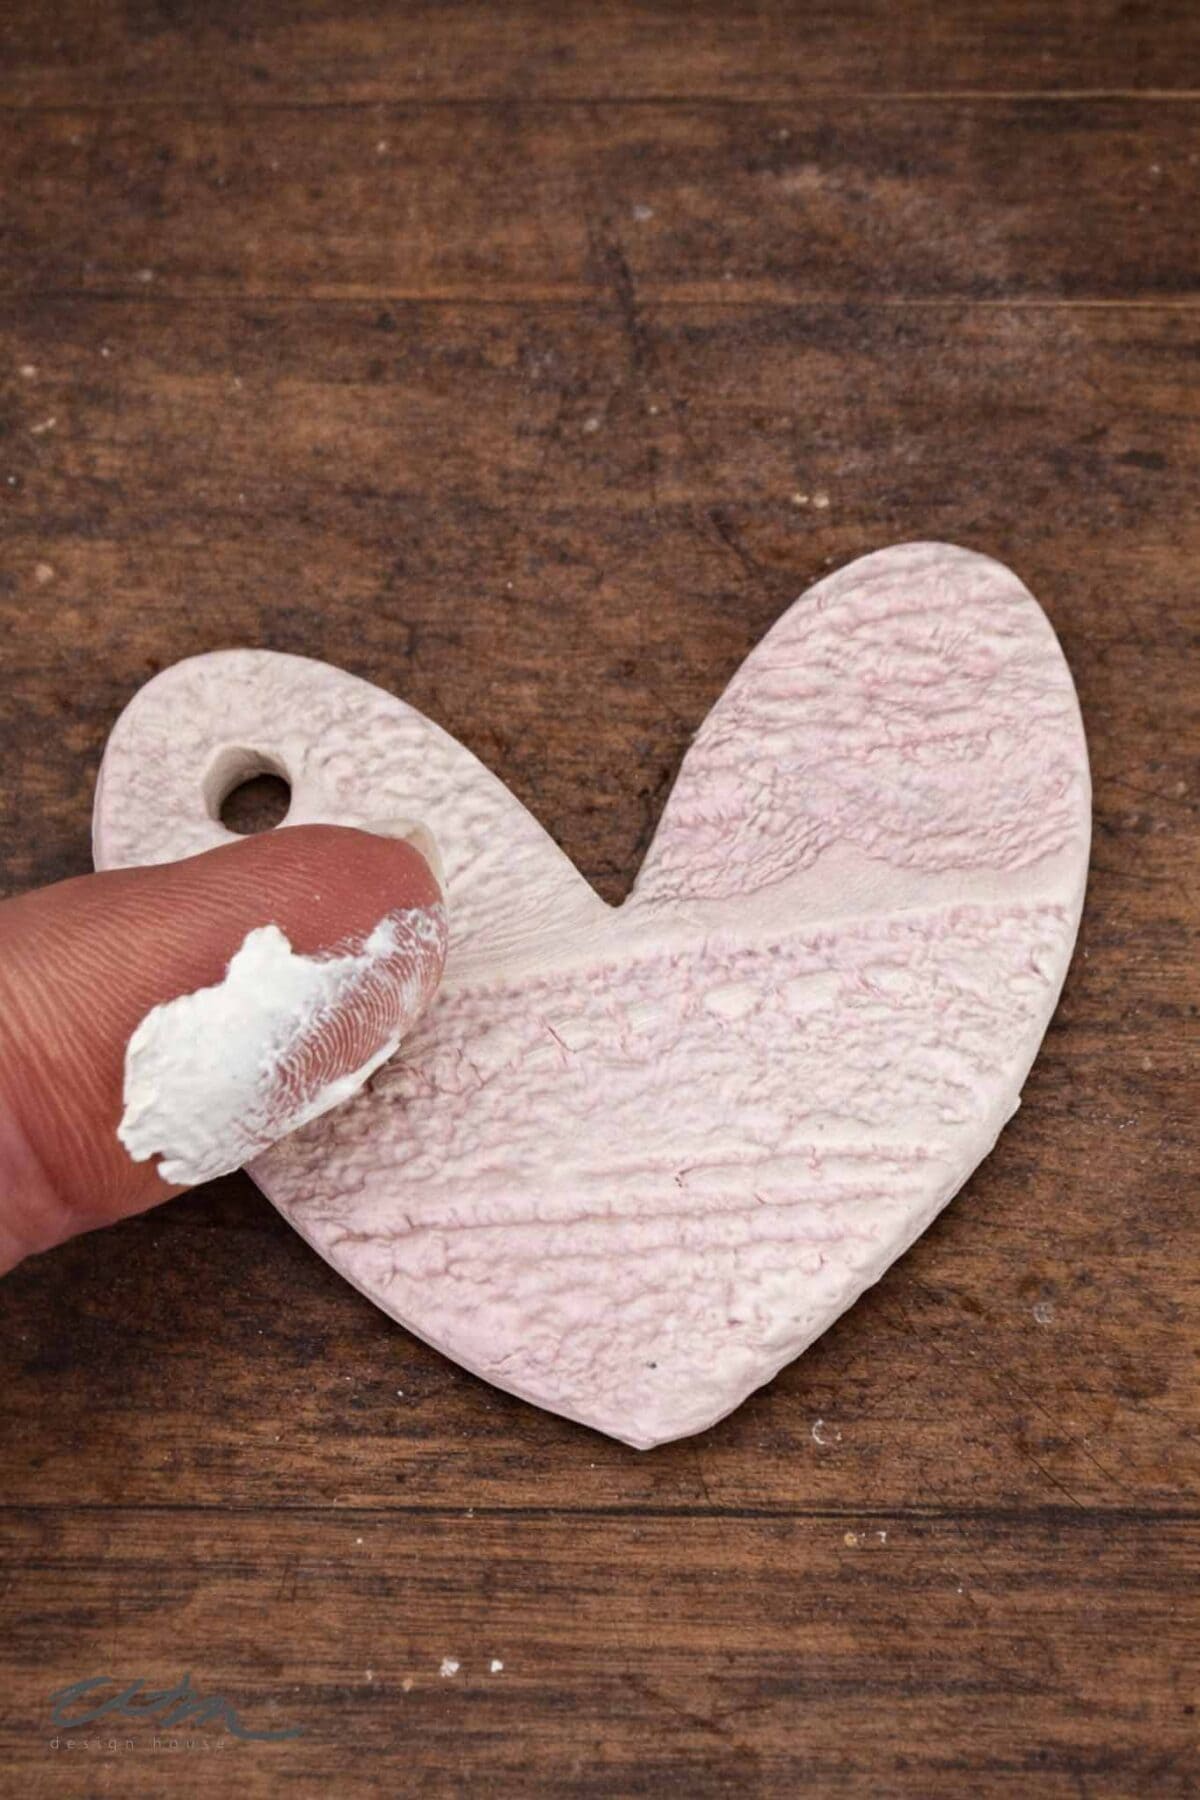
Step 6: How to Paint and Distress Lace Hearts for a Vintage Finish
If you’d like to change the look of your lace hearts, a simple paint wash and wax treatment can completely transform them. The key is to keep everything soft and build the layers slowly.
Here are a few variations I tried:
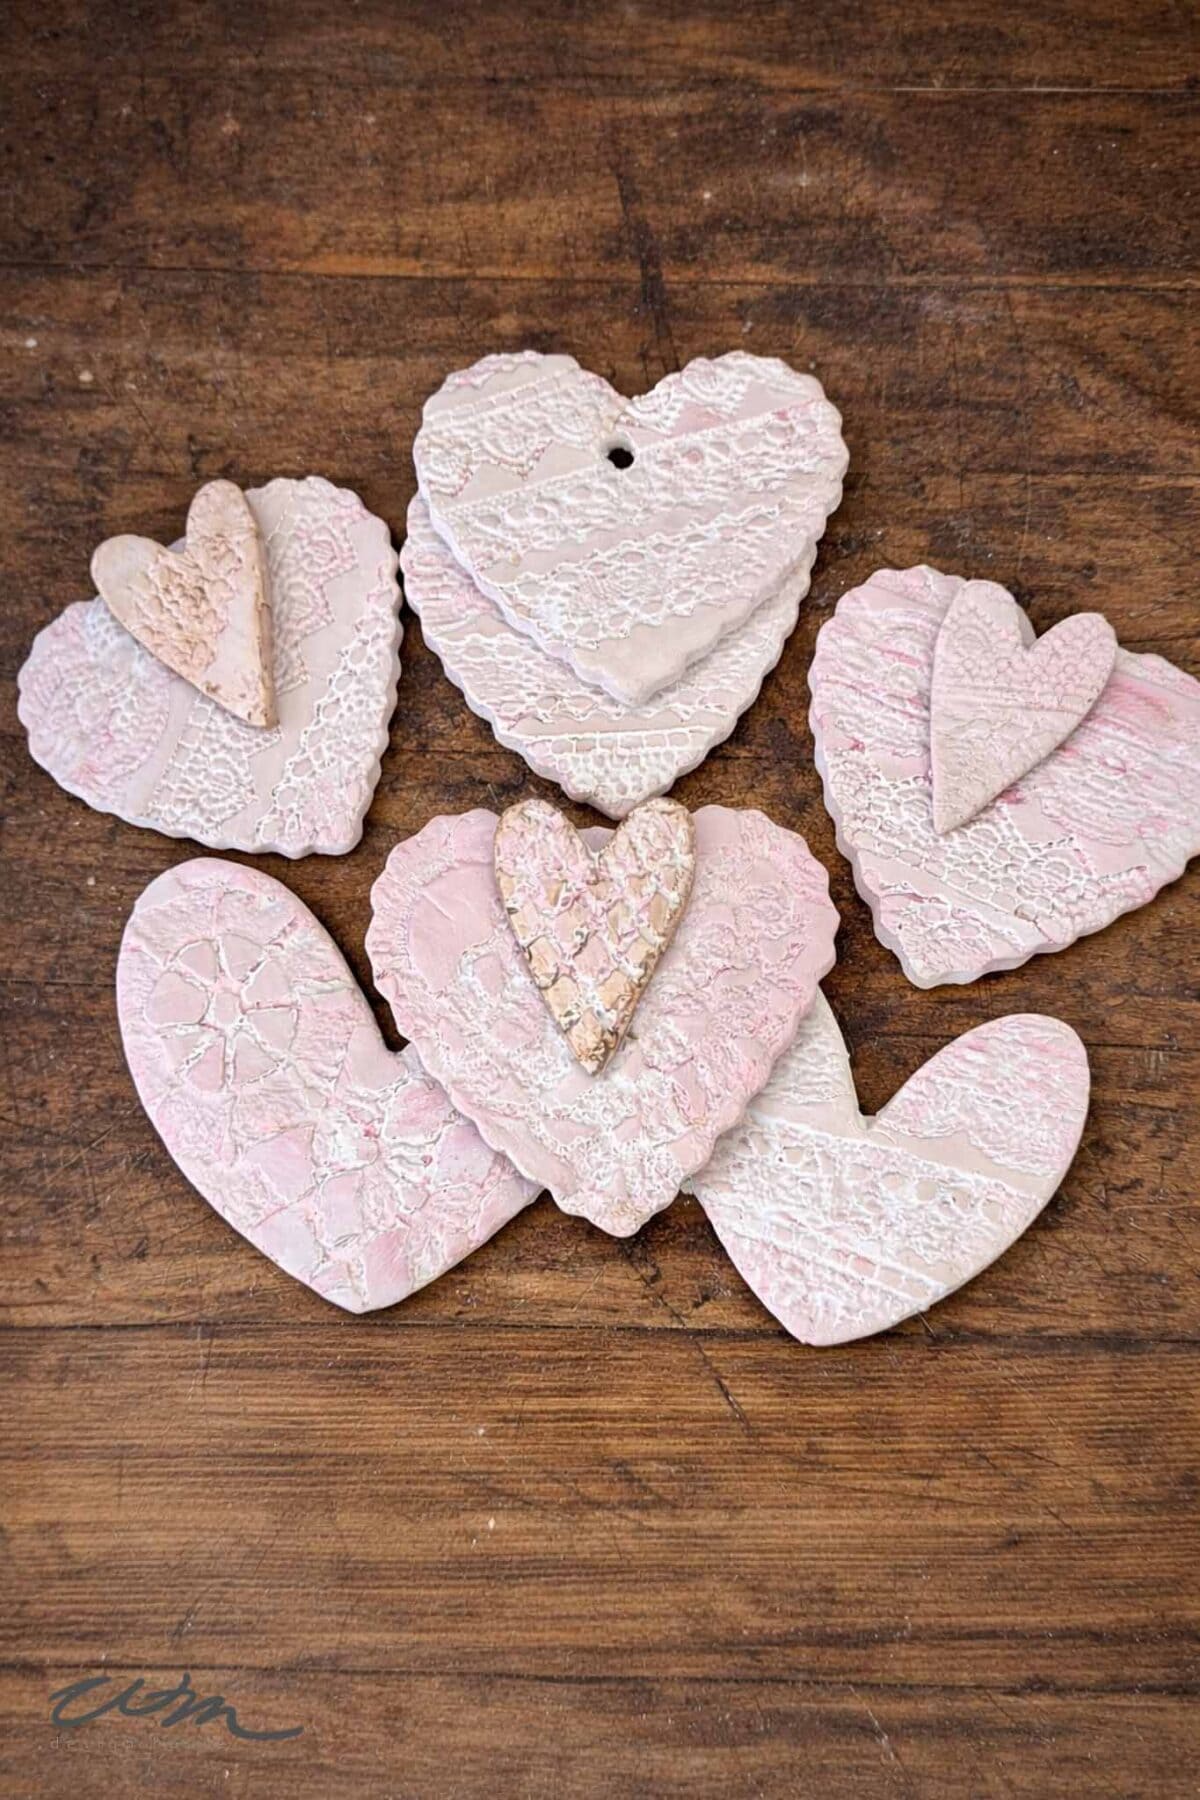
Soft Blush Wash with White Wax
To create a subtle pink finish, I mixed one part acrylic paint with four parts water to make a very light wash. Using a brush, I applied the wash over the entire heart, allowing it to settle gently into the lace texture.
After the paint dried completely, I applied a thin layer of white wax over the surface. This helps soften the color and lightly enhances the raised lace pattern without darkening it.
Tip from wendy’s craft room:
Wipe back excess paint with a soft cloth while it’s still damp if you want an even lighter effect.
Blush Wash with Dark Wax (More Vintage Contrast)
For a slightly more aged look, I repeated the blush wash but followed it with a very small amount of dark Annie Sloan wax.
The dark wax settles into the lace imprint and adds contrast, giving the hearts that timeworn, vintage lace appearance.
Apply sparingly and buff gently — a little goes a long way.
Pearlized White Wash
For a softer, almost porcelain-like finish, I used a pearlized white acrylic paint and mixed it using the same ratio — one part paint to four parts water.
It’s subtle but very pretty layered into a soft Valentines tablescape.
Natural Clay with Dark Wax
On a few hearts, I skipped paint altogether and applied dark wax directly over the natural clay once fully dry.
This method keeps the neutral tone of the clay but deepens the lace detail, creating a very natural vintage look.

How to Use Lace Hearts Around Your Home
One of the things I love most about this craft is how versatile it is. These lace hearts don’t feel overly seasonal — they just feel soft and thoughtful.
Here are a few ways to use them:
- Tie ribbon through the hole and use them as Valentine place cards.
- Attach a handwritten name tag for a layered table setting.
- Add one to a wrapped gift instead of a bow.
- Hang them from some cherry branches or a Valentine’s Day tree.
- I love styling small seasonal trays too — I shared a few Valentine tiered tray decorating ideas that layer beautifully with pieces like these.

Because you can choose to keep some neutral, they work beautifully beyond Valentine’s Day — bridal showers, spring tables, even wedding favors.

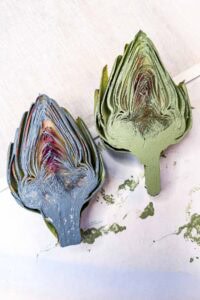
Vegetable Block Printing
Materials
- Linen or cotton fabric such as tea towels or a table runner
- Fabric paint
- Small paint roller or foam brush
- Cutting board and sharp knife
- Paper plate or paint tray
- Fresh vegetables including cabbage peppers, lettuce, artichokes, or okra
- Tip: Natural fabrics like linen and cotton absorb paint well and produce the clearest prints.
Instructions
- Prepare the Fabric
- Wash and dry the fabric before starting to remove any coatings that may prevent the paint from absorbing properly. Lay the fabric flat on a protected work surface and smooth out wrinkles. If printing tea towels or a runner, place cardboard inside or underneath the fabric to stop paint from bleeding through.
- Slice the Vegetables
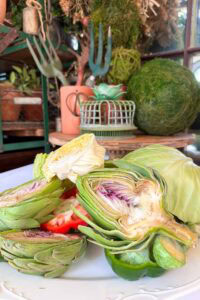
- Cut the vegetables in half to reveal the natural patterns inside. Gently pat the cut surface dry with a paper towel before applying paint.
- Apply the Paint
- Pour a small amount of fabric paint onto a plate or tray. Use a small roller to apply an even layer of paint to the vegetable. If the paint looks heavy, lightly dab the vegetable on a paper towel to remove excess.
- Stamp the Fabric
- Press the vegetable firmly onto the fabric and lift straight up without twisting. Continue stamping across the fabric to create either a repeating pattern or a more relaxed, scattered design.

Notes
A few crafting tips
For Making Air Dry Clay
- Work in smaller sections instead of trying to do everything at once. It makes the process feel calmer and more manageable.
- Lay parchment paper down first. It saves your table and makes cleanup so much easier.
- If something feels too perfect, soften it. A little imperfection often makes handmade pieces feel more collected.
- Always test your paint or wax on the back first. It’s easier to adjust before committing to the front.
- Build color slowly. Thin layers give you more control and a softer finish.
- Keep a soft cloth nearby when waxing. It’s the easiest way to control depth and distressing.
- Don’t throw away lace scraps. Even the smallest piece can create beautiful texture.
- Let pieces dry longer than you think they need. Rushing rarely improves the result.
Wrapping Up
This is one of those crafts that looks far more detailed than it actually is. The process is simple, the supplies are minimal, and the result feels thoughtful and collected.
I love when a project like this comes together — especially when it fits seamlessly into my home decor. These lace hearts feel vintage without being old-fashioned, handmade without feeling rustic, and seasonal without being overdone.
If you’re looking for a Valentine craft that leans soft and timeless instead of trendy, this might be the one.
I hope this helps, and if you try your own lace hearts, I’d love to see how you use them around your home.


Did you make this craft?
We would love to see what you have created, so mention us @wmdesignhouse or tag us using #wmdesignhouse so we can see your creations!
More about me!

Hello, I’m Wendy – a dedicated homemaker with a deep passion for decorating, gardening, cooking, and crafting. I find joy in harmonizing beautiful elements to fashion a space that is both comfortable and inspiring. I will help you create a beautiful home, one project at a time.
Connect with Wendy
Other Tutorials from WM Design House
If you love this easy air dry clay project, you might also enjoy some of my other favorite Valentine’s Day blog posts.


Hi Wendy! I love this idea for Valentine’s Day. Especially for a name cards at a table setting. Your ideas of using wax and pearlized paint to highlight the features of the lace are so creative. Your hearts turned out beautifully. Happy Valentine’s Day to you!
Hi Wendy! Your hearts are lovely, and they look so fun to make! Thanks for sharing the different ways you painted them. I’m always amazed by what a little wax can do to change the look! Happy Valentine’s Day!
These are gorgeous, Wendy! The pink hearts are my favorite. I always love how you cut the hearts so the lace runs at different, interesting angles. Anyone would love to receive one of heartfelt lace hearts!
Excellent tutorial Wendy! I’m loving all the variations of heart shapes and the finishes you came up with! Such a wonderful project and gift idea!
These are so pretty, Wendy! I love all the designs you created with the different lace and crochet patterns and how you painted some and used different waxing finishes too. They’re perfection! Big hugs, CoCo
Wendy, these are beautiful keepsakes. There are so many uses for these darling hearts. Love it!
Stunning (as always)! Love all the different effects you achieved with all the different waxes and paint washes — very inspiring!