How to Make a DIY Paper Table Runner with Tea-Stained Doilies
There’s something undeniably enchanting about vintage table decor—the way it tells a story, evokes nostalgia, and adds a touch of timeless elegance to any space. Over the years, I’ve found joy in collecting vintage-inspired pieces: delicate china teacups, eclectic plates, and more. These treasures have become the heart of my home, each one adding its unique flair to my decor. One of my favorite ways to showcase these finds is by creating a DIY paper table runner that complements their charm and brings the whole look together.
This simple tea-stained paper doilies project transforms ordinary paper into a stunning centerpiece with vintage charm. Whether for a cozy family dinner in February, a spring brunch in April, or a festive gathering in December, this table runner sets the perfect tone any time of the year.
In this post, I’ll guide you through the steps to craft an inexpensive handcrafted table runner using tea-stained doilies. We’ll explore selecting the right materials, achieving the desired antique hue, and assembling a runner that complements your table setting beautifully. So, gather your supplies, and let’s infuse your home with vintage charm!

On my blog WM Design House, I may sometimes use affiliate links, which means a small commission is earned if you purchase via the link. The price will be the same whether you use the affiliate link or go directly to the vendor’s website using a non-affiliate link. Read my full disclosure policy here.
Hand Crafted Society
Today marks another exciting installment of our Handcrafted Society series, where a group of creative bloggers comes together to craft projects centered around a common theme.
This month, we’re all about doilies—those delicate, lacy pieces that add a touch of vintage charm to any project. It’s always fascinating to see the unique interpretations each member brings to the table.
So, grab your favorite cup of coffee, get cozy, and join us as we showcase our latest DIY creations. You’re sure to find inspiration for your next crafting adventure!
Don’t forget to check out the links to all the bloggers’ projects at the end of this post.
Why Choose a Doily Table Runner?
Doilies bring an elegant, old-world feel to any table. When tea-stained, they exude a rustic, farmhouse vibe that’s timeless and trendy. Pairing them with kraft paper or butcher paper creates a beautiful base, making your DIY paper table runner stand out.

DIY Paper Table Runner with Tea Dyed Doiles
Materials
* Paper doilies: Available in various sizes at craft stores like Hobby Lobby or online.
* Brown kraft paper or white wrapping paper: Serves as the base for your table runner.
* Black tea bags: For staining the doilies.
* Large pot: To brew the tea.
* Tongs: For handling hot doilies.
* Drying rack or parchment paper: To dry the stained doilies.
* Glue dots or double-sided tape: To attach doilies to the paper.
* Clear spray sealant: Optional, for added durability.
Instructions
Brew Tea: Boil water and steep 6–8 black tea bags until the tea is dark. Let it cool completely.
Stain Doilies: Submerge doilies in the cooled tea. For a vintage look, gently crumple them before soaking. Soak for 5 minutes to 1 hour, depending on desired color intensity.
Dry Doilies: Carefully remove doilies and lay them flat on a drying rack or parchment paper. For quicker drying and a more antique effect, place them in the oven at 200°F for a few minutes.
Prepare Base: Roll out kraft or butcher paper to your desired table runner length.
Assemble Runner: Arrange the dried doilies on the paper, overlapping them slightly for a lace-like pattern. Secure with glue dots or double-sided tape.
Seal (Optional): For added durability, especially if reusing, apply a clear spray sealant over the entire runner. Let it dry completely before use.

Step-by-Step Guide: How To Make A Simple Table Runner
Step 1: Tea-Staining the Doilies
Prepare the Tea Bath:
Boil water in a large pot and add 6–8 black tea bags.
Let the tea steep until it reaches a rich brown color.
Remove from the heat and allow it to cool completely.
Tip from wendy’s craft room:
Cooling the tea is very important as the hot tea will tear the doilies.
Soak the Doilies:
- Submerge a few doilies at a time, using tongs to ensure they are thoroughly soaked.
- Be cautious, as the paper can be fragile after soaking; using your fingers might offer better control.


Enhance the Vintage Charm with Texture:
- For a more aged, textured aesthetic, gently crumple your paper doilies before immersing them in the tea bath.
- This technique creates creases that absorb more dye, resulting in a deeper, more antique appearance.
- In my experience, leaving the doilies crumpled during the soaking process yields a more dramatic, vintage-inspired effect than laying them flat.
Tip from wendy’s craft room:
For a beautifully aged and textured look, try gently crumpling your paper doilies before submerging them in the tea bath. This technique creates creases that absorb more dye, resulting in a deeper, more antique appearance. In my experience, leaving the doilies crumpled during the soaking process yields a more dramatic, vintage-inspired effect than laying them flat. This simple step adds depth and character to your tea-stained doilies, enhancing the overall charm of your table runner.
Experiment with Soaking Times:
- 5 minutes: Light, subtle tint.
- 20–30 minutes: Medium, aged look.
- 1 hour or more: Deep, rich stain.
- Feel free to experiment to achieve your desired shade.


Step 2: Drying Your Paper Doilies
After staining, carefully lay the doilies flat on a drying rack, parchment paper, or paper towels to dry completely.
For a more antique effect, you can also dry them in the oven at a low temperature (around 200°F) for a few minutes. I also love how quickly they dry in the oven.
Tip from wendy’s craft room:
If you’re working in a small space or need to dry multiple doilies quickly, the oven method is a fantastic solution.


Step 3: Preparing the Base
Roll out your kraft paper or butcher paper to the desired length of your table runner. This base adds stability and a neutral background that complements the tea-stained doilies.
Step 4: Assembling the DIY Paper Doilie Runner
Lay out your largest doilies in a pattern all the way down the center of the table
Add medium and small doilies, overlapping them slightly to create an organic, lace-like pattern.


Once satisfied with the layout, use glue dots or double-sided tape to attach the doilies to the kraft paper.
Tip from wendy’s craft room:
For convenient storage, I prefer not to attach the doilies to the kraft paper base. Instead, I simply lay them out on the table when setting up. This approach allows me to stack the doilies neatly after use, making them easier to store and preserving their delicate structure for future projects.
To keep your doilies in perfect condition, consider layering them with acid-free tissue paper and storing them flat in a clean, dry container away from direct sunlight and moisture. This method will prevent them from losing their shape or tearing over time.

Styling Ideas
There are so many beautiful ways you can style this handcrafted table runner to enhance your vintage table decor.
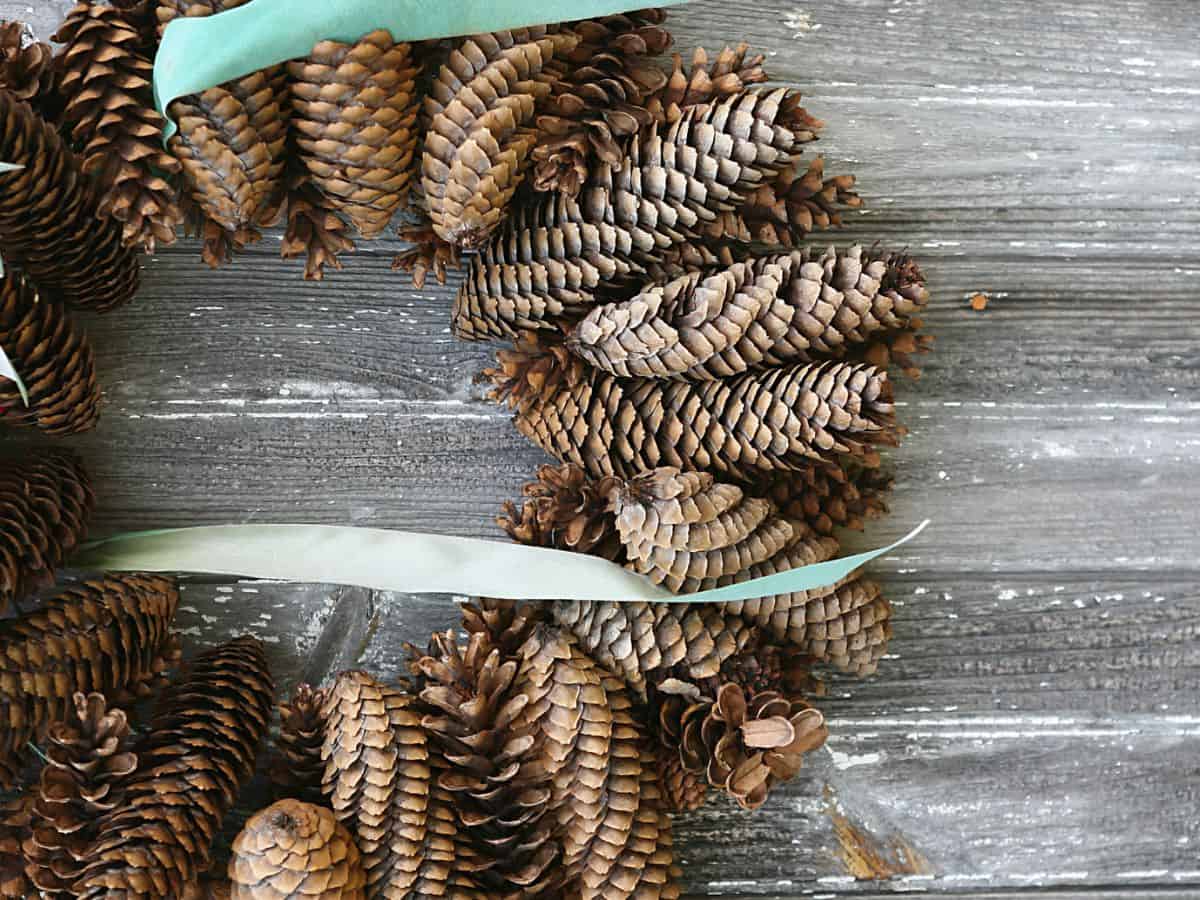
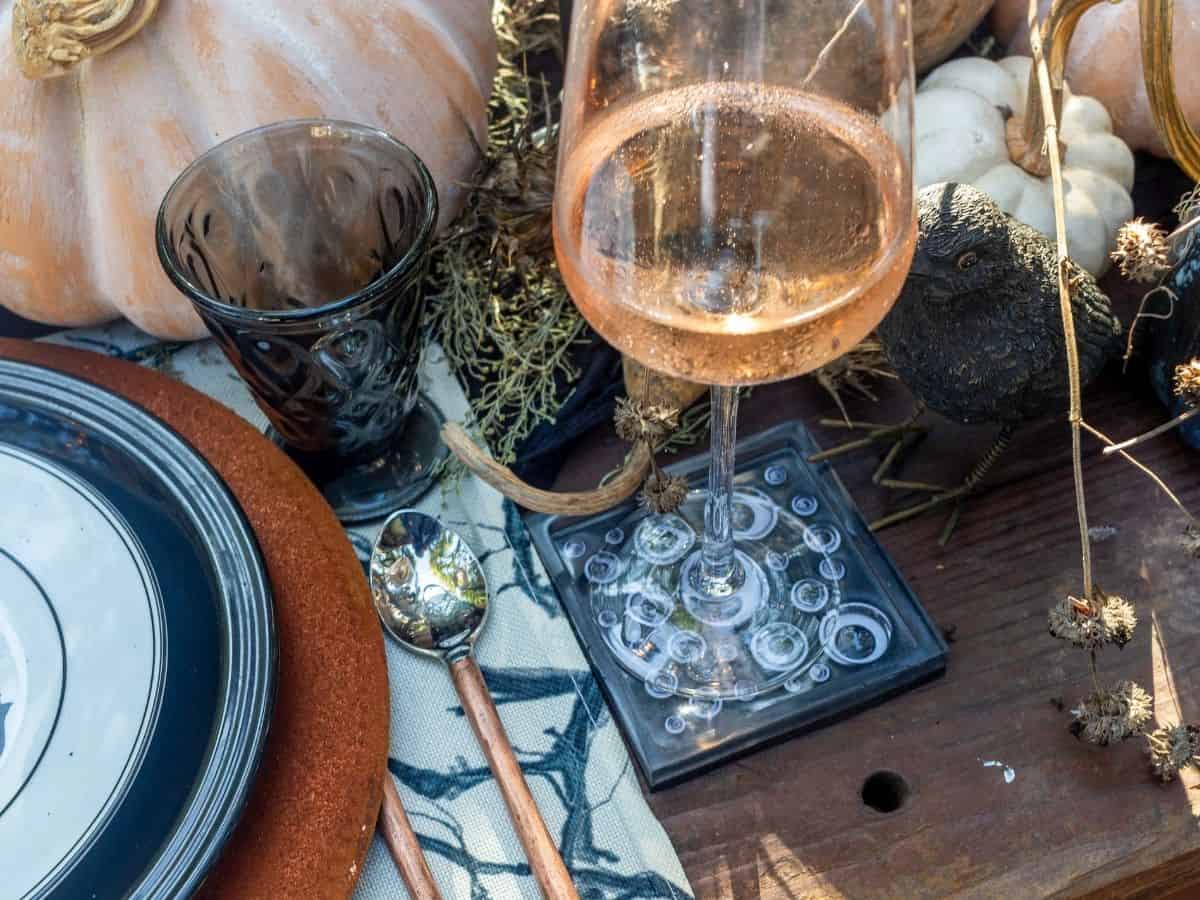
Thanksgiving Warmth:
Layer your tea-stained doily runner with natural elements like autumn leaves (dyed with coffee stain), mini pumpkins, and pinecones. Add amber glassware and brass candlesticks to enhance the cozy, rustic ambiance.
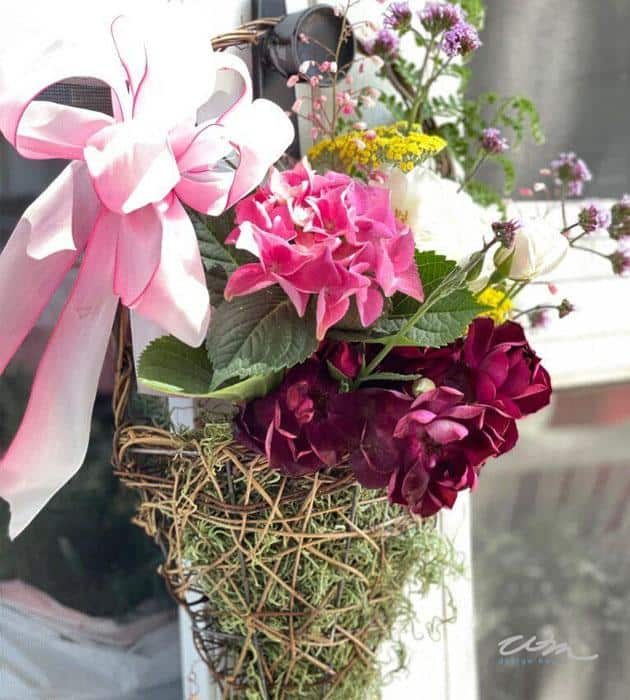
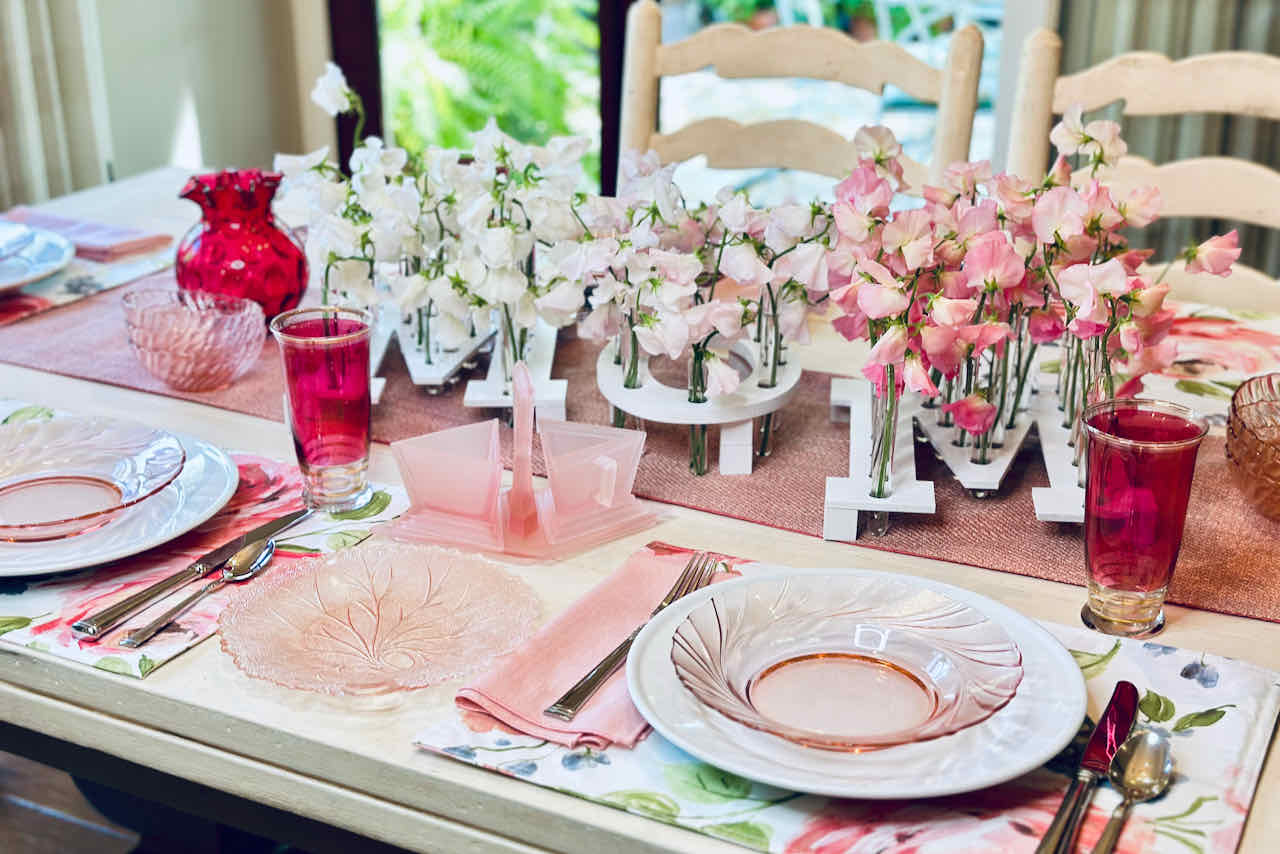
Spring Garden Party:
Pair your doily runner with pastel-colored tableware and fresh flowers like tulips, sweet peas or daffodils. Incorporate soft linens and vintage teacups for a charming springtime setting.

Tip from wendy’s craft room:
For added durability, especially if you plan to reuse the runner or doilies, apply a clear spray sealant over the entire surface. Allow it to dry completely before using.
Tea Parties:
Set the runner on a coffee table with an assortment of teas, scones, and finger sandwiches. Complement with vintage teapots and lace napkins for a classic tea party feel.
Additional Tips and Tricks
While I have shared many of my tips with you already, here are a few other fun ideas to enhance your project.
1. Experiment with Colored Teas for Subtle Hues in Your Tea-Stained Doilies
Venture beyond traditional black tea by using herbal or fruit-infused teas. For instance, cranberry or hibiscus teas can impart a soft pink or reddish tint to your materials. These natural dyes offer a gentle wash of color, perfect for adding a unique touch to your projects.
2. Sprinkle Instant Coffee for a Distressed Vintage Look
After removing your doily or fabric from the tea bath and while it’s still damp, lightly sprinkle instant coffee granules over the surface. As it dries, the coffee creates darker speckles and stains, enhancing the aged, antique appearance. This technique adds depth and a timeworn charm to your pieces.
3. Deepen Tones with Espresso or Strong Coffee
Incorporate a cup of brewed espresso or strong coffee into your tea mixture to achieve richer, deeper tones. The concentrated coffee intensifies the color, providing a more pronounced vintage effect. This method is especially effective for materials that you want to have a more dramatic aged appearance.
4. Add a Touch of Rit Dye for Custom Shades
For a personalized color palette, consider adding a small amount of Rit dye to your tea bath. This allows you to achieve specific hues while maintaining the natural, aged look that tea-dyeing provides. Experiment with different dye colors to find the perfect shade for your project.
Other Fun Projects
While you’re feeling crafty, why not check out a few other fun DIY projects? They’re super easy to make and guaranteed to add a little extra charm to your home (and a smile to your face)!


Wrapping Up
That wraps up today’s project! I hope this budget-friendly DIY has inspired you to create a beautiful handcrafted table runner that adds charm to your vintage table decor. Don’t forget to explore the incredible creations from my fellow bloggers—it’s always a joy to see the unique ways everyone incorporates doilies into their designs. Their links are at the end of this post, so be sure to check them out for more inspiration.
Happy crafting!


Did you make this craft?
We would love to see what you have created, so mention us @wmdesignhouse or tag us using #wmdesignhouse so we can see your creations!
More about me!

Hello, I’m Wendy – a dedicated homemaker with a deep passion for decorating, gardening, cooking, and crafting. I find joy in harmonizing beautiful elements to fashion a space that is both comfortable and inspiring. I will help you create a beautiful home, one project at a time.


Great idea Wendy! I’ll have to save this one for our next tea party! Of course your vintage and antique plates really add to the look.
Beautiful table!
♥️ Kathy
Thank you Kathy, it is a super easy way to decorate the table, especially for a tea.
Wendy, these don’t even look like paper doilies! What a cute table runner! Definitely going to try this! Thank you!
Thank you Amy! it’s super easy and a fun project.
Wendy – First I love anything with “tea stain”. It always has that romantic vintage country look. Your runner turned out beautifully and I particularly love the variation in colors. Thanks for the tip about drying them in the oven. This is definitely on my list of projects to make!
Hi Wendy, Thanks for showing us how to make plain doilies look like vintage treasures! I adore how you made a gorgeous table runner with them! It’s the perfect base for your pretty centerpiece and dishes! I’m pinning this so I can try it sometime!
Such a cute idea! I’m hosting a bridal shower this summer and this just might be the perfect table runner for our event!
What a NEAT project, Wendy!! Super creative and extra-unique! What a special DIY to use on any table!
I love this so much Wendy! I’ve created a runner with linen pieces but this is genius. I love how you distressed them. This would be great to use for a seafood boil or crab feed. It’s easily disposable but looks like a million bucks! Your assorted china is lovely too. XO- MaryJo
From the photo, I would have never realized they were paper until reading on. Love how you made them look vintage and soft. A great tablescape for a tea party or ladies brunch. Love the idea, Wendy.
Wendy, What a beautiful runner you have created with some simple steps! This is perfect for so many table setting ideas! Thank you for sharing your lovely table and the creative runner!
Wendy
This is so adorable. Love your creativity. I’ll share on Sunday.
I can’t get over how these paper doilies look like vintage and antique ones, Wendy, that is so cool! I love how delicate they are yet easy to create, store and use in multiple seasons too. I can’t wait to try a pink version! Sending you hugs and hoping your spring has been filled with all good things, CoCo