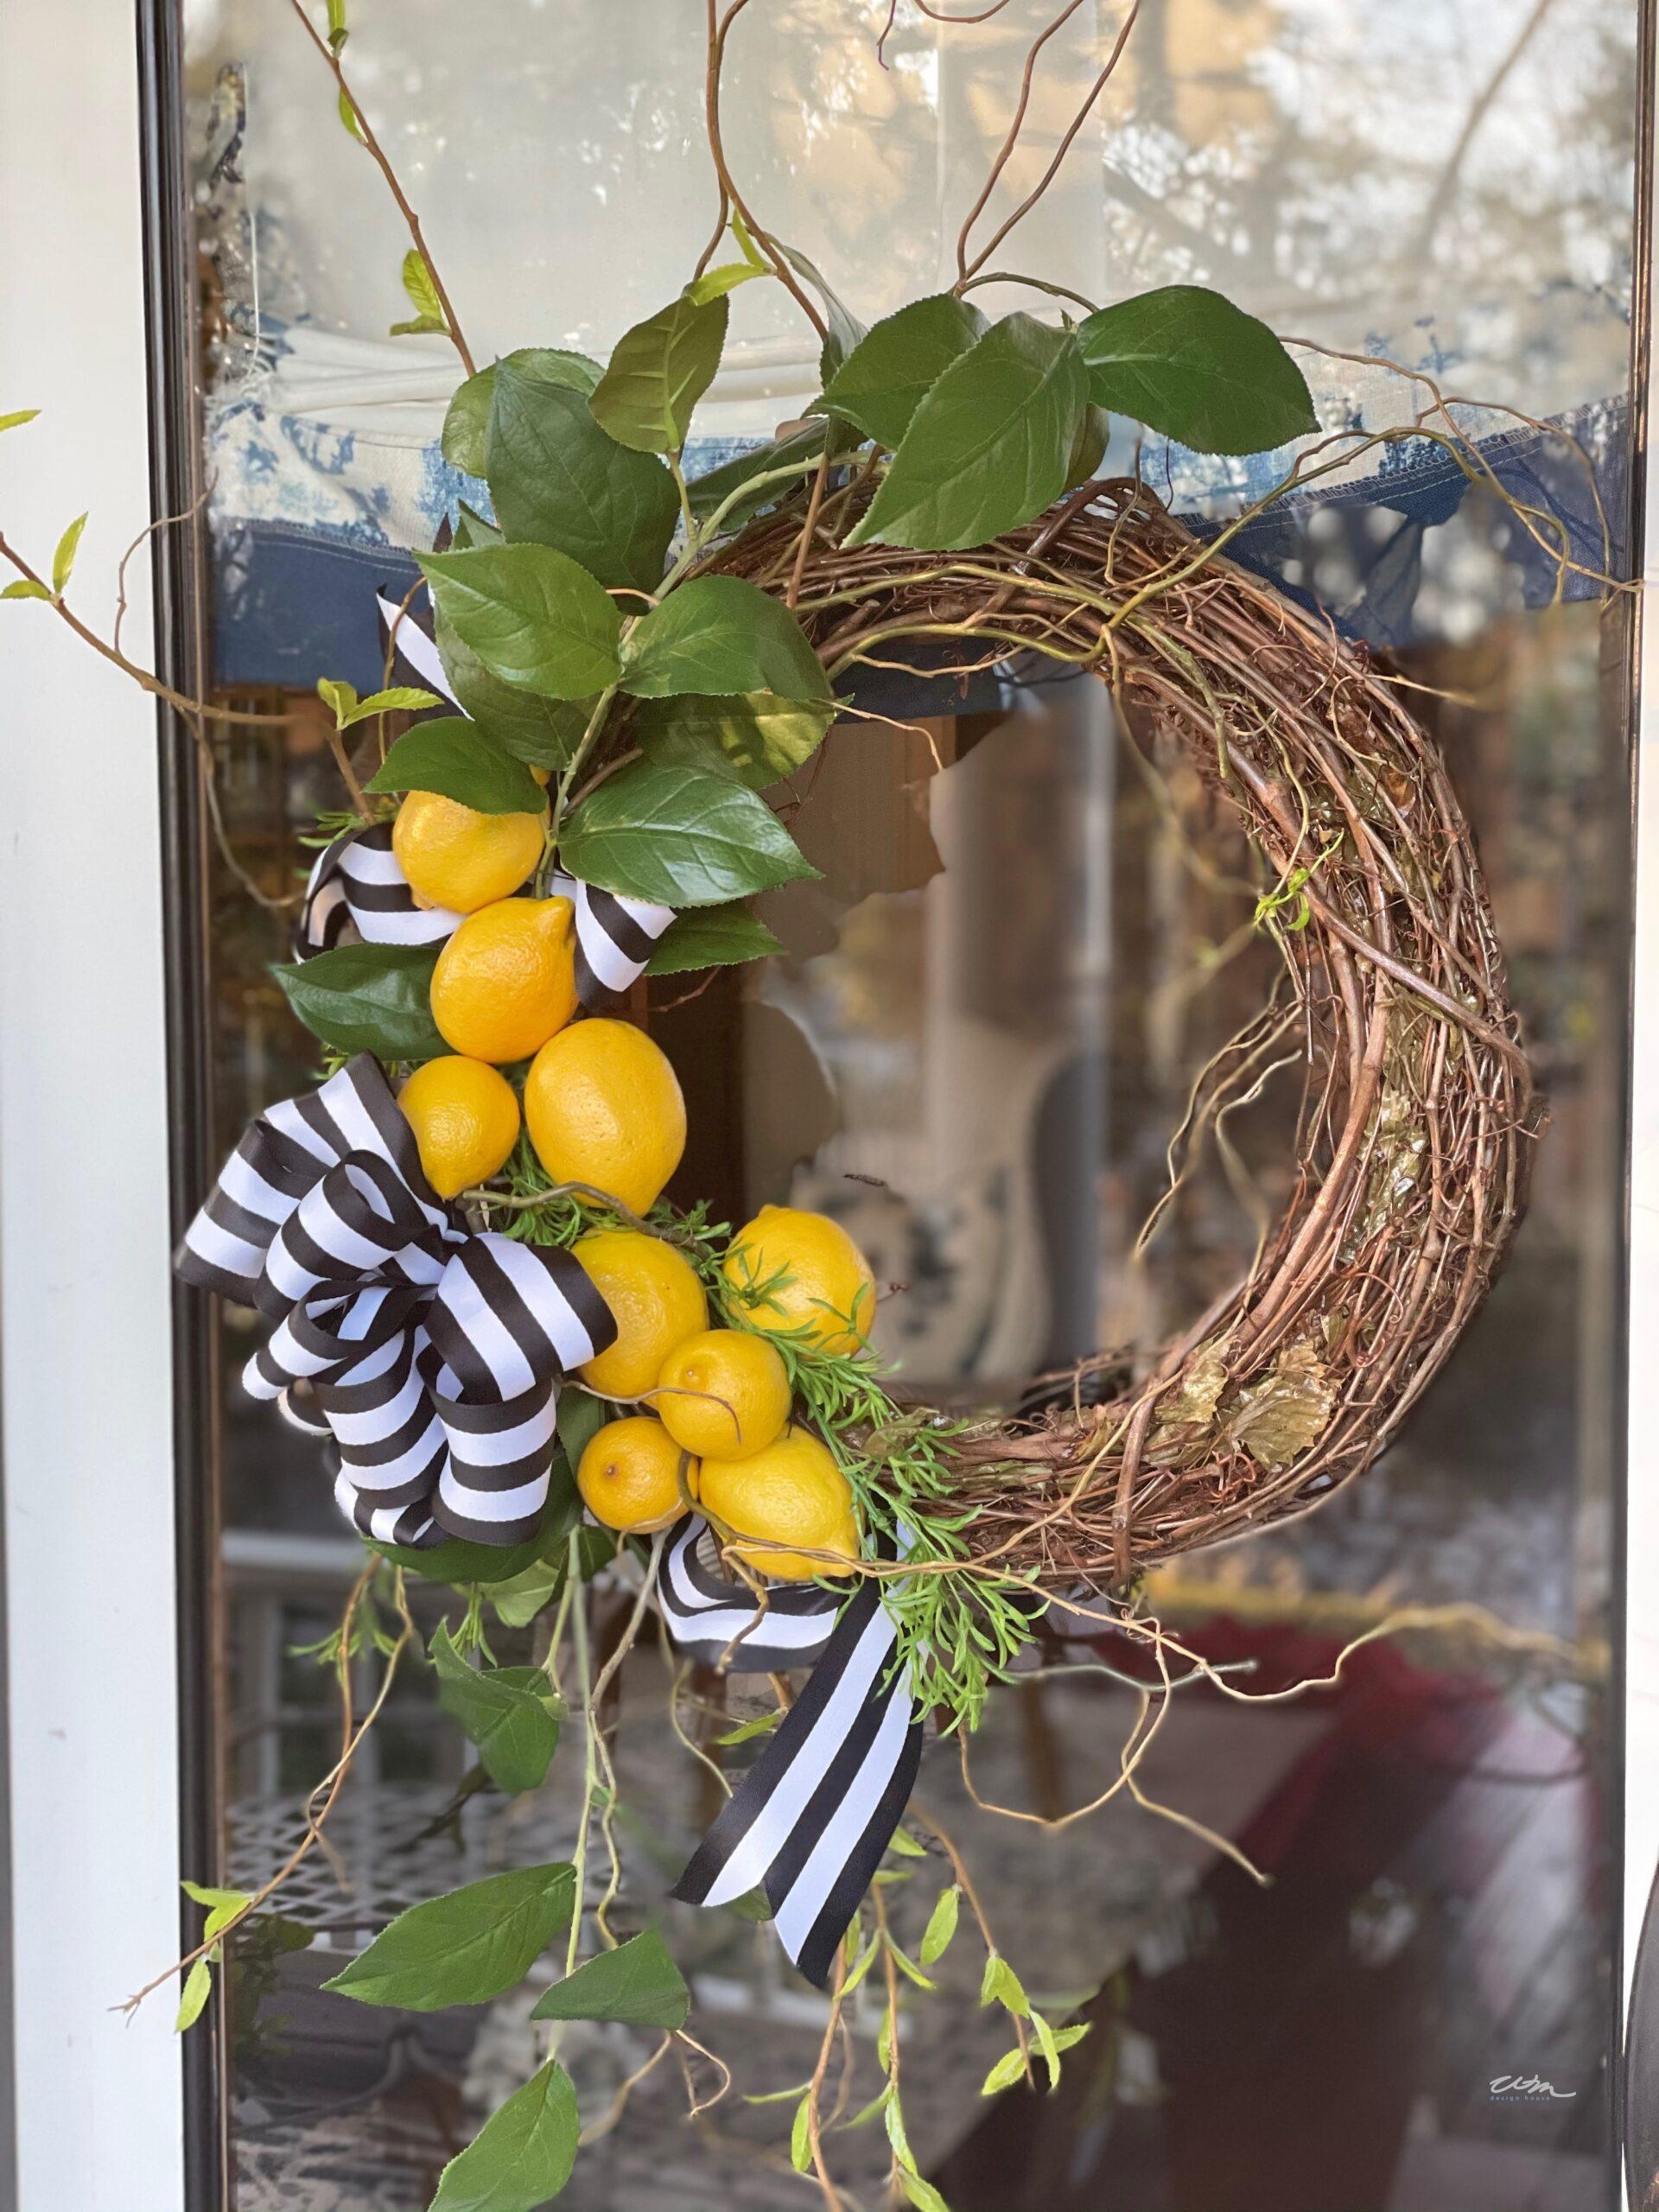
Easy DIY Easter Bunny Wreath from the Dollar Tree
Get ready for some fun and creative Easter crafts! Let’s dive into a budget-friendly project this season and make a charming Easter bunny wreath. With affordable supplies from Dollar Tree, you can create a festive and cheerful decoration that’s easy on your wallet and makes an adorable front door decoration. Let’s get crafting!
On my blog WM Design House, I may sometimes use affiliate links, which means a small commission is earned if you purchase via the link. The price will be the same whether you use the affiliate link or go directly to the vendor’s website using a non-affiliate link. Read my full disclosure policy here.
Easy DIY Easter Bunny Wreath
As spring approaches, it’s time to embrace the season with some handmade Easter decorations.
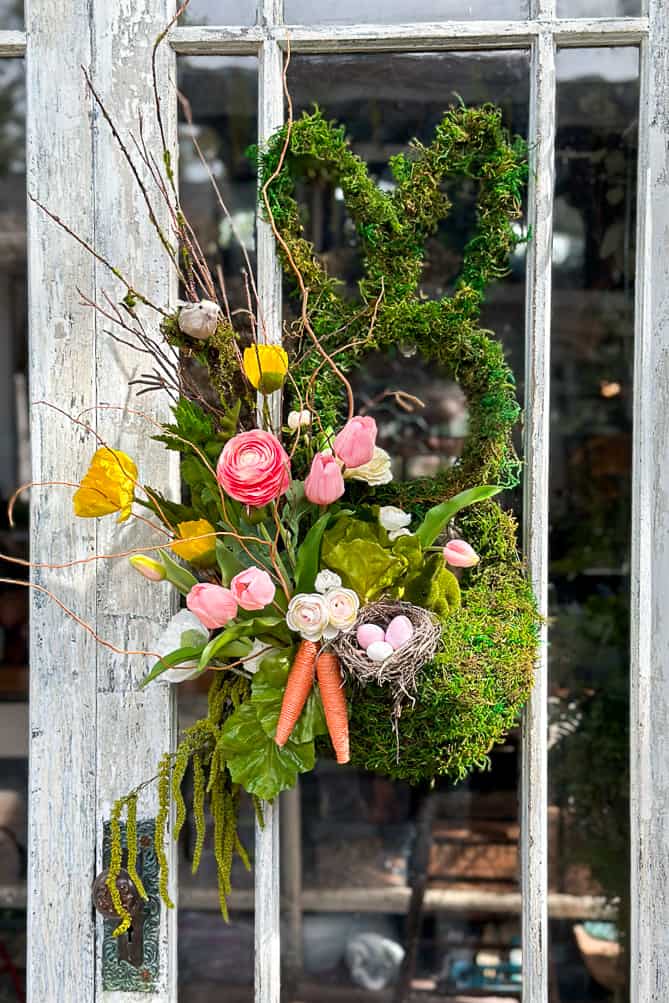
What better way to start than crafting a charming Easter bunny wreath for your front door? With the promise of blooming flowers and warmer days, this DIY project is a delightful introduction to the upcoming Easter celebrations. Using a bunny head wire wreath form and an Easter egg wreath form, I crafted this DIY Easter wreath with a pop of color for a festive touch.
Pinterest Challenge
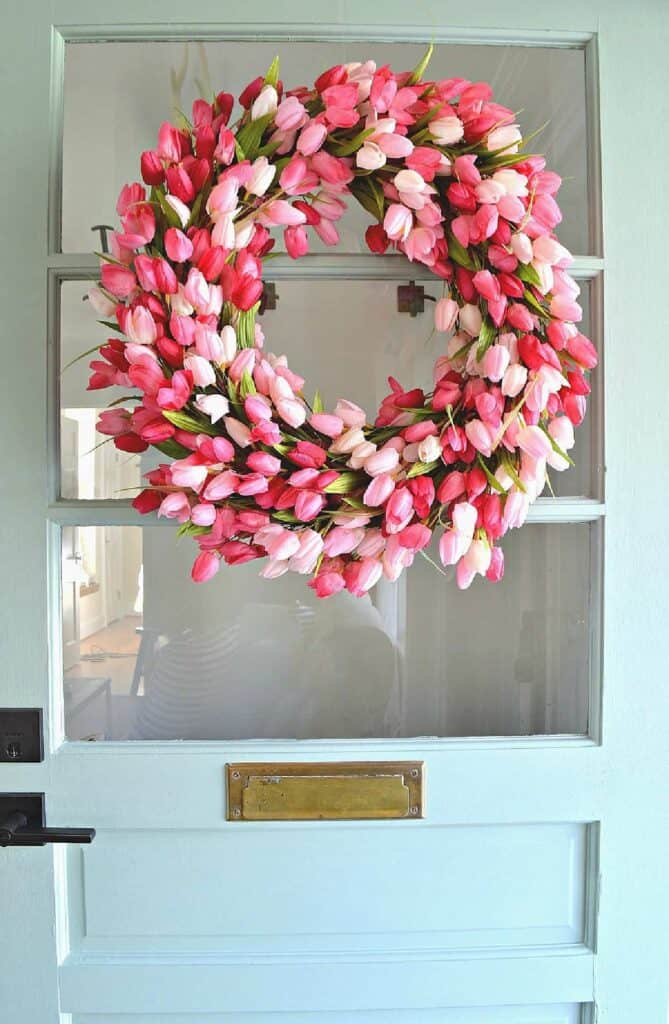
Today is the Pinterest Challenge dedicated to beautiful spring door decor. If you are not familar with this challenge. Several of us bloggers get together and are given an image from Cindy @countyroad407 to inspire us and we are to recreate our own version to share with you all.
This month, our image is from Kristi’s post @ChatfieldCourt.com. Don’t you adore this gorgeous wreath? I wonder how many tulips she used?
I thoroughly enjoy seeing creative bloggers coming together to share their creations.
If you have come over from my friend Michelle @thistlekeylane, welcome. I adore Michelle and her creativity.
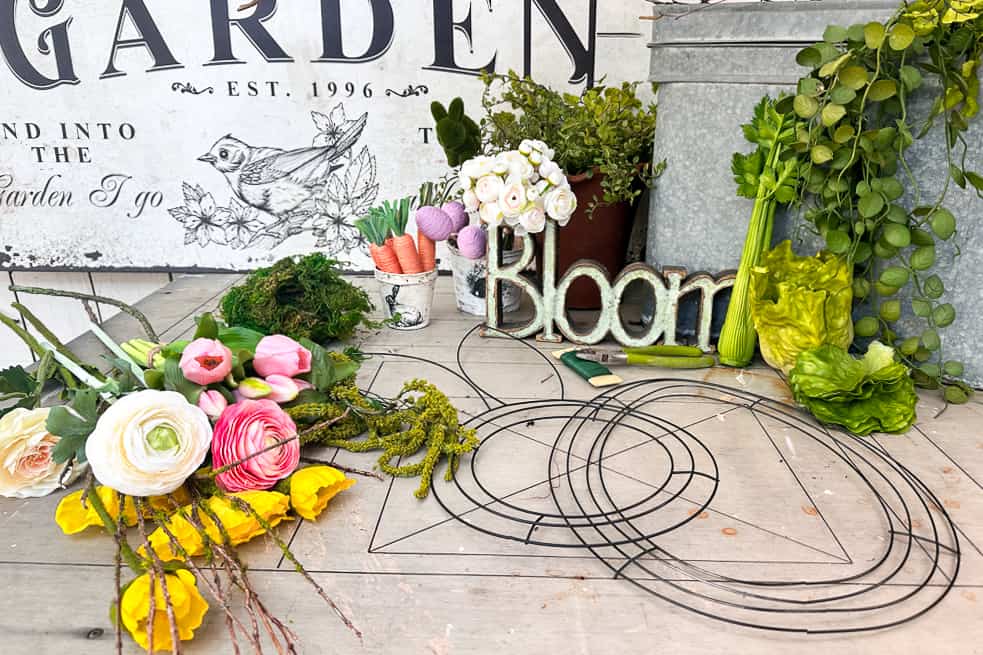
Materials You’ll Need to Make an Easy Easter Wreath
I mainly purchased Dollar Tree items, with a few exceptions I had at home or picked up on Amazon. This made the wreath very cost-effective. Of course, you can also buy your craft supplies at most local craft stores.
Additional Tools You’ll Need to Make a DIY Easter Bunny Wreath Dollar Tree
Simple DIY Easter Bunny Wreath
Follow these simple steps to create the cutest little Easter Bunny wreath!
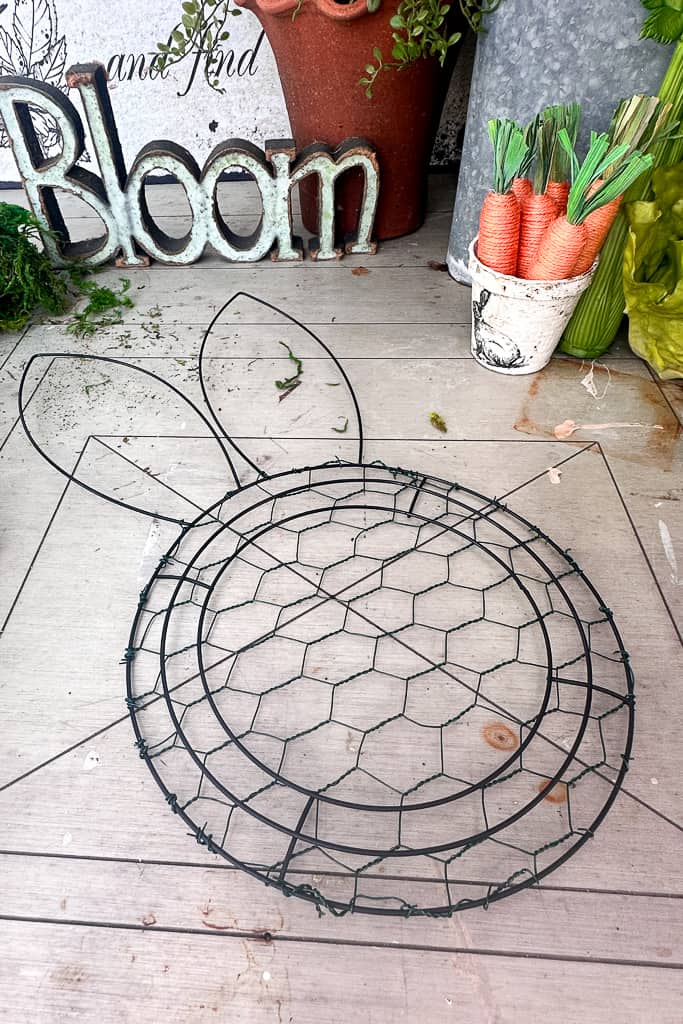
Step 1: Attaching Chicken Wire to the Wreath Frames
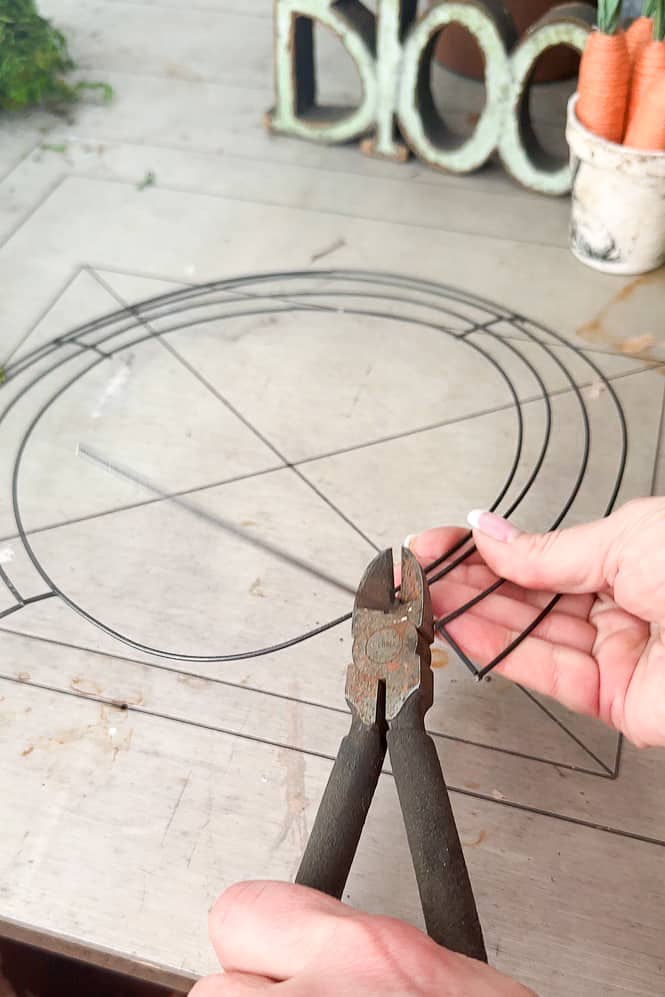
- Begin by placing a piece of chicken wire behind the bunny’s face. Cut it into a circular shape and securely wrap the ends around the sides of the bunny wreath frame.
- Next, use wire cutters to remove the top section of the Easter egg wreath base. Then, place a piece of chicken wire behind the Easter egg frame and wrap the ends around the sides to hold it in place.

Tip from wendy’s craft room:
Use floral chicken wire, as it is softer and easier to work with vs the traditional chicken wire you purchase at Home Depot. (You can find where to buy this wire by clicking on the link in the supply list).
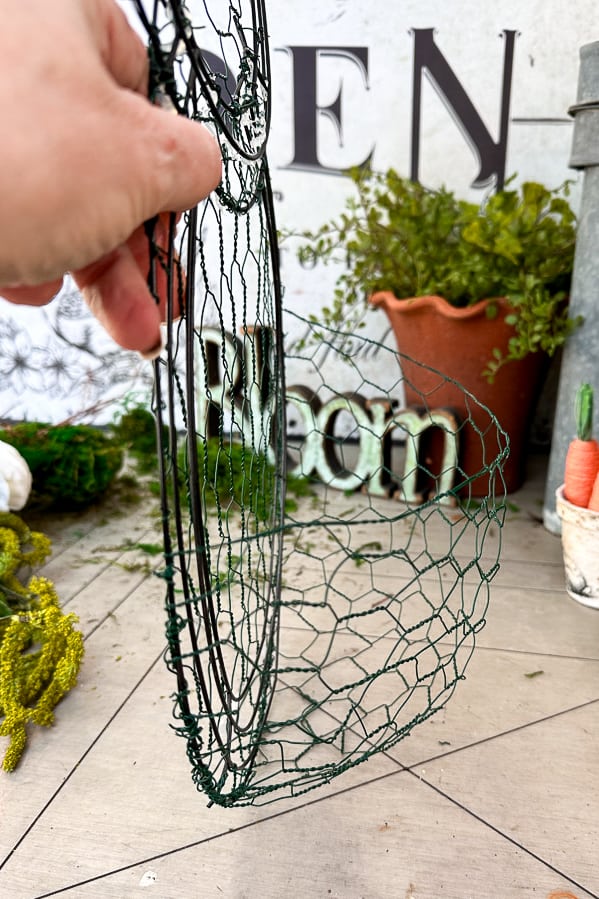
Step 2: Connecting the Wire Wreath Frames
- Cut a long piece of floral wire and secure one end to the top of the egg-shaped frame. Then, weave the wire in and out along the frames to tightly connect them, just like in the image below.
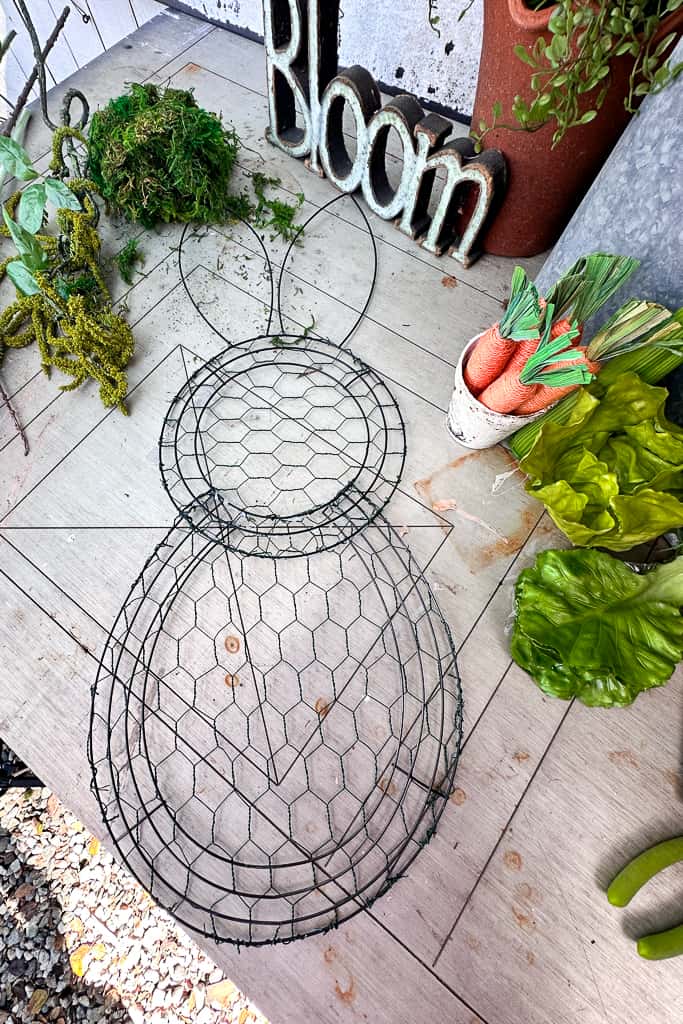
Step 3: Construct the Bunny’s Basket
Cut a piece of chicken wire approximately 12 inches tall by 20 inches wide. Shape it into a pouch or basket on the front of the bunny’s body, molding and trimming as needed to achieve the desired shape.
For a clean finish, use the smooth, finished edge of the chicken wire at the top of the basket. Ensure the basket is spacious enough to accommodate a flower arrangement.
Position the basket so that it extends about 6 inches from the bunny’s body. Secure it by wrapping the ends of the chicken wire around the frame, starting from the left side, then attaching the right side, and finally securing the bottom.

Tip from wendy’s craft room:
Attaching a little bit of the chicken wire on each side at a time will make molding the basket easier.
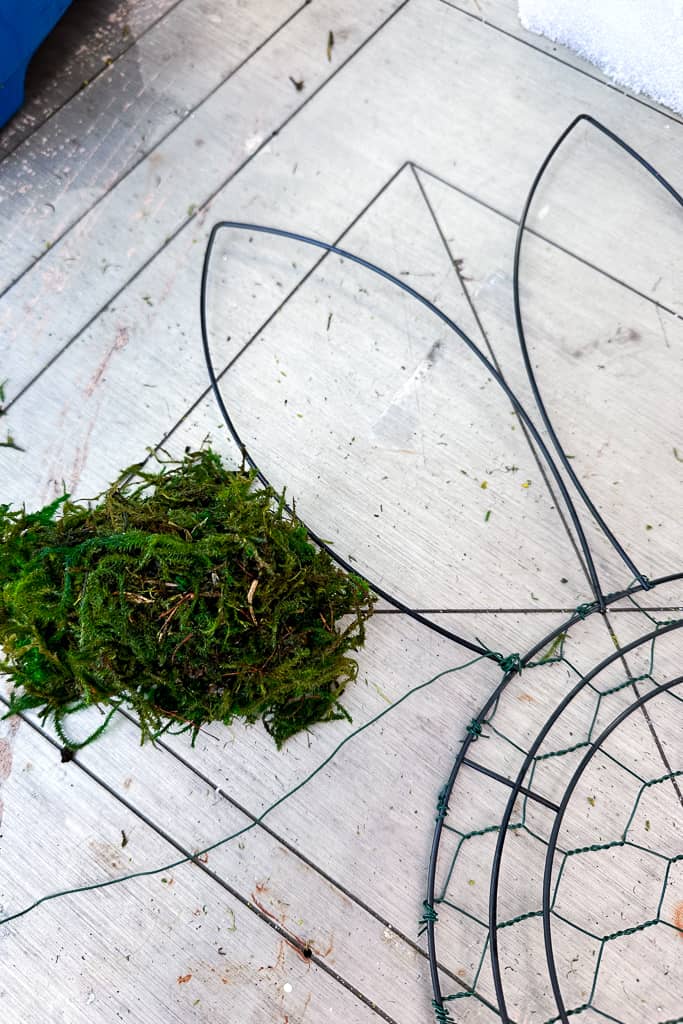
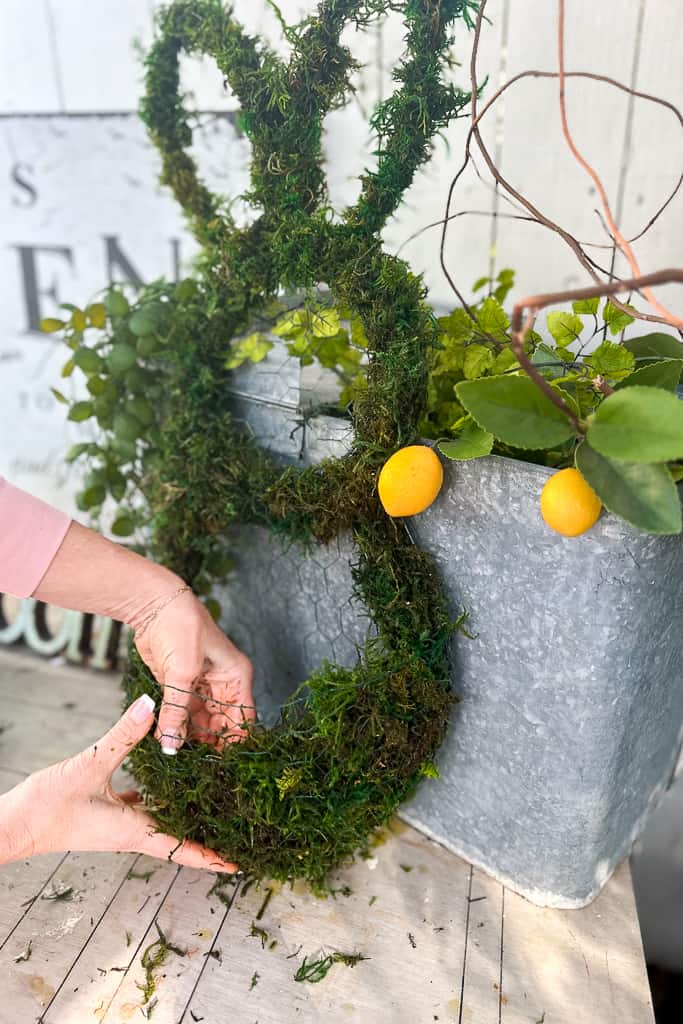
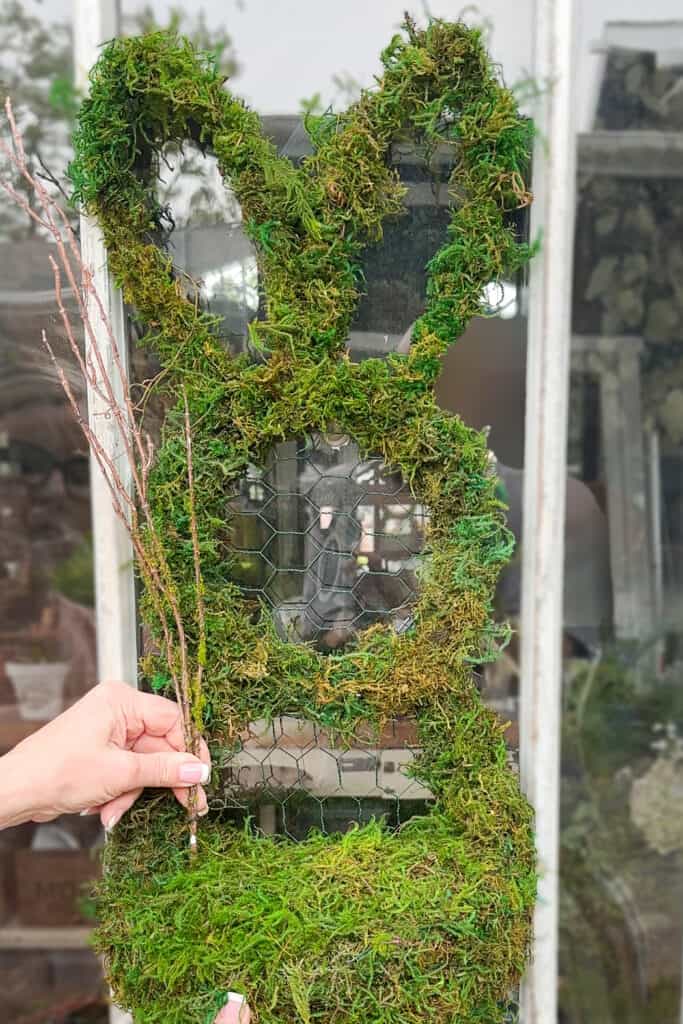
Step 4: Adding Moss to the Wire Wreaths
- Begin by soaking the moss in a bucket of water for a few minutes.
- Start with the bunny ears:
- Attach the end of the paddle wire to the bottom of one ear (don’t cut the wire).
- Squeeze excess water from a handful of moss and wrap it around the wire ear.
- Secure the moss by wrapping the spool wire around it, repeating the process until the entire ear is covered.
- Repeat the same steps for the second ear.
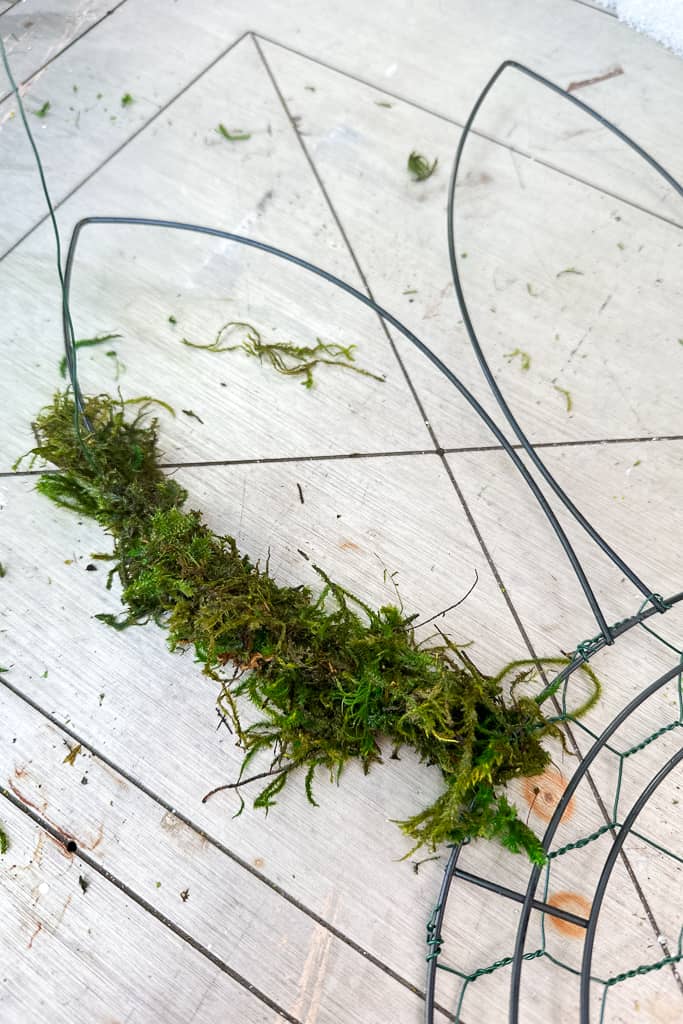
- Insert small pieces of damp moss into the sections of the wire wreath frame surrounding the rabbit’s face, pressing them firmly against the chicken wire to secure them in place.
- Then, using the paddle wire, wrap around the rabbit’s face and continue down both sides of the body, extending approximately 4-6 inches from the bottom of the face. This will help hold the moss securely in place.
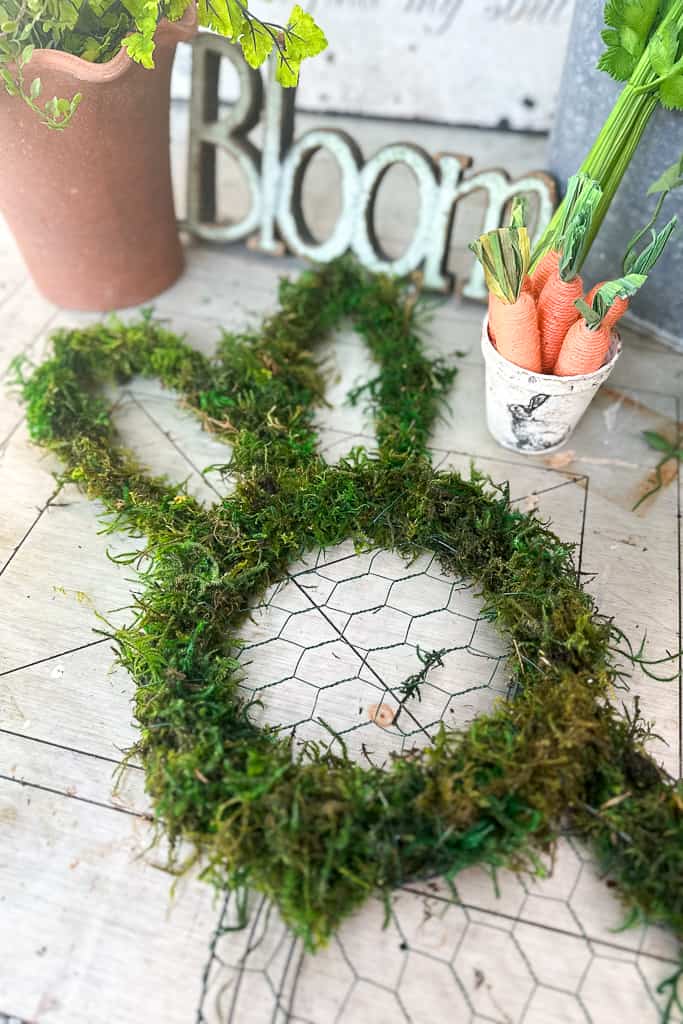
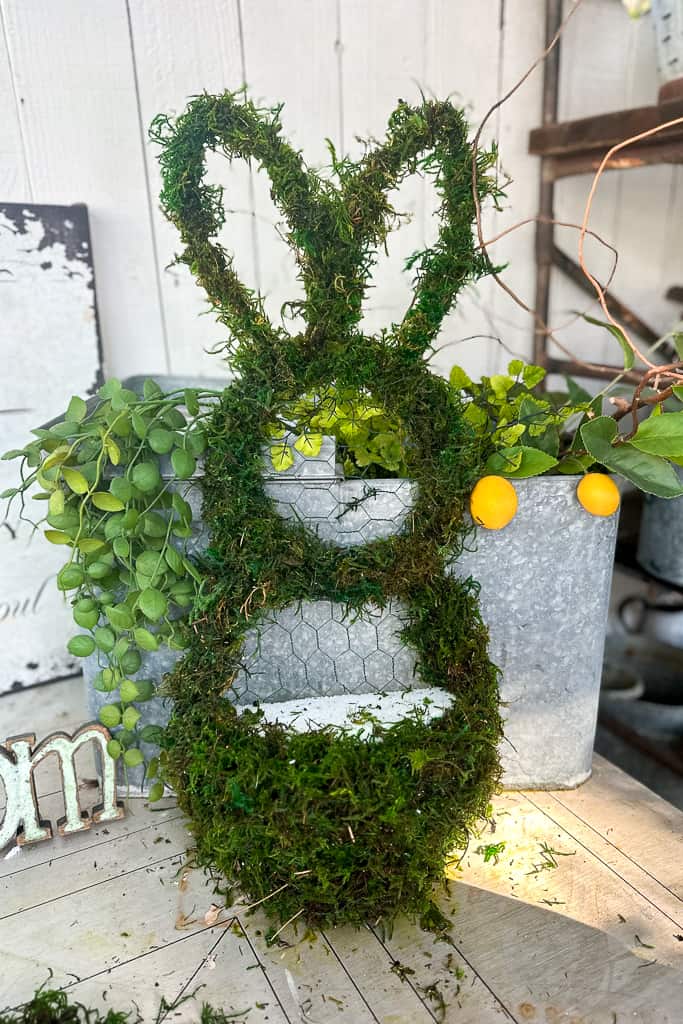
- Line the inside of the basket with damp moss, starting from the bottom and working your way up to the top. There’s no need to cover the back, as it will rest against the door.
- Next, place a piece of styrofoam inside the basket. If the foam sits too low, add extra moss underneath for additional thickness. I used a half-circle piece of foam cut in half, but you can also use a small foam block and surround it with moss to fill the space.
- Finally, cover the top of the foam with a thin layer of moss and secure it with a few floral pins.
- Let the wreath dry overnight or until the moss is completely dry.

Tip from wendy’s craft room:
Soaking the moss in water before wiring it onto the frame will make this job much more manageable and yield better results.
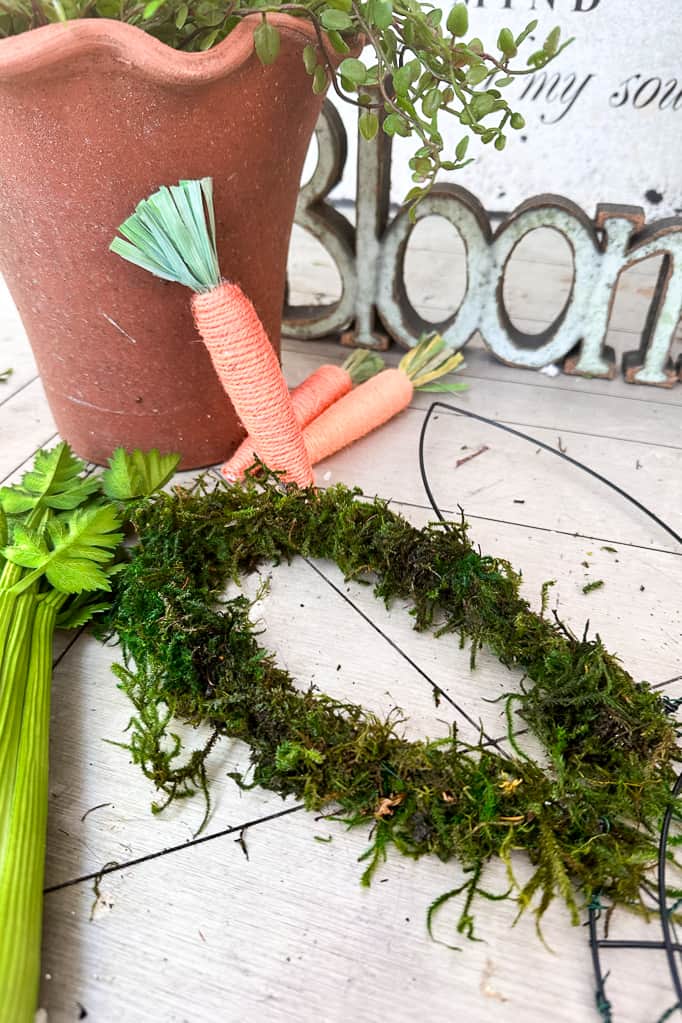
Step 5: Filling your Easter Basket with a vegetable and flower arrangement
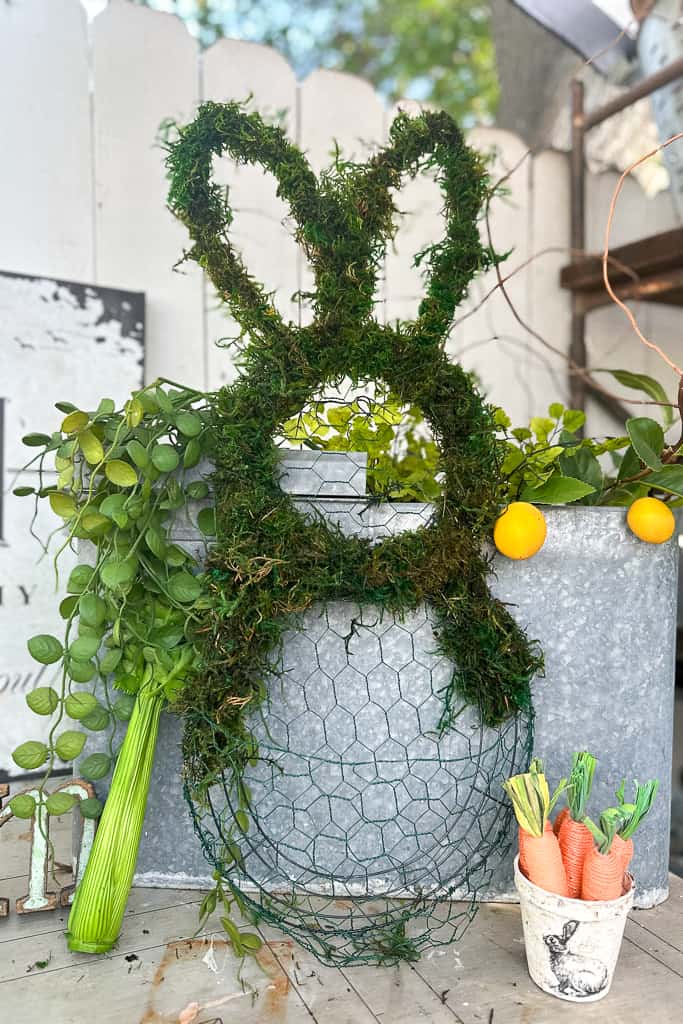
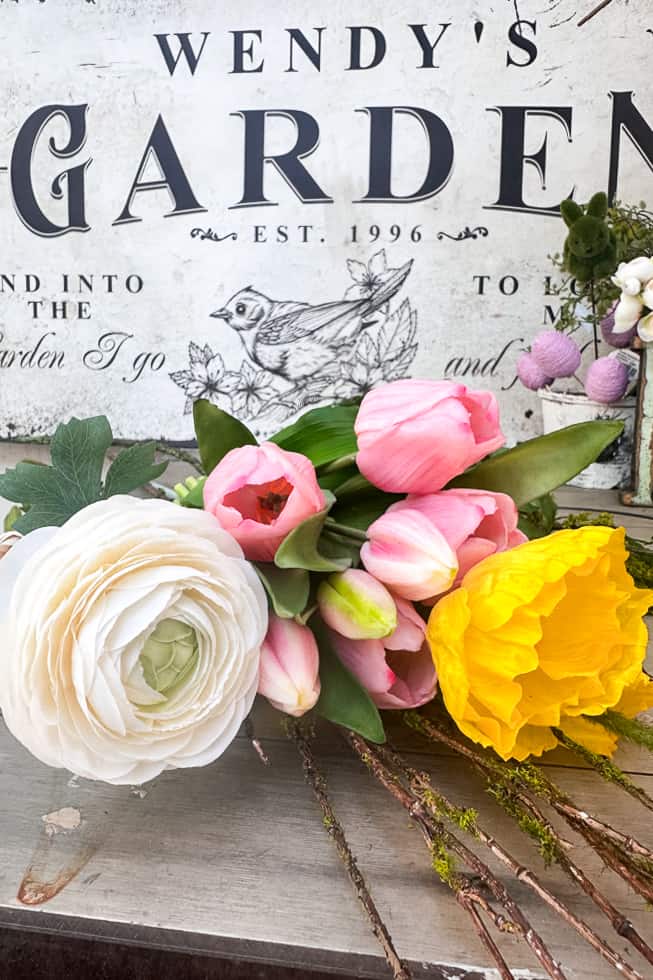
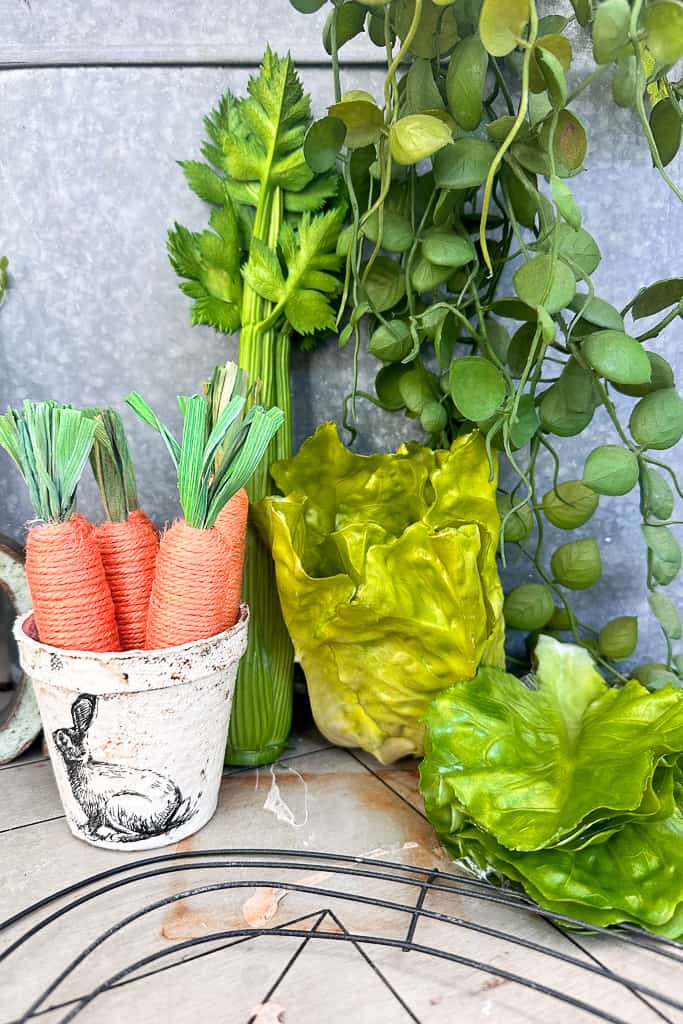
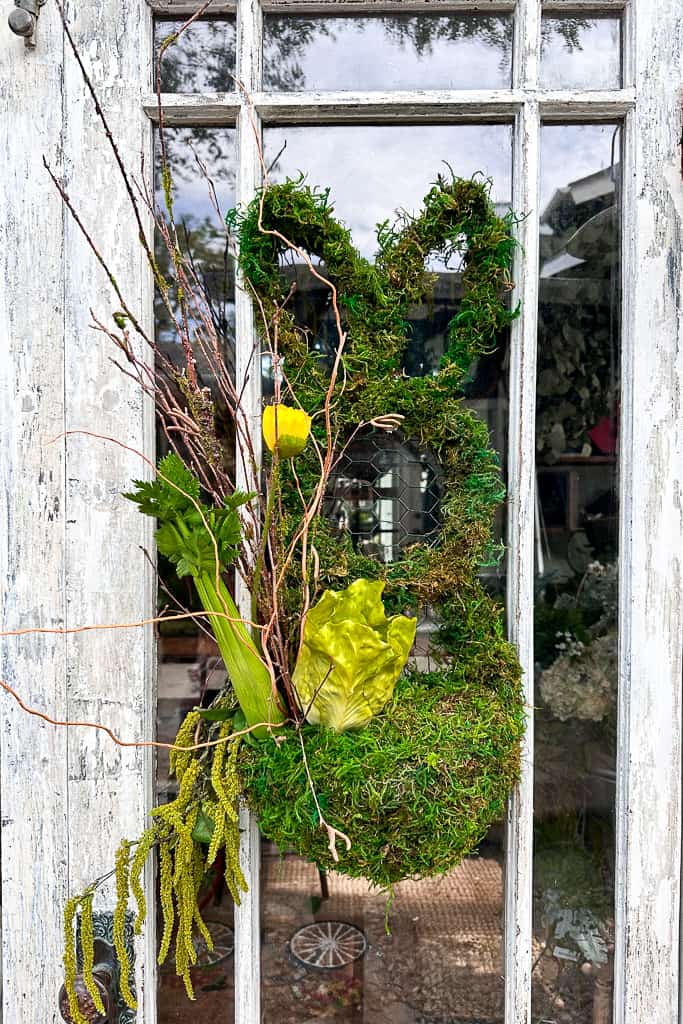
I wanted to get creative by repurposing items I already had at home, along with a few fun finds from Dollar Tree. To fill my basket, I used twigs, flowers, faux vegetables, a bird’s nest, and an adorable moss bunny for the perfect finishing touch!

- Start by placing a few twigs or pieces of curly willow in the left-hand corner of the basket, making sure to push the branches securely into the styrofoam for stability.
- Next, insert a floral pick into the bottom of the celery stalk and a small head of faux lettuce to help anchor them into the styrofoam.
- To attach the bird’s nest, use a floral pin. For extra security, you can add a small dab of hot glue to the bottom of the nest. (I used a real bird’s nest I found in a tree last spring, but you could also make your own!)
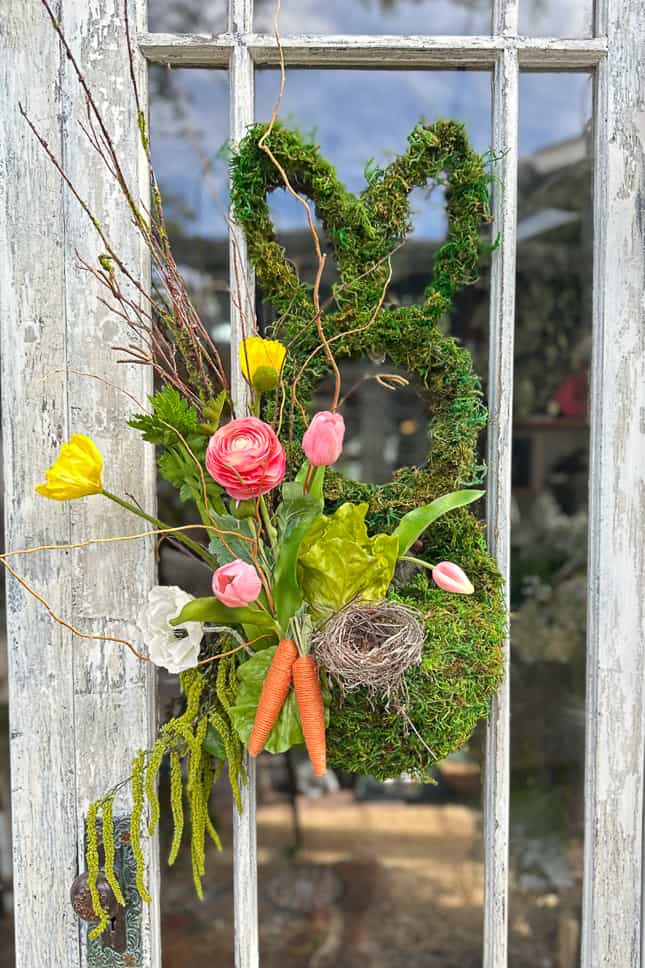
- Add more flowers, a few carrots, and lettuce leaves (I attached them with a floral pin) until you have the desired look.
- I painted a few tiny eggs I bought at Dollar Tree and placed them in the nest with a sweet moss bunny rabbit peering over it.
- Lastly, I placed a tiny bird on one of the branches and covered the clip with moss.

How to Style/Decorate With A Dollar Tree Easter Wreath
Whether it’s charmingly displayed on your front door, the shed door, or incorporated into a gallery wall, this Dollar Tree Easter wreath adds a touch of seasonal flair without compromising on style. Explore endless possibilities and infuse your home with the joy of affordable and delightful decor.
Aha! Moments with Wendy: Expert Crafting Tips and Tricks for making a DIY Easter Bunny Wreath
Have you ever had those ‘aha’ moments mid-project and thought, “I wish I knew that before I started”?
Me too!
Below are a few tips and tricks that worked for me while making my Dollar Tree Easter wreath.
- Wear gardening gloves when adding the chicken wire to the frames. The ends of the wire can be sharp and scratch very quickly.
- Be sure to wet your moss, it makes life so much easier.
- Shop your craft closet before shopping in the stores, saving you money.
- I trimmed my birch branches from my tree, so be sure to look around the yard to see what else you could use in your wreath.
Whether you’re a crafting newbie or a seasoned pro, I hope these tips and tricks take some guesswork out of creating your own beautiful wreath.

How to Make a Dollar Tree Easter Wreath
Equipment
- Hot glue gun
- Wire cutters
- * Floral pins (if you have them; if not, you can use a tiny bit of hot glue to keep the moss on top of the styrofoam).
- * Floral picks or skewers
Materials
- * One Easter bunny wire frame from Dollar Tree
- * One of Dollar Tree’s Easter egg wreath forms
- * Floral wire
- * Small styrofoam eggs for bird nest
- * Small bird
- * One bird’s nest
- * Assorted faux flowers
- * Green moss or a bag of Spanish moss if you want grey moss
- * Faux vegetables celery, lettuce head, lettuce leaves
- * Orange carrots
- * Birch twigs
- * A large piece of styrofoam to insert into your basket. I used half of an 8″ half-round.
- * Floral chicken wire
Instructions
- Step 1: Adding chicken wire to the wire wreath frames
- Start by putting a piece of chicken wire behind the face of the bunny. Cut the chicken wire into a circle and wrap the ends around the sides of the bunny wreath frame.
- Remove the very top section of the Easter egg wreath base using wire cutters.
- Place a piece of chicken wire behind the Easter egg wreath frame and wrap the ends around the sides of the egg.
- Step 2: Attaching the two wire wreaths
- Using the floral wire, cut a long piece of wire and attach it to the frame at the top of the egg. Next, weave the wire in and out to connect the two frames.
- Step 3: Create a basket on the front of the bunny’s body
- Cut a piece of chicken wire (approximately 12″ tall x 20″ wide) and frame a pouch or basket around the front of the bunny. This is something you have to mold and trim as you go.
- Be sure to use the finished edge of the chicken wire at the top of the basket. You would like the basket to be large enough for your floral arrangement.
- My basket comes out about 6″ from the rabbit’s body. Wrap the end of the chicken wire onto the frame of the rabbit’s body, starting on the left and then attaching the right side and, finally, the bottom of the basket.
- Step 4: Adding Moss to the wire wreaths
- Soak the moss in a bucket of water for a few minutes.
- Start with the bunny ears. Attach the spool wire’s end to the ear’s bottom. ( do not cut the wire)
- Squeeze the water from a handful of moss and wrap it around the wire ear.
- Take the spool of wire and wrap it around the moss-covered wire ear, repeating this process until the entire ear is encircled.
- Continue this with the second ear.
- Insert small pieces of wet moss into the sections of the wire wreath frame around the rabbit’s face. Pack it in tightly against the chicken wire.
- Continue with the paddle wire to wrap around the face of the rabbit and down the sides of the body (approximately 4-6″ on both sides) from the bottom of the rabbit’s face.
- Line the basket with wet moss from the inside of the basket, starting at the bottom and working your way to the top. You don’t need to moss the back of the basket as this will sit against the door.
- Place a piece of styrofoam inside the basket. Add more moss as needed if additional thickness is required under the styrofoam. I cut a half circle of foam in half, but you can also opt for a small foam block and surround it with moss to fill in the space.
- Lastly, cover the top of the foam with a thin layer of moss. You can secure this with a few floral pins.
- Allow to dry overnight or until the moss is completely dry.
- Step 5: Filling your Easter Basket
- The first thing is to add a few twigs or pieces of curly willow in the left-hand corner of the basket. Be sure to poke your branches down into the styrofoam for stability.
- I inserted a floral pick into the bottom of the celery stalk and a small head of lettuce to enable me to insert them into the styrofoam.
- Attach a bird’s nest using a floral pin. If you choose, add a small amount of hot glue to the bottom of the nest. (I used a real bird’s nest that I found in a small tree last spring). Or you could make your own bird’s nest.
- Add more flowers, carrots, and lettuce leaves (I attached them with a floral pin) until you have the desired look.
- I painted a few tiny eggs I bought at Dollar Tree and placed them in the nest with a sweet moss bunny rabbit peering over it.
- Lastly, I placed a tiny bird on one of the branches and covered the clip with moss.
Next up on our challenge is my friend Lora @lorabloomquist. She has made the most adorable fabric tulip wreath that you do not want to miss.
Other [Project] Tutorials from WM Design House
If you love this DIY Easter wreath, you might also enjoy some of my other favorite [projects]:
Other Easter Bunny Wreath Ideas
I have seen some other really creative Dollar Tree Wreaths. Here are a few of my favorites.
Dollar Tree Egg Frame wreath ideas
DIY Easter bunny wreath with mesh
This project not only adds a touch of charm to your space but also reflects the joy of crafting with accessible materials. Display your creation proudly, and may it bring smiles and springtime vibes to your home. Happy crafting!”


Did you make this craft?
We would love to see what you have created, so mention us @wmdesignhouse or tag us using #wmdesignhouse so we can see your creations!
More about me!

Hello, I’m Wendy – a dedicated homemaker with a deep passion for decorating, gardening, cooking, and crafting. I find joy in harmonizing beautiful elements to fashion a space that is both comfortable and inspiring. I will help you create a beautiful home, one project at a time.
Connect with Wendy
-
10 Best Cut Flowers to Grow for Beautiful Homegrown Bouquets
Grow the 10 best cut flowers for stunning bouquets all season long. Discover easy-to-grow favorites like dahlias, zinnias, roses, and cosmos.
-
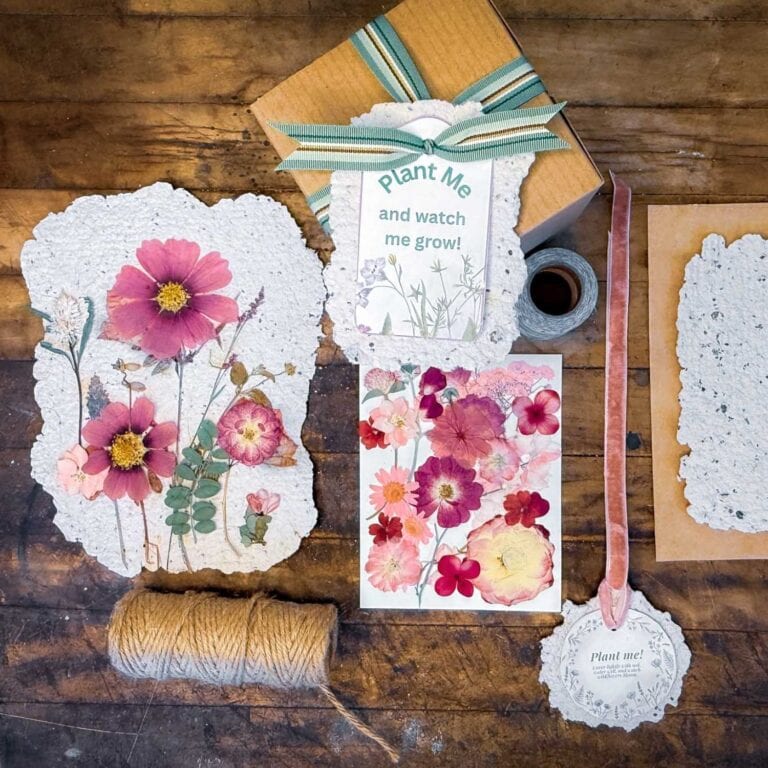
How to Make DIY Seed Paper for Handmade Cards and Stationery
Learn how to make DIY seed paper at home with this easy step-by-step tutorial. Perfect for Mother’s Day gifts, and botanical stationery.
-
Preparing Your Garden for Spring: 14 Easy Tips
Get your garden ready with these 14 easy tips for preparing your garden for spring — soil prep, tools, planting, and more!

Oh, my goodness, Wendy! This is so stinking cute. It is so unique and perfectly spring.
Thank you Christy. Happy spring!
Thank you Renae.
Oh my gosh, Wendy. This turned out so darn cute. I love it! So perfect for Easter.
Thank you Jen!
Wendy, this is one of the cutest and most creative Easter wreaths I’ve ever seen. What a gorgeous wreath for any front door. Love how well you explained the process.
Thank you so much Carol, it was a fun one to come up with and I will enjoy on my door.
Your wreathe is adorable. I have been trying to get ambitious enough to start spring crafting. Your post is great for my imagination. I love the tip about wetting the moss; flexible and less wasteful is always a good thing!
Thank you, Kathy. I was thinking out of the box for this one. I had seen everyone use the bunny and the egg, but not together.
I am glad you are inspired now.
Wow, that turned out great, Wendy! I’ve seen the bunny form at Dollar Tree before but really didn’t know what to do with it. Yours turned out amazing with the moss!
Thank you so much, Niky! I am glad you liked it.
That is the cutest thing since the color pink! So fun and festive. I can think of lots of things to put inside. Wish you lived close so I could come over and just buy yours! 😉 Thanks for joining us. Such fantastic spring inspo!
This little guy is adorable! So cute!
Thank you Susan!
Such a fun original idea and I love it. Your tutorial is so easy too, thanks for sharing. I think I will make one with my grands, they would love it.
Thank you so much Marty, so fun to hop with you.
This turned out so cute, Wendy! And great floral tips, too:)
Thank you so much, Lora.
Wendy, your bunny wreath is a work of art! Excellent tutorial on how to assemble, and the flowers are just gorgeous!
Thank you so much, Michelle. You are too kind.
Wendy, this is so creative and absolutely adorable! Love your creativity! Pinned xx
Thank you Cindy. Happy Easter!
What an adorable wreath, Wendy! It turned out perfect and you are so creative! Here’s to spring!
Thank you Kim. Yes, cheers to spring weather and wishing you a Happy Easter!
This is INCREDIBLE, Wendy!! The bunny is SO darling and this craft looks so high end…it would cost easily over $100 at Pottery Barn or Anthro! Such a welcoming door display for the Spring season!
Thank you Rachel!
You always come up with the most magical ideas, Wendy! I love how you took a basic wreath form and totally made it your own by adding those gorgeous flowers and nods to spring. It’s super creative and such a festive way to celebrate the season. Hugs, CoCo
Thank you, CoCo. Crafting brings me so much joy! I hope you have a Happy Easter.
Wendy
Your wreath looks amazing. You are so talented. Thank you for sharing my wreath ideas.
Thank you, and you are very welcome. Happy Easter Rachel!
Wendy this is absolutely adorable! I have a similar bunny and you have inspired me to give it a makeover.
Thank you Laura. I’m sure your wreath will turn out adorable. I can’t wait to see it!