DIY Winter Wreath with Wood Flowers and Rustic Charm
Join me as we delve into the step-by-step process of creating a unique winter wreath using wood flowers, blending nature-inspired elements with a cozy aesthetic.
On my blog WM Design House, I may sometimes use affiliate links, which means a small commission is earned if you purchase via the link. The price will be the same whether you use the affiliate link or go directly to the vendor’s website using a non-affiliate link.
Welcome to our first post of 2024 at the Hand Crafted Society, where we’re starting the year with a theme close to nature’s heart: wood.

Here at the Hand Crafted Society, we’re not just a group of bloggers but a community of passionate creators who gather monthly to embark on creating together. This month, our focus is on wood. And trust me, the outcomes are enchanting.
What makes this project so special is witnessing each participant’s diverse perspectives and interpretations of the identical medium. It’s a captivating journey, and I can’t wait for you to explore the array of creativity that unfolds.
As you make your way to the end of this post, you’ll discover all of our projects. The images and links lead you to the project of each blogger.
Materials Needed to Make A Winter Wreath
Supplies Needed


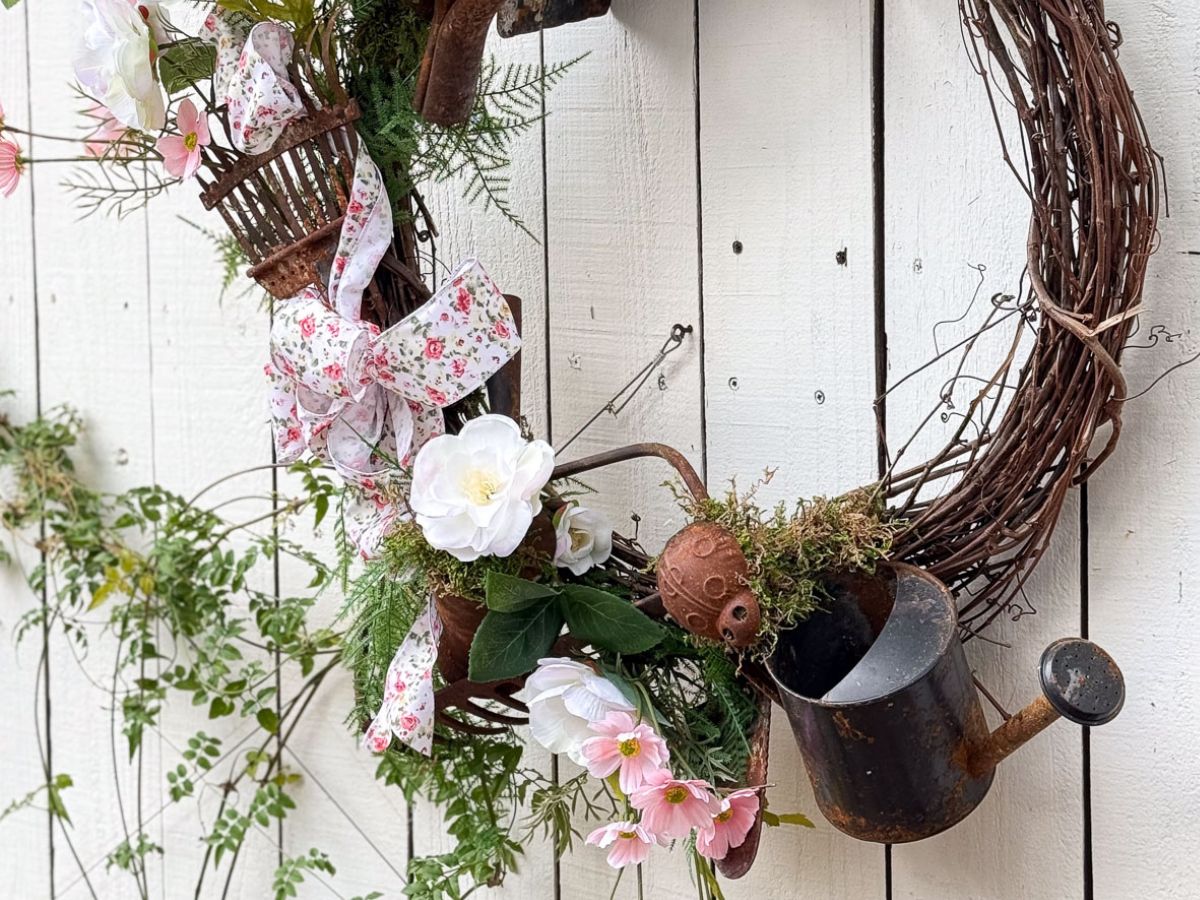
- For the wreath base, I used an old picture frame. If you do not have one at home, you can find these frames at estate sales or your nearby thrift store. Add a touch of paint to achieve a rustic look, and you’ll be all set to start your project. If you prefer, you could use a grapevine wreath or a willow wreath as your base.
- Sola wood flowers– choose a variety of flower styles. They come in a natural color, but it is so easy to paint a different color.
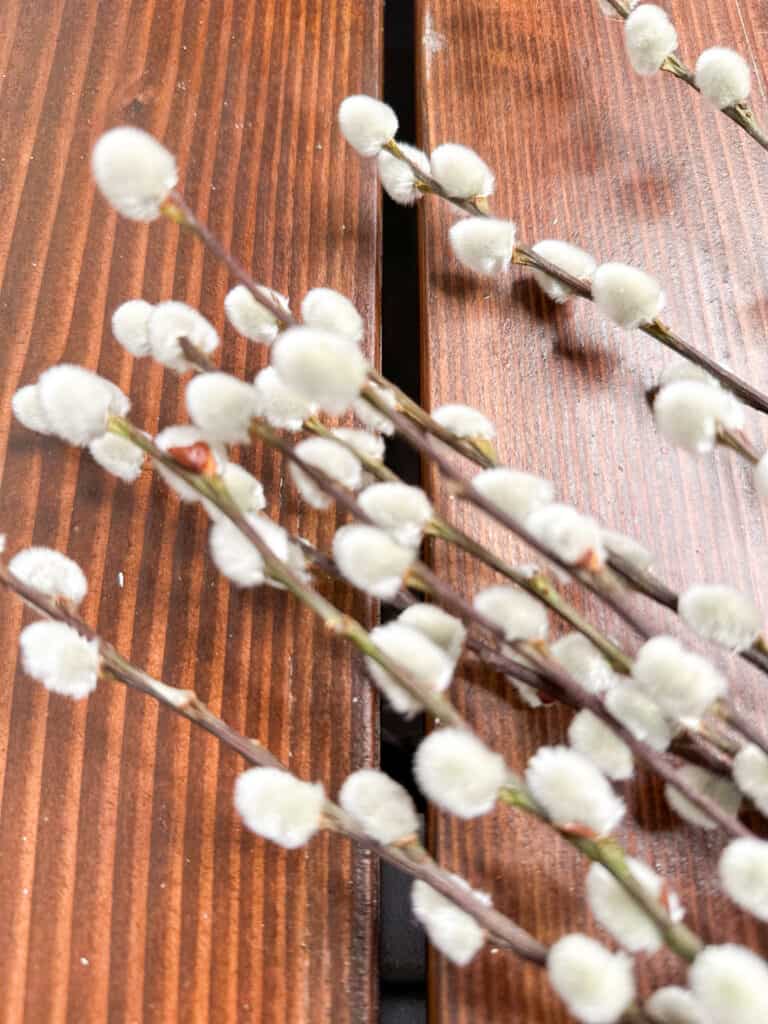
- Pussy Willow branches (faux or real)
- Branches or twigs (I collected them on a walk)
- White or cream acrylic paint (or any color you would like)
- White spray paint
- Gray Spanish moss
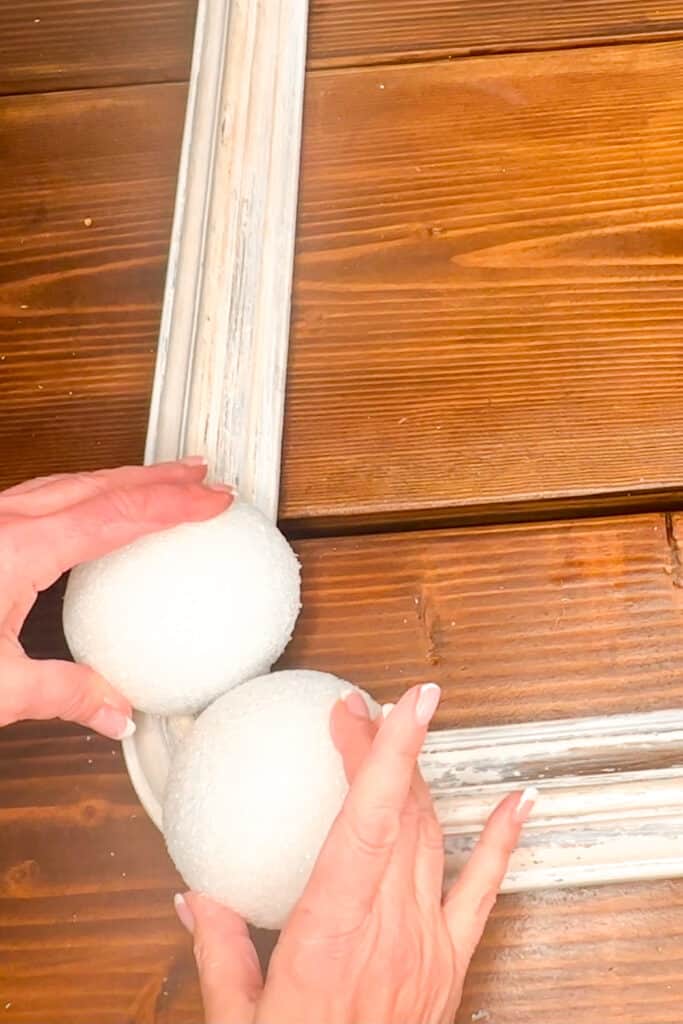
- Two 4″ half-round styrofoam balls
- Craft wire
- Three inch wide ribbon to hang your wreath
- Dried fall leaves
- Thumbtacks (to hang your wreath)
- Six inch long wood skewers
Additional Tools Needed
- Hot glue gun
- Glue sticks
- Wire cutters
- Scissors
- Paper or plastic cup
- A small amount of water
Winter Wreath Tutorial
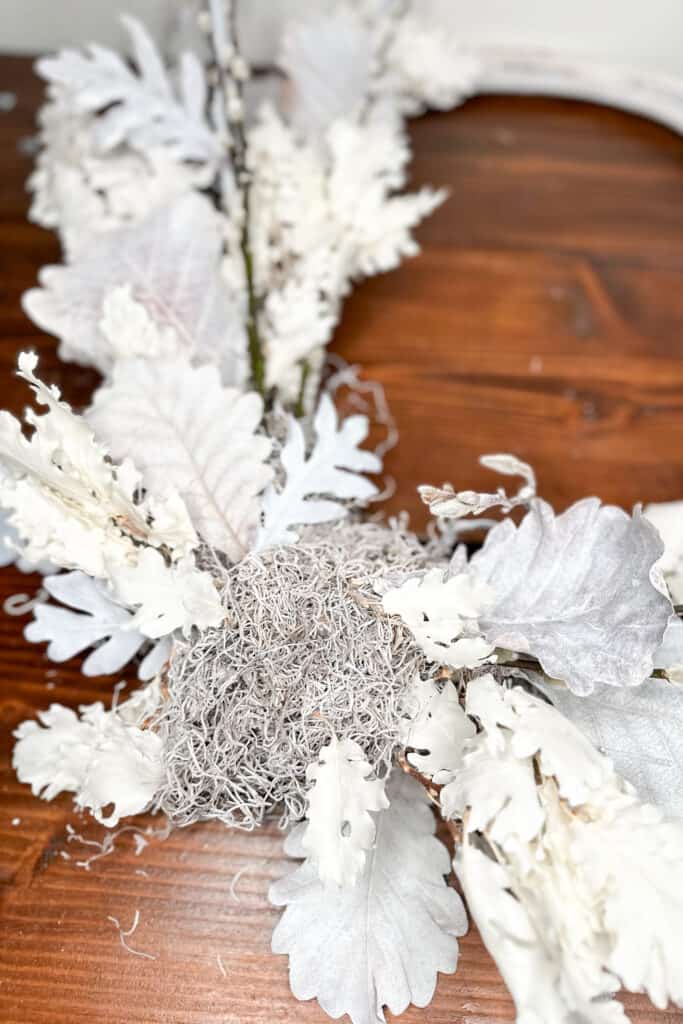
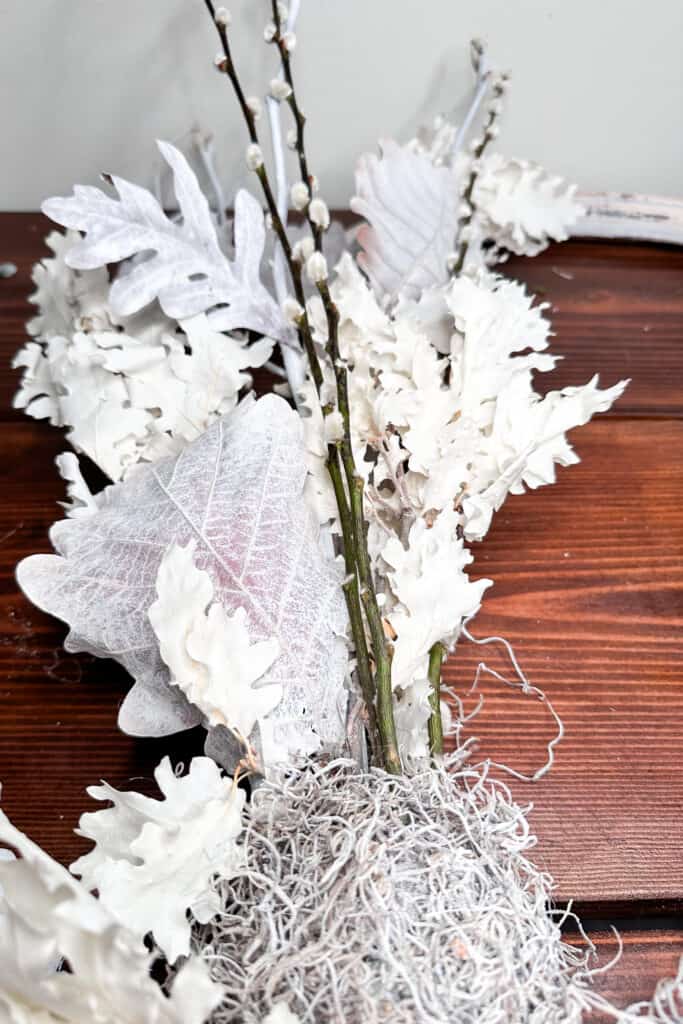
Creating a base for your flower arrangement on the wreath
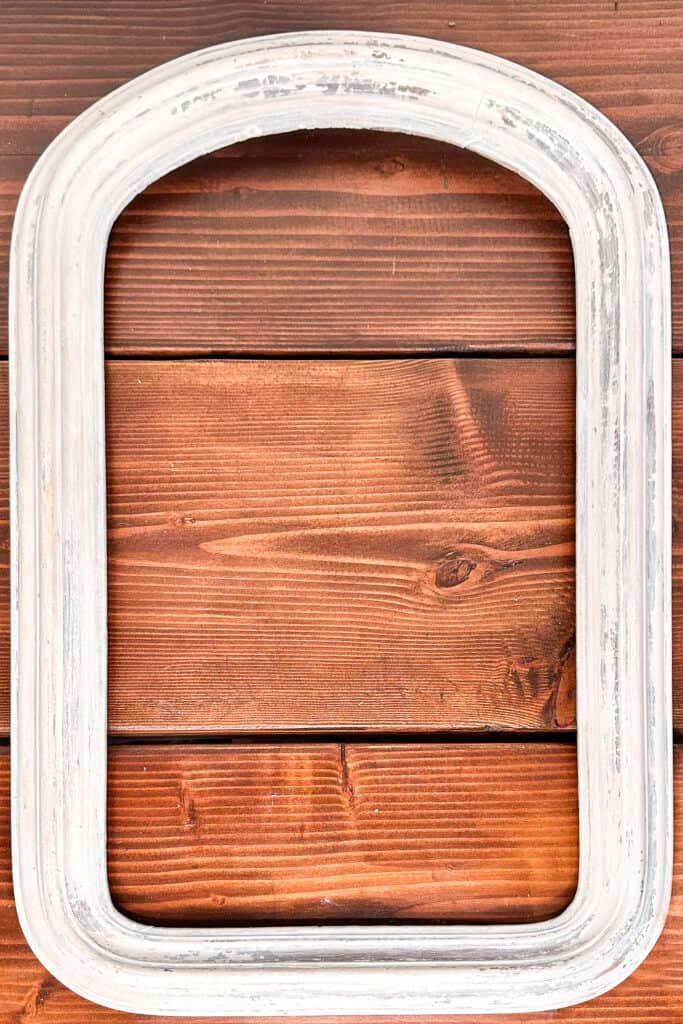
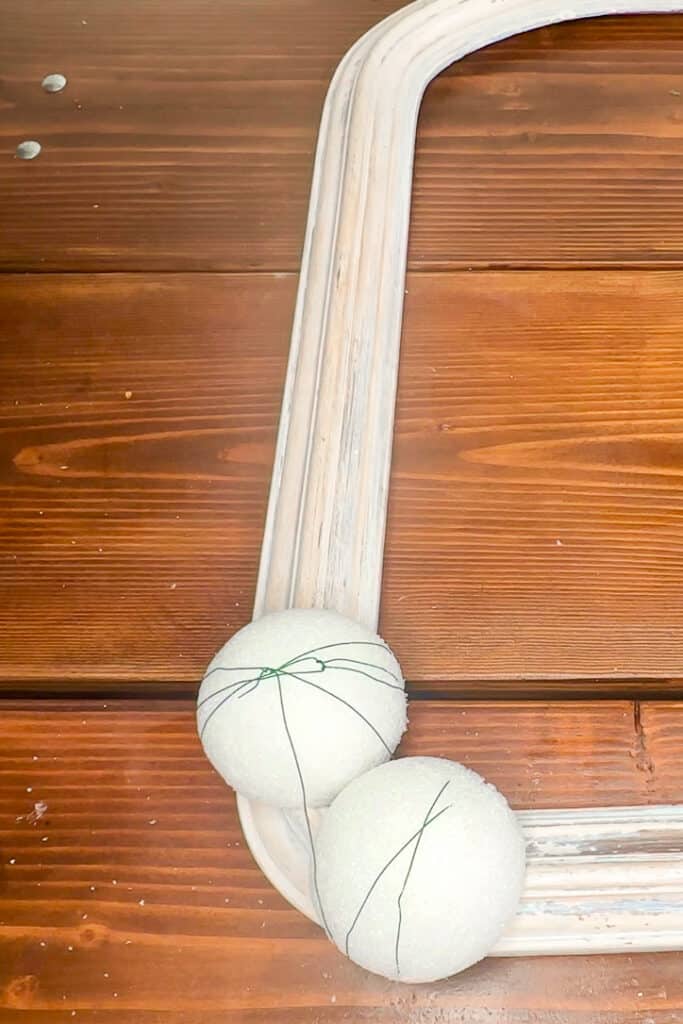
- I wanted my wreath to be all white and cream-colored. My frame was a bit yellow, so I added white paint to the edges. You can leave your base a natural color or spray paint it to match your decor.
- Use two styrofoam ball halves or cut a ball in half.
- Hot glue the two halves of the ball onto the lower left corner of your wreath.
- Add craft wire around the balls to secure them.
Create your floral arrangement on the wreath
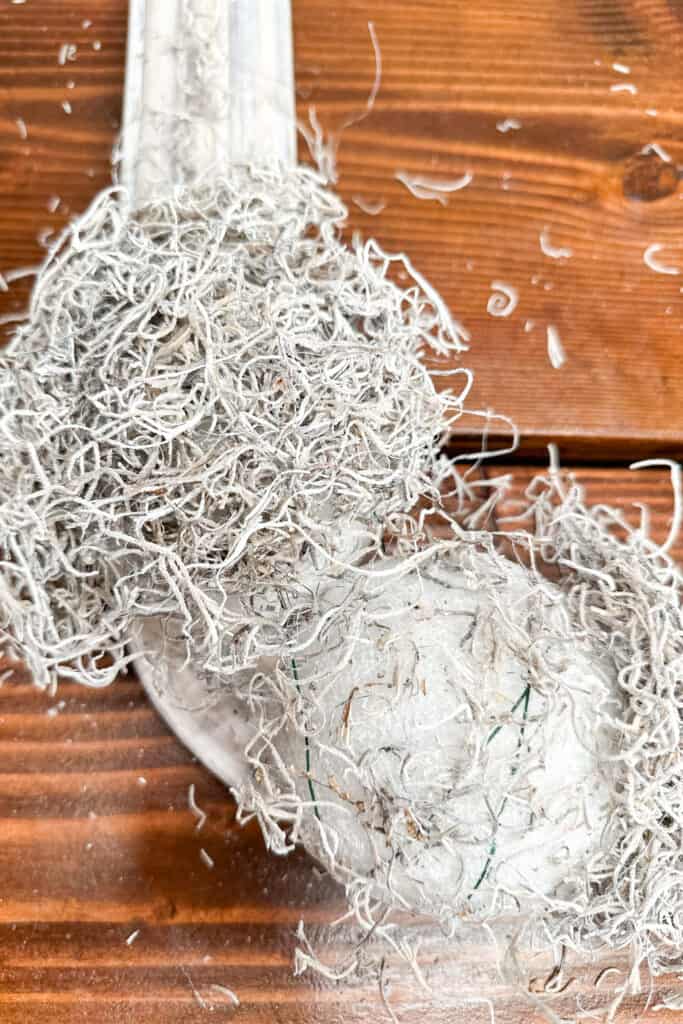
- Cover the styrofoam balls with Spanish moss using hot glue.
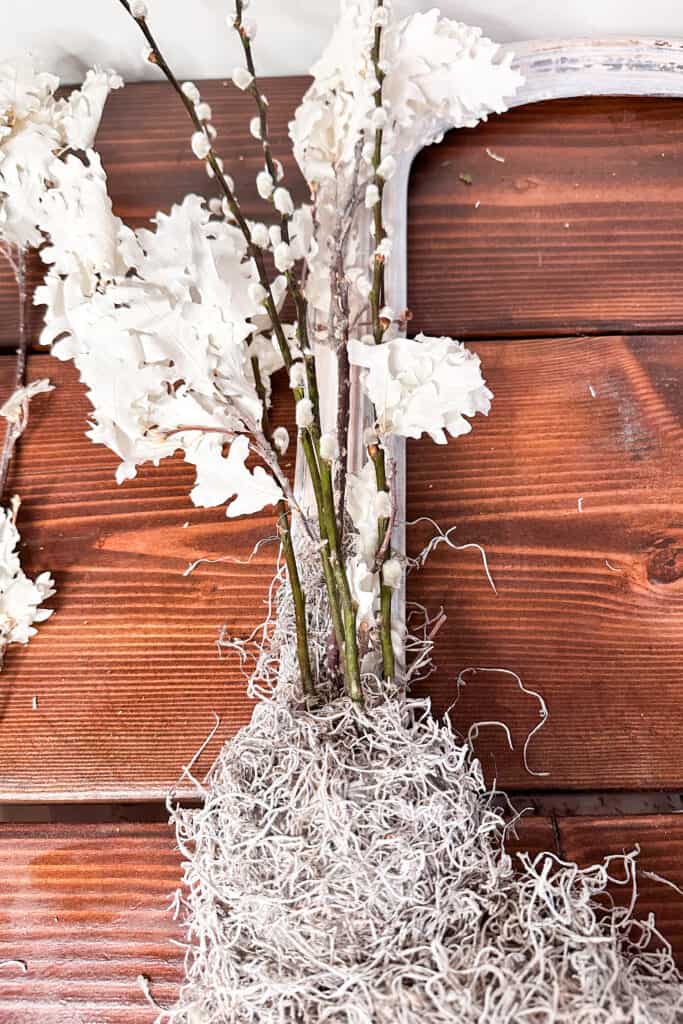
- Spray paint your twigs white.
- Insert a few pussy willow branches and a branch or two of the bleached oak leaves (or branches of your choice) along with the spray-painted white branches. Insert them into the styrofoam going up along the edge of your frame.
- Insert a few horizontal branches along the bottom edge of your frame.
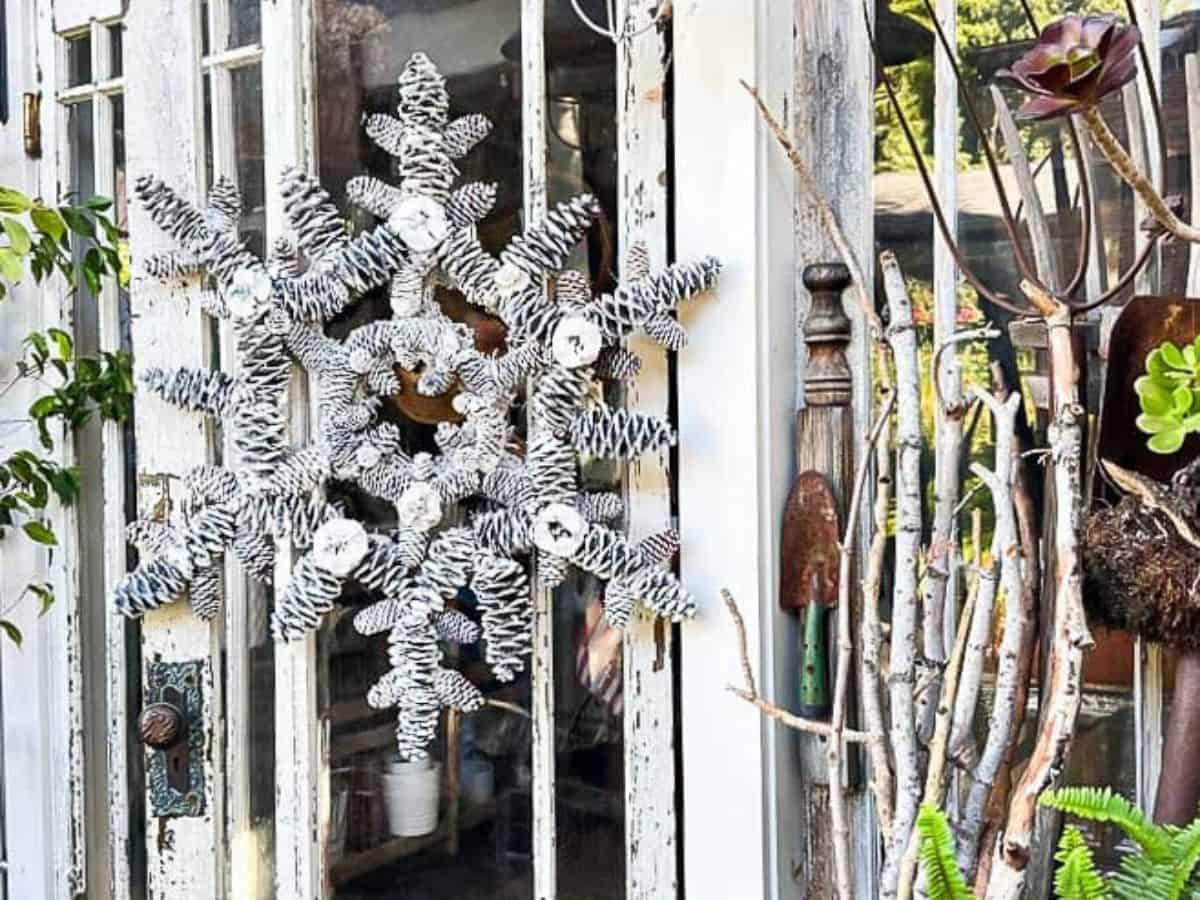
Dying Sola Wood Flowers
(This is a DIY option) You do not have to dye them if you like the natural look.

TIP FROM WENDY’S CRAFT ROOM: Pre-soak the wood flowers in warm water before dying them. Sola wood is highly absorbent, and a quick soak helps the flowers absorb the dye more evenly. This ensures vibrant and consistent coloring throughout the petals.
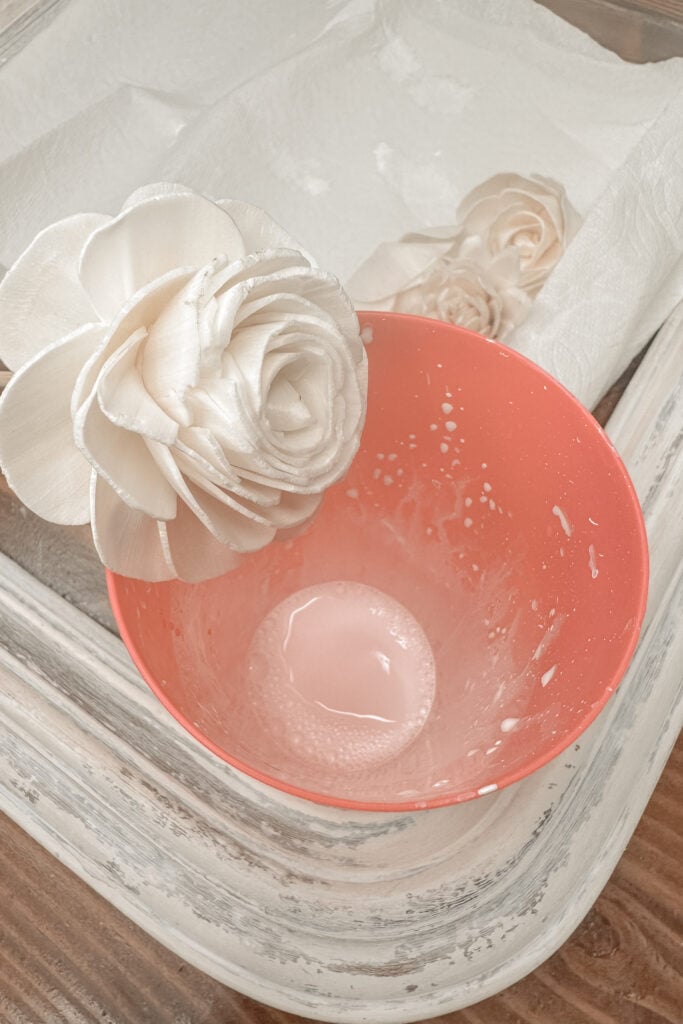
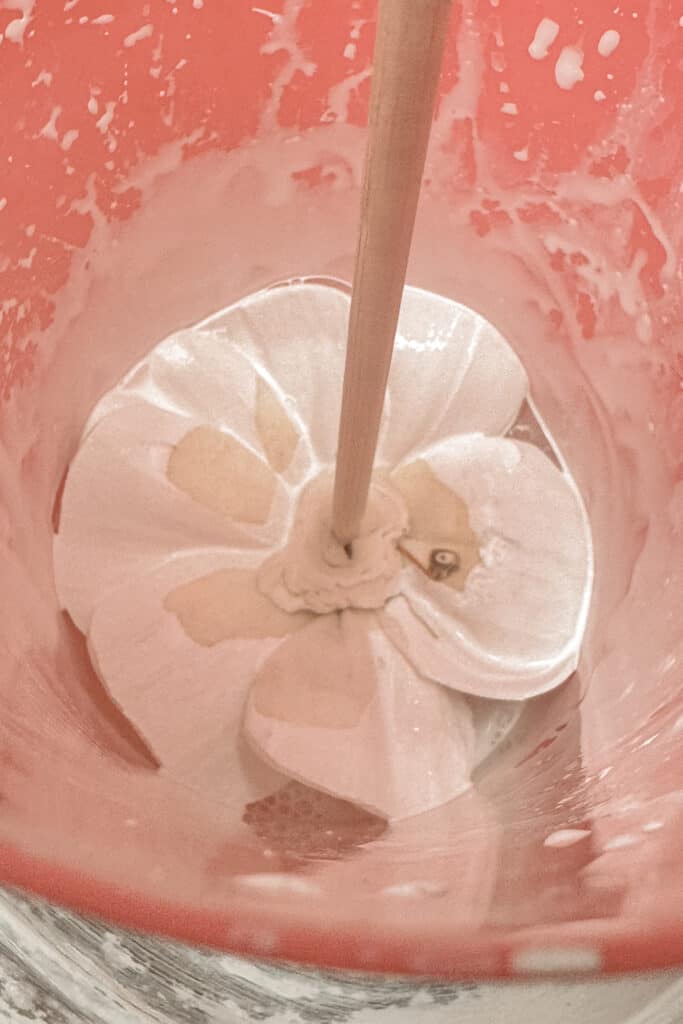
- You can use any paint color you would like to dye your flowers. Add a small amount of acrylic craft paint into a paper or plastic cup and add a little bit of water.
- Take an individual sola flower, dip it into the paint mixture, and swirl it around to get a good coat on the flower.
- Since I wanted all white and cream flowers, I chose to use white paint.
- Remove the flower and blot any excess off onto a paper towel.
- Allow to dry.
- If your flowers did not come on a stick, you can add floral stem wires to the base of the flower so you can work with them.
Spray painting leaves and adding them to the wreath
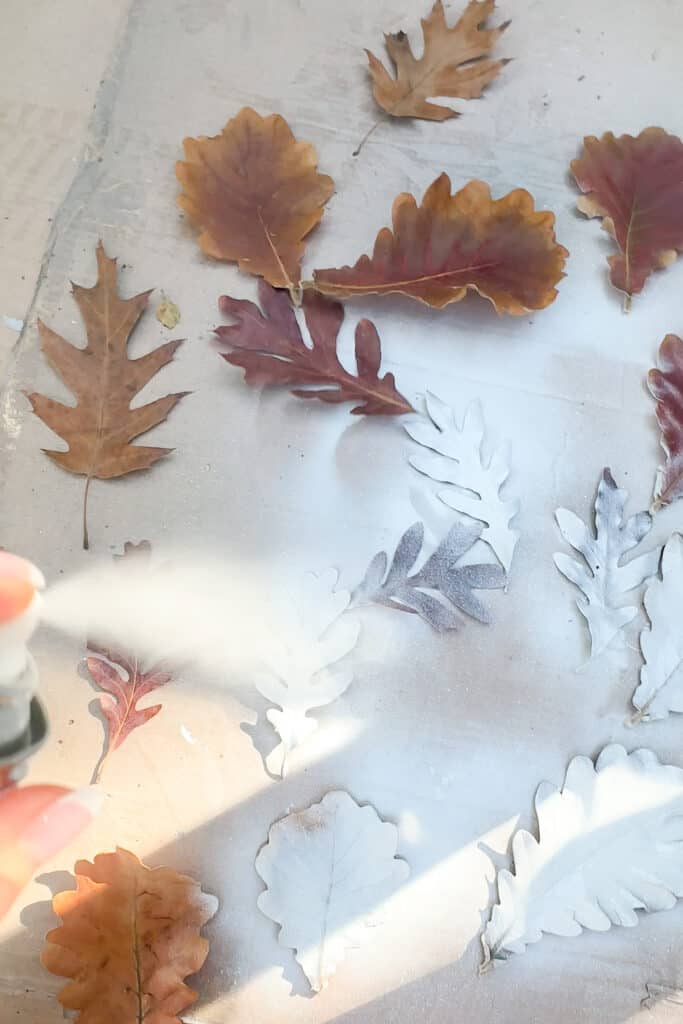
- I gathered a few fall leaves from the yard and spray-painted them with a light coat of white paint.
- Hot glue them into the wreath where you would like them.
TIP FROM WENDY’S CRAFT ROOM:
Avoid applying a thick layer of paint to the leaves; retaining some of the details and the natural color is nice. Consider lightly wiping off excess paint after spraying for a more nuanced and visually appealing result.
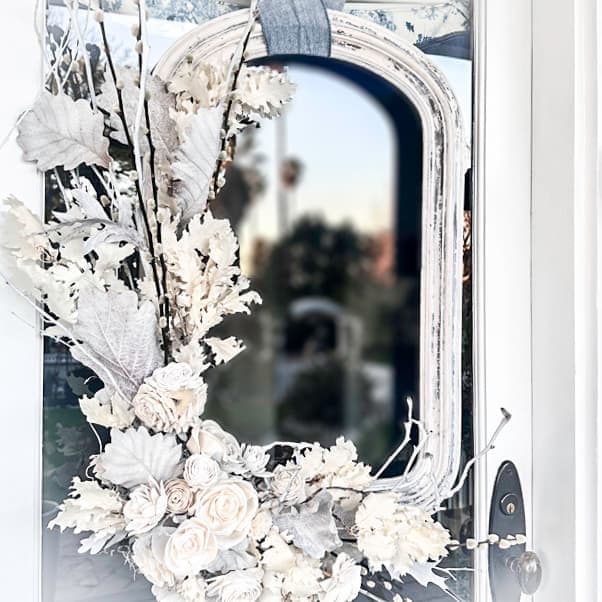
How do you attach Sola wood flowers to a wreath?

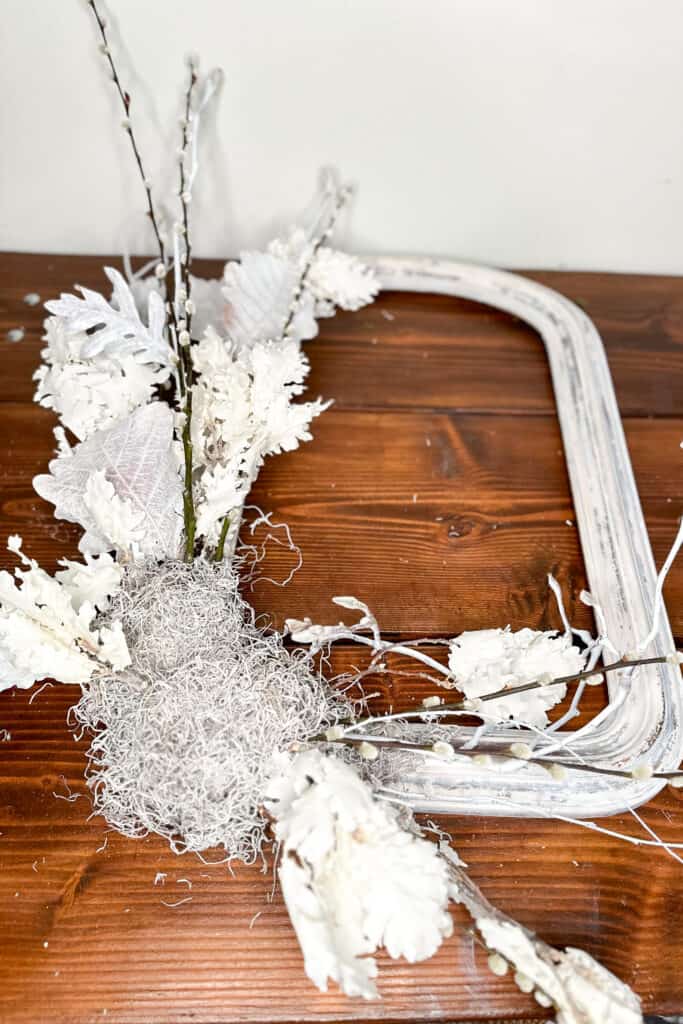
- Start inserting the flowers into the wreath where you want to place them.
- I hot glued a 6″ wood skewer to some flowers and cut it to approximately 3″ long. This way, it is easy to insert them into the styrofoam.
- In addition, I also directly glued some of the flower heads without a skewer.
- Attaching the wood flowers at different heights gives the wreath dimension.

How to Make A Winter Wreath With Wood Flowers

How to Make A Winter Wreath With Wood Flowers
Equipment
- Hot glue gun
- Glue sticks
- Wire cutters
- Scissors
- Paper or plastic cup
- A small amount of water
Materials
- For the wreath base I used an old picture frame. If you do not have one at home, you can find these
- frames at estate sales or your nearby thrift store. Add a touch of paint to achieve a rustic look and
- you’ll be all set to start your project. If you prefer you could use a grapevine wreath or a willow
- wreath as your base.
- Sola wood flowers- choose a variety of flower styles. They come in a natural color but it is so easy to
- paint a different color.
- Pussy Willow branches faux or real
- Branches or twigs I collected them on a walk
- White or cream acrylic paint or any color you would like
- White spray paint
- Gray Spanish moss
- Two 4″ half-round styrofoam balls
- Craft wire
- Three-inch wide ribbon to hang your wreath
- Dried fall leaves
- Thumbtacks to hang your wreath
- Six-inch long wood skewers
Instructions
- I wanted my wreath to be all white and cream-colored. My frame was a bit yellow, so I added white paint to the edges. You can leave your base a natural color or spray paint it to match your decor.
- Use two styrofoam ball halves or cut a ball in half.
- Hot glue the two halves of the ball onto the lower left corner of your wreath.
- Add craft wire around the balls to secure them.
- Cover the styrofoam balls with Spanish moss using hot glue.
- Spray paint your twigs white.
- Insert a few pussy willow branches and a branch or two of the bleached oak leaves (or branches of your choice) along with the spray-painted white branches. Insert them into the styrofoam going up along the edge of your frame.
- Insert a few horizontal branches along the bottom edge of your frame.
- You can use any paint color to dye your flowers. Add a small amount of acrylic craft paint into a paper or plastic cup and add a little bit of water.
- Dip an individual sola flower into the paint mixture and swirl it around to get a good coat on the flower.
- I chose to use white paint because I wanted all white and cream flowers.
- Remove the flower and blot any excess onto a paper towel.
- Allow to dry.
- If your flowers did not come on a stick, you can add floral stem wires to the base of the flower so you can work with them.
- I gathered a few fall leaves from the yard and spray-painted them with a light coat of white paint.
- Hot glue them into the wreath where you would like them.
- Start inserting the flowers into the wreath where you want to place them.
- I hot glued a 6" wood skewer to some flowers and cut it to approximately 3" long. This way, it is easy to insert them into the styrofoam.
- I also directly glued some of the flower heads without a skewer.
- Attaching the wood flowers at different heights gives the wreath dimension.
Styling your Winter Wreath
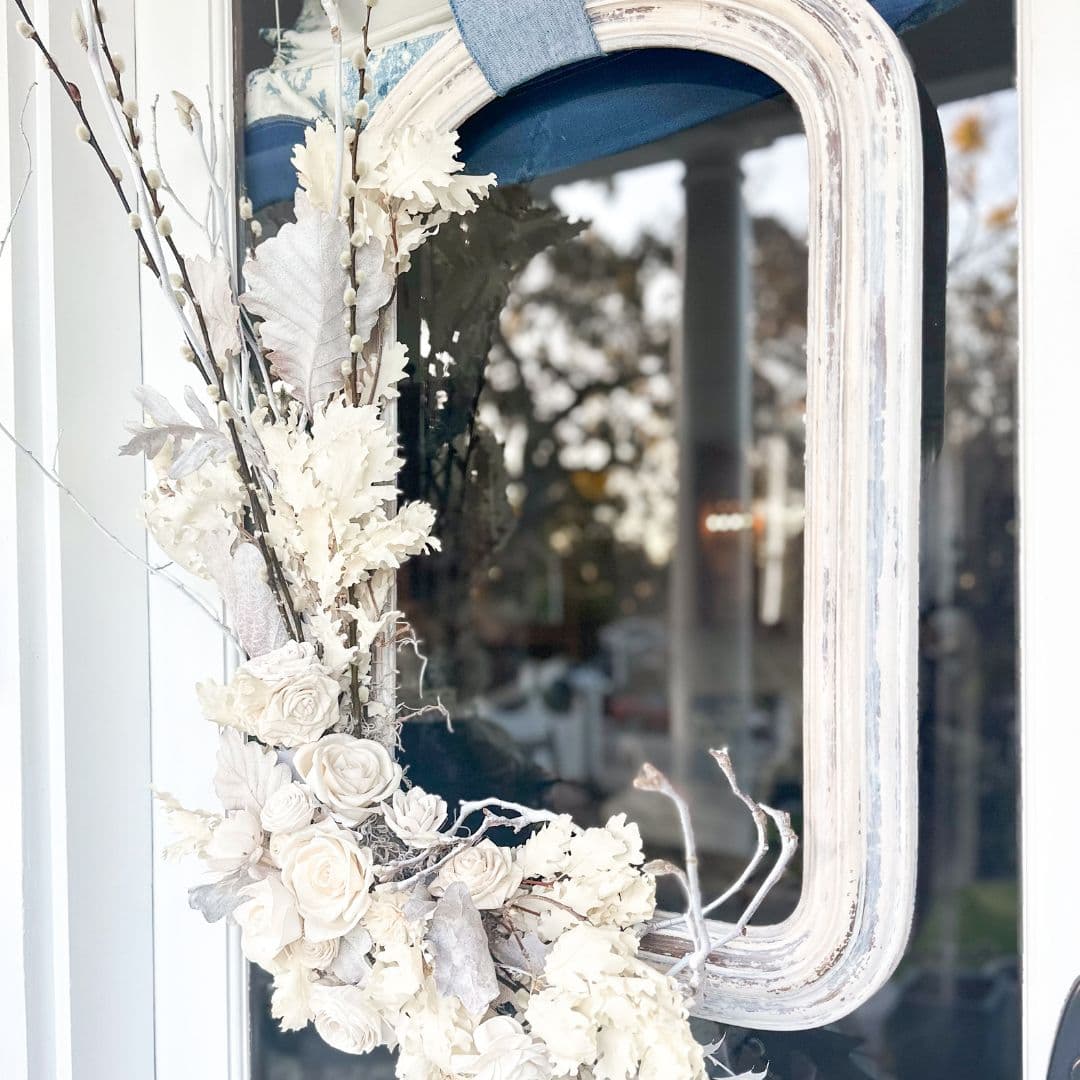
I intended to showcase my newly crafted wreath on the front door, especially after giving our front porch a recent update that I absolutely love.
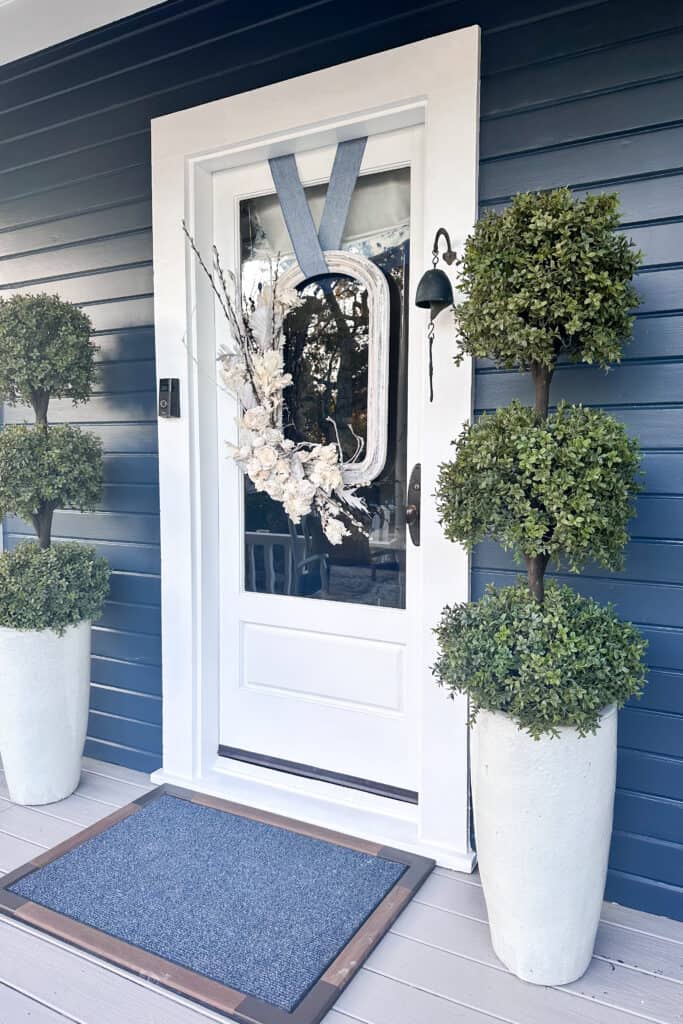
How to hang a wreath on the front door
There are several ways you can hang a wreath on the front door. However, we have a glass door, which is more challenging.
If a wreath is light weight, I will use a Command hook that I attach directly to the glass.
Since the wreath is rather heavy, I am going to use a 3″ wide ribbon.
I place the ribbon through the wreath and use three thumbtacks (for each ribbon end) and a hammer to attach the ribbon to the very top edge of the door.
This takes two people, one to hold the wreath and the other to hammer in the thumbtacks.
TIP FROM WENDY’S CRAFT ROOM:
You must ensure the thumbtacks are flat and trim any excess ribbon so the door will close nicely. I also added round felt pads to the back of the wreath so it does not damage the glass door.
Tips: Making a winter white wreath
- Choose a Coordinated Color Palette: Opt for a winter-inspired color palette such as whites, blues, greens, and silver or gold accents. Coordinating your color scheme will evoke a cohesive and harmonious winter theme in your wreath.
- Select Seasonal Materials: Use seasonal materials that are easily accessible to you, allowing you to capture the true essence of winter. These elements not only boost the visual appeal of your wreath but also infuse a natural and festive touch, making your creation distinctly suited to the winter season.
If you love this project, you might also enjoy some of my other favorite wreaths:
Other Wreath Tutorials
I hope you enjoyed this quick, easy wreath project using an old wooden picture frame and Sola wood flowers. Take a moment to see all the stunning projects the other talented gals created below, and mark your calendar for next month’s post on March 12th. You don’t want to miss it!


-
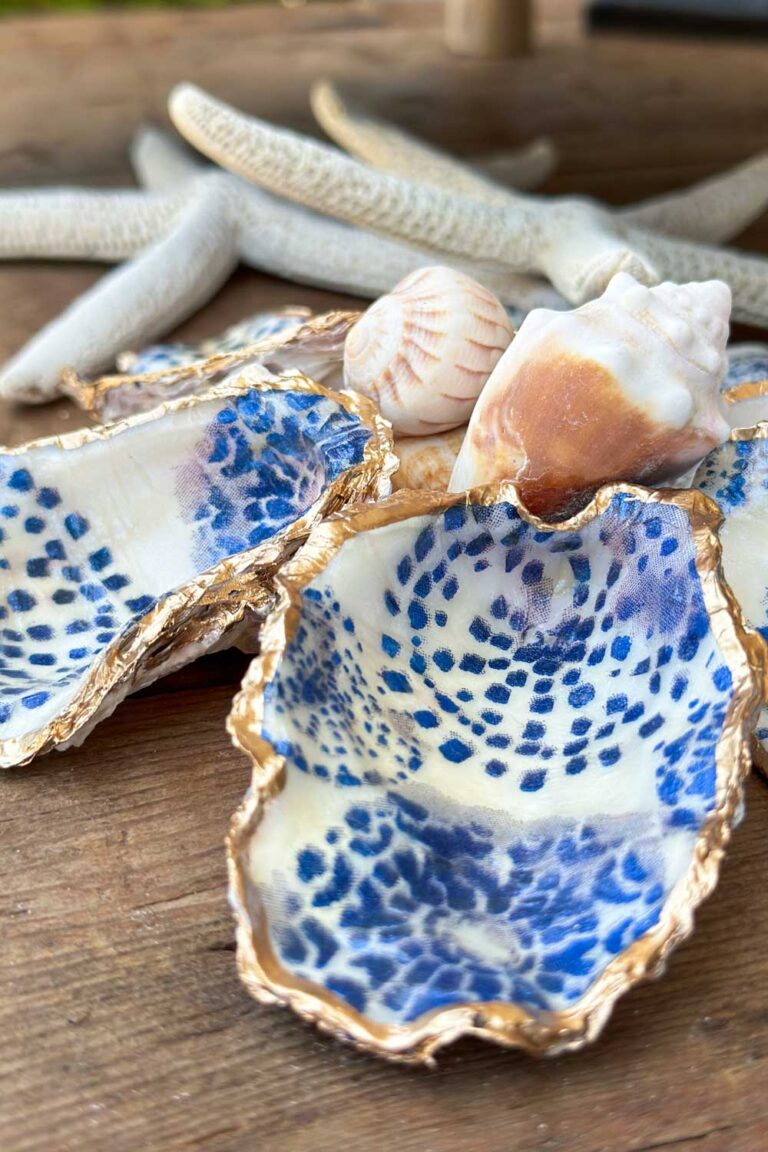
How to Make a Beautiful Oyster Shell Garland with Wood Beads
369 shares Facebook Pinterest Save Threads Looking for an easy way to add a touch of coastal charm to your decor? Learn how to make an oyster shell garland using wooden beads, decoupaged oyster shells, and jute twine. This DIY project is a beautiful way to add natural texture and coastal style to your home….
-
Easy 4th of July Front Porch Decorations for a Patriotic Welcome
Summer is here, and nothing welcomes the season like 4th of July front porch decorations in classic red, white, and blue.
-
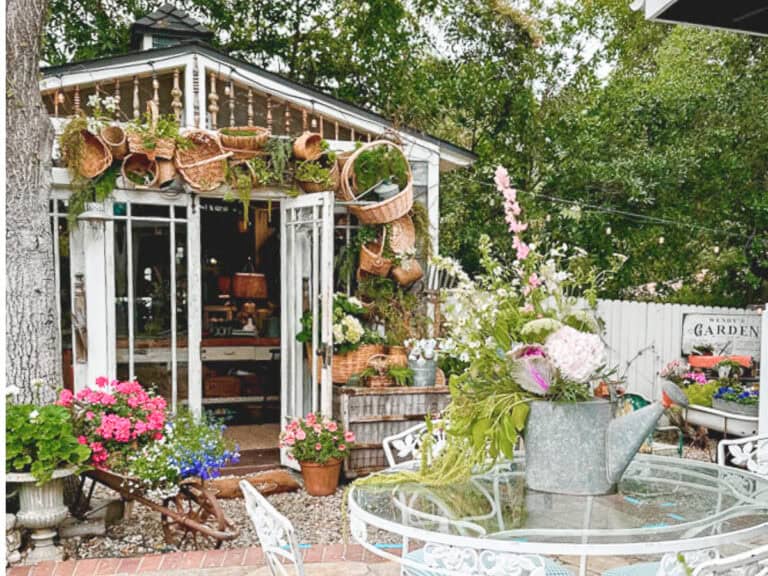
Beautiful Arch Basket Decor for a Summer-Ready She Shed
Learn how to make a charming DIY basket arch for your she shed using thrifted baskets and faux greenery, an easy summer decor project.


What a great project, Wendy! Love the dyed flowers!
Thanks so much, Kim! I’m so happy you love them as much as I do.
Wendy, your wreath is stunning! Thank you for the tips on dying the sola wood flowers! I can think of so many fun creations to make with them!
Thank you, Kim, they are so easy to dye. One year I was doing a pink pumpkin-themed baby shower, and I dyed the wood flowers
pink and created arrangements in pink pumpkins. It was so much fun.
It turned out so cute! I love it and the blue color of your house!
Thank you, Amy. I love my new wreath too. We are so glad to have the paint project done. It was quite the adventure, but worth it. We love the new color.
Your winter wreath is beautiful. Loved seeing how you brought all of the elements together for a wintery effect. Thanks so much for sharing! Pinned.
Thank you, Kelly. I really enjoyed making this wreath. I love how all the pieces came together. I’m so glad you love it too.
A great project Wendy! Love the frame used for the wreath.
Thank you so much Tammy!
This is absolutely stunning!
Thank you Susan!
This wreath is gorgeous Wendy! I love the all-white look next to your gorgeous new blue home. We used these flowers in my daughter’s wedding a couple of years ago – they are amazing! Pinned 🙂
Hi Wendy – I had never heard of sola wood until I read this post. It sounds like it would be fun to use in a variety of craft projects! After reading your post, I really want to try to dye the sola flowers. Your winter wreath turned out beautifully – especially with the whites you used. The natural elements add the perfect amount of texture.
Thank you, Anna. I would love to see your flowers once you’re done. I know they will be gorgeous!
Hi Wendy! Your wreath is gorgeous! I have several vintage frames I thrifted and have been wanting to make a wreath with one of them! You have inspired me to add that to my to-do list! I love working with wood flowers but have never painted them before! Glad to read how to do that! PS love the new paint color on your house!!
Oh I’m so glad to hear that, Donna. This was such a fun wreath to create. I can’t wait to see what you do!
Wendy your wreath is absolutely stunning with you combination of winter white leaves, flowers and branches. Your guests are sure to admire it as well. Thanks for organizing and coming up with a fun medium for this month. All the HS projects are so impressive!
I agree with you, Michelle. All of this month’s projects are beyond beautiful and impressive!
I love all of the beautiful textures in this gorgeous door wreath! I would leave this out year-round if Nebraska weather would permit! As usual, a great project and a great tutorial! Thanks again for being our Handcrafted host! Pinned!
Thank you Missy. I’m so happy to have you join me each month.
So gorgeous, Wendy. Love the all white florals and white leaves on that amazing white frame. My door needs a refresh!
Thank you so much Debra. It’s the perfect wreath for the winter season.
I LOVE this, Wendy!! How whimsical and pretty! The wood flowers are such a gorgeous addition. It hangs so beautifully on the door, too! Hope you are well!
Thank you Rachel!
This wreath is so beautiful Wendy. I had no idea you could dye these flowers different colors. That is so cool! I’ve seen them in the store before but never realized how simple they would be to work with because they always seem so delicate. I’m excited to try them now. This wreath is just gorgeous! Thanks so much for putting this hop together and for inviting me to be a part of it. Big hugs, CoCo
Thank you CoCo. It was such a fun wreath to create. I’m glad you like it.