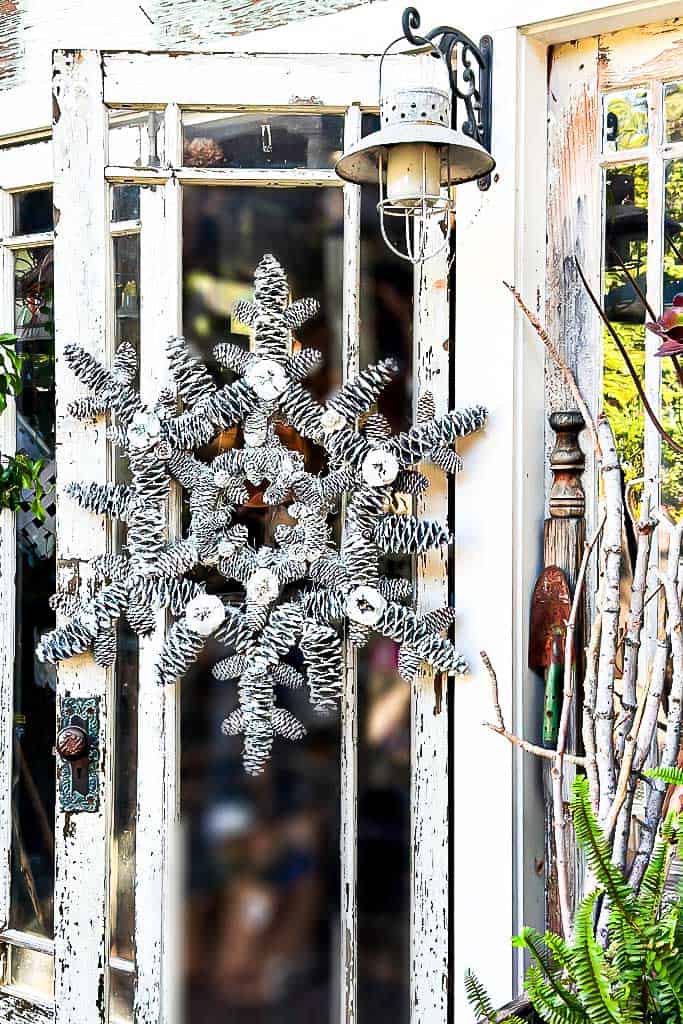
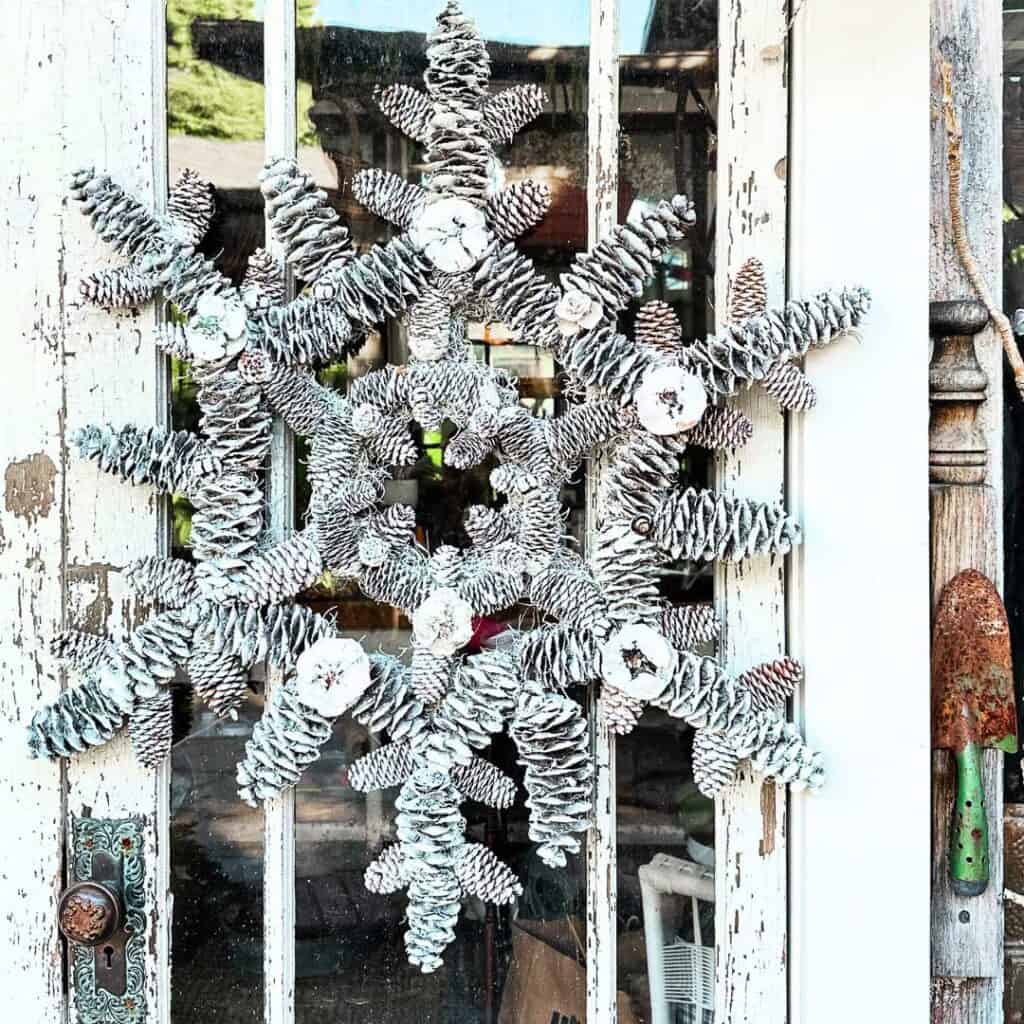
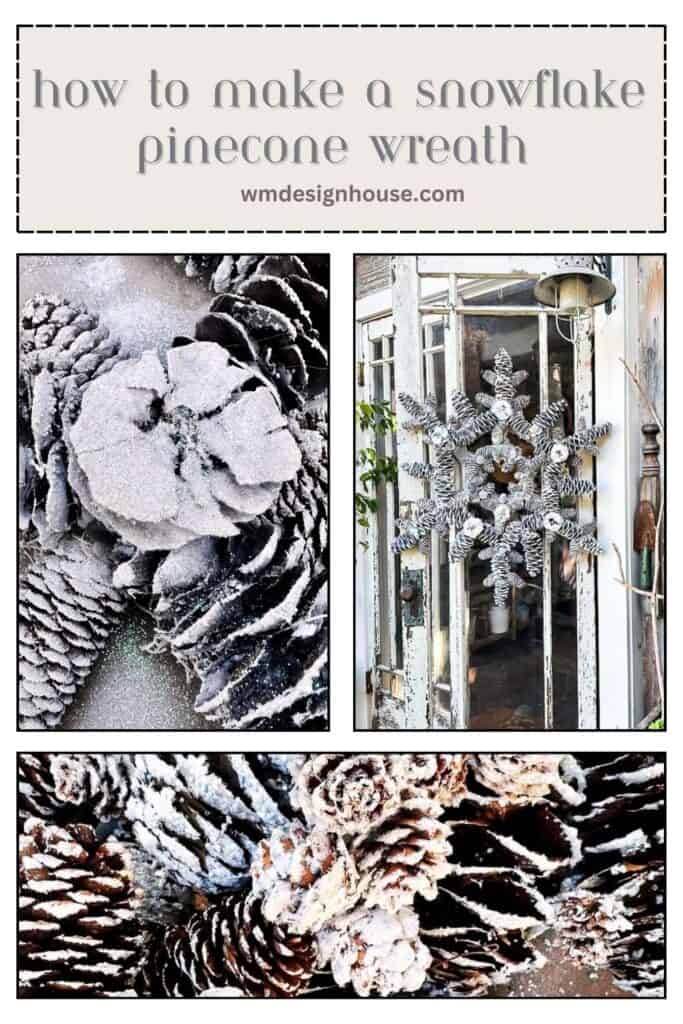
How To Make a Pine Cone Wreath (To Look Like a Snowflake)
Get ready to add a touch of natural beauty to your home this holiday season with our step-by-step guide on making a beautiful pinecone wreath (DIY) in the shape of a snowflake.
Pinecones are natural elements often associated with the holiday season, symbolizing the beauty of winter and the spirit of the outdoors. Their rustic charm can instantly create a cozy, welcoming atmosphere. They create beautiful natural decorations that you can use all season long.
Pinecones are readily available and often free, making this DIY project an affordable way to add festive decor to your front door without breaking the bank.
In addition, this beautiful wreath will last year after year, so let’s get started.
On my blog, WM Design House, I may sometimes use affiliate links, which means a small commission is earned if you purchase via the link. The price will be the same whether you use the affiliate link or go directly to the vendor’s website using a non-affiliate link.
Hand Crafted Society
It is the first Tuesday of the month, so it is time for the Hand Crafted Society gals to share their creations with you.
If you happen to come over from Regina’s @savedfromsalvage, welcome. She is so creative, and I have no doubt you loved her fun fire starters.
We always invite a guest to join in on the fun. This month, we welcome Kim @cottageinthemitten. We are so happy she joined us.
Supplies Needed to make Pine Cone Wreaths
- One 14″- 16″ wire wreath form
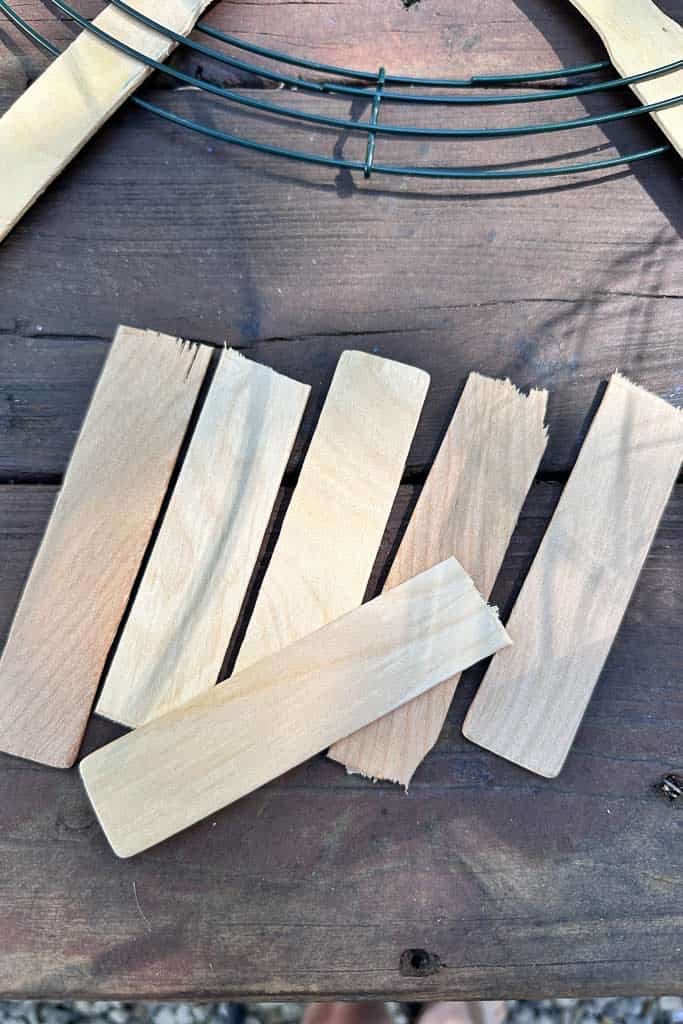
- 9 wood paint stir sticks
- White paint or spray paint
- Hot glue gun
- Glue sticks
- Aluminum foil
- Drop cloth
- Floral wire
- Wire cutters
- Iridescent glitter (adds a festive touch)
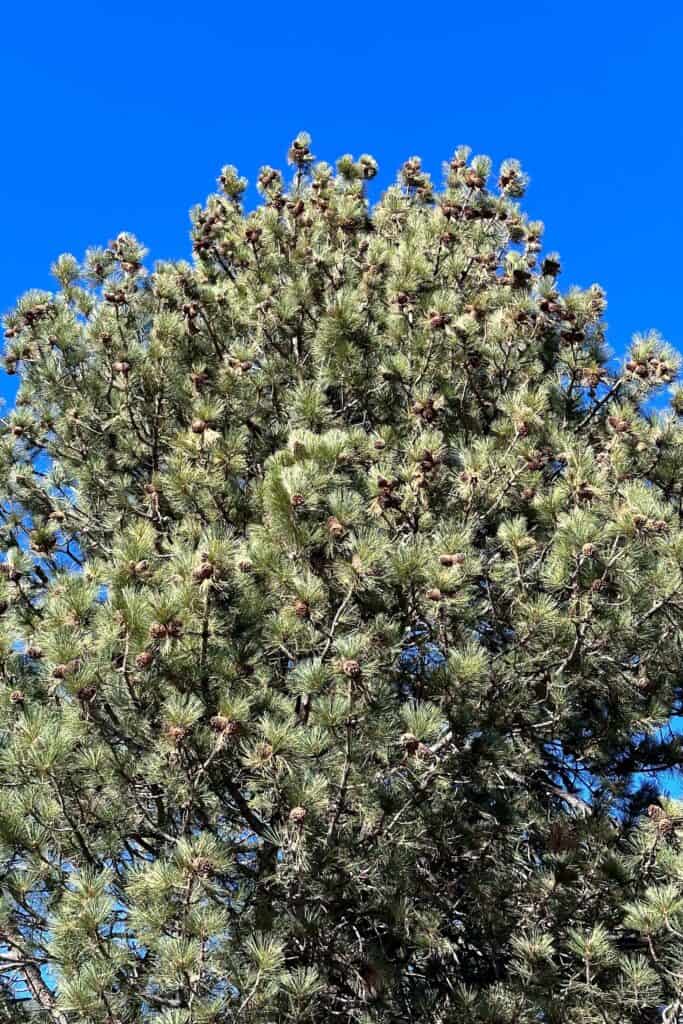
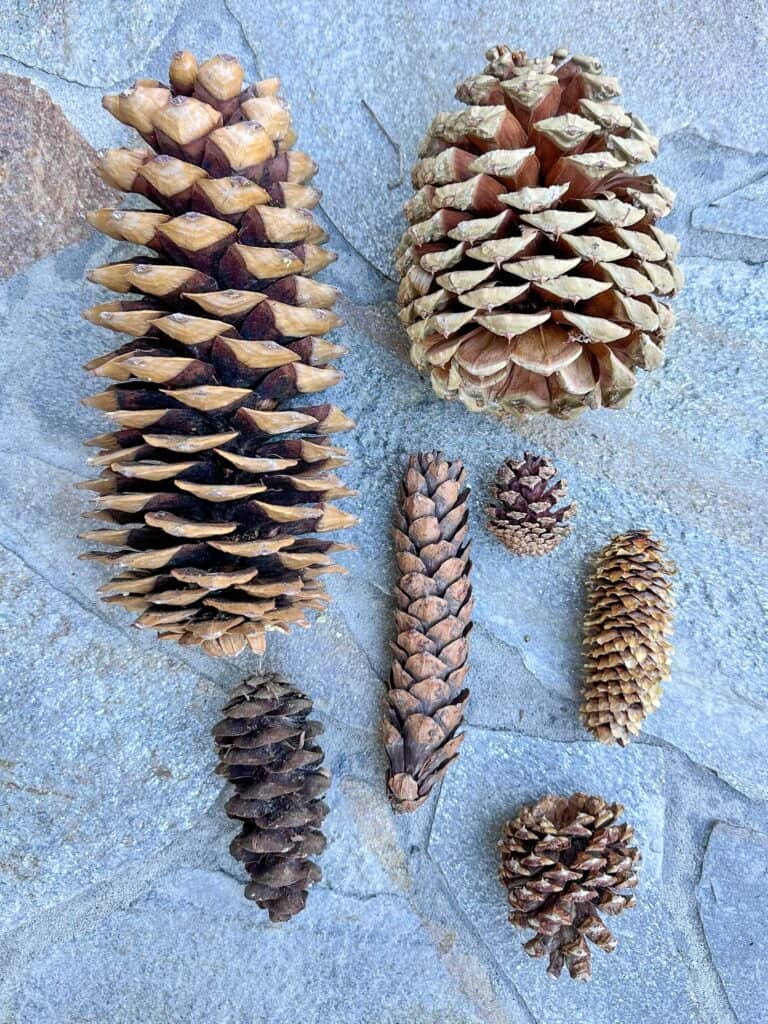
- Variety of pinecones- The perfect largest pinecones for this project come from the eastern white pine trees. Unfortunately, I don’t have those trees in my local mountains, and I wanted to use natural pine cones I could find locally. I chose to use cones from a local Mountain Hemlock tree.
- Small pine cones- I used small cones from the Engelmann spruce tree.
- White vinegar
- Baking sheet
- Spanish moss
- Chip paintbrush
- Spray glue
I have provided links to purchase supplies you need to make your own pine cone wreath, or you can purchase them at a local craft store, Walmart, or a thrift store.

Where to find Pinecones
There are many places you can find pinecones.
Pinecones can be found in various places, both in nature and at stores. Here are some of the best places to find pinecones:
- Local Parks and Forests: Take a walk in your local parks or forests, especially in areas with pine trees. Pinecones are often scattered on the ground, especially in the fall season.
- Your Backyard or Garden: If you are lucky enough to have a pine tree, you can collect them in your own backyard.
Or there are several places to purchase them:
- Gardening Centers: Some garden centers or nurseries sell pinecones, especially during the holiday season.
- Craft Stores: Local craft stores often stock pinecones in the floral or seasonal decoration sections. You can buy them in various quantities.
- Online Retailers: You can find pinecones for sale on various online marketplaces, such as Etsy or Amazon. Read reviews and check the seller’s reputation when buying online.
- Craft Supply Stores: Craft supply stores like Michaels or Joann’s carry pinecones, especially around the holiday season.
Preparing the Pinecones
Before using them in craft projects, you need to clean and bake the pinecones. If you have purchased them in a store, then there is no need to bake them.
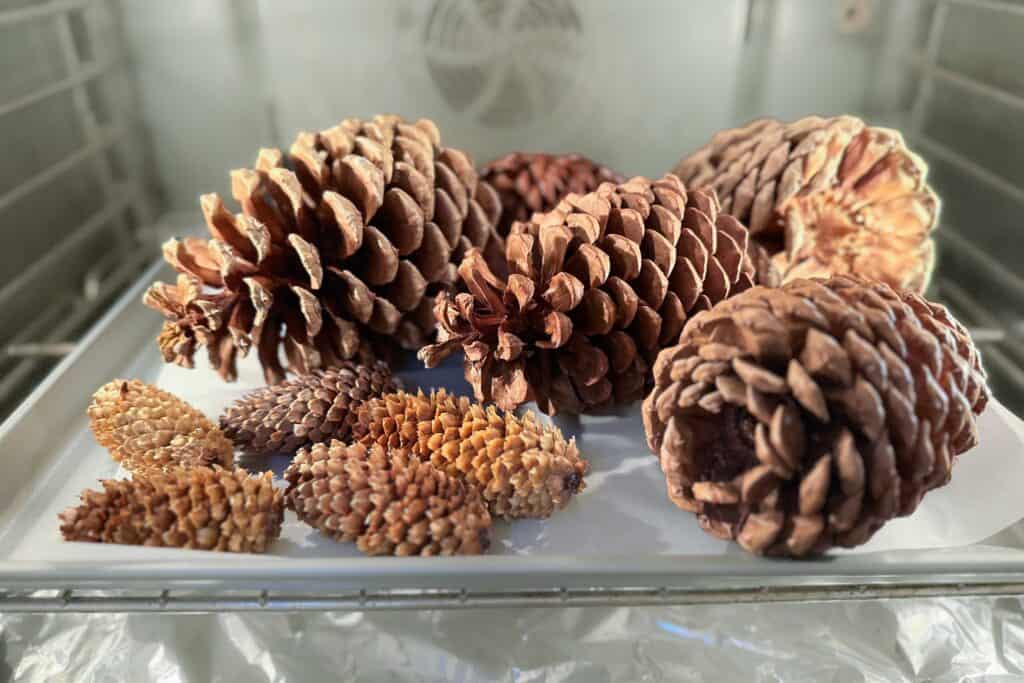
It’s a simple process of soaking them in hot water and equal parts of vinegar for 30-60 minutes.
Next step, bake them on a foil-lined cookie sheet at 200 degrees for 1 hour.
This process is so important that I wrote an entire blog post about “Cleaning and Baking Pine Cones for Craft Projects” which will tell you why we soak pinecones in vinegar.
Step-by-Step Tutorial to Make Pine Cone Wreaths
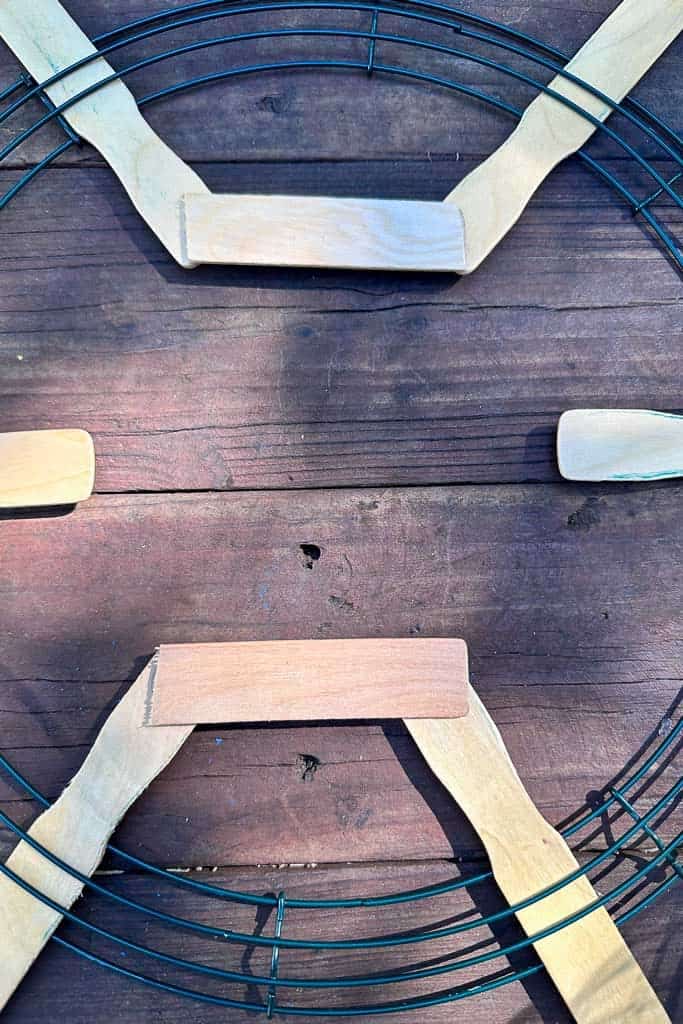
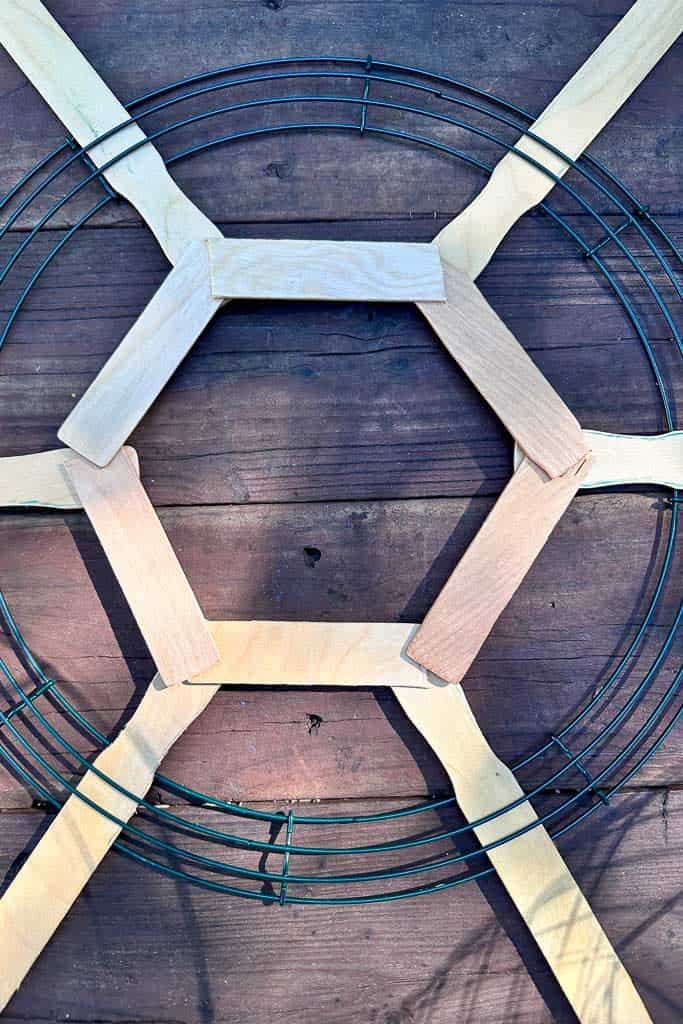
- Gather your paint stir sticks and the wire form to create the snowflake frame.
- Weave six of the wood paint stir sticks into the frame to create the arms of the snowflake.
- Break the other three paint sticks into six 4- 5″ pieces.
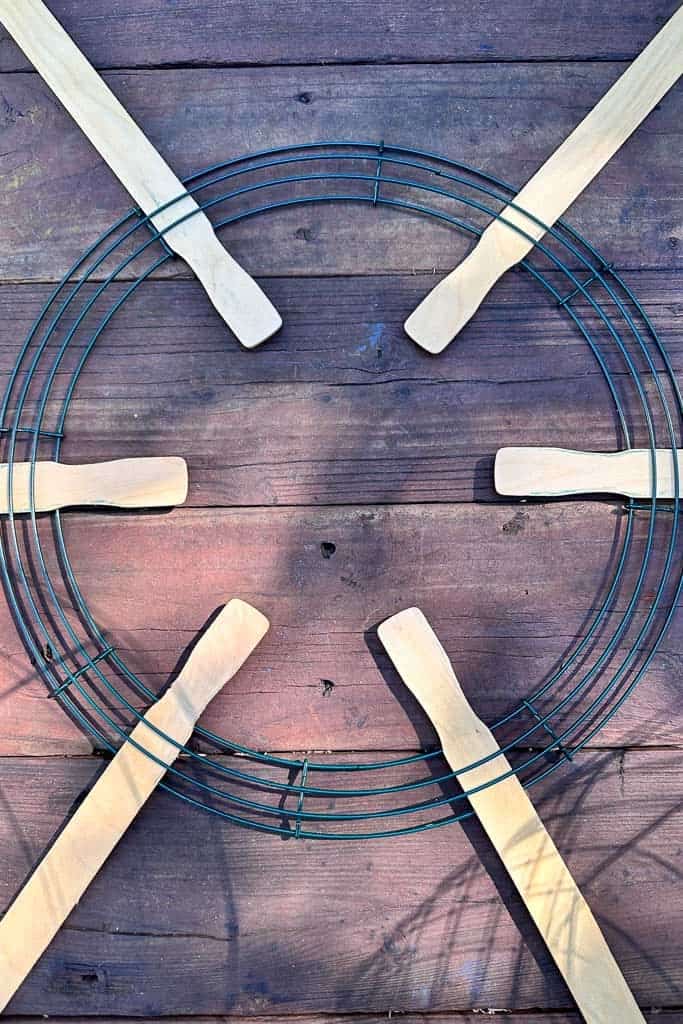
- Arrange the small pieces in the center of the wire frame on top of the paint sticks to form a hexagon.
- Hot glue these pieces in place.
- Spray paint the entire frame with the white spray paint.
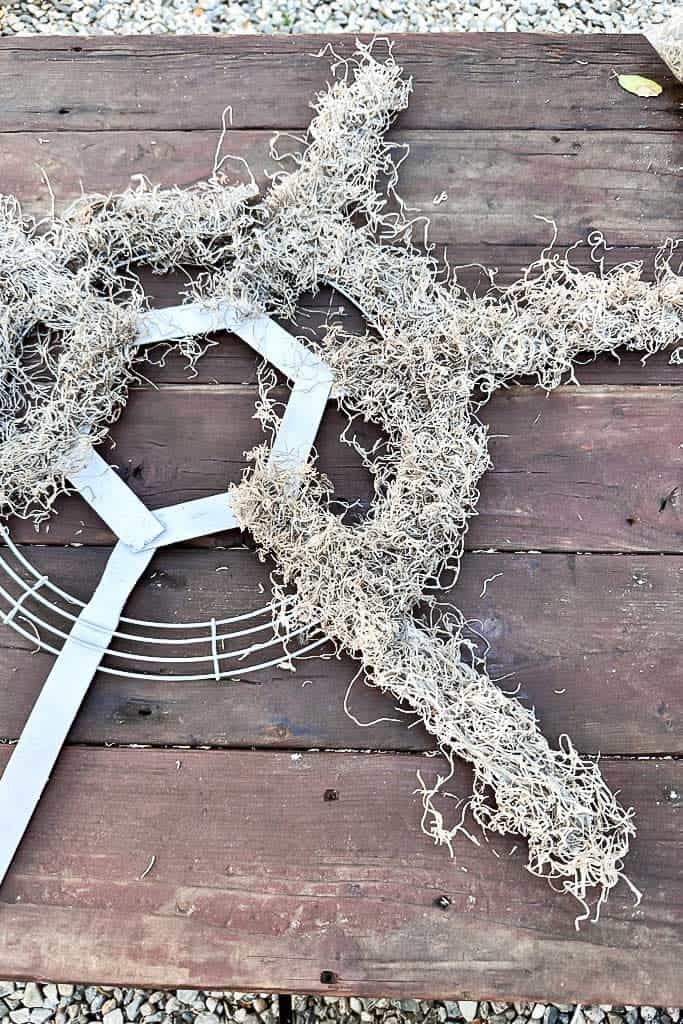
- Hot glue a small amount of Spanish moss onto the frame.
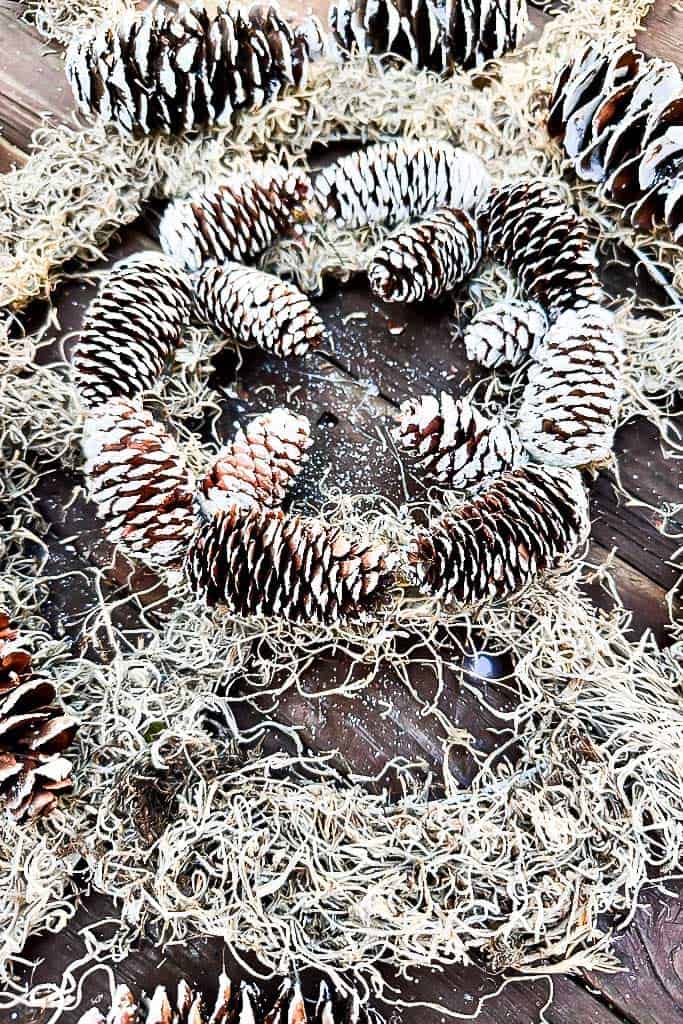
- Lay out your small pinecones in the center of the frame to create a pattern similar to mine. This will help you figure out how many pinecones you will need. I used 50 small pinecones in total on my wreath.
- Lay out your larger pinecones to determine precisely how many you need. (I used a total of 30 on my wreath).

.
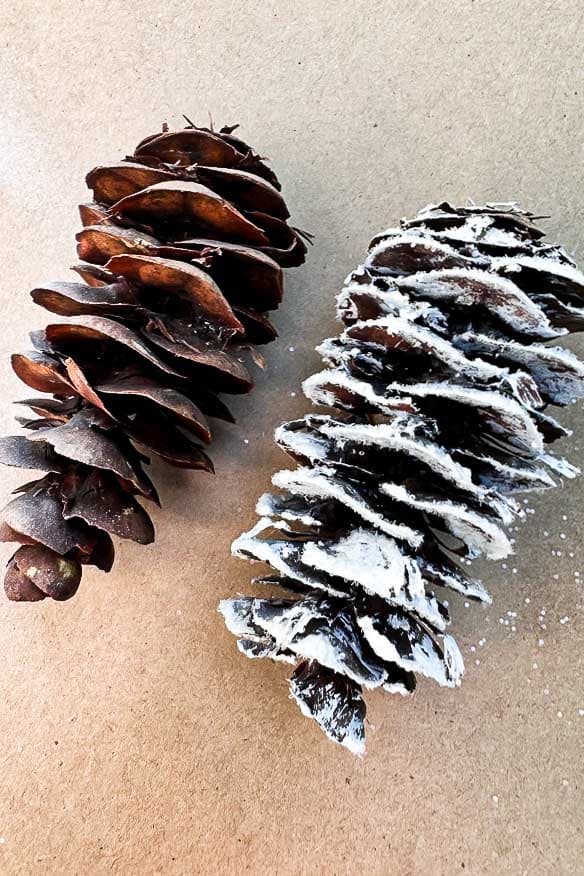
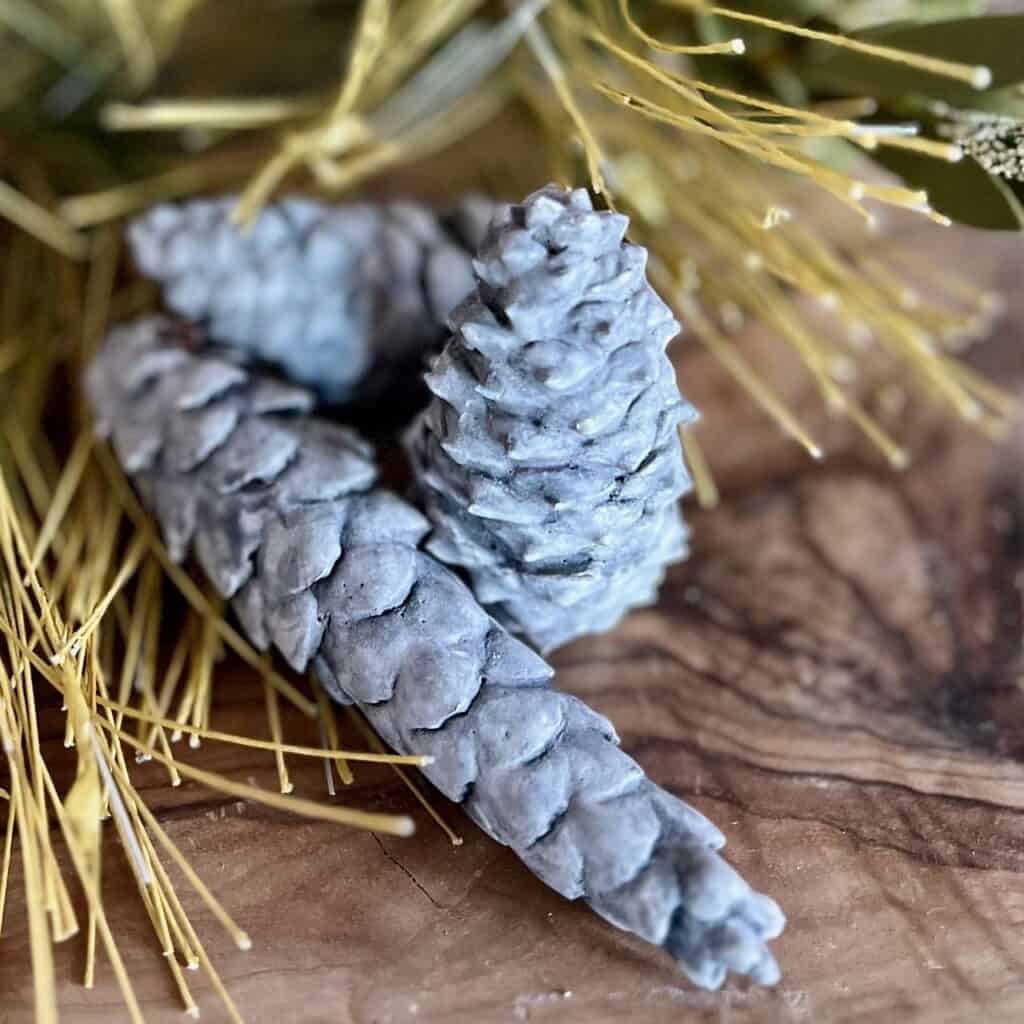
- Using a small paintbrush and some white acrylic paint, give these pine cones a light coat of white paint and sprinkle them with glitter while the paint is still wet. You could also use white spray paint for this process, but I have better control with a paintbrush. Since I did not want to fully cover my pinecones in paint.
- Allow the paint to dry for a few hours.
Assembling the Snowflake Wreath
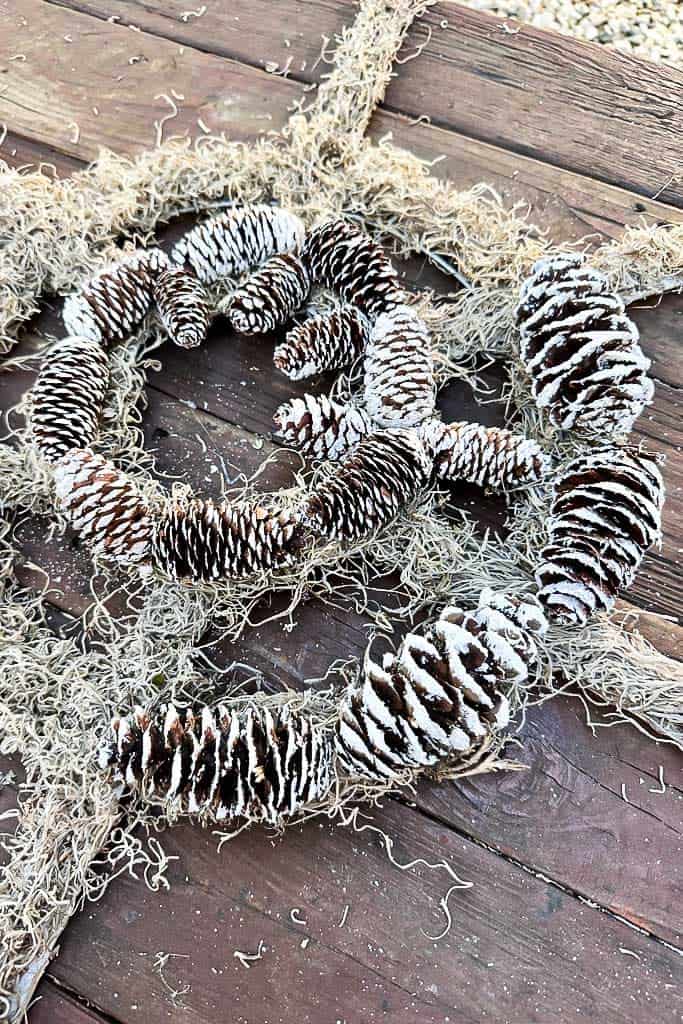
- Lay out your pine cones in the pattern you want. You can use my image as an example.
- Use a little bit of hot glue to attach the pine cones in place, starting with the inner ring.
- Reinforce the pinecones by wrapping the spool of wire around each pine cone and attaching it to the frame.
Adding Special Touches
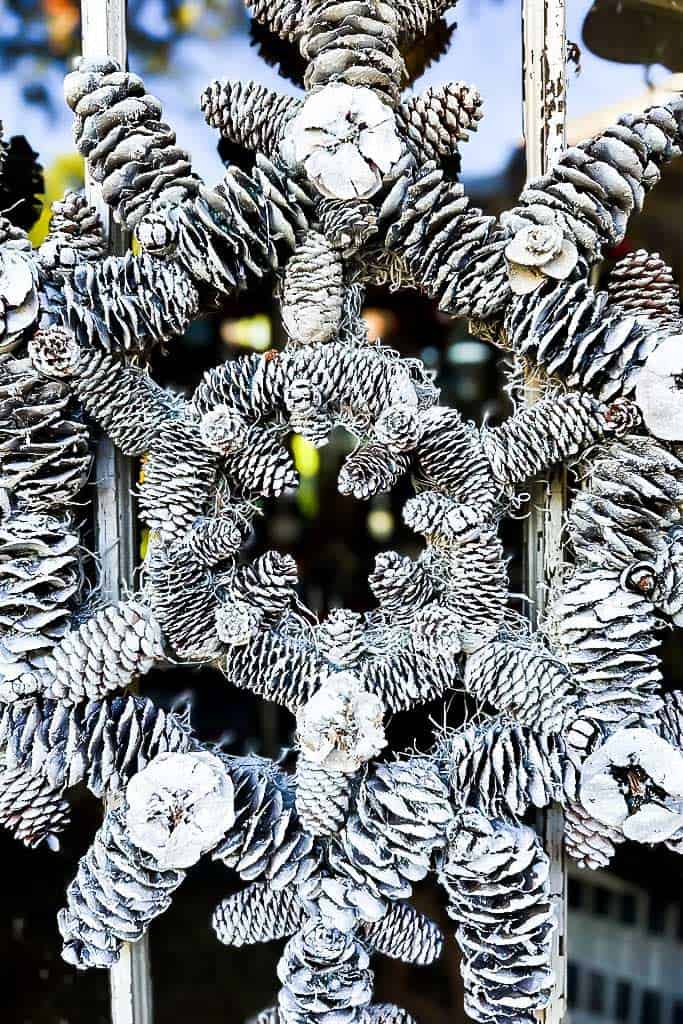

Add smaller items to fill any open spaces when your beautiful pine cone wreath is finished.
I used pinecone flowers made from pinecone petals and a few small cypress pods.
I painted them white, added glitter, allowed them to dry, and then hot glued them to the wreath in a random pattern.
If you want your wreath to have more glitter, you can spray it with spray glue and sprinkle a little bit more on it. You can never have too much glitter for the holidays.
You could also add a pretty ribbon or a few berries for a touch of color.

Pinecone Wreath DIY: How To Make a Pine Cone Snowflake
Equipment
- Wire cutters
- Hot glue gun
- Chip paintbrush
Materials
- One 16″ wire wreath form
- Nine wood paint stir sticks
- White paint or spray paint
- Glue sticks
- Aluminum foil
- Drop cloth
- Spool of wire
- Iridescent glitter adds a festive touch
- Variety of pinecones- The perfect largest pinecones for this project come from the eastern white pine trees. Unfortunately I don’t have those trees in my local mountains, and I wanted to use natural pine cones I could find locally. I chose to use cones from a local Mountain Hemlock tree. I used 30 of these on this wreath.
- Small pine cones- I used 50 small cones from the Engelmann spruce tree.
- White vinegar
- Cookie sheet
- Spanish moss
- Spray glue
Instructions
- Gather your paint stir sticks and the wire form to create the snowflake frame.
- Weave six of the wood paint stir sticks into the frame to create the arms of the snowflake.
- Break the other three paint sticks into six 4- 5" pieces.
- Arrange the small pieces in the center of the wire frame on top of the paint sticks into a hexagon.
- Hot glue these pieces in place.
- Spray paint the entire frame with the white spray paint.
- Hot glue a small amount of Spanish moss onto the frame.
- Lay out your small pinecones in the center of the frame to create a pattern similar to mine. This will help you figure out how many pinecones you will need. I used 50 small pinecones in total on my wreath.
- Lay out your larger pinecones to determine precisely how many you need. (I used a total of 30 on my wreath).
- Using a small paintbrush and some white acrylic paint, give these pine cones a light coat of white paint and sprinkle them with glitter while the paint is still wet. You could also use white spray paint for this process, but I have better control with a paintbrush as I did not want to fully cover my pinecones in paint.
- Allow your cones to dry for a few hours.
- Assemble the Snowflake Wreath per the below instructions.
- Use a little bit of hot glue to attach the pine cones in place, starting with the inner ring.
- Reinforce the pinecones by wrapping the wire spool around each pine cone and attaching them to the frame.
- Adding Special Touches
- Add smaller items to fill open spaces when your beautiful pine cone wreath is finished.
- I used pinecone flowers made from pinecone petals and a few small cypress pods.
- I painted them white, added glitter, allowed them to dry, and then hot glued them to the wreath in a random pattern.
FAQ’s
- How many pine cones does it take to make a wreath? My wreath turned out rather large; it measures 24″ around, and I used 30 large pine cones and 50 small pinecones.
- How long do pinecone wreaths last? Pinecones are pretty hardy; storing the wreath in a wreath box will help it last for years.
- What would you say is the best glue for pine cone crafts? I prefer to use hot glue. It holds the pinecones well and dries quickly.
- Can you use Mod Podge on pine cones? Yes, you can use Mod Podge on pinecones if you want to add clear finish to them and not paint them. Mod Podge is a popular sealer used for various crafting projects, including decorating pinecones. It can help you create a glossy or matte finish on pinecones and adhere to other decorative elements like glitter, paper, or fabric. Allow it to dry completely before using the decorated pinecones in your crafts.
- Does Hairspray preserve pine cones? Hairspray can be used as a quick and easy method to help preserve pinecones temporarily, but it may not be as effective as other preservation techniques. Hairspray can help hold the petals of the pinecone in place and reduce the likelihood of them shedding, but it won’t provide long-term preservation.
- If you want to preserve pinecones for a more extended period, it’s better to use other methods, such as baking or using a clear craft sealant specifically designed for preserving natural materials. These methods can help prevent the pinecones from deteriorating and maintain their appearance for a more extended period.
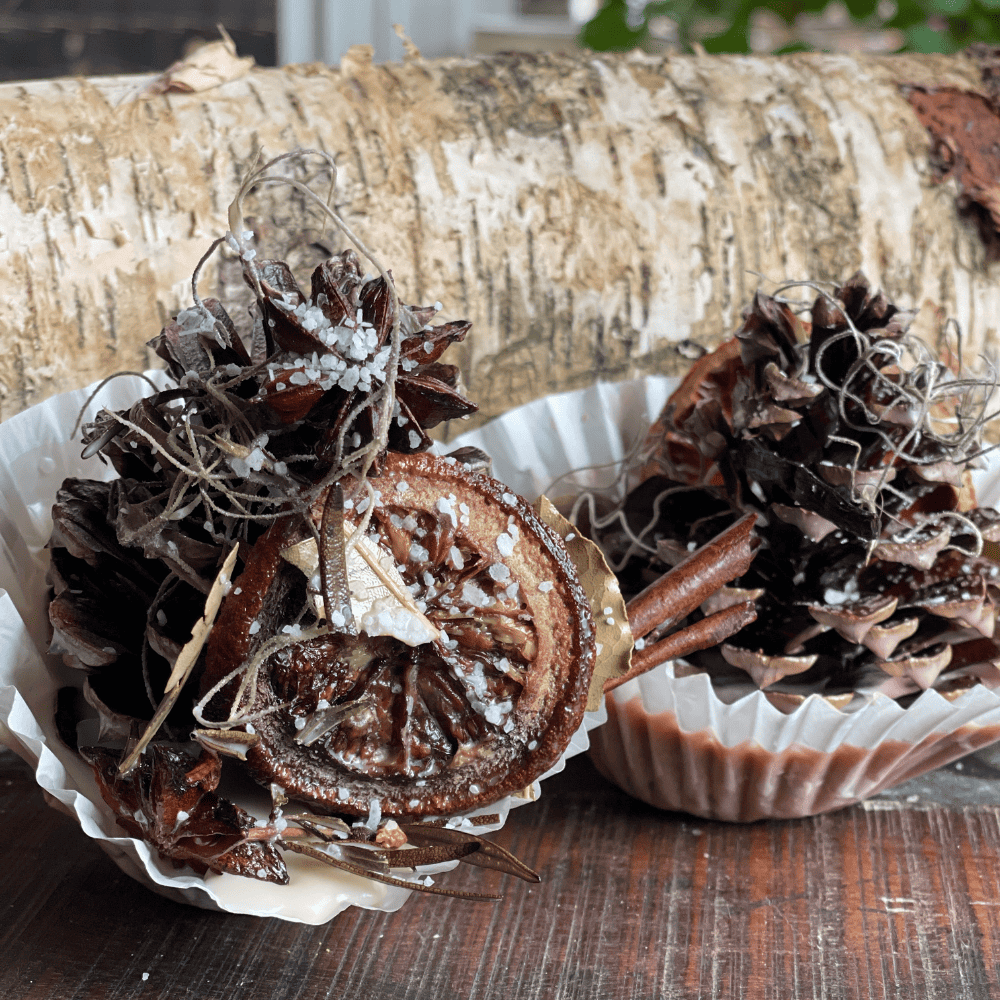
Other Favorite Pine Cone Crafts
This is just one idea of using pine cones for your Christmas decorations. Here are a few other suggestions to get your creative juices flowing.
- Create a centerpiece with a dough bowl filled with fresh greens, pinecones, and a few twinkle lights for a festive look.
- Decorate your Christmas tree with pinecone ornaments. You can paint them, add glitter and tie a ribbon loop for hanging.
- Scent your home with the natural aroma of pine by placing pinecones in a decorative bowl and adding a few drops of essential oils like pine, cinnamon, or lavender.
- Make a pine cone garland for your fireplace mantel, staircase or table decoration.
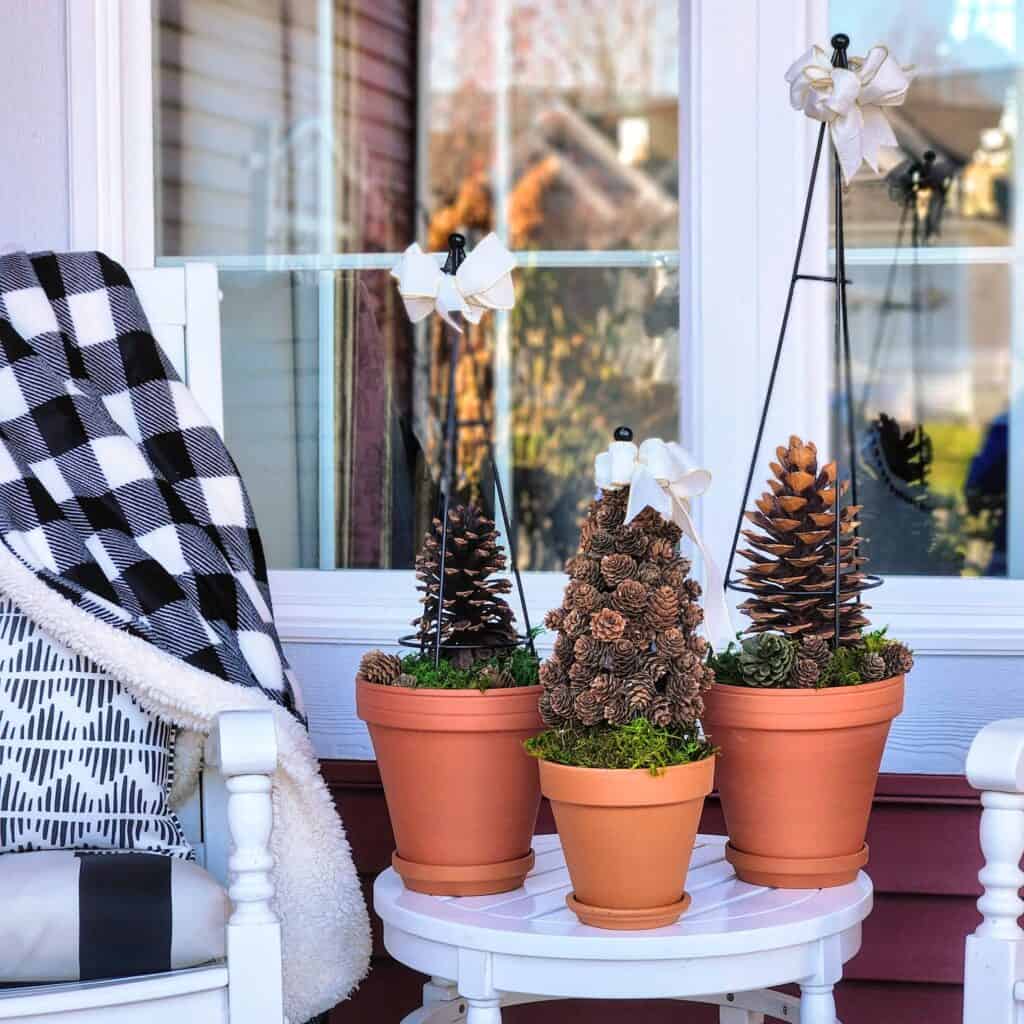
- Use pinecones in a basket to decorate around your fireplace or the front porch.
Handmade decor adds a personal touch to your home during the holidays. A pinecone wreath is a unique and inexpensive, one-of-a-kind creation that showcases your creativity and craftsmanship. I hope you give it a try.
Now, let’s visit my friend Amy’s beautiful blog. She has created some darling pinecone elves. Explore the links below to discover the enchanting pinecone-inspired creations by the other talented gals.


Other Posts to Inspire You This Holiday Season


Wendy,
OMG, this wreath is so gorgeous. I love it. Congratulations, you are being featured on TFT. https://www.eclecticredbarn.com/2023/11/december-decorating-on-thursday.html
Hugs,
Bev
Wendy, this snowflake is GORGEOUS!
Will be featuring you starting Wednesday at the Creative Crafts Linky Party! Pinned and shared!
Creatively, Beth
Hi Beth, thank you so much. I look forward to the party!
This is absolutely fabulous Wendy! I plan on featuring your post in next week’s Friday Favorites. 🙂
Thank you so much for the share Laura. I appreciate you so much.
Thank you for hosting the Handcrafted Society! I love this gorgeous door hangers! It’s such a great idea and adding the sparkles is the perfect touch!!
Thank you, Susan, it sure was one of those projects that I don’t want to repeat anytime soon, LOL.
I love how you used the paint stirrers as supports, so clever!!
Thank you!
I thought I knew about pinecones, and then you teach me something new Wendy. When I received a large bag from my mom last year, I baked them, but heck, I had no idea I needed to soak them in vinegar too! Oh, the things I learn when I come for a visit with you. 😉 I am loving this pinecone wreath too, you are so smart! Now if I can do this is another story. Hope you are well.
LOL, I have had pinecones bring in some bad stuff before, so I am a bit cautious about bringing them into the house.
I was sick last week and I feel so behind, making better progress this week. I am anxious to catch up and get back to some normalcy.
Your really is so pretty, Wendy! Beautiful inspiration this month. Thanks so much for having me, this month!
We loved having you Kim!
This wreath is gorgeous, Wendy! The snowflake design is so pretty and I LOVE how large the wreath is! Stunning on your door! Thank you again for hosting the Handcrafted Society!
Thank you so much Missy! I am glad you enjoyed the post.
Brilliant idea using the paint sticks for your frame Wendy! What a beautiful door decoration and with your construction, it will last for many years. Love it Wendy!
Oh my gosh Wendy this is SO PRETTY!! I love all of the super simple materials you used to create it. Such a pretty handmade decor piece for the upcoming season!!
Thank you so much, Rachel, I hope you are doing well.