How to Make a Stunning DIY Faux Fall Tree That Looks Real
I must admit that fall is my favorite season, and I am always anxious to start decorating, especially on the front porch.
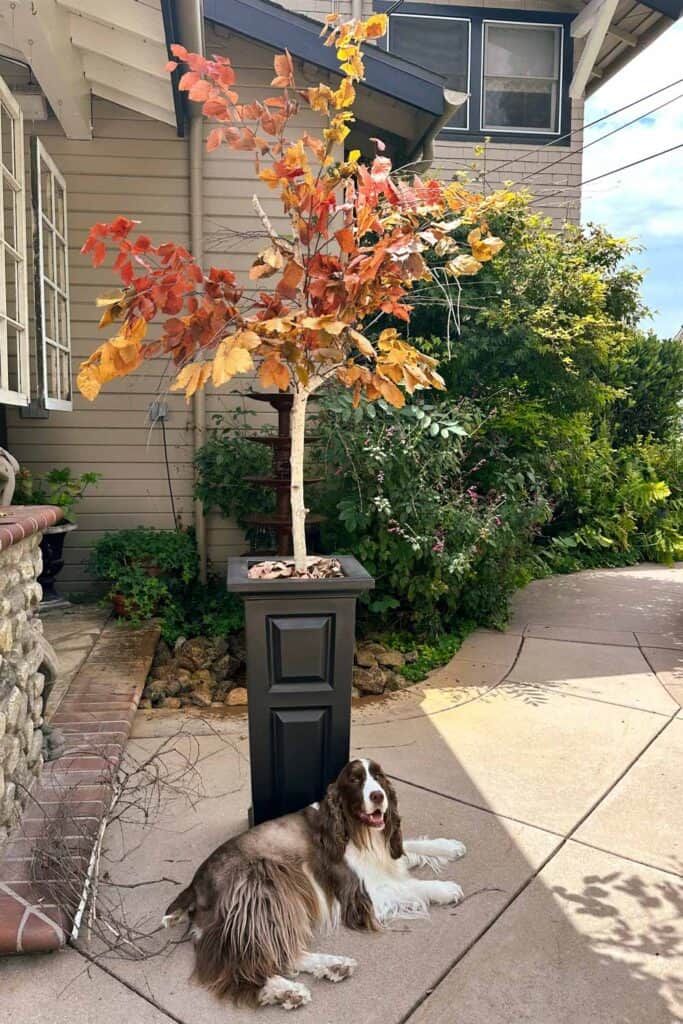
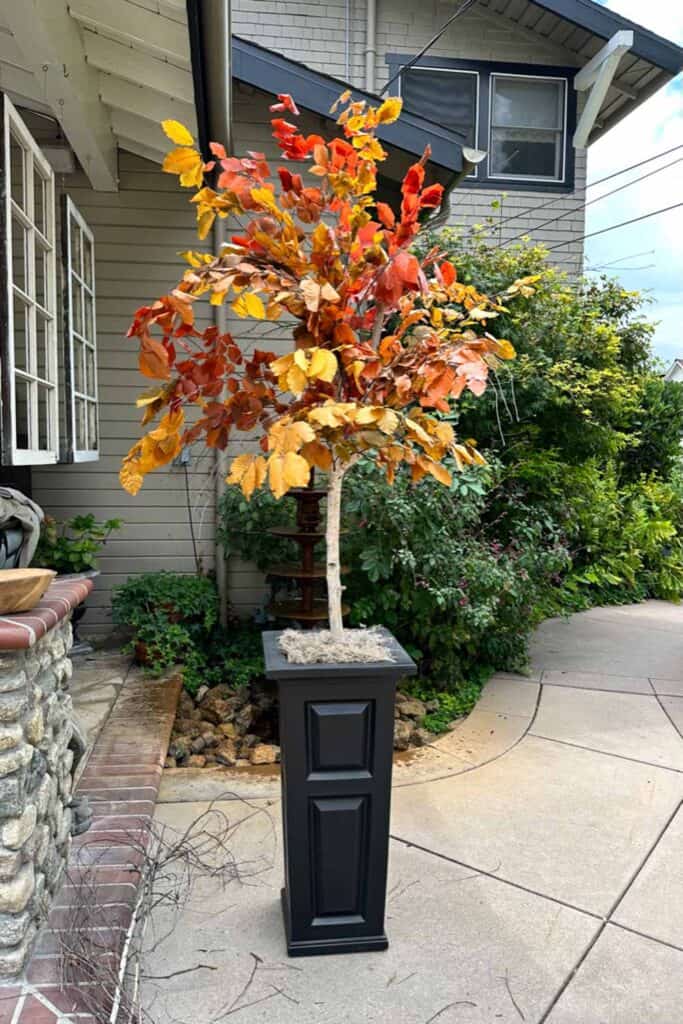
I’m sharing one of my front porch secrets with you today: how to make a DIY faux fall tree that looks real. Typically, I’m not a fan of most artificial trees, but I love real plants or plants that at least look real. I know that fake plants these days look amazing, and sometimes you can hardly tell the difference.
In addition I am joined by several other bloggers hosted by my friend Pasha @pashaishome. You see I am not the only one itching for fall to arrive. If you happen to come over from Tammy’s blog @whitelilacfarmhouse, welcome. I am sure you are all inspired by all of her centerpiece ideas.
How Much Does It Cost To Make a Fake Tree?
The cost of this project is very affordable. You can use any pot you have at home, or you can purchase tall pots. I purchased tall pots when I first made this tree a few years ago, for under $100 for two. However, I have been using the same pots for three years and the same leaves on the trees for two years. This is the most realistic option for my budget and my aesthetic.
On my blog WM Design House, I may sometimes use affiliate links, which means a small commission is earned if you purchase via the link. The price will be the same whether you use the affiliate link or go directly to the vendor’s website using a non-affiliate link.
I used a real branch from our Birch tree, but you can use any big branch. Just drive around and find a tree trimming company that might be trimming a tree. They will be happy to give you a branch or two.. I have also listed out all of the supplies below along with links for you.

Benefits of A DIY Faux Fall Tree
There are many upsides to having a faux tree.
- Cost-effective
- Looks real! All my guests think my trees are real.
- You can reuse the tree branch each season to create a different tree.
- You never have to buy an ugly faux tree.
- The tree can be used indoors or on a covered porch. (If you have a lot of humidity in your air, I suggest using faux leaves instead of preserved)
Different Types of DIY Trees You Can Make
I have used this branch to make several different types of trees over the years. Here is a list of a few ideas for you.
- Artificial Olive Tree (purchase faux olive leaves to create this type of tree)
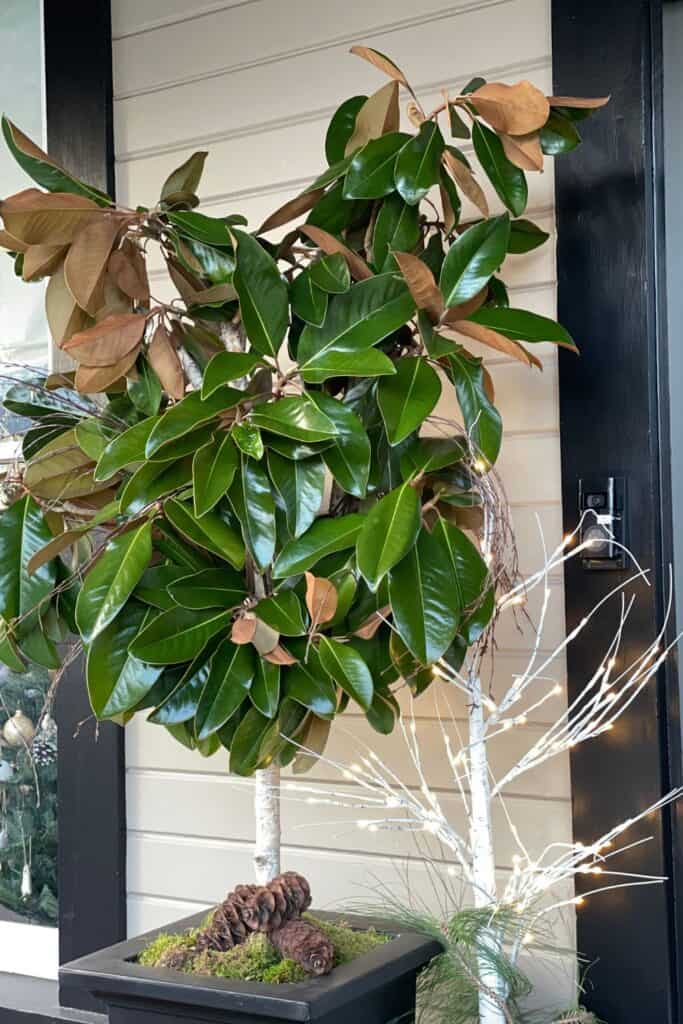
- Artificial Magnolia Tree (I used real magnolia branches to do this last year) but these fall leaves are beautiful.
- Cherry Blossom Tree (I used real cherry blossoms to create a spring tree this past spring)
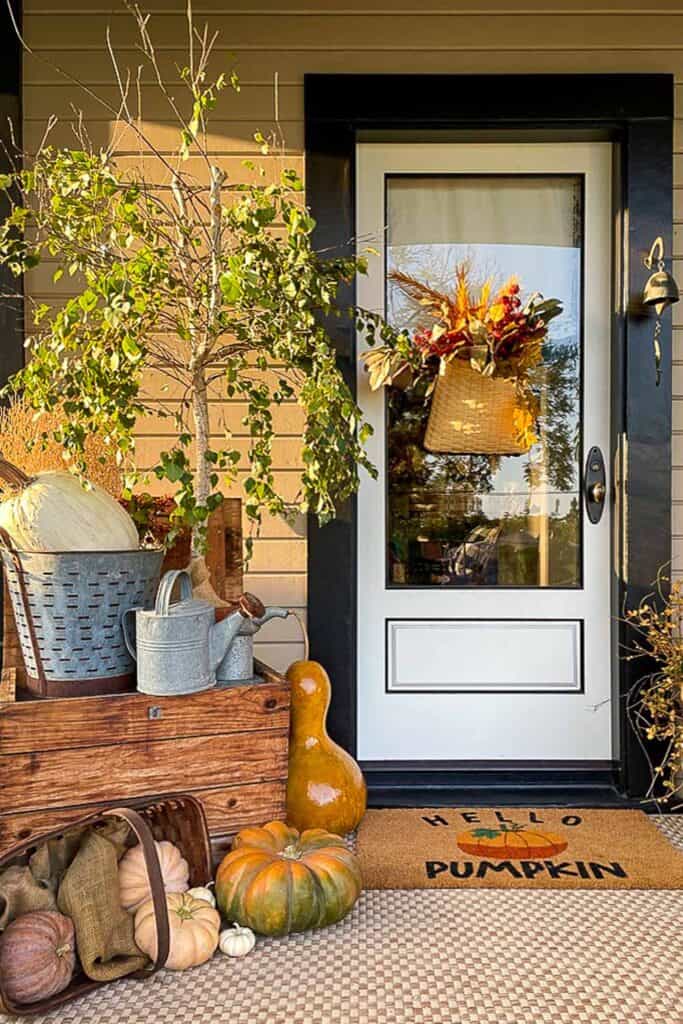
- A real looking birch tree
- Artificial Christmas Tree (you could use real pine branches)
- faux fiddle leaf fig tree
Material List for DIY Faux Fall Tree That Looks Real
- A large tree branch (mine measures 48″ tall x 1-2″ in diameter. I like to find a branch with offshoots, or you can use two branches together.
- Drill with a small drill bit
- Wire cutters
- Spanish moss or sheet moss
- Twigs or real tree branches that are 2-3′ long or faux branches.
- 3 Bags of preserved fall leaves orfaux stems of leaves (use different colors for a realistic look).
- Wire
- Plaster of Paris
- Old bucket
- Packing paper, paper bags, or bubble wrap
- Frog tape
- 2 Tall Planter Boxes
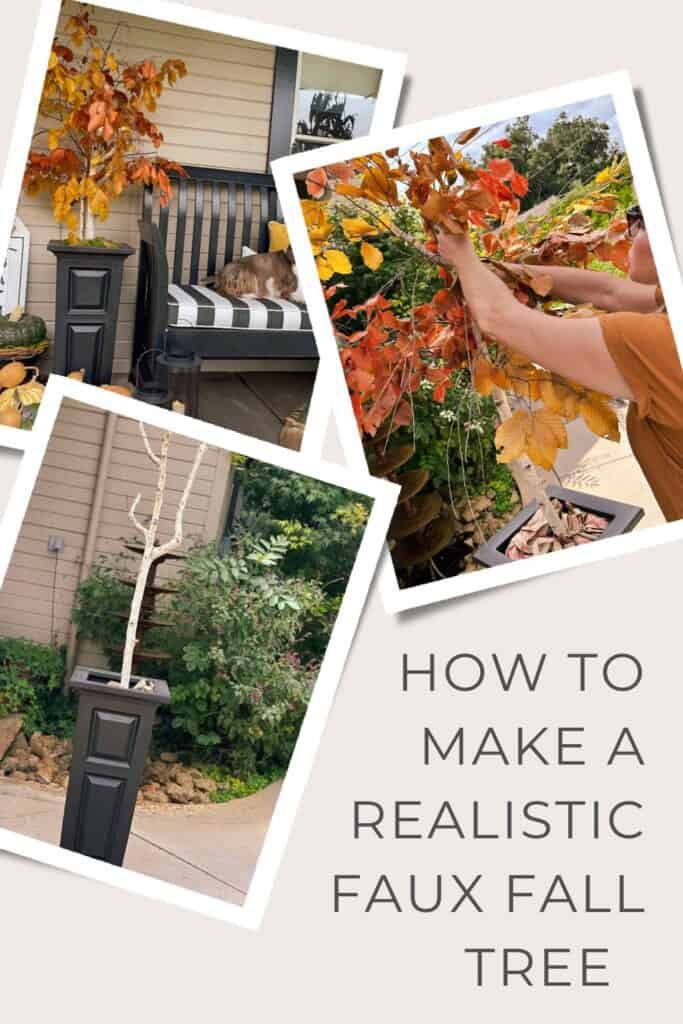
Directions How to Make a Faux Fall Tree That Looks Realistic
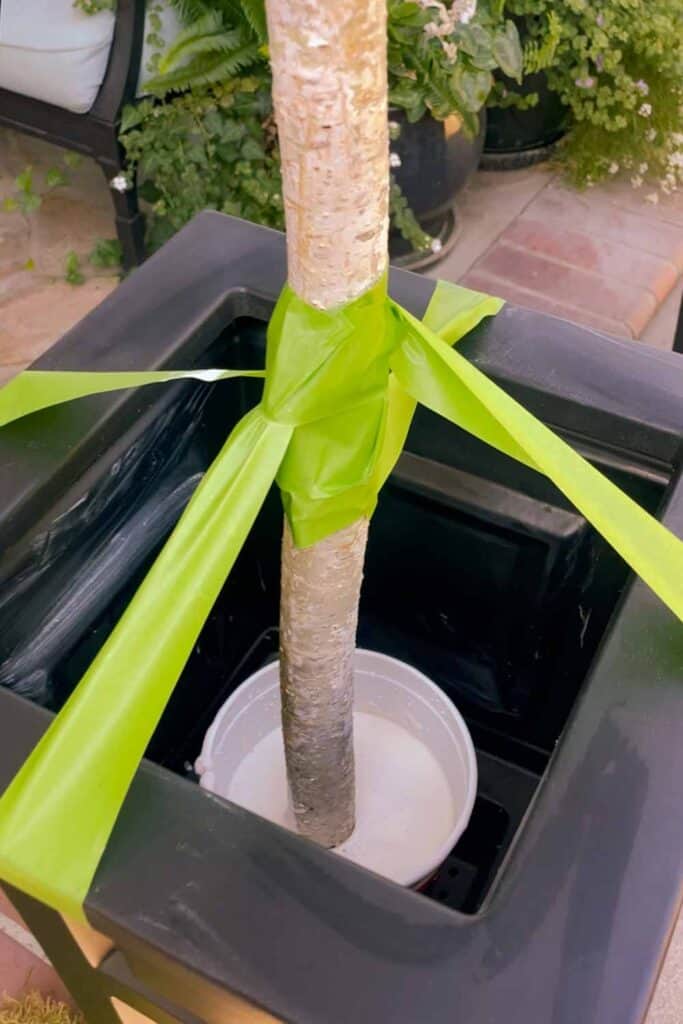
- Mix up a bucket of Plaster of Paris and place the bottom of the tree branch into the center of the bucket of Plaster (I used the plastic bucket the Plaster of Paris came in). You could also use a small plastic pot.
- I added a few rocks into the plaster to take up more space in the bucket, but this is unnecessary.
- Place the bucket with the branch inside your tall planter box.
- Using frog tape, tape the branch to stand up straight and allow it to dry overnight.

Prepping the Tree Trunk for the Branches
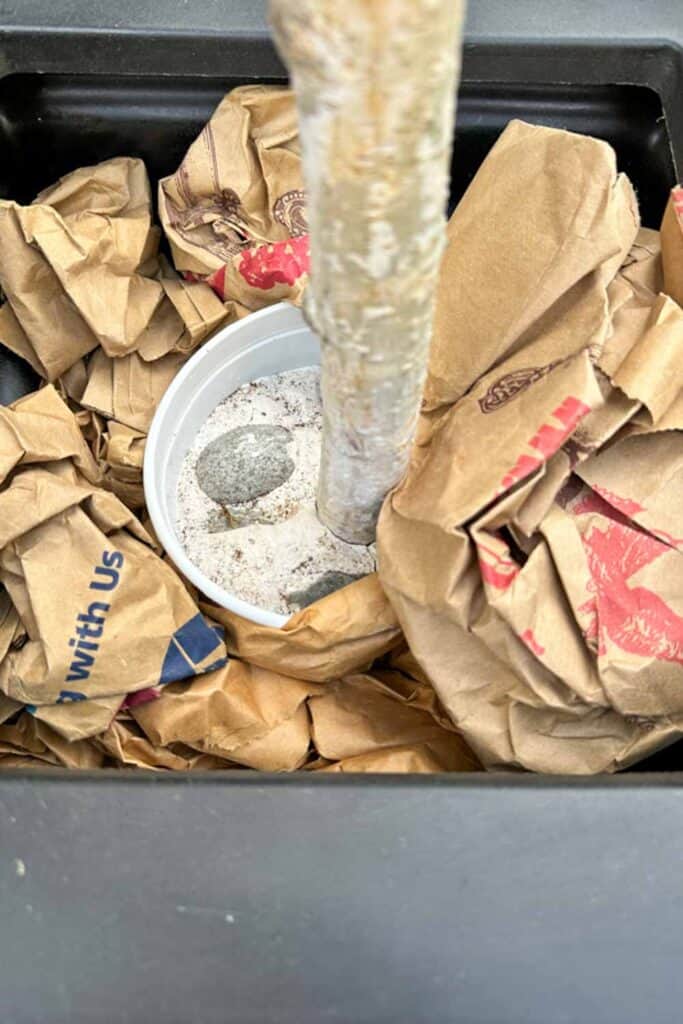
- First, pack around the plastic pot with your branch inside using packing paper, plastic bags, or paper shopping bags. This will help to stabilize the branch and prevent it from moving around. Continue packing until the pot is secure and won’t move.
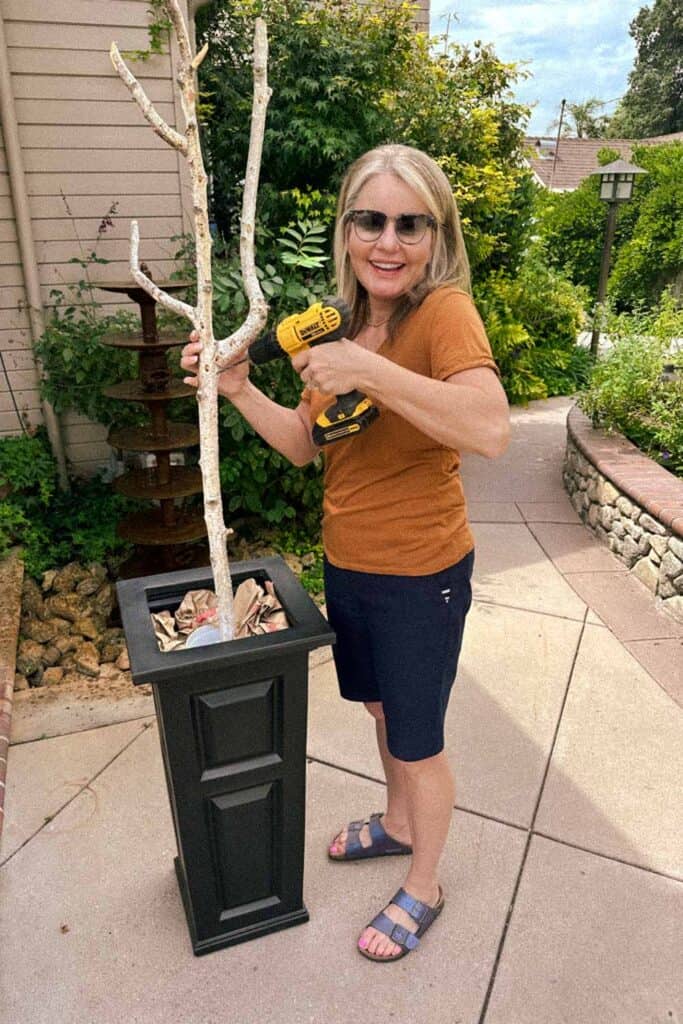
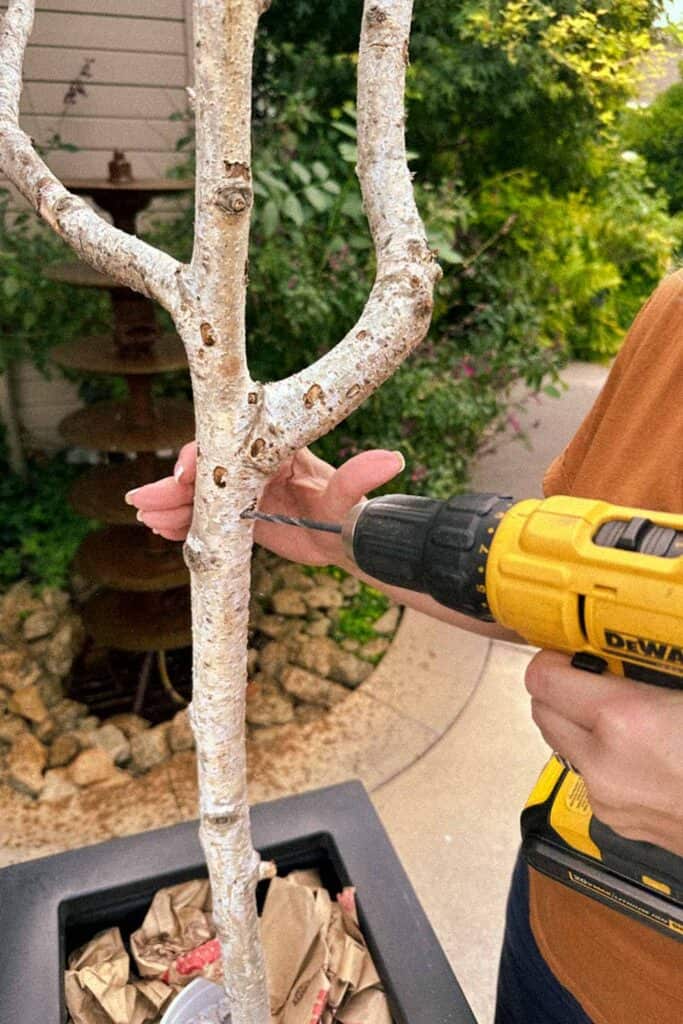
- Next, choose drill bits approximately the same size as your branches of leaves and the bare twigs. This will ensure that the holes you drill are the right size to accommodate the branches.
- Now, drill holes in the tree trunk (the top third of the large branch) at an angle. This will help the branches to look natural when you insert them. The holes should only be deep enough to hold the branches in place, approximately 1/2″ deep. Drilling the holes on a downward angle helps the branches to stay in place.
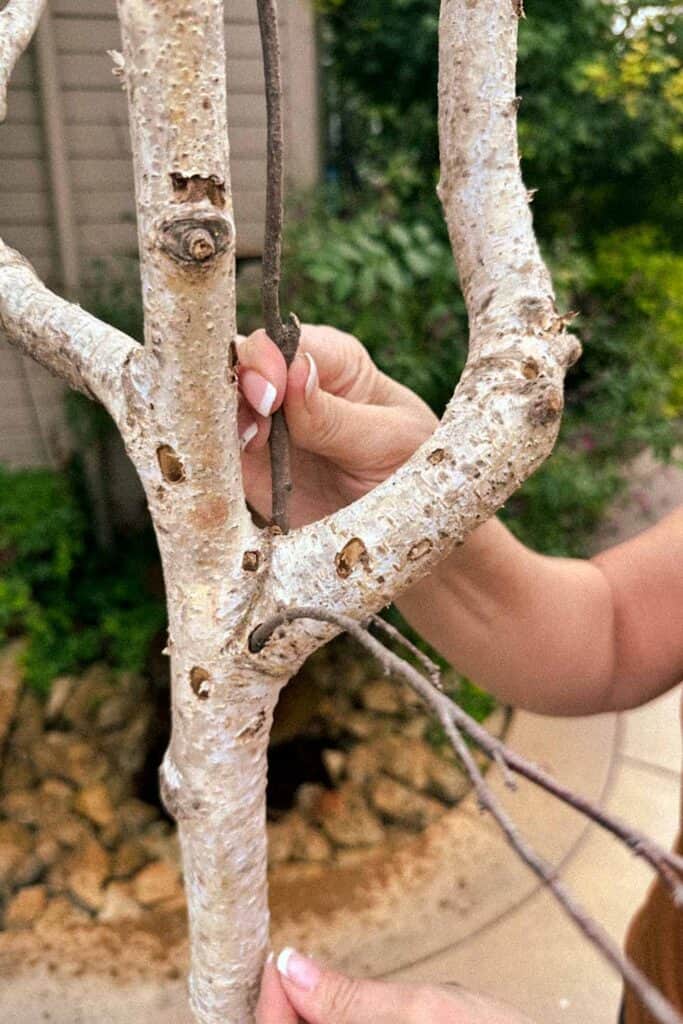
- Finally, insert the branches into the holes per the directions below. I did not use hot glue as they stayed in place without glue and I wanted to reuse the tree trunk for other trees at a later time. If you have an issue with the branches falling out, you can add some wire or brown floral tape to help hold them in place.
- Start by placing your bare branches on the trunk to create the shape of your tree.
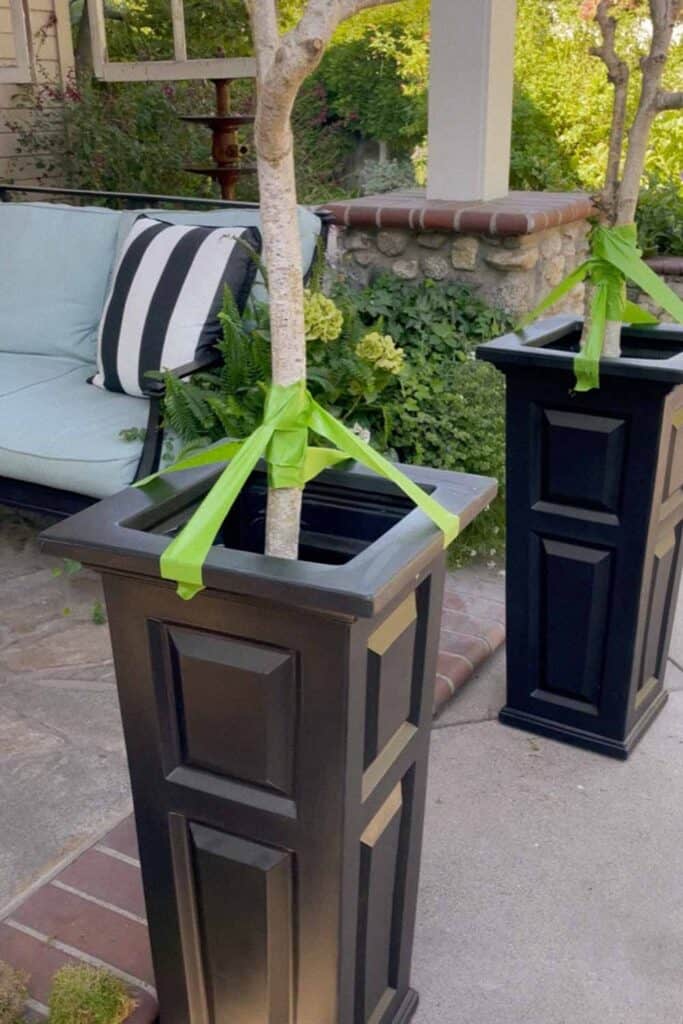
- Think about where you will place your tree, as this may alter the shape or size of tree you need to end up with. My trees go up against my house on either side of my front door, so I do not want a lot of foliage on the backside of the tree.
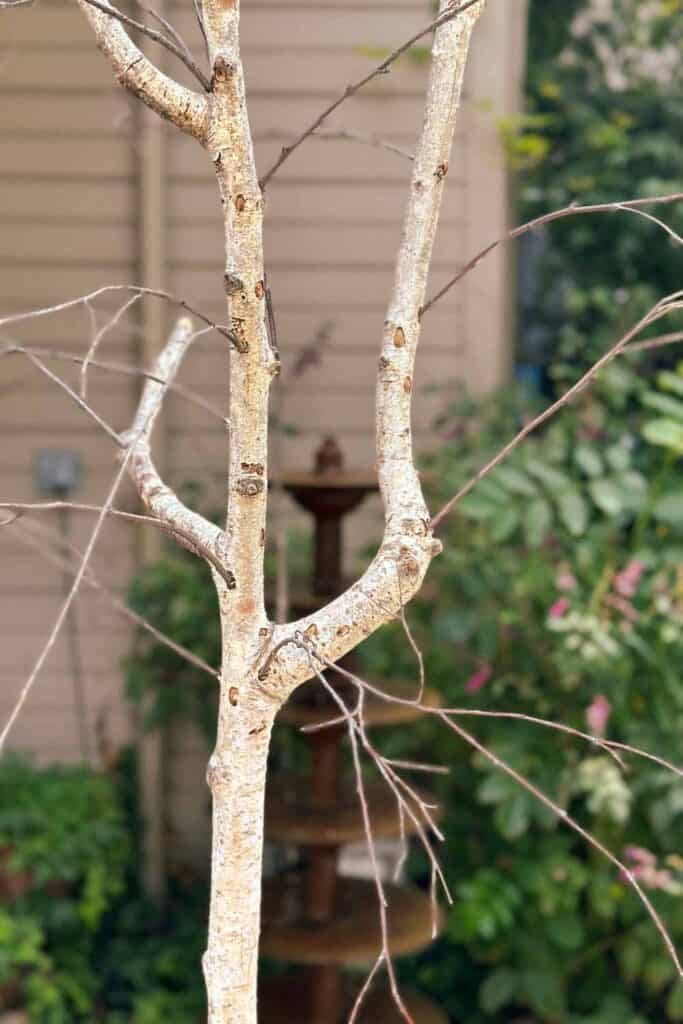
- Remember that the widest point of the tree should be at the bottom of your branches, and there should be some height in the center at the top of the tree.
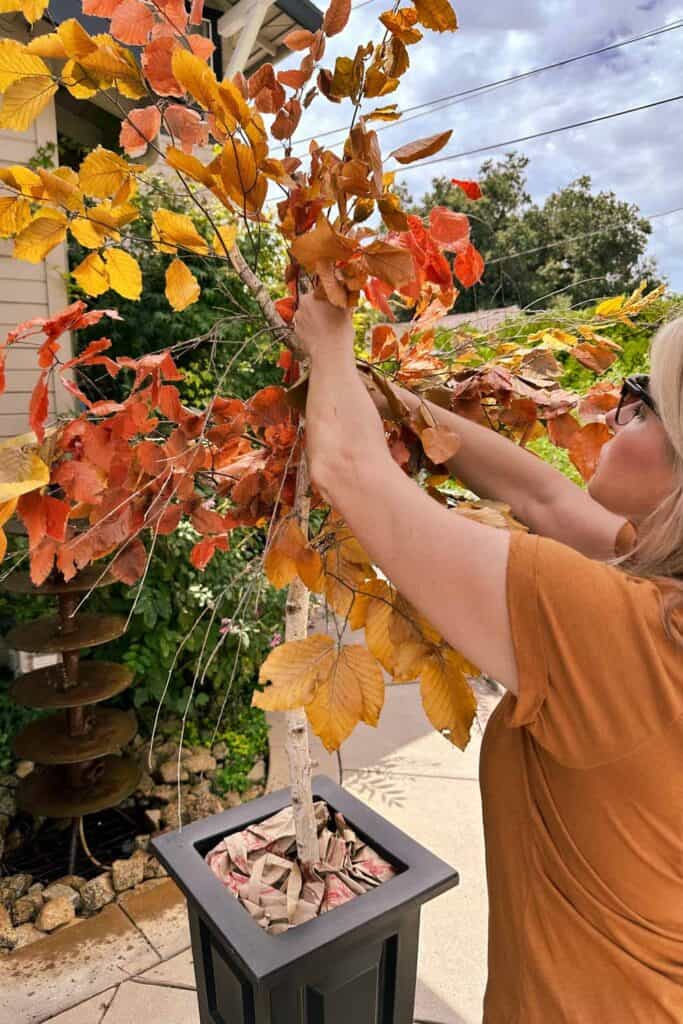
Adding Leaves to the Tree Trunk
- Once you have placed most of your bare branches on the tree trunk, put your branches with the leaves onto the tree.
- Be sure to step back and look at the tree as you are working. This way, you can see where you need to add branches.

How to Make a Stunning DIY Faux Fall Tree That Looks Real
Equipment
- Drill with small drill bits
- Wire cutters
- Garden Clippers
- Scissors
Materials
- A large tree branch (mine measures 48″ tall x 1-2″ in diameter. I like to find a branch with offshoots. Or use two smaller branches together.
- Spanish moss or sheet moss to place around the base of the tree trunk
- Bare twigs that are 2-3′ long or faux branches
- 3 Bags of preserved fall leaves or faux stems of leaves use different colors for a realistic look
- Wire
- Plaster of Paris
- Old bucket or the container the plaster came in
- Packing paper large brown paper bags, or bubble wrap
- Frog tape
Instructions
- Mix up a bucket of Plaster of Paris and place the bottom of the tree trunk into the
center of the bucket of Plaster of Paris (I used the plastic bucket the
Plaster of Paris came in). You could also use a small plastic pot. - I added a few rocks into the plaster to take up some space in the bucket, but this is unnecessary.
- Place the bucket with the branch inside of your tall planter box.
- Using frog tape, tape the branch to stand up straight and allow it to dry overnight.
- Using packing paper, plastic bags, or paper shopping bags, pack around the
plastic pot with your branch inside. until the tree branch is stable and
won't move. - Using a drill, choose drill bits approximately the same size as your stems of the leaves and bare twig branches.
- Next step, drill holes in the tree trunk (the top third of the large branch)
at an angle to look natural when you insert the branches. I made my holes 1/2"- 3/4"deep.
Drilling the holes on a downward angle also helps the branches to stay
in place. - Start by placing your bare branches on the trunk first, then add the stems with leaves.
- Think about where you will place your tree, as this may alter the shape or
size of tree you want. My trees go up against my house on either
side of my front door, so I do not want a lot of foliage on the backside
of the tree. - Remember that the widest part of the tree should be at the bottom of your branches, and
there should be some height in the center of the tree. - Once you have placed most of your bare branches on the tree trunk, add your branches with leaves onto the tree trunk.
- Be sure to step back and look at the tree as you are working. This way, you can see where you need to add more branches.
Important Tips
- Choosing suitable materials is essential in making a realistic-looking faux fall tree. You’ll want to use natural branches and leaves, if possible. If you can’t find natural branches, you can use artificial branches that are made to look like natural branches. You’ll also need some Spanish moss to help fill around the base of the tree.
- Arrange the branches and leaves naturally. Don’t just stick the stems and leaves on the tree haphazardly. Take some time to arrange them in a way that looks natural. You may want to start by adding the larger branches first and then fill in with the smaller branches and leaves.
- Place the tree in a prominent location. Once the tree is finished, you’ll want to place it in a central location in your home. This will help it to make a statement and add to the fall décor.
- .Use the tree indoors or outdoors. If you use preserved leaves that are the real deal, you do not want them exposed to the outdoor elements once they have been preserved. They typically are soaked in glycerin and need to stay dry. We live in a warm climate, so I can use my trees on my porch until the weather gets damp.
- .Using your DIY faux tree indoors adds height and visual interest to a room. Use a large basket instead of a planter for added texture.
- Revamp your tree each season- You can use this tree for Spring, Summer, Fall, and Christmas with your own diy touches.
Styling your Tree in your Home for the Holiday Season
A faux fall tree is a great way to add a touch of autumn to your home without the hassle of a real tree. However, with some planning and creativity, you can easily create a faux tree that will last for months or years.
Here are some different ways to style a faux fall tree in your living room, family room, and front porch:
Living Room:
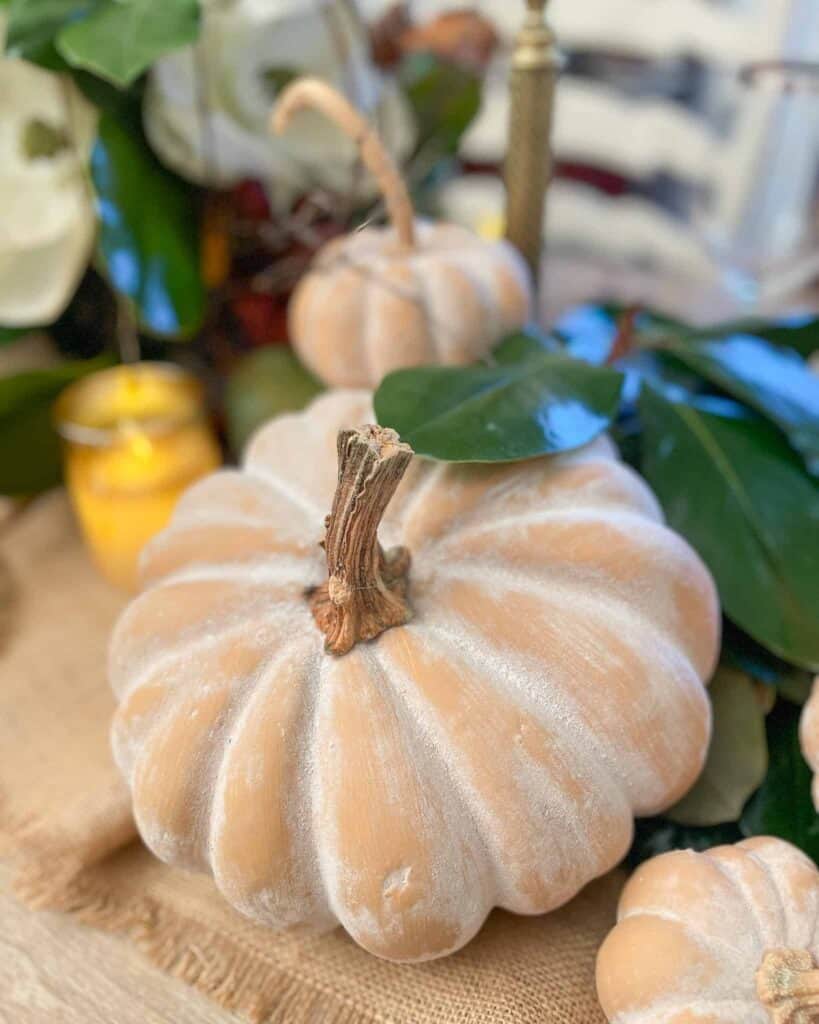
- For a traditional look, place your artificial plant (faux tree) in the corner of your living room to create a focal point. Surround it with pumpkins, gourds, and other fall decorations.
Family Room:
- In your family room, you can use your artificial indoor tree or a faux olive tree to create a cozy and inviting space. Place it near a fireplace or a window, and add throw blankets and pillows to create a comfortable seating area nearby.
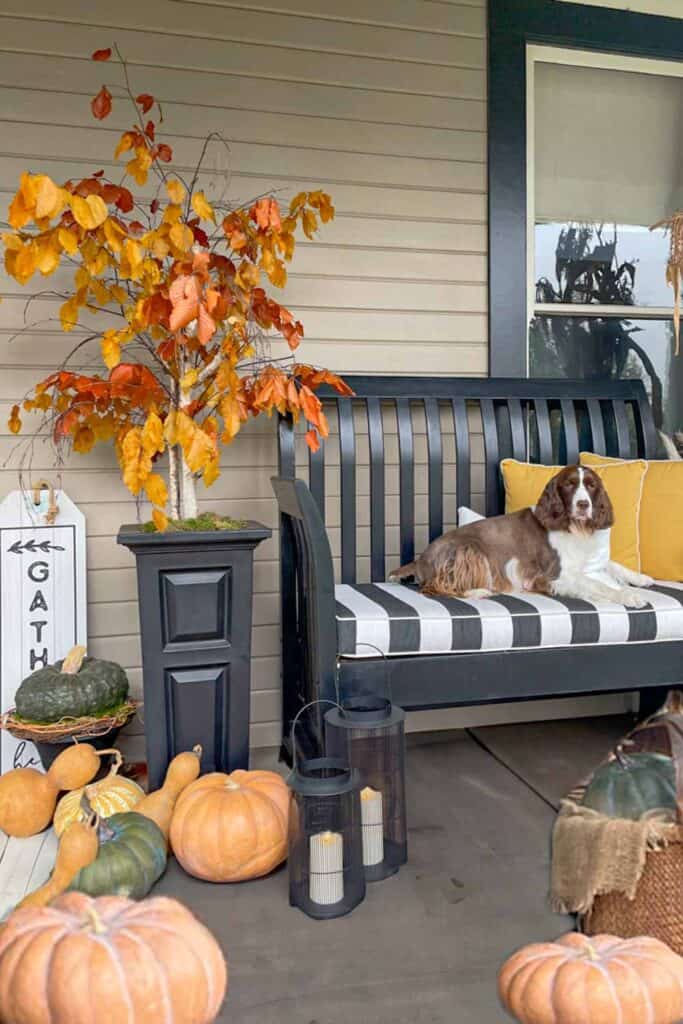
Front Porch:
- A faux fall tree is an easy way to add cheer to your front porch. Place it in a large planter and surround it with mums, pumpkins, and other fall decorations to welcome your friends and family.
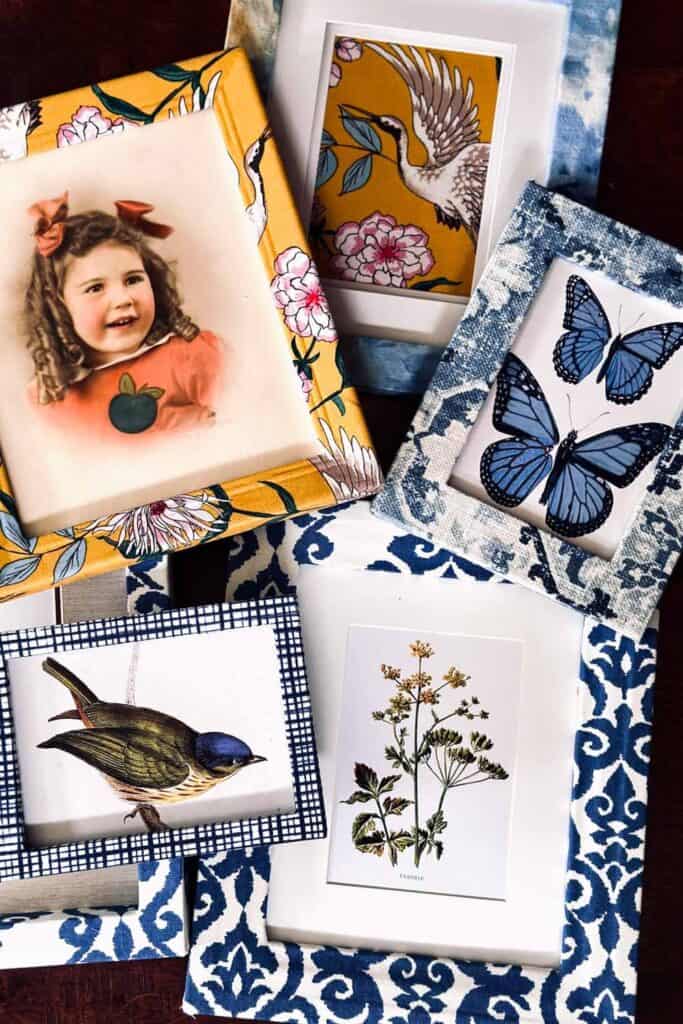
I hope you enjoyed this quick and easy DIY project. Now it is time to move on to my friend Jen’s blog @midwestlifeandstyle. You will love the fun book page DIY project she has is store for you.
Happy Fall!


Early Fall Inspiration From Fellow Bloggers

Easy First Touches of Fall Decor // White Arrows Home
Neutral and Natural Fall Home Tour // Willow Bloom Home Blog
Simple and Charming Minimalist Fall Decor Ideas // Eleanor Rose Home
Fall Decorating on a Budget: Easy Ideas for a Cozy Home // Cottage on Bunker Hill

25 Creative Fall Decoration Table Ideas for Your Home // The Ponds Farmhouse
How to Create a Festive Fall Table Setting // Cottage in the Mitten
6 Easy and Affordable Fall Centerpieces That You Can Make Yourself // White Lilac Farmhouse
How to Make a Stunning DIY Faux Fall Tree That Looks Real // WM Design House

How To Make A Fall Book Page Leaf Garland // Midwest Life and Style
5 Ways To Cozy Up Your Kitchen This Fall // She Gave It A Go
Favorite Faux Fall Stems for Your Home this Year // Pasha is Home
Easy Fall Flower Arrangement // Sand Dollar Lane

Easy Fall Pumpkin Pillow Cover DIY Using A Vintage Chenille Bedspread // Southern Crush at Home
Simple Ideas for Decorating Fall Living Room Centerpieces // Robyn’s French Nest
19 Easy Ways to Transition Your Home Decor From Summer To Fall // Shiplap and Shells

Early Fall Decorating // Paint Me Pink Blog
Transition Summer To Fall With Simple Changes // A Stroll Through Life
Easy Fall Wreath For Your Front Door // Amy Sadler


It’s gorgeous! Did I somehow miss how you attached the leaves to the branches though? I’d love to create one of my own.
Ho Andrea, I am so glad you enjoyed the tutorial. I purchased preserved leaves on the branches. So the leaves were already on the branches.
You could use faux leaves if you do not have access to preserved leaves, however, I did link some in the post. Please send me a picture of the tree is you make one.
Thank you so much. Also, you could hot glue fake leaves onto real branches as well. Feel free to reach out if you have any other questions.
Thank you Nicole! you are the best!
I tell you this all of the time, but you really do have the best ideas Wendy. I love this, but I cannot say I will be brave enough to try this one. I am laughing at myself just thinking about it now. I will share, and now you can laugh too, I created a very small faux tree last year from a paper towel roll, see, I knew I could get a chuckle from you! That is about the extend of my tree making, but I will definitely be admiring yours from afar. I love it.
Ok, you did make me laugh! Now I want to see the tree. I am sure it was darling. We are at the beach with our kids for a few days.
I am enjoying every minute. I hope your week is going well and you look forward to the weekend. I will catch up with your blog after our kids leave.
Love the tree Wendy! The colors for fall are amazing. I could have one for each season!
Yes, I agree that is the beauty of this tree. You can change it for each season.
What a great idea Wendy and it turned out so beautifully! I may have to try this one myself. It’s the perfect touch for your fall porch.
Wendy, I have been wanting to make one of these for quite a few years now. I noticed my neighbors down the street have a small dead tree that would be perfect! You think I could ask these strangers if I can cut down their dead tree? LOL!!
Oh, Chloe! I wish I lived closer and I would march right on over to that neighbor and ask. I am sure they would be happy to let you have a piece of their dead tree.
Wendy ~ You’re so talented, my friend! Thank you for sharing this amazing fall inspiration idea! I especially love your enthusiasm and it makes me feel like I can do this, too! It turned out great!!!!
Hi Melanie! Thank you so much. I sure hope I get to see you in Waco again this year?
What a great idea for fall Wendy! And I love the price! Thanks so much for sharing.
Thank you Kim!
Your fall tree turned out great Wendy! Such a great idea!
Oh, Wendy! I am in love with your tree. What a fun and creative fall craft idea. It turned out beautifully. I’ve pinned it to my fall craft board. I want to try to make some for our front porch.
Thank you so much Jen. They are easy to make once you find the perfect branch.
So ready for fall!
Me too!
Stop it! This is so creative Wendy! I didn’t make a fall tree but I did buy my first faux fall tree this year and I love it so much! Now I want to make my own! Thank you for this DIY!
I saw your beautiful tree Norma! Maybe once you move and get settled, you can make a few more.
Your fall tree turned out beautiful, Wendy! It’s such a fun idea for a DIY, and I’ll definitely have to give it a try.
Thank you, Kristin. I am sure you get plenty of beautiful fall trees where you live. Unfortunately, we don’t get too many.
WOW! That looks fantastic Wendy!!
Thanks, Jennifer! I hope you had a great weekend.
This is so amazing Wendy! I’m always in awe of the things you create!!! Happy fall!
Thank you so much Heidi.
What a great project! Your DIY fall tree looks amazing and definitely a great price to make. Thanks for sharing and good to tour with you today!
Thank you Kim! It is always a pleasure to tour with you.
This is such an amazing DIY! It looks so real and it’s beautiful! I loved getting to do this fall tour with you, friend!
Thank you, Robyn. I always look forward to the fall season. I hope you are staying cool in Florida and will be able to enjoy some fall weather soon.
Such a great idea. I love this!
Thank you Renae!
Love yours Wendy! So bright and realistic looking. I plan to do this. Just gotta find the perfect branch. The hubs got rid of the one I was saving on the side of the house (insert rolling eyes). Lucky for him we have a forest at the end of the block. 😉 pinned
LOL! It’s a darn good thing there is a forest at the end of the road…… I am sure you will find the perfect branch, and I can’t wait to see your new tree.
I love this and your step by step tutorial is perfect. Your tree looks amazing.
Thank you so much Marty! Happy Fall.
Wendy,
These are wonderful DIY ideas. Thanks so much for sharing!!
Thanks so much, Rachel.
Wendy, I love your fall tree. It’s gorgeous and a fraction of the cost if buying one from the big box store. Plus, your tree looks so much better. Wish I knew some with a white birch tree. It makes all the different for the trunk of the tree. It gives a elegant look it.
Thank you, Tammy. I much prefer the more natural look of my tree. I hope you can find a branch somewhere along your travels.