How to Make Twine Pumpkins
Want to add some charm to your fall decorating? These DIY twine pumpkins are quick, easy, and budget-friendly. I’ll walk you through both small and large versions so you can mix and match around your home

On my blog WM Design House, I may sometimes use affiliate links, which means a small commission is earned if you purchase via the link. The price will be the same whether you use the affiliate link or go directly to the vendor’s website using a non-affiliate link. Read my full disclosure policy here.
DIY Twine Pumpkins for Fall
You all know that fall is my favorite time of the year. I also have a slight obsession with pumpkin. So, now that August is here, I’m excited to share this super-easy DIY project with you.
I love using twine and rope to create simple, budget-friendly crafts. From vases to wreaths, and even DIY cornucopias for Thanksgiving, there are so many creative ways to work with these materials.
Today I’m sharing how to make charming twine pumpkins. Yes, you heard me right, twine pumpkins! They are adorable and make the perfect decoration for the fall season. I’ll walk you through both small and large versions that you can customize to fit your style.
So grab your crafting supplies and join me to make your own DIY twine pumpkins.
Why You’ll Love This Project
- Budget-friendly fall craft: Twine and rope are inexpensive materials, making this DIY pumpkin project an affordable way to decorate for the season without sacrificing style.
- Customizable to your home: Whether you make a few mini pumpkins for a table centerpiece or one large statement pumpkin for your mantel, you can size and style them to fit your space.
- Fun and easy to make: With just a few simple supplies and easy-to-follow steps, this is a beginner-friendly craft you can enjoy on a quiet afternoon.
- Decor you can reuse every year: Unlike real pumpkins, these twine versions last season after season, giving you handmade home decor you can pull out each fall.
Supplies Needed to Make Twine Pumpkins
Small Pumpkin Supplies:
Small Pumpkin Supplies:

How to Make Small Twine Pumpkins
Step 1: Preparing the Loops
First, create six twine loops, like in the image below. These will form the sections of your pumpkin.
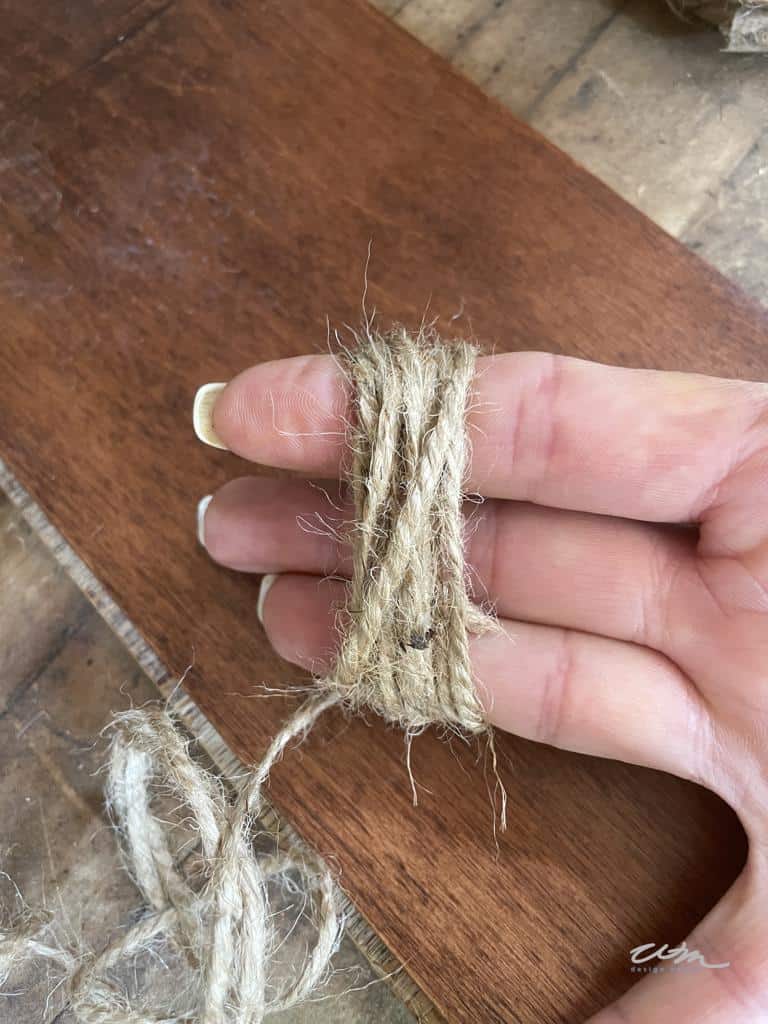

To make the loops, wrap the twine around three fingers about 15–20 times. Once you’ve finished wrapping, use a piece of floral wire to twist and secure the loops together in the center.
Repeat this process until you have six jute bundles.
Step 2: Choose a Stem
Next, choose a stem for your twin pumpkins. There are so many creative options, and here are a few of my favorites:
- Cinnamon sticks
- Twigs from the yard
- A piece of driftwood
- A natural gourd or pumpkin stem
I love using real stems from gourds. We visit a gourd farm every fall, and the ground is always covered with them. Perfect for picking up and saving for projects like this.

Step 3: Glue Your Loops Together
Now it’s time to attach your twine loops. Using a hot glue gun, secure each loop to the stem one at a time. Let each bundle set before adding the next to keep everything in place.

Hot glue can be tricky, so take your time and be careful not to burn yourself. (Protective gloves are always a good idea!)
Step 4: Add the Finishing Touches
Now for the fun part! Once you have glued all six of your rope bundles onto your stem, you are ready to decorate.
You can use your imagination here.
I used some preserved fall leaves with some pampas grass. You can use faux flowers, dried flowers, ribbon, pompoms, or glitter; the choices are endless.

Tip from wendy’s craft room:
Don’t forget to check the Dollar Tree for inexpensive fall decor like faux flowers, leaves, and stems. They make the perfect finishing touch for your twine pumpkins without spending much at all.
How to Make Large Twine Pumpkins
I created the second twine pumpkin in a larger size, around 9″ wide x 4″ tall.
I used a heavier jute rope for this pumpkin. It is approximately 3/8″ in diameter.
The other supplies are similar to the miniature twine pumpkin listed above.
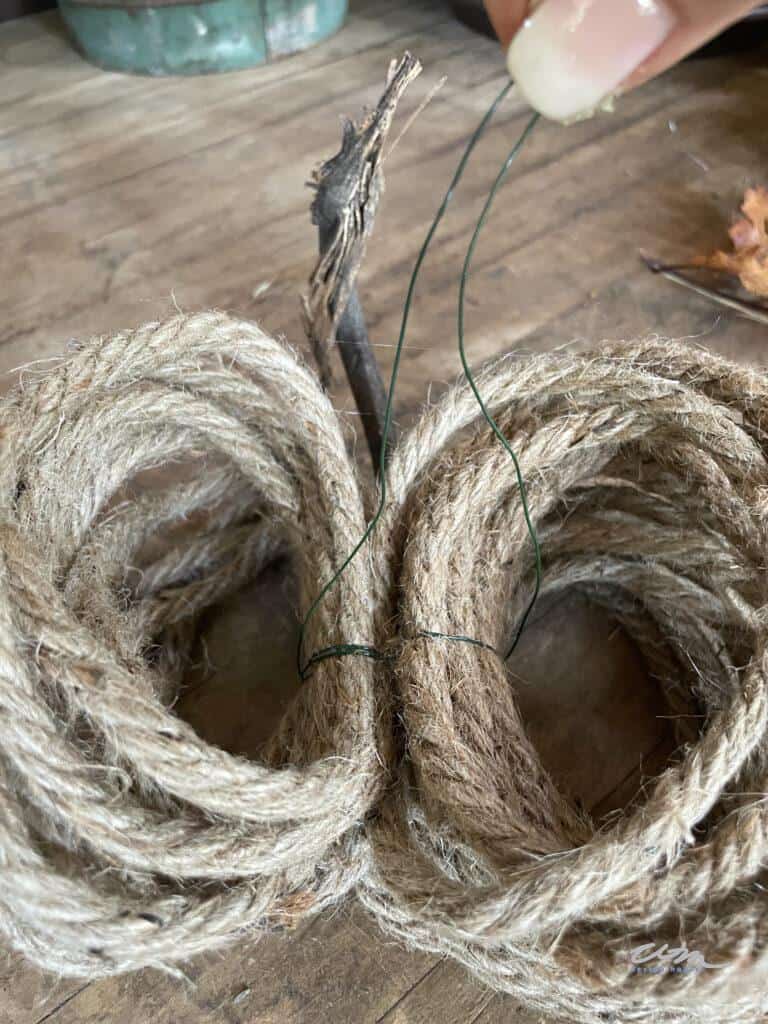
Step 1: Prepare Your Jute Loops
First, you need a board approximately 5″ wide to create the loops for this pumpkin.
Start by taping a piece of wire about 12 inches long to your board. Your board doesn’t need to be this exact size. I just grabbed one I had in the garage. The important thing is that it’s sturdy enough to hold its shape without bending.


Next, wrap the rope around the board five times, then slide it off and twist the wire ends together in the center to form a bundle.

Repeat this process until you have five bundles.
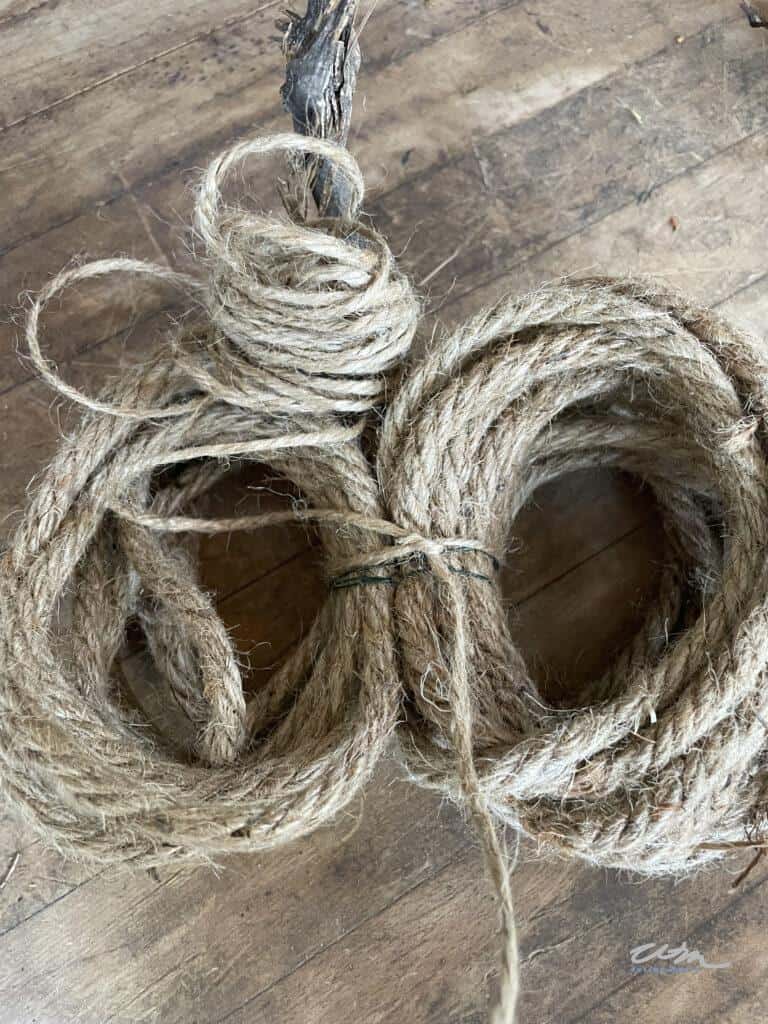
Step 2: Choose a Stem and Glue Your Loops Together
Start by hot gluing one bundle of rope to the stem at a time. Once you have three bundles in place, wrap the wire tightly around the center to hold them securely


Now glue the remaining two sets of loops onto the stem and add more wire for stability, as shown in the photo below.
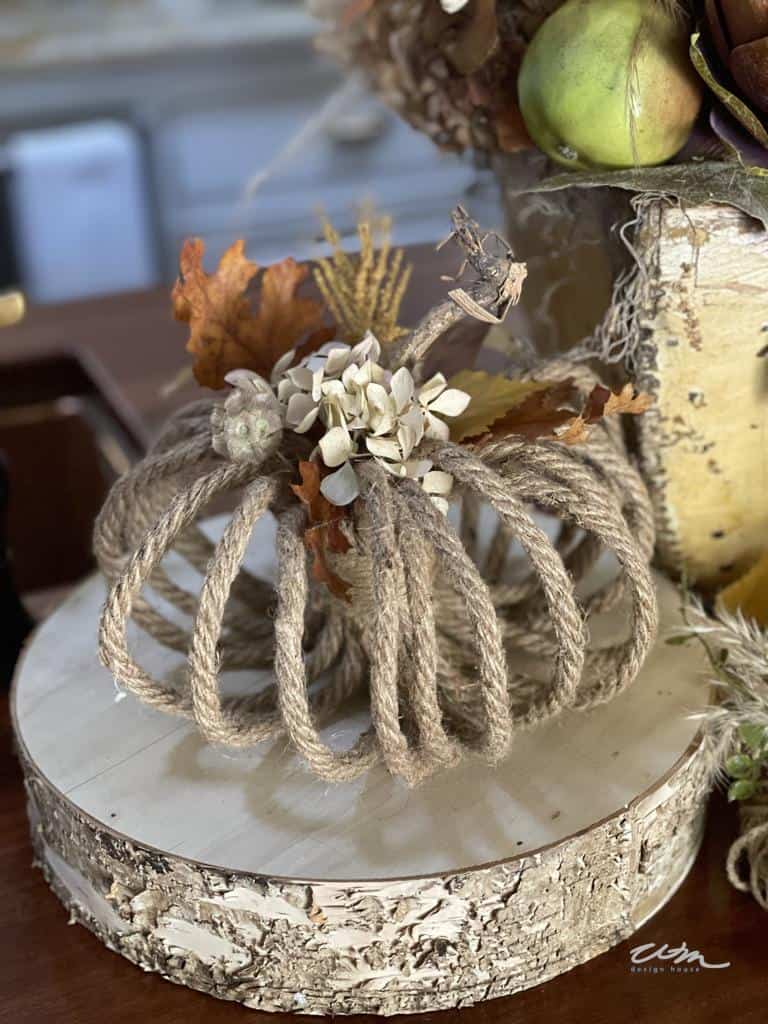
Lastly, use the thin twine that you used for the small twine pumpkin to cover the wire in the center of the pumpkin.

Once you have wrapped the twine around and covered all the wire, tie the two ends in a knot and trim.

Step 3: Add the Finishing Touches
I like a natural look, so to finish my larger twine pumpkins, I used dried and preserved leaves, some pampas grass, a few dried scabiosa pods, and a small piece of dried hydrangea.
You can decorate your pumpkin however you like to match your decor and personal style. They’re simple to make and add such a charming touch to your home.
Styling Ideas for Your Twine Pumpkins
These sweet little twine pumpkins fit just about anywhere in your home. I set the large pumpkin on a wooden riser in my kitchen, and it looked so pretty as part of my fall decorations.
In addition, I made a few more and grouped a large pumpkin with two small pumpkins for the perfect touch in my she shed.
You could also make a handful of small pumpkins and tuck them into a dough bowl for an easy centerpiece.
They’re the perfect accent for a fall tablescape or styled together in a cozy fall vignette. They would even look cute styled on a rustic and spooky Halloween table! rHowever you use them, they bring a charming handmade touch to your seasonal decor.

Other Fall Crafts You’ll Love!

Final Thoughts
Making twine pumpkins is such a fun and easy way to bring a handmade touch to your fall decorating. You can size them however you like, and they look beautiful on a mantel, shelf, or even as part of a fall tablescape or vignette.
If you decide to make these twine pumpkins, I cannot wait to hear how they turn out. Be sure to share your photos with me because I always enjoy seeing your creation
Thanks for stopping by, and happy crafting!


Did you make this craft?
We would love to see what you have created, so mention us @wmdesignhouse or tag us using #wmdesignhouse so we can see your creations!
More about me!

Hello, I’m Wendy – a dedicated homemaker with a deep passion for decorating, gardening, cooking, and crafting. I find joy in harmonizing beautiful elements to fashion a space that is both comfortable and inspiring. I will help you create a beautiful home, one project at a time.


These are the BEST, Wendy!
Thank you, friend. These are super easy, just like the copper pumpkins you did:))))
I love these, and your tutorial is very instructive — thanks!
Thank you Debbee, I really appreciate your kind comment. I hope you enjoy making the pumpkins.