Beautiful Patina Pumpkins for Fall Using Metal Paint
As autumn sets in, it’s time to spice up your fall decor with some stunning patina pumpkins created using metal paint.
Get ready to discover how to turn ordinary pumpkins into unique, rustic masterpieces that will elevate your seasonal decorating game.
Join us as we dive into the world of metal-painted pumpkins and add a touch of unconventional elegance to your fall decorations.
On my blog WM Design House, I may sometimes use affiliate links, which means a small commission is earned if you purchase via the link. The price will be the same whether you use the affiliate link or go directly to the vendor’s website using a non-affiliate link.
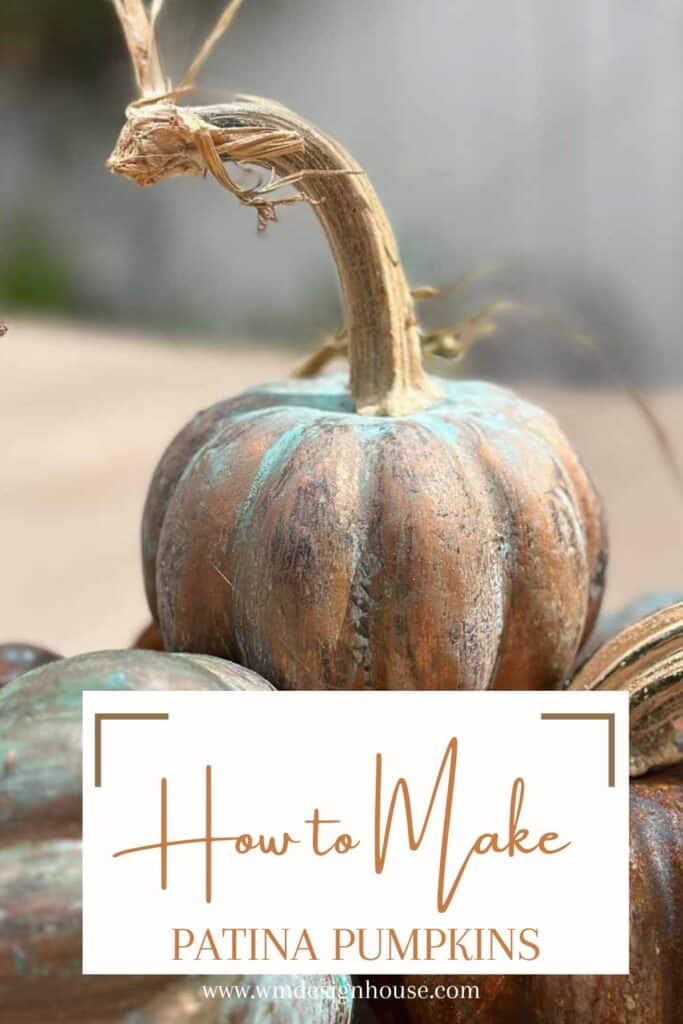
What is a patina pumpkin?
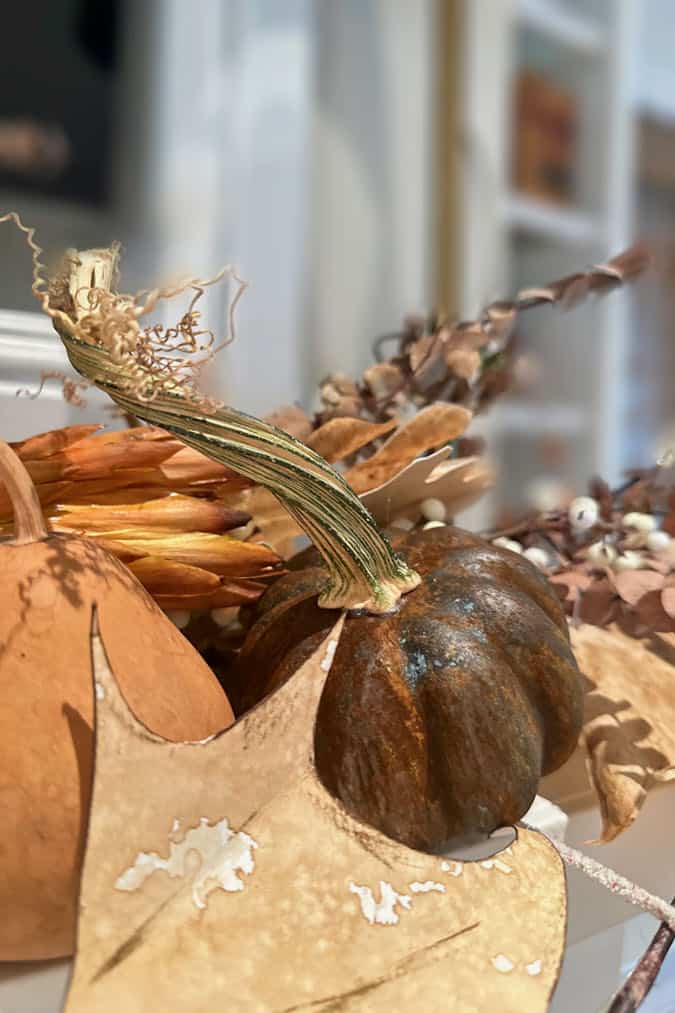
A patina pumpkin is a decorative pumpkin that has been intentionally aged or weathered to give it the appearance of being exposed to the elements over time.
This effect is typically achieved through crafting techniques, such as painting, staining, or adding texture to the pumpkin’s surface.
The goal is to create a rustic, aged, or antique look, often characterized by subtle, earthy colors and a worn or weathered texture. Patina pumpkins are popular in fall and Halloween decor, adding a touch of vintage charm to seasonal displays.
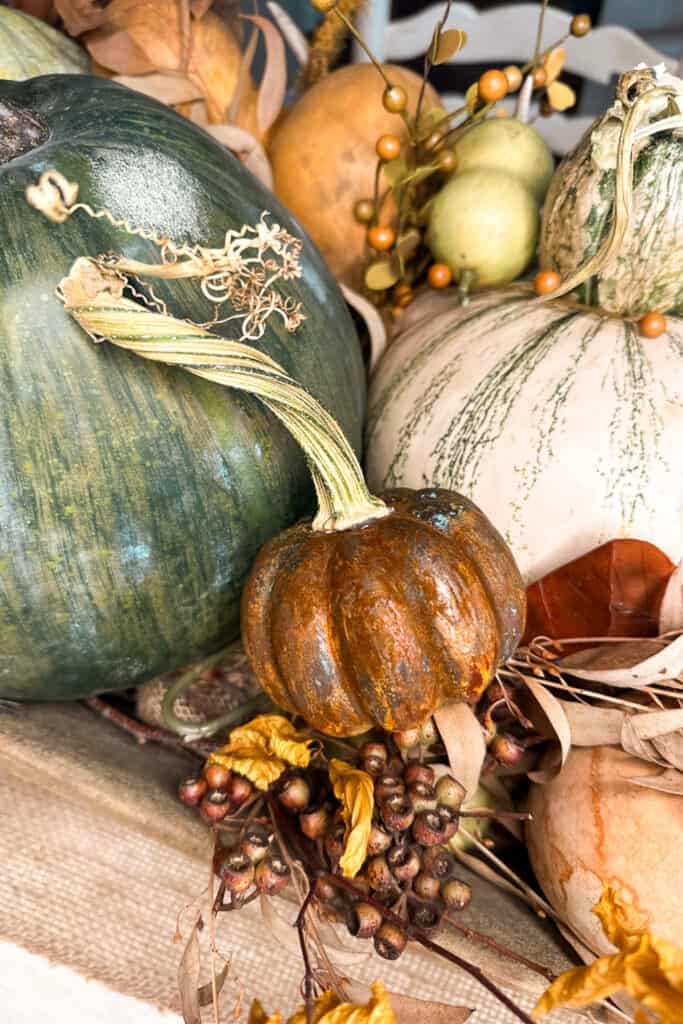
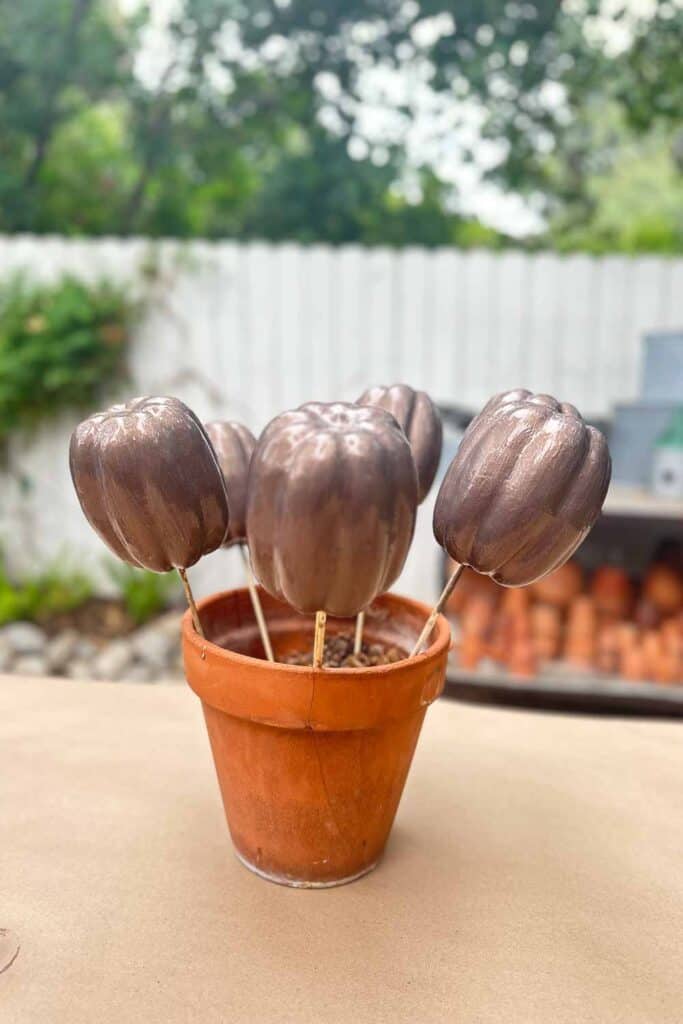
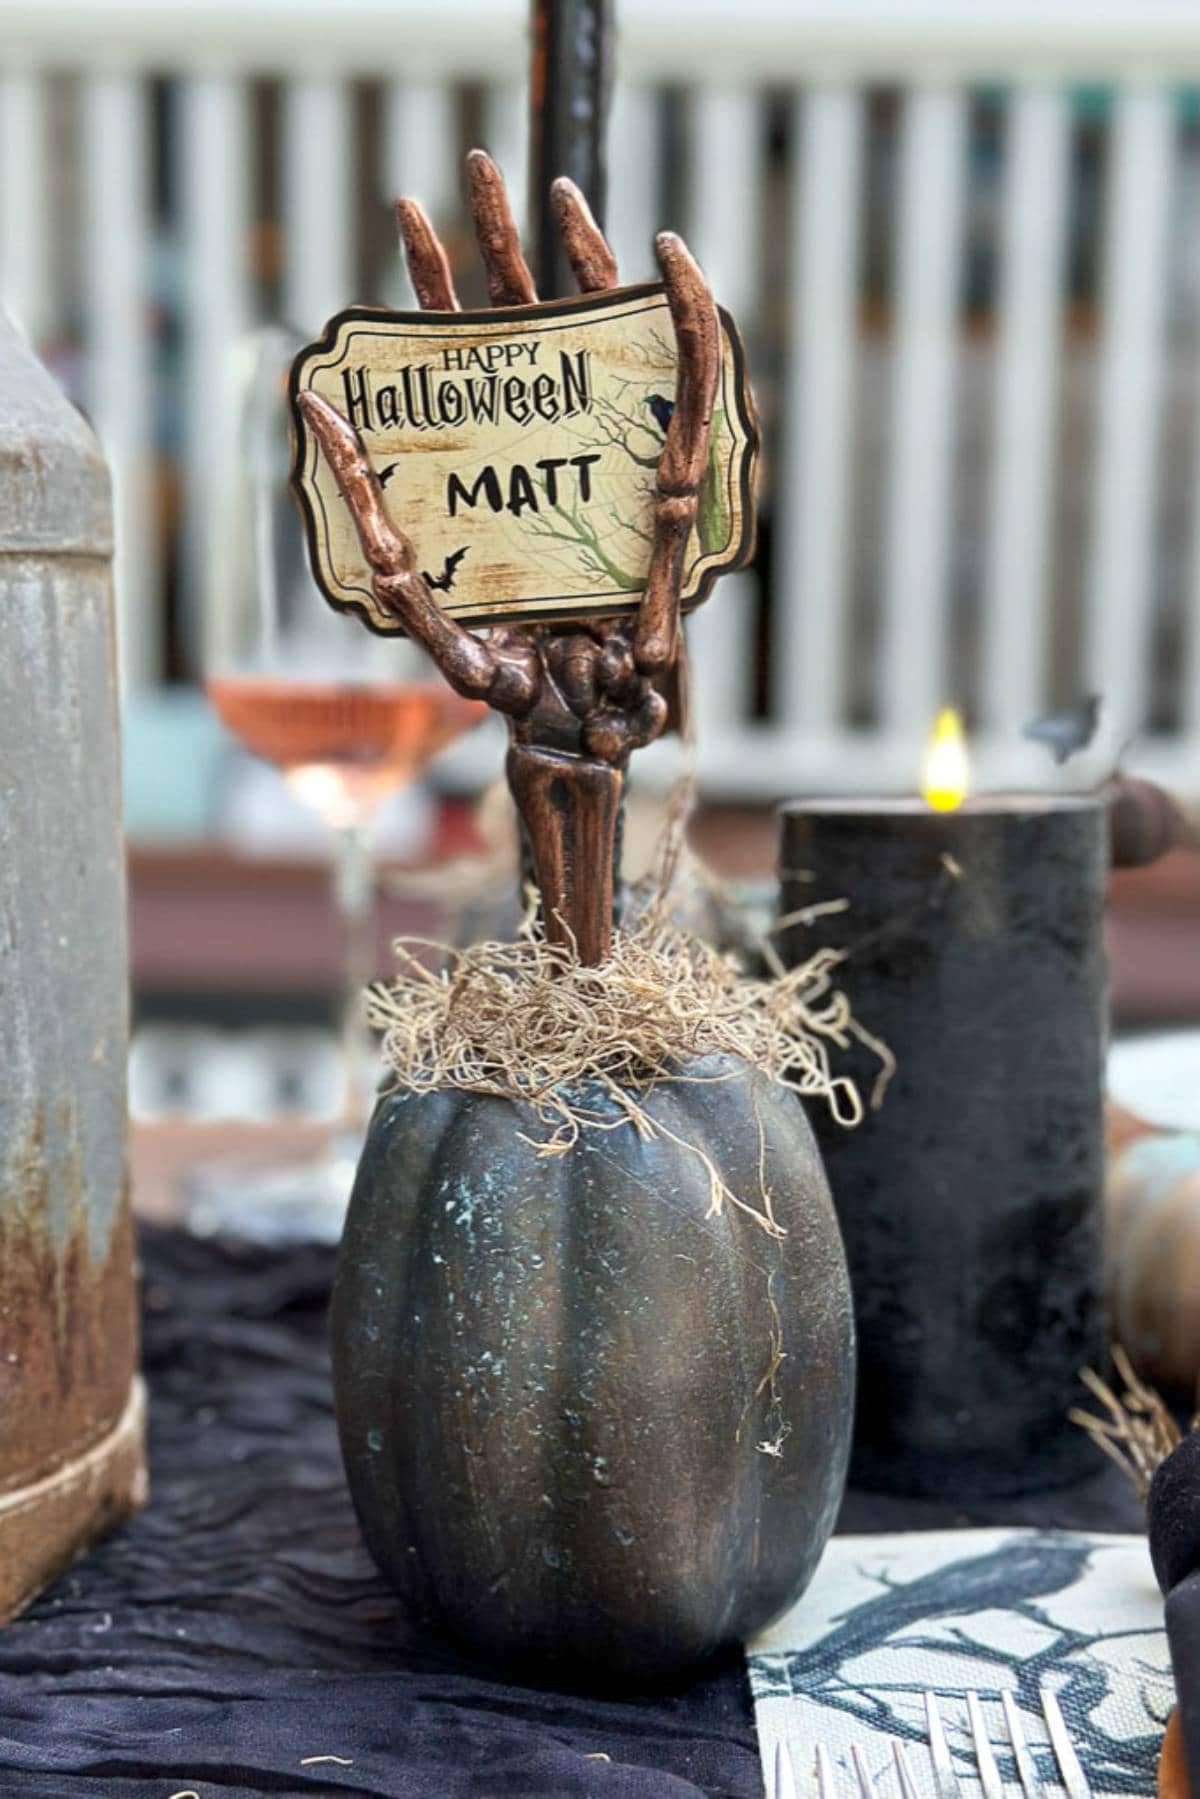
I use several pumpkins as name card holders and others for table decorations.

How can you give faux pumpkins an aged patina?
There are several creative methods to give a pumpkin a patina or aged appearance. I used a product called Modern Masters Metal Effects paint and patina spray, which I will go into detail about. However, you can use several other methods to patina a pumpkin.
Painting:
You can use acrylic or chalk paint to achieve a patina effect. Start with a base coat in a desired color (often a muted or earthy tone), and then layer on additional colors while allowing some areas to show through for a weathered look. You can use a sponge or a dry brush to create texture and depth.
Staining:
Applying a diluted paint mixture or wood stain to the faux pumpkin’s surface. This gives it a subtle and organic patina look. Apply the stain, let it soak in, and wipe off any excess for a distressed appearance. ( I have not tried this method, but I think it would work best on a wooden pumpkin, not a foam pumpkin.)
Oxidation:
Some crafters use vinegar, hydrogen peroxide, and salt to encourage natural oxidation on a metal pumpkin’s surface. You can also try this method to rust metal.
Texture and Aging Techniques:
You can distress a pumpkin with sandpaper or a stiff toothbrush to give the pumpkin some texture. In addition, you can then paint the pumpkin with chalk paint mixed with baking soda and wax it for added dimension.
Decoupage:
Apply pieces of torn or aged-looking paper or fabric to the pumpkin’s surface using decoupage glue like my friend Heidi @eleanorrosehome. This can create a vintage, textured appearance.
Patina Paint:
Dixie Belle Paint Company also makes excellent patina paint and spray, giving you a look similar to what I have created. They carry iron patina paints as well as copper and bronze metallic paint.
Material list for patina pumpkins
I have created a list to make it easy for you to shop for the supplies. You can also pick up your pumpkins at the Dollar Store or Walmart. And if you are really lucky, you may find some pumpkins at the thrift stores.
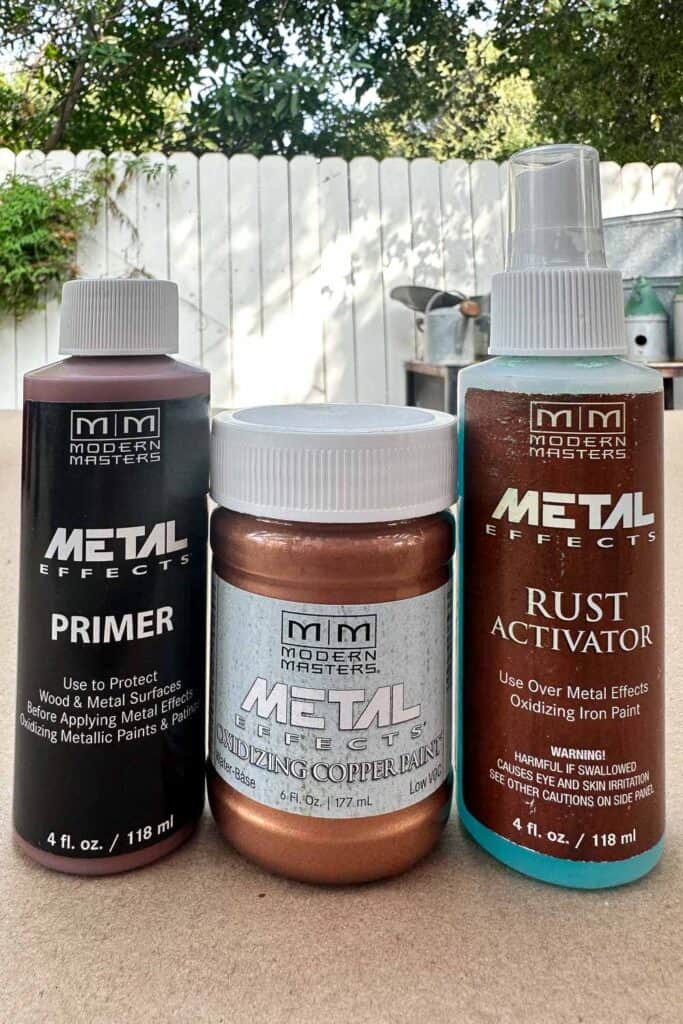
- Modern Masters Metal Effects paint in bronze, copper, or iron ( I used all three of these colors)
- Modern Masters Metal Effects Primer
- Modern Masters Metal Effects Patina Spray (green patina and rust patina)
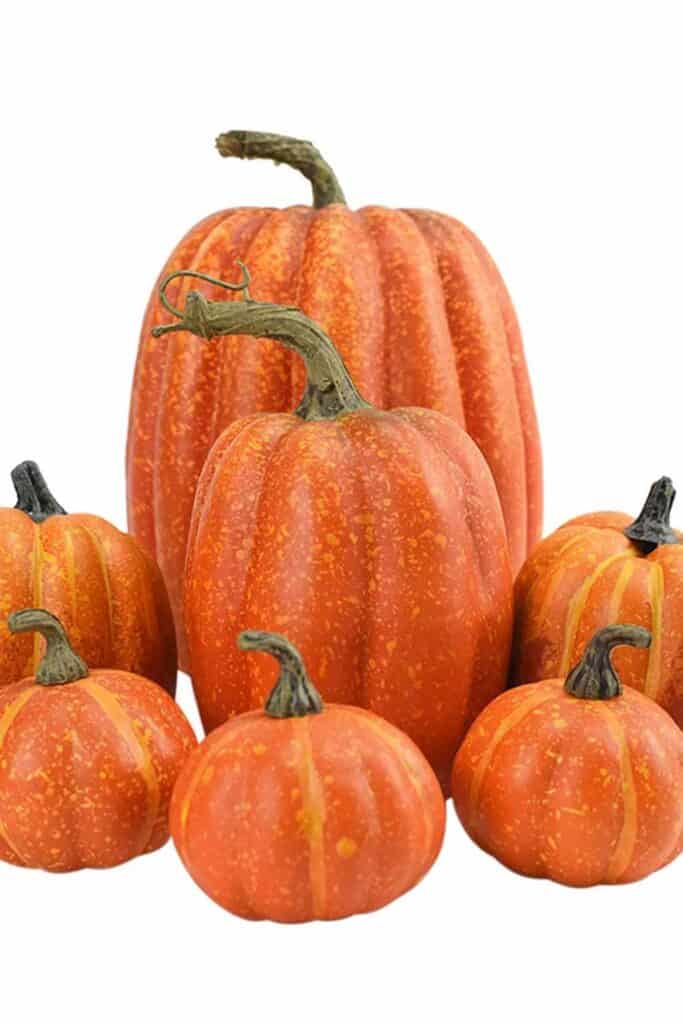
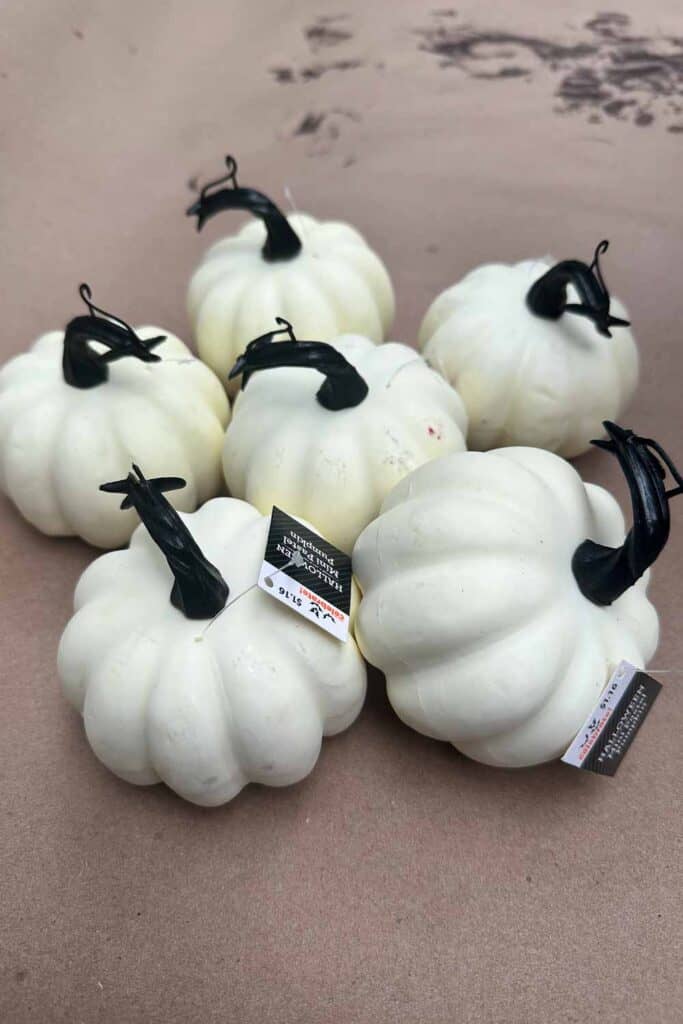
- Faux foam pumpkins
- Paintbrush
- Skeleton salad tongs (optional, If you want to use your pumpkins for place card holders)
- Copper spray paint (only if you are going to make the name card holders)
- Hot Glue gun
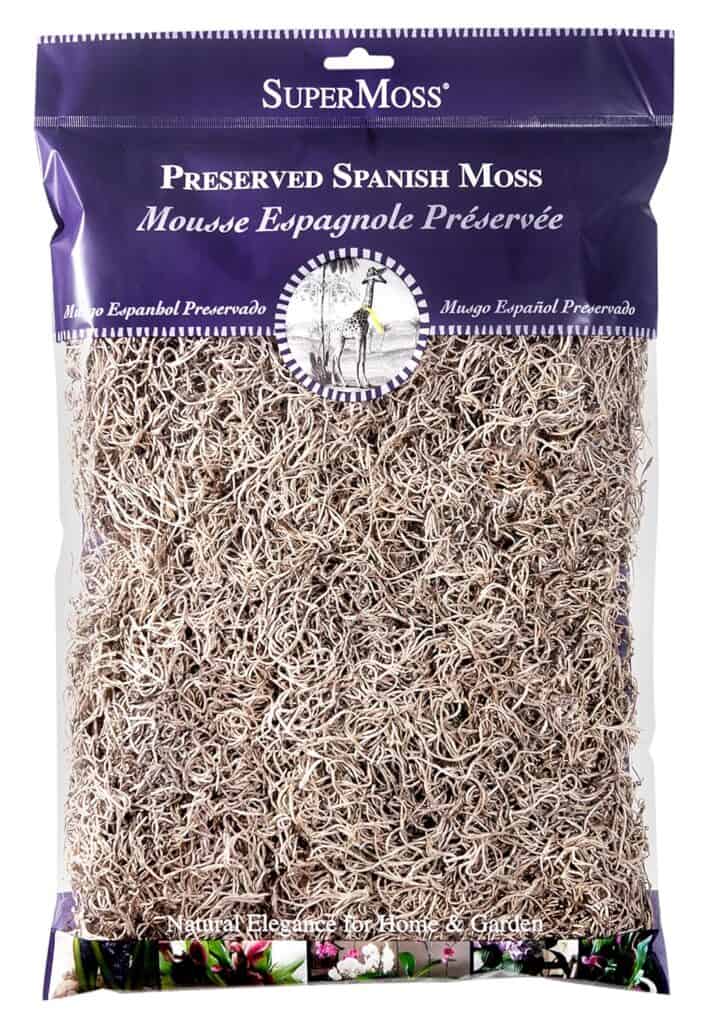
- Spanish moss (only for the name card holder pumpkins)
- Wooden dowels (or skewers)
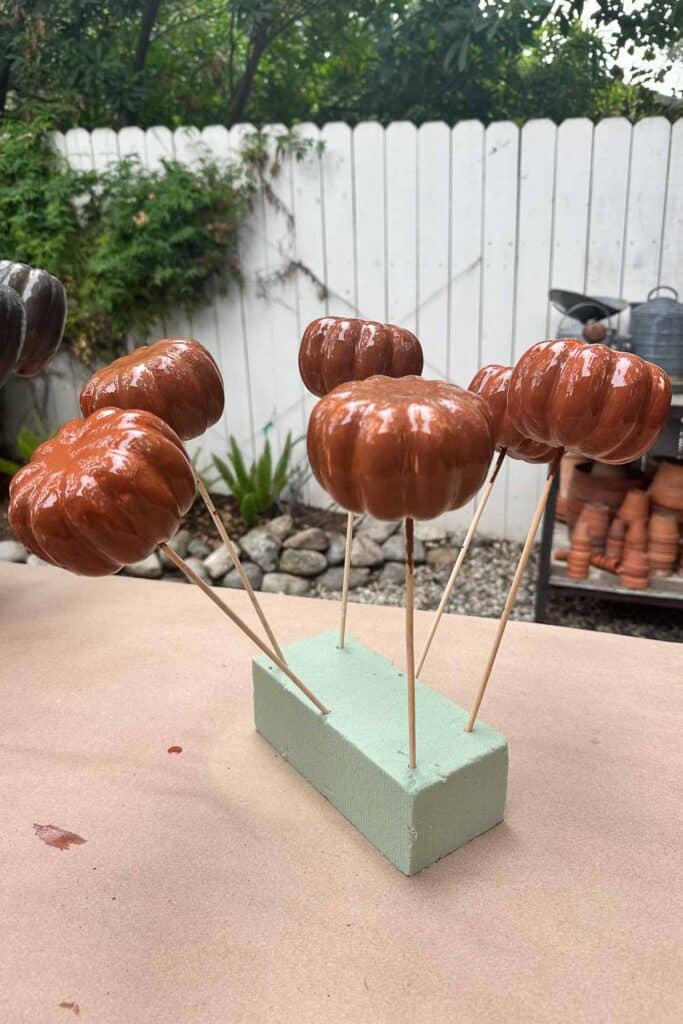
- Foam block or a flower pot filled with dirt to hold your pumpkins while drying
- Paper towel
- Clear coat spray (matte finish)
- Real pumpkin stems
- Sea sponge (optional)
Step by step instructions
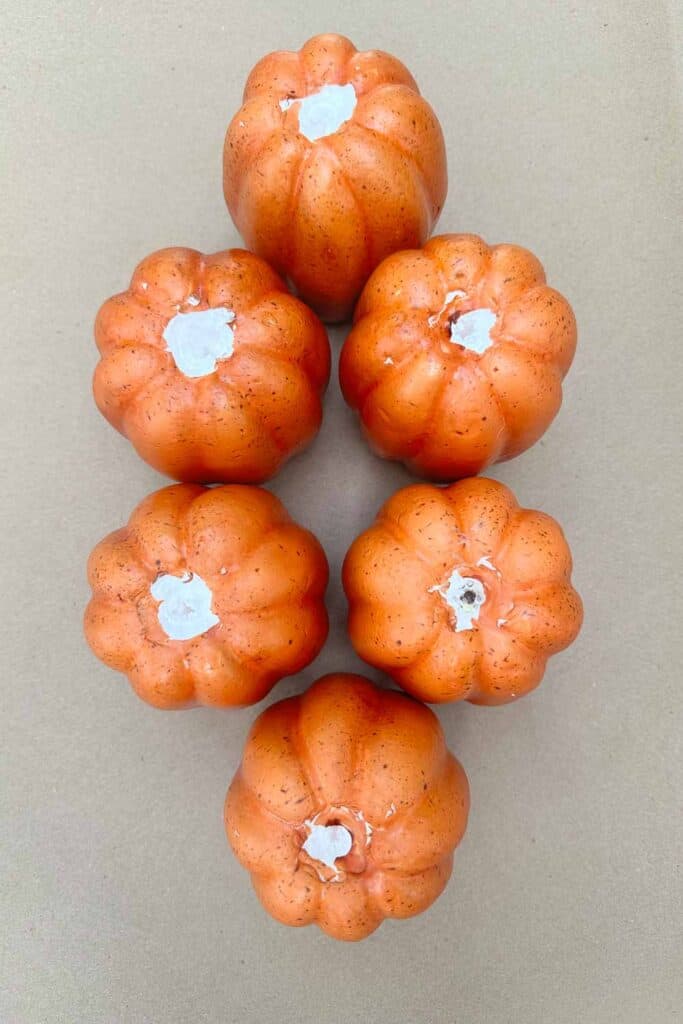
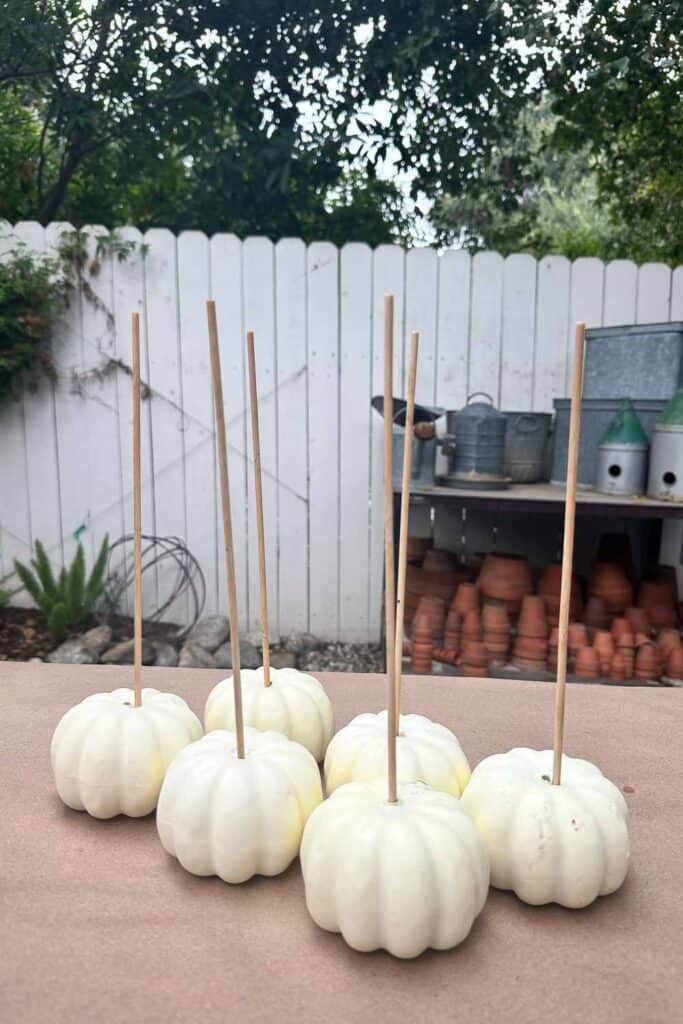
- The first thing you want to do is remove the plastic stems from the pumpkins.
- Place a wooden dowel or skewer into each pumpkin.
Priming
- Paint a good coat of primer onto the exterior of each pumpkin.
- Dry the pumpkin upside down on the skewer in a foam block or a dirt-filled pot and allow it to dry for a few hours.
Paint the base coats.
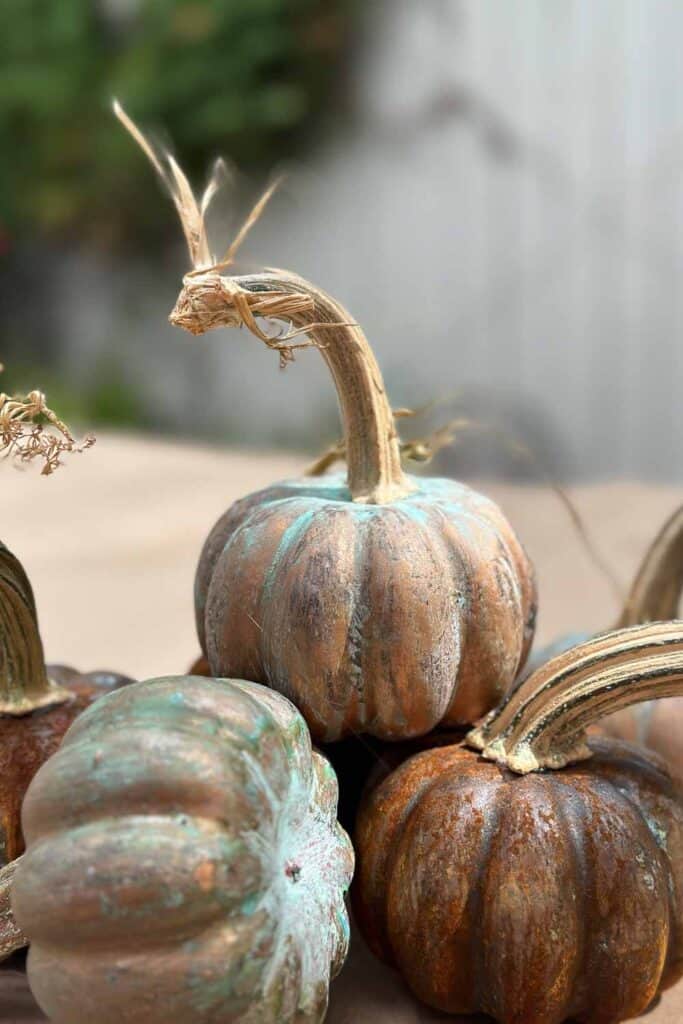
I’ve crafted three distinct paint styles, each with its unique charm. Feel free to pick your favorite, or why not try all three?
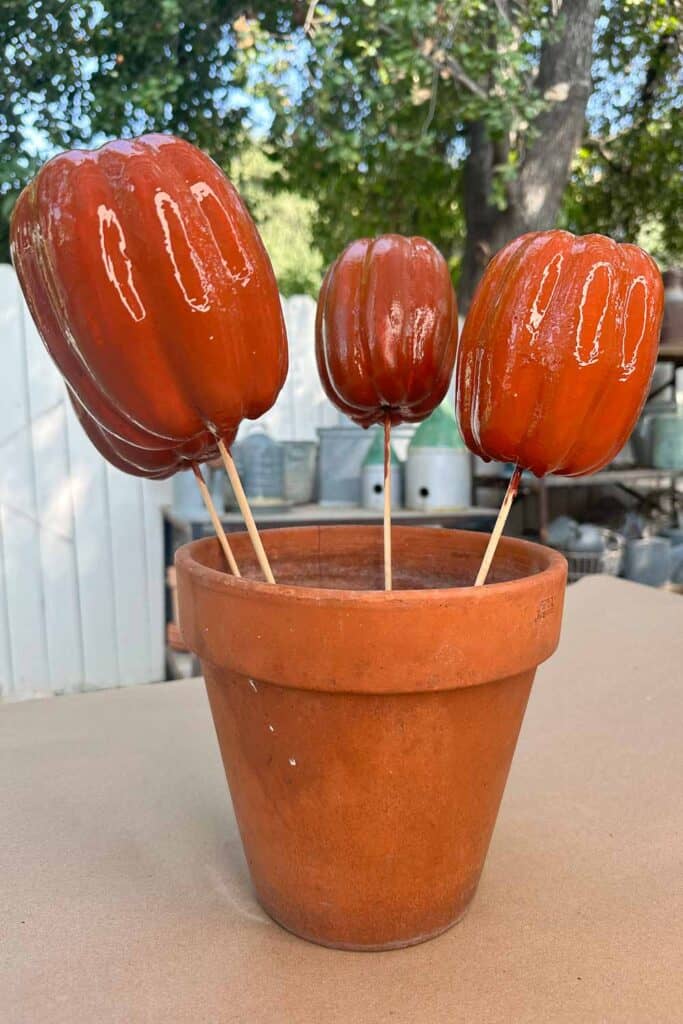
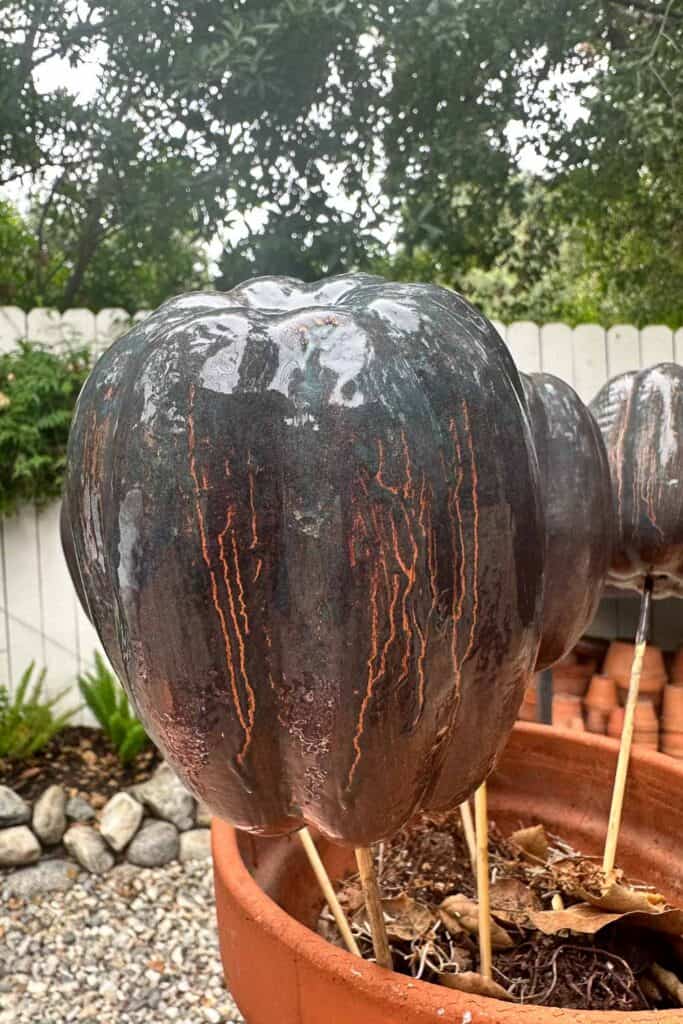
- Copper patina pumpkins– Use the metallic copper paint with the green patina spray.
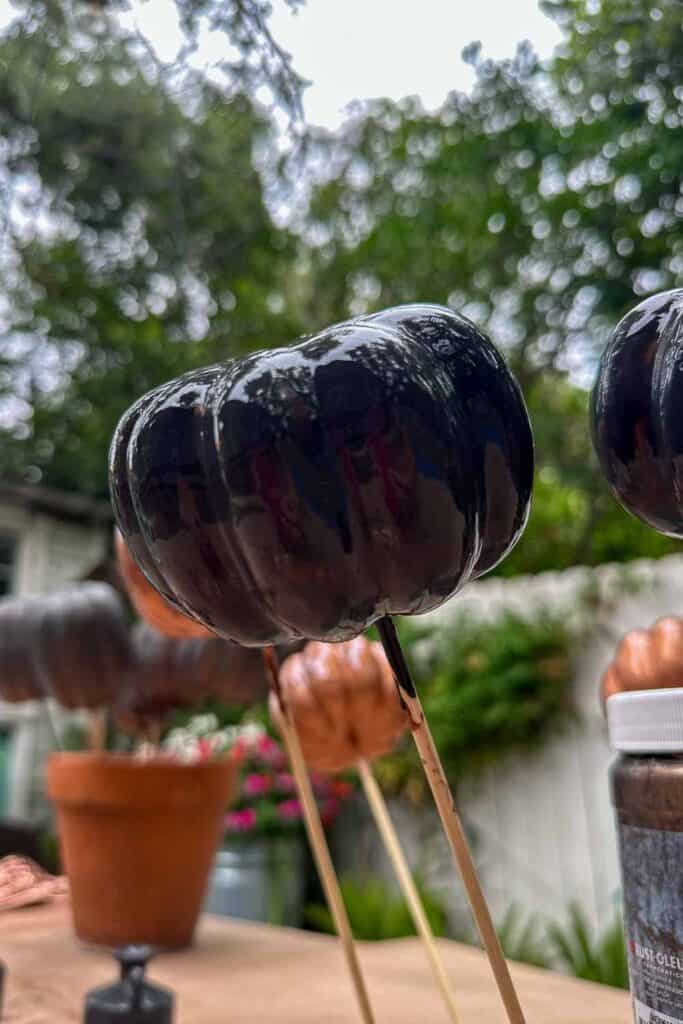
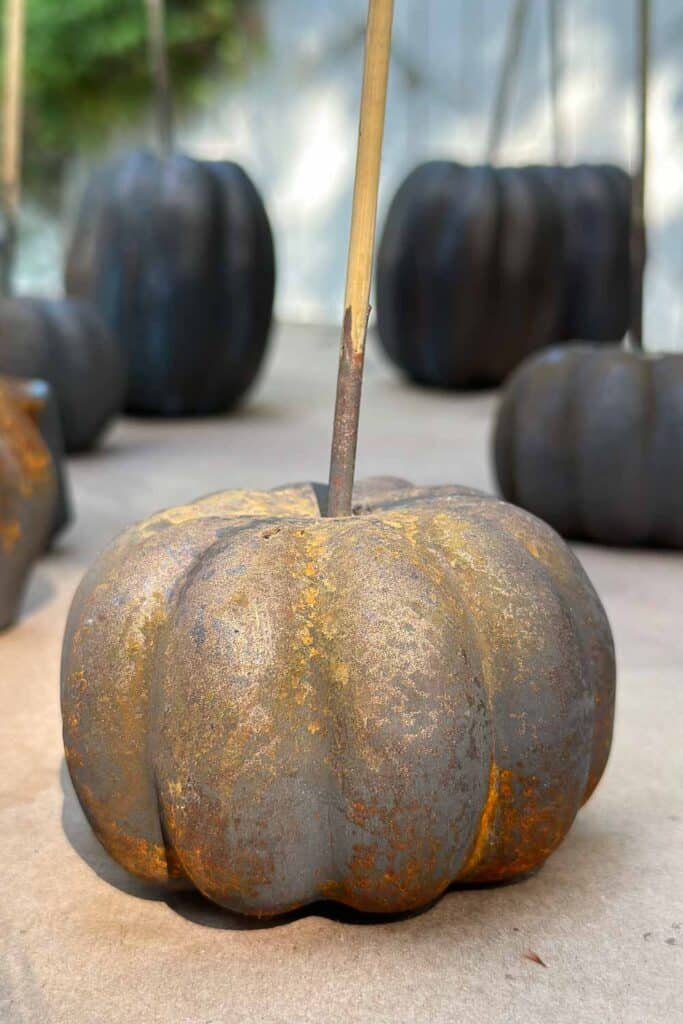
- Rusted patina on black iron pumpkin– Use the black iron paint with the rust patina spray.
- Dark Bronze pumpkins- Use the bronze paint with the green patina spray.
Paint a coat of your chosen color over the primer and allow it to dry.
Now comes the fun part!
Creating a patina
- You can use a sea sponge or a brush to apply a second coat of paint to each pumpkin.
- While the paint is wet, spray it with the patina spray you choose.
- Place the pumpkins back in the foam block or pot to dry upside down to dry.
- Once the pumpkins are fully dry, place the bottom of the pumpkin on the table and sponge a little bit of paint around the top and sides.
- Respray the patina spray and allow it to dry on the table right side up.
- You can stop at this point or continue until you have the perfect patina you want.
Seal and protect
- Protecting your creation is essential once you’ve achieved the desired patina effect and fully dried. Apply a clear sealer to preserve the patina. This step will also enhance the sheen and longevity of your pumpkin’s patina finish.


How to Create Beautiful Patina Pumpkins
Equipment
- Hot glue gun
- Paint brush
Materials
- Modern Masters Metal Effects paint in bronze copper, or iron ( I used all three of these colors)
- Modern Masters Metal Effects Primer
- Modern Masters Metal Effects Patina Spray green patina and rust patina
- You can buy the above three items in a small kit. Please have a look at my links below.
- Faux foam pumpkins
- Skeleton salad tongs optional, If you want to use your pumpkins for place card holders
- Copper spray paint only if you are going to make the name card holders
- Spanish moss only for the name card holder pumpkins
- Wooden dowels or skewers
- Foam block or a flower pot filled with dirt to hold your pumpkins while drying
- Paper towel
- Clear coat spray matte finish
- Real pumpkin stems
- Sea sponge optional
Instructions
- Prep
- The first thing you want to do is
remove the plastic stems from the pumpkins. - Place a wooden dowel or skewer into
each pumpkin. - Prime
- Creating a patina
- Paint a good coat of primer onto the
exterior of each pumpkin. - Dry the pumpkin upside down on the
skewer in a foam block or a dirt-filled pot and allow it to dry for a few
hours. - I've crafted three distinct paint
styles, each with its unique charm. Feel free to pick your favorite, or why not
try all three? - Copper Patina Pumpkins-
- Use the metallic copper paint with the
green patina spray. - Rusted Patina on Black Iron Pumpkin-
- Use the black iron paint with the rust
patina spray. - Dark Bronze Pumpkins-
- Use the bronze paint with the green
patina spray. - Paint a coat of your chosen color over
the primer and allow it to dry. - Creating the Patina
- You can use a sea sponge or a brush to
apply a second coat of paint to each pumpkin. - While the paint is wet, spray it with
the patina spray you choose. - Place the pumpkins back in the foam
block or pot to dry upside down to dry. - Once the pumpkins are fully dry, place
the bottom of the pumpkin on the table and sponge a little bit of paint around
the top and sides. - Respray the patina spray and allow it
to dry on the table right side up. - You can stop at this point or continue
until you have the perfect patina you want. - Seal
- Protecting your creation is essential
once you've achieved the desired patina effect and thoroughly dried. - Apply a clear sealer to preserve the
patina. This step will also enhance the sheen and longevity of your pumpkin's
patina finish. - Paint a coat of your chosen color over
the primer and allow it to dry. - You can use a sea
sponge or a brush to apply a second coat of paint to each pumpkin. - While the paint is
wet, spray it with the patina spray you choose. - Place the pumpkins
back in the foam block or pot to dry upside down to dry. - Once the pumpkins
are fully dry, place the bottom of the pumpkin on the table and sponge a little
bit of paint around the top and sides. - Respray the patina
spray and allow it to dry on the table right side up. - You can stop at this
point or continue until you have the perfect patina you want. - Seal
- Protecting your creation is essential once you've achieved the desired patina effect and thoroughly dried. Apply a clear sealer to preserve the patina. This step will
also enhance the sheen and longevity of your pumpkin's patina finish.
Tips and tricks
- Layering for Depth: To achieve a realistic patina, you want to experiment with multiple layers for added depth and variation in color.
- Use a Natural Sponge: For a textured and organic look, consider applying the Metal Effects paint using a natural sea sponge or a crumpled paper towel. Dabbing the paint rather than brushing it on can create a more uneven and weathered appearance, characteristic of an aged patina.
- Aging with Salt: For an additional weathered look, consider sprinkling a small amount of coarse sea salt or kosher salt onto the wet Metal Effects paint while it’s still tacky. As the paint dries, the salt crystals can create subtle texture and irregularities in the patina, mimicking the appearance of natural weathering. After the paint has dried completely, gently brush off any excess salt to reveal the textured patina underneath.
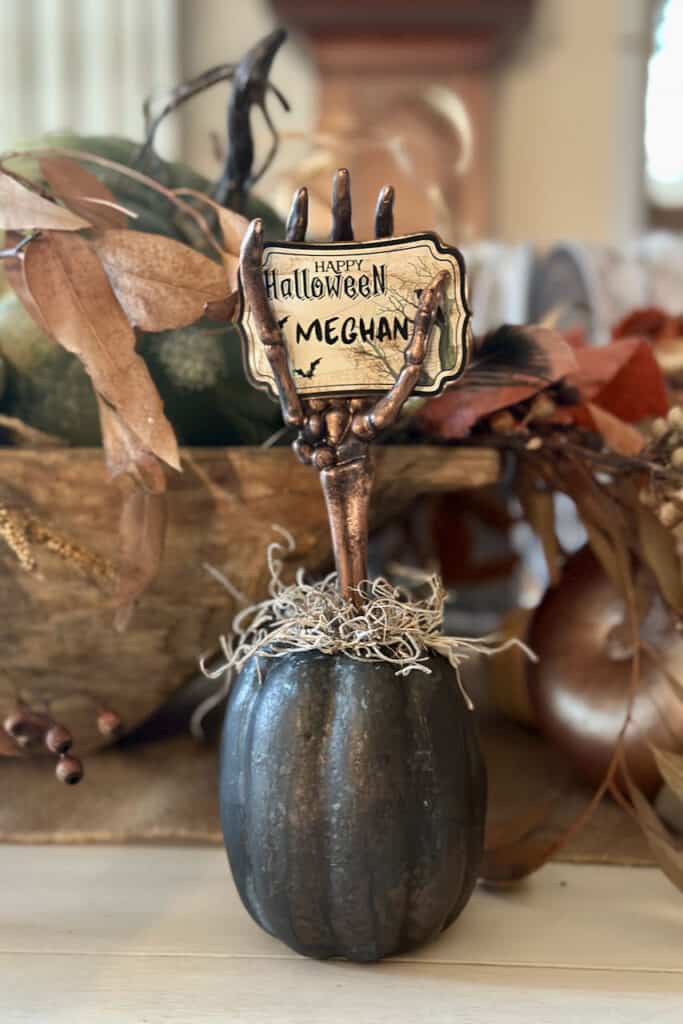
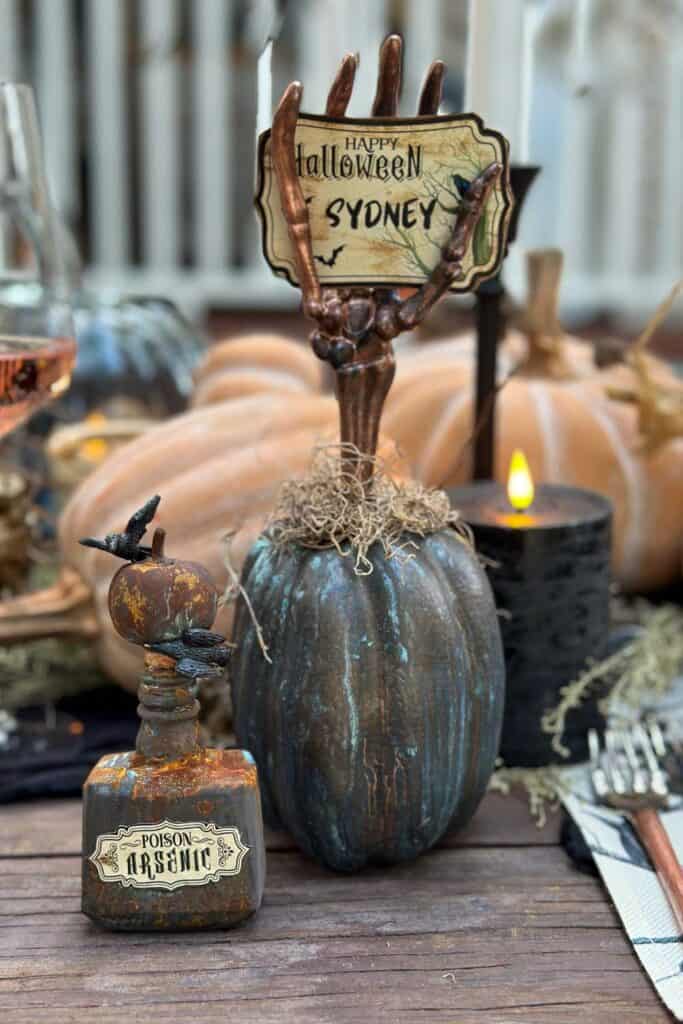
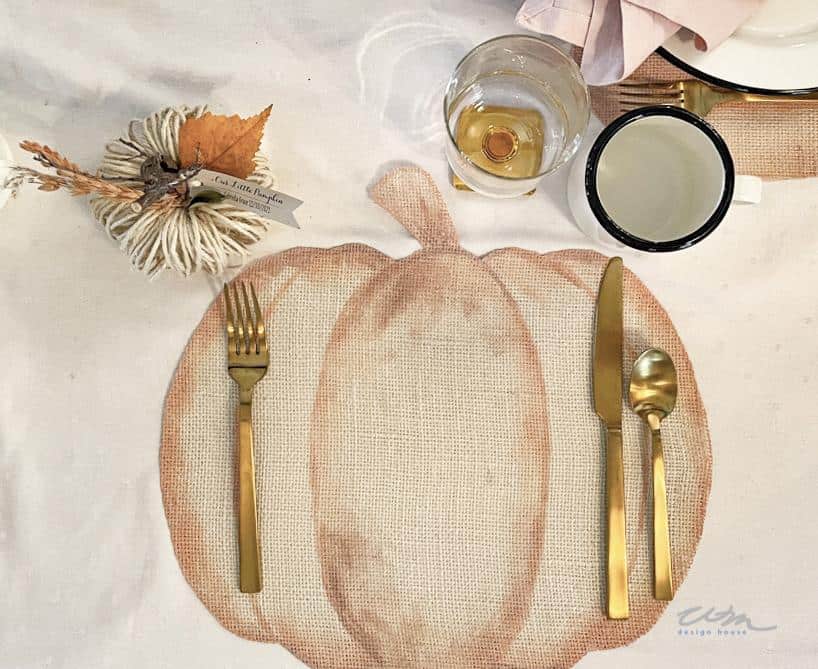
Creating a place card holder using your patina pumpkin
Setting a fun table and creating place cardholders using these pumpkins is easy.
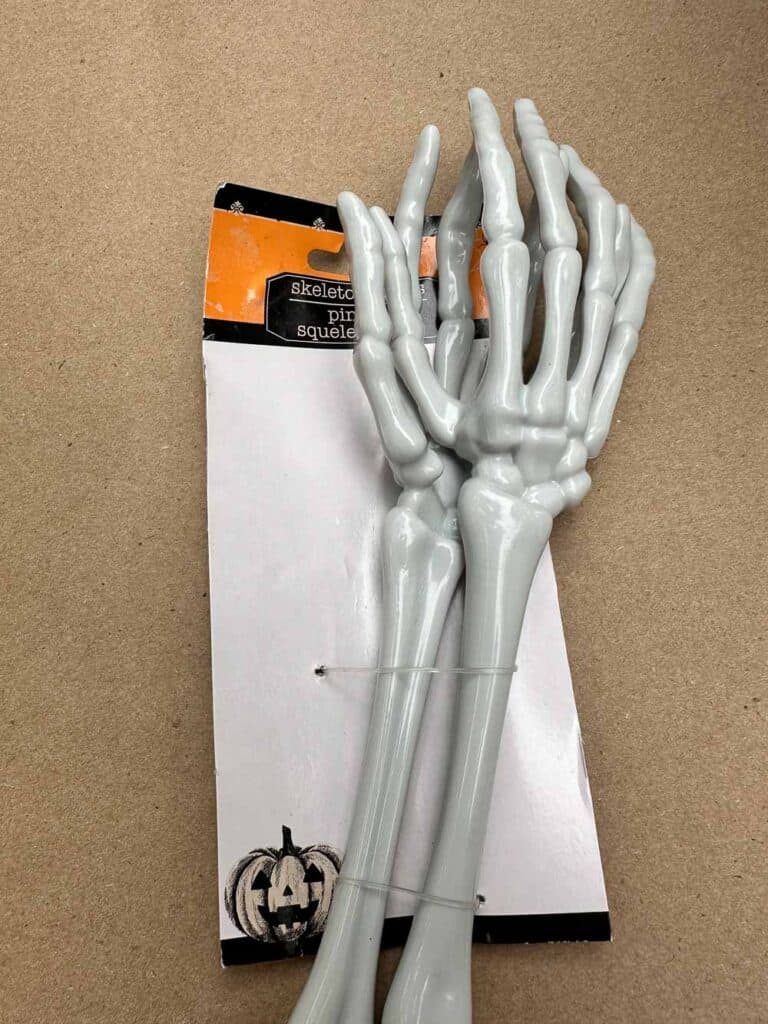
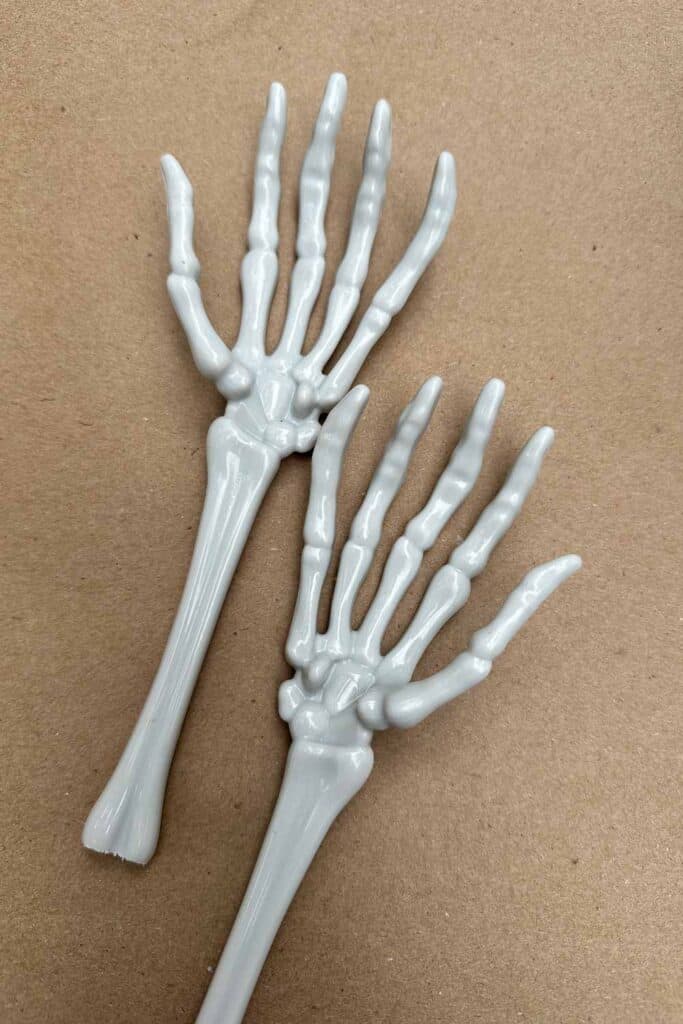
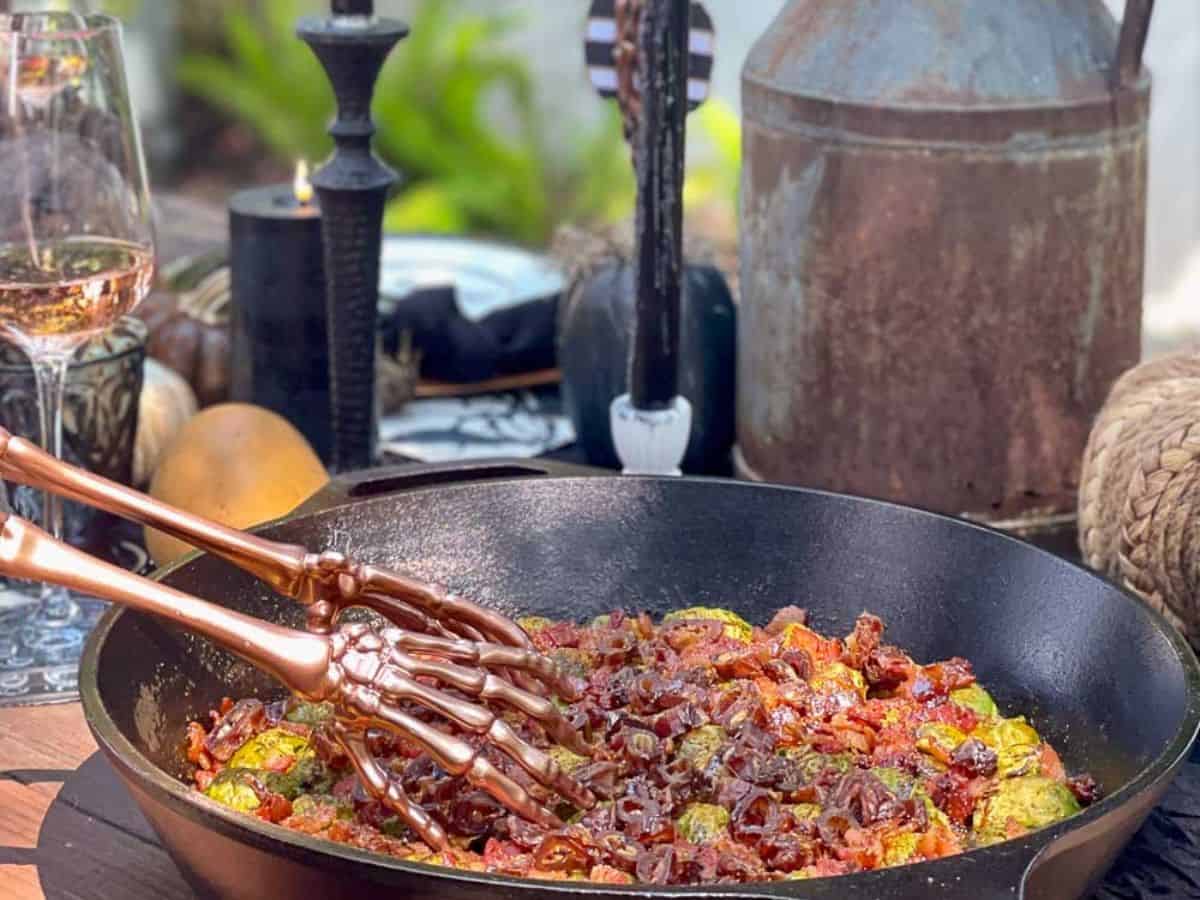
- Purchase a few sets of Skeleton salad tongs.
- Cut the handle in half at the bone joint using a hack saw.
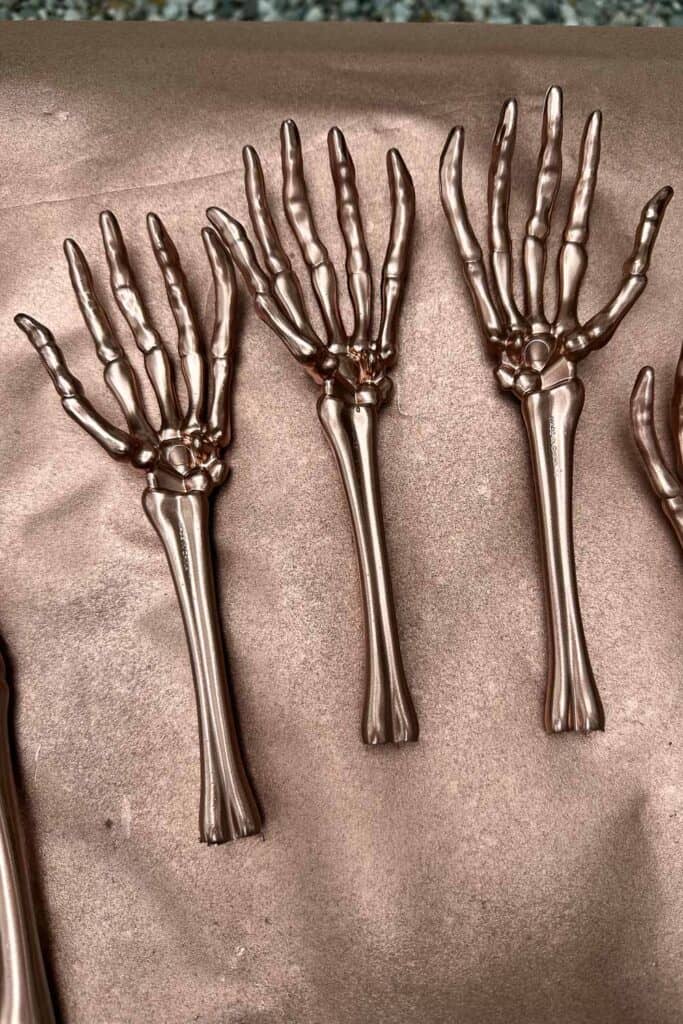
- Spray the hands using a rose gold metallic paint.
- Using some black matte paint, spray a little onto the hand and wipe some of the paint off using a paper towel or an old rag.
- Let this dry for a few hours.
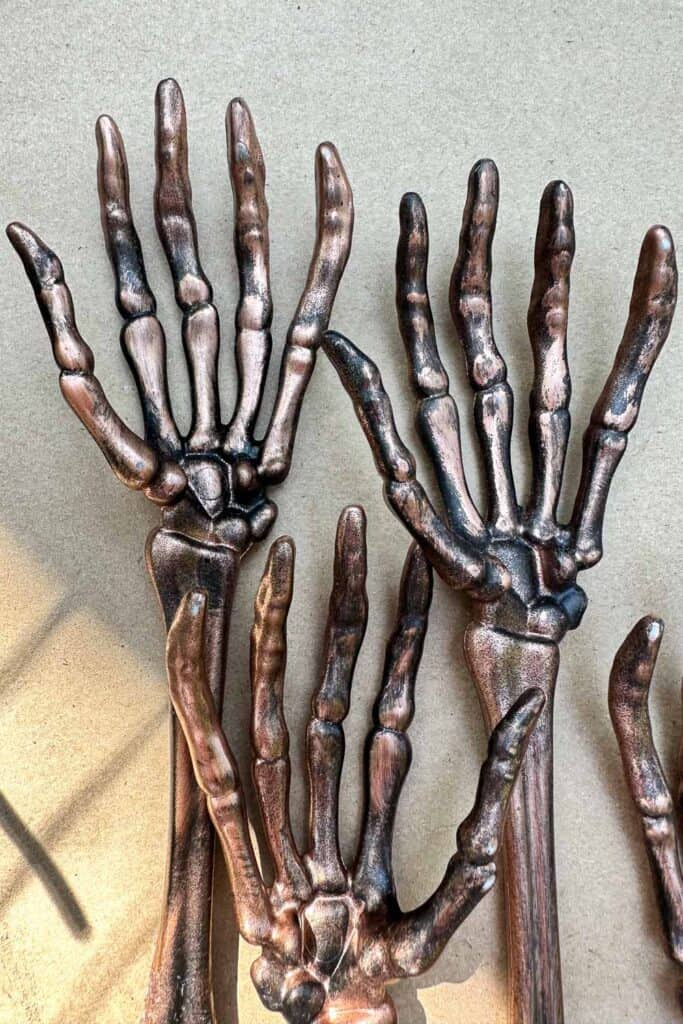
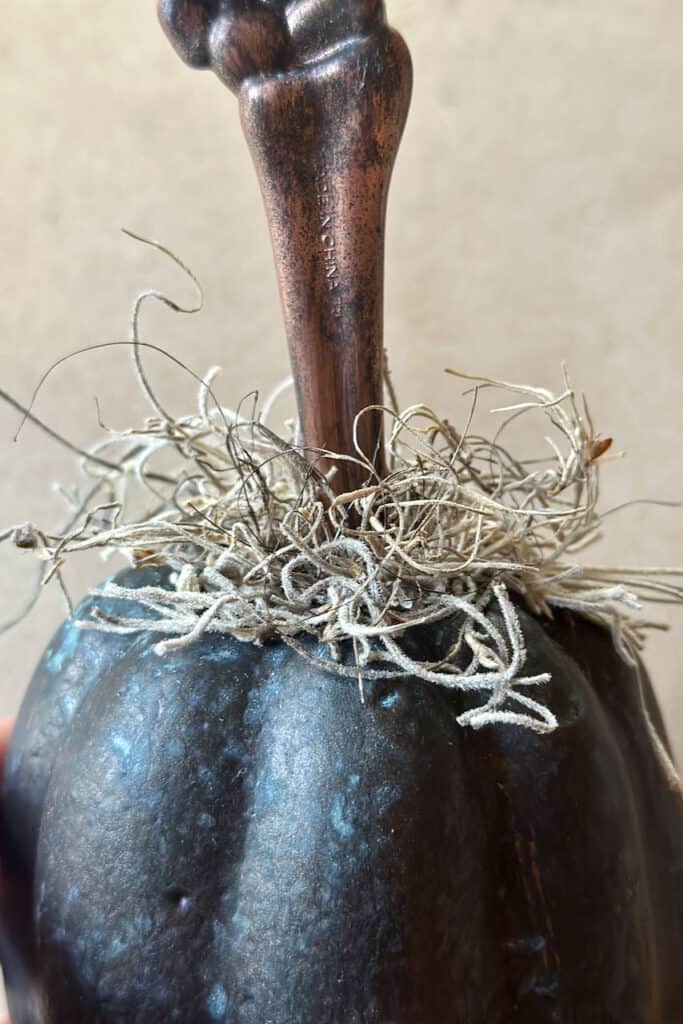
- Insert the bone into the top of the pumpkin.
- Add hot glue to secure the hand inside of the pumpkin.
- Add some Spanish moss around the base of the bone.
- Print out this free printable to create these name cards.
- Use spray glue and glue the regular paper to a piece of cardstock.
- I used a fun striped cardstock paper for the back of my name tags.
- Age the name tags for a rustic look using Archival Ink pads.
- Place the name card into the hand.
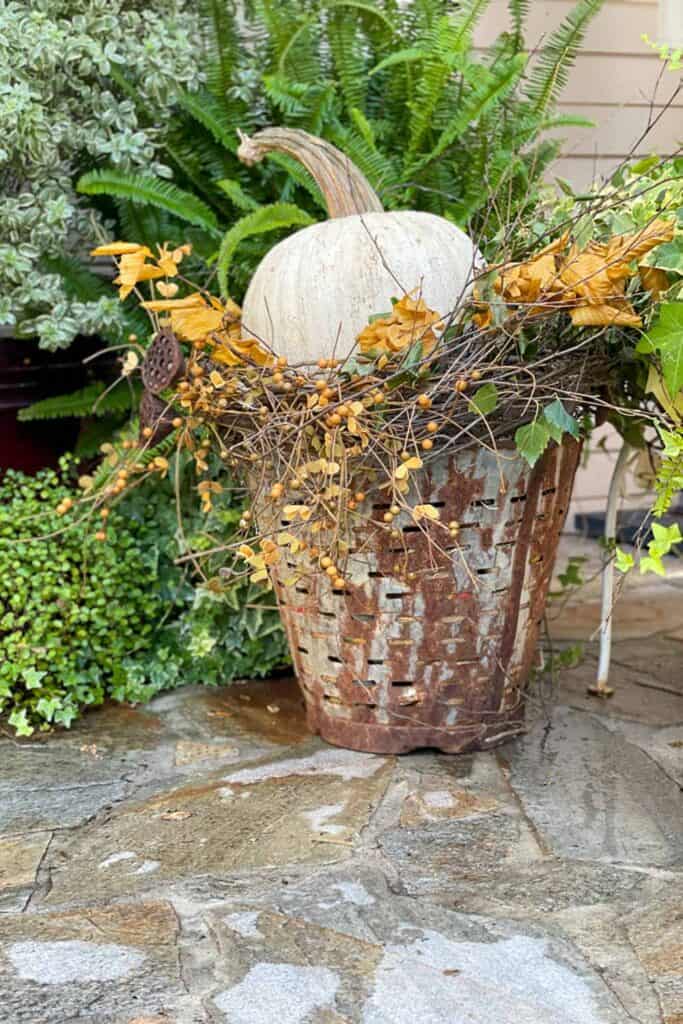
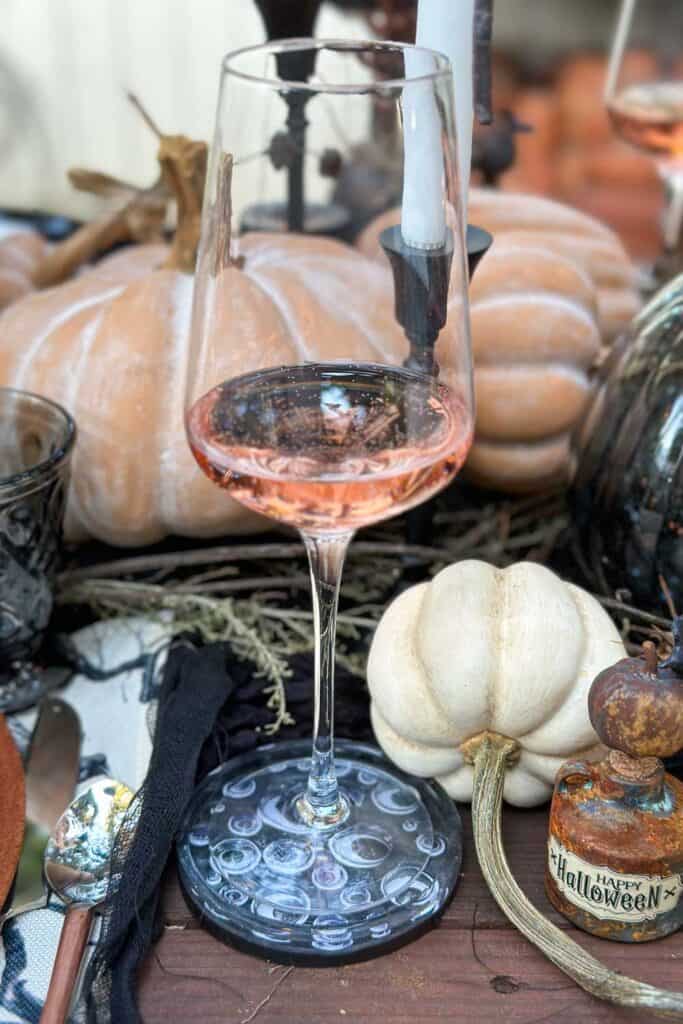
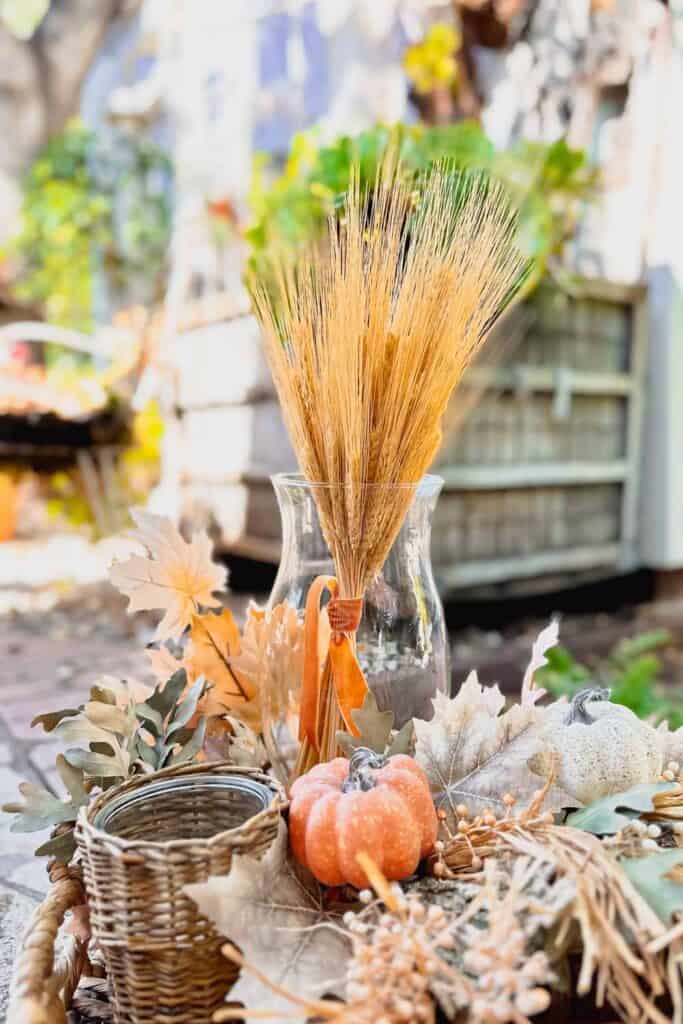
Decorating with patina pumpkins
With your newly acquired patina pumpkins, here are some practical decorating ideas:
Use them to create beautiful fall shelf decor.
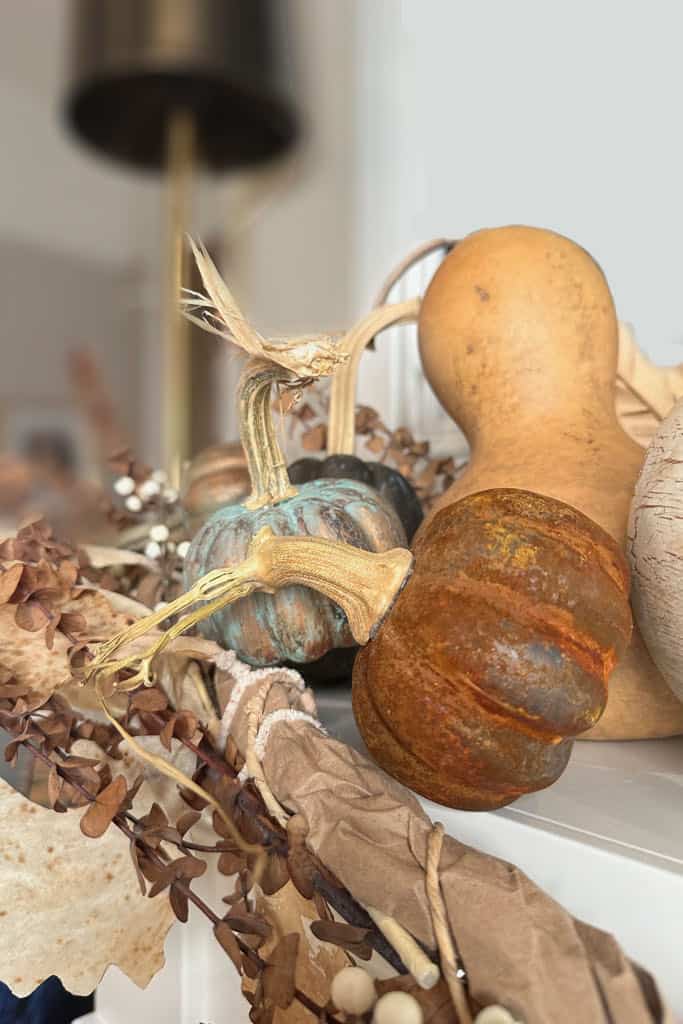
- Use them on your mantel display for a fall-themed arrangement.
- Incorporate them into a vintage vignette for added rustic charm.
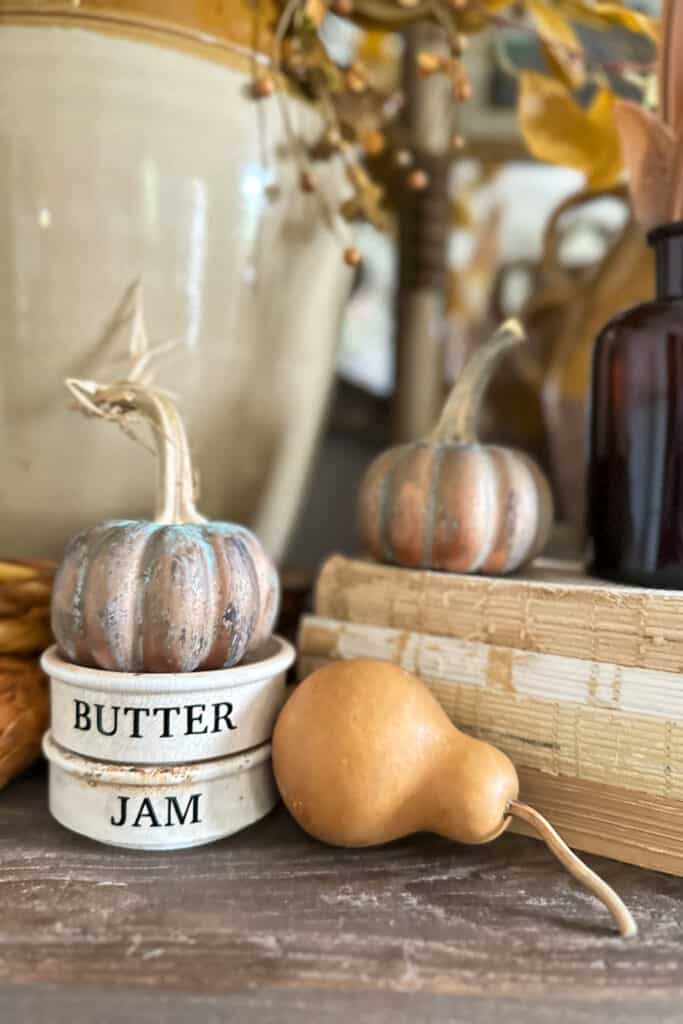
- Place them in a centerpiece on your table to create a focal point with your pumpkin decor.
Conclusion
In closing, this post has unveiled the art of creating stunning patina pumpkins and using them to elevate your decor. Following the step-by-step instructions and applying various patina techniques, you can transform ordinary pumpkins into captivating autumn accents. Patina pumpkins add a touch of rustic elegance to your fall decoration. Happy crafting!


Fall DIY’s
Fall is just around the corner, so it’s time to start thinking about all the fun DIY crafts and decor projects you can make to get in the spirit. Whether you want something simple or elaborate, I am here to inspire you. Click the button to see all of my fall projects.

Wendy, I love the creativity you used to achieve these gorgeous finishes! I am happy to be sharing it at TTA! Thank you so much for sharing!
Wendy – I love these metallic pumpkins! What a great idea. I love that you are using them as place card holders.
Thank you, Anna. the metal paint is so fun to work with,, you never know what you are going to get
Such a super unique and totally rad DIY for Fall, Wendy!! I’ve never seen anything like it. The copper ones are amazing!!
Thank you Rachel, it was such a fun project. I loved experimenting with all of the different patinas. Stay tuned, I have another project coming with the same paint.
I love the way these pumpkins turned out Wendy. The skeleton hands are the icing on the pumpkin cake! Perfection! Having them at a Halloween party would be so cute. You always amaze me with your creativity, you are such a creative soul and I always enjoy visiting you.
Thank you so much Cara. It was a very busy week with all of my DIYs and trying to get out of town to go to the Acheive conference.
Any chance you are going? I appreciate you stopping by for a visit.
Thank you, Jennifer! I appreciate you sharing.
The pumpkins turned out beautiful Wendy! And what a cute idea for a place card holder!
Thank you Michele.
Wendy, LOVE this post! Pinned and I want to share it on Saturday Meanderings next week. You are so darn creative!
Hi Mary, thank you so much. I’m sorry that I’m so late in the game here. I have lived in a blogging hole this week. I hope you have had a wonderful week. W
I love all of the different patinas for the pumpkins. (I always love metallic!) Your pumpkin with the skeleton arm really makes me smile!
Wendy
These look so cute.
Thank you, Rachel, I am glad you enjoyed it.
Thank you sweet friend, I appreciate the share.
Thank you, Brooke, for the kind share. I have been so lax with my Saturday posts lately.
I will be featuring you this coming Saturday. XO