Pomegranate Christmas Ornaments : DIY (Free Printable Template)
This year, I leaned into a rich, seasonal palette outdoors and filled all of my exterior spaces with pomegranates. These DIY pomegranate Christmas ornaments are an easy way to carry that theme indoors, and the free printable makes them simple to create. Their deep red color pairs beautifully with greenery and natural textures, both outdoors and on the tree.
Pomegranates also carry a touch of holiday symbolism—often associated with abundance and good fortune—which makes them a sweet, meaningful detail to incorporate into your décor.
If you’ve seen my pomegranate Christmas décor or tried my pomegranate cosmopolitan martini, you already know how much this theme has woven its way through my home. These ornaments are an easy next step, and the free printable template makes them simple to recreate.

Materials You’ll Need to Make DIY Pomegranate Ornaments
- Free printable pomegranate template
- Heavyweight cardstock to print on
- Red marker
- Glue sticks
- Twine for hanging
- Scissors


DIY Pomegranate Ornament
Materials
- * Free printable pomegranate template
- * Heavyweight cardstock to print on
- * Red Marker
- * Glue sticks
- * Twine for hanging
- * Scissors
Instructions
- Print both templates on sturdy cardstock or watercolor paper
- Cut out 8 solid pomegranates + 1 seeded pomegranate per ornament
- Fold all solid pieces in half with the printed design on the inside
- Score creases (optional) to keep folds crisp and aligned
- Glue folded pieces together one at a time to form a rounded shape
- Add a loop of twine inside before sealing the final seam
- Glue the seeded pomegranate to the back to cover seams and twine
- Trim edges if needed and touch up with a deep red marker
How to Make DIY Pomegranate Ornaments
These ornaments look beautifully dimensional, but they’re wonderfully simple to create thanks to the printable template.
Step 1: Print and Prepare the Template


- Print one copy of each free template onto heavyweight cardstock or watercolor paper. For this project, you’ll use eight solid pomegranates plus one pomegranate with seeds per ornament you want to make.
- Cut out each pomegranate shape, staying close to the printed outline.
Tip from wendy’s craft room:
If your printer struggles with thick paper, print on regular paper and adhere it to cardstock before cutting. Or have them printed at a print shop.
Step 2: Score and Fold the Pieces


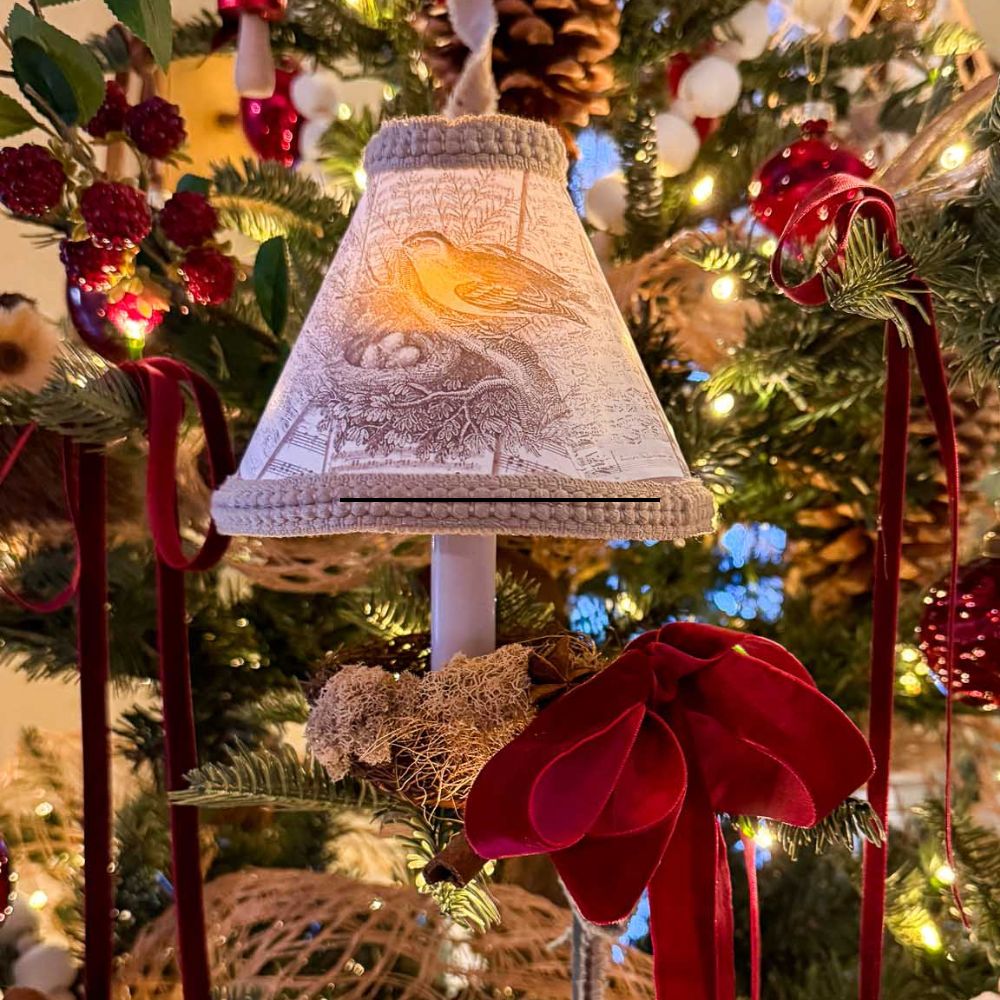
- Fold each one in half so the printed design is on the inside. (I placed a light black line on the image to help you)
- Make sure your creases are crisp—this helps the ornament sit evenly.
- Group folded pieces together so they stay aligned.
- Use a bone folder if you have one.
Tip from wendy’s craft room:
Scoring prevents cracking, especially on watercolor or thicker papers.
Step 3: Build the 3D Pomegranate Christmas Ornaments
- Run a thin layer of a glue stick along one half of a folded piece.
- Press a second folded piece on top, edges aligned.
- Continue layering 8 pieces until your ornament forms a full, half rounded shape.
- Check your spacing and adjust if needed to keep it as symmetrical as possible.
Step 4: Add Twine

- Before sealing the ornament, tuck a loop of twine inside the center.
- Secure it in place with a bit of hot glue.
- Fluff and adjust the layers so the ornament looks even from all angles.
Tip from wendy’s craft room:
Don’t worry if your edges do not line up perfectly! We will trim some of the white and then use a dark red marker to enhance and shade the edges.
Step 4: Add The Seeded Image


- Place a thin layer of glue stick on the back of the seeded pomegranate image.
- Place it over the white side of your layered ornament to cover the twine and seams.
- Feel free to leave the trim white, or add a bit of color with a deep red marker. I personally like to color the edges for a cleaner, more realistic appearance.


Crafting Tips
- Watercolor paper adds gorgeous texture but needs slightly longer drying time.
- Thin glue layers work best—too much glue can cause rippling and make the sections stick together.
- Narrow twine blends beautifully into the design, while thicker ribbon can look bulky.
- Cutting multiple templates at once makes batch-assembly much easier.
- Whether you’re a new crafter or a seasoned pro, I hope these little shortcuts help your ornaments come together beautifully.

How to Style DIY Pomegranate Christmas Ornaments
- These ornaments add a bright, festive pop of color to your Christmas tree, especially when paired with warm lights, greenery, and natural textures. I love using them as repeating accents throughout the tree to echo the pomegranate touches in my outdoor spaces.
- You can also tie them to gifts, use them as place-card accents on your holiday table, or string several together to create a small garland. If you’re decorating with a coordinated theme, pair these with my Mercury Glass Ornaments, Dried Orange Ornaments, and Velvet Flocked Ornaments for a collected, handmade look.

Wrapping Up
I hope you enjoy making these DIY pomegranate ornaments as much as I did. They’re simple, meaningful, and such a lovely way to bring a coordinated look to your holiday décor. Whether they end up on your tree, tied to a special gift, or displayed throughout your home, they’re sure to add a warm handmade touch to your season. Happy crafting, my friend!


More about me!

Hello, I’m Wendy – a dedicated homemaker with a deep passion for decorating, gardening, cooking, and crafting. I find joy in harmonizing beautiful elements to fashion a space that is both comfortable and inspiring. I will help you create a beautiful home, one project at a time.
Connect with Wendy
Did you make this craft?
We would love to see what you have created, so mention us @wmdesignhouse or tag us using #wmdesignhouse so we can see your creations!


Wendy,
I love this idea! You are so creative and I’m sharing a link on my DRA on Sunday. Have a blessed weekend.