How to Upcycle a Picket Fence into a Creative Easel
You all know by now that I stop for junk!
Yup, I love nothing better than when someone leaves their junk by the side of the road. I see it as another chance for me to take someone’s unwanted stuff and put it to good use in creative ways.
Full disclosure, this upcycle was completely unplanned. Sometimes, the best and most fun DIY projects are those you do on the fly.
Today on the blog, along with five other blogging friends hosted by Carol @blueskysathome, we share some of our favorite summer projects. Be sure to check the bottom of the post for all of the links.
Here is the story of how I came to upcycle a picket fence into a creative garden easel.
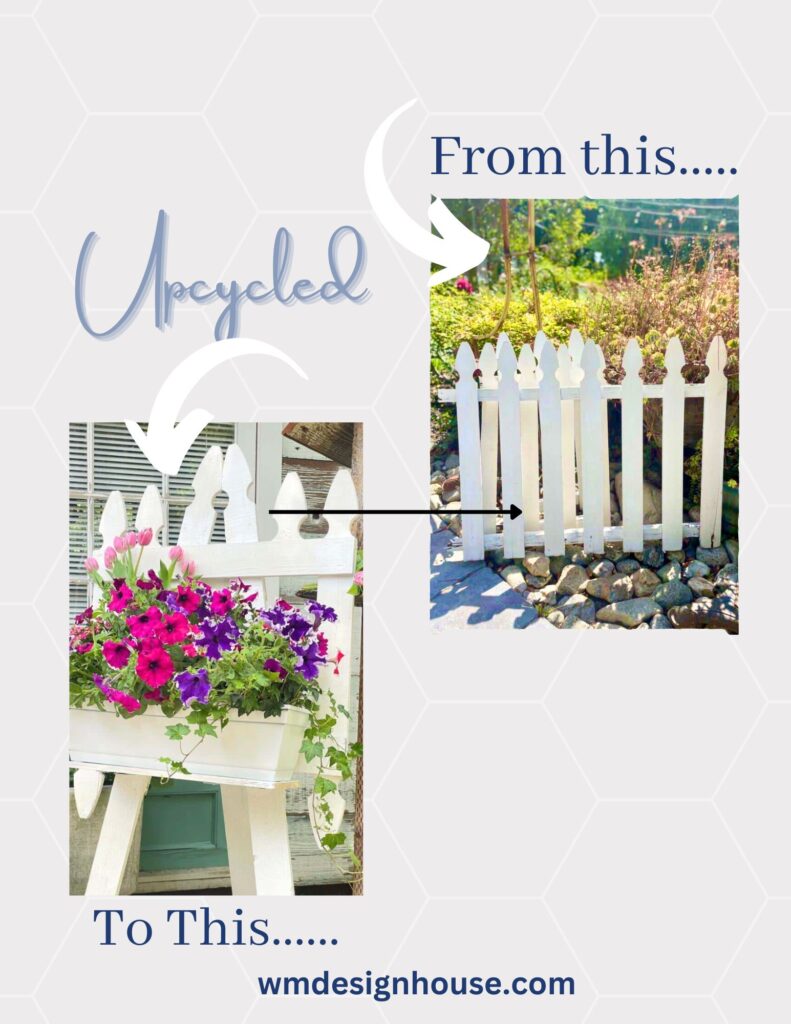
I happened to be on a walk and noticed a neighbor a few doors down was taking down old fence pickets and fence posts.
I quickly ran home, hopped in my car, and returned to the neighbor’s house. Then I started loading my trunk with old wooden fence panels.
The best part was that ten people watched me in another neighbor’s yard. I’m sure they thought I was crazy, and maybe they were right. (what woman loads up their car with old fence pieces in broad daylight?)
You can only imagine my husband’s excitement when I came home.
He was laughing so hard; he could barely speak. “What will you do with all that?” he asked.
I smiled and said, “Don’t worry, it will come to me.” It was time to put on my creative thinking cap and come up with a great idea.
Upcycled picket fence projects
I started brainstorming great project ideas. How could I upcycle a picket fence? So many ideas were running through my head, but here are just a few.
- Planter Box
- Easel for the garden
- Rustic Coffee Table
- Towel Rack
- Wooden clock
- Picket Crates
- Shelves
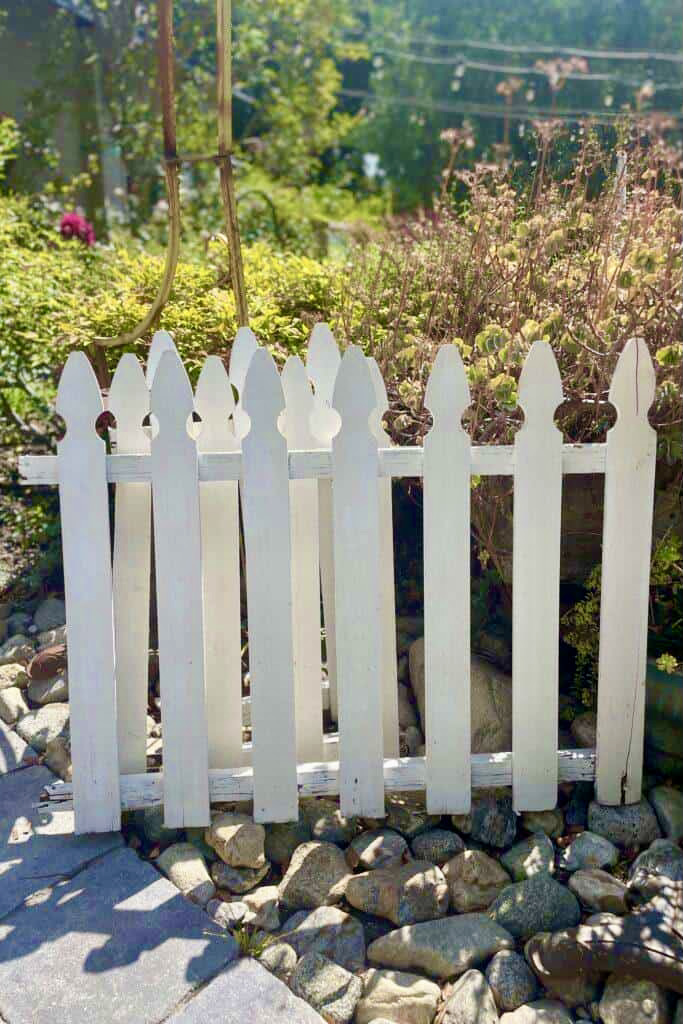
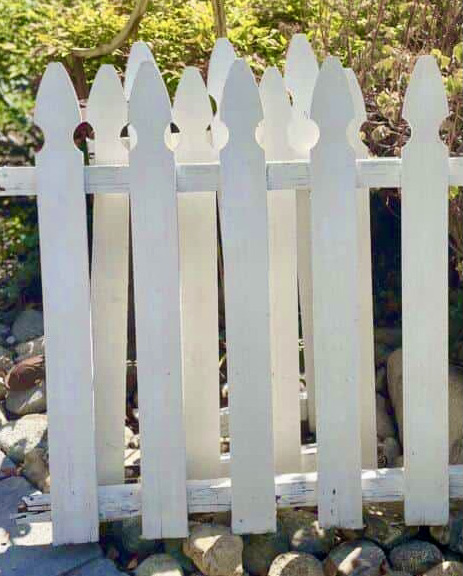
For me, a white picket fence belongs in an outdoor space, especially in the garden!
I wanted to create an art easel with a frame out of the pickets and somehow manufacture a shelf to hold a window box to display plants in the garden.
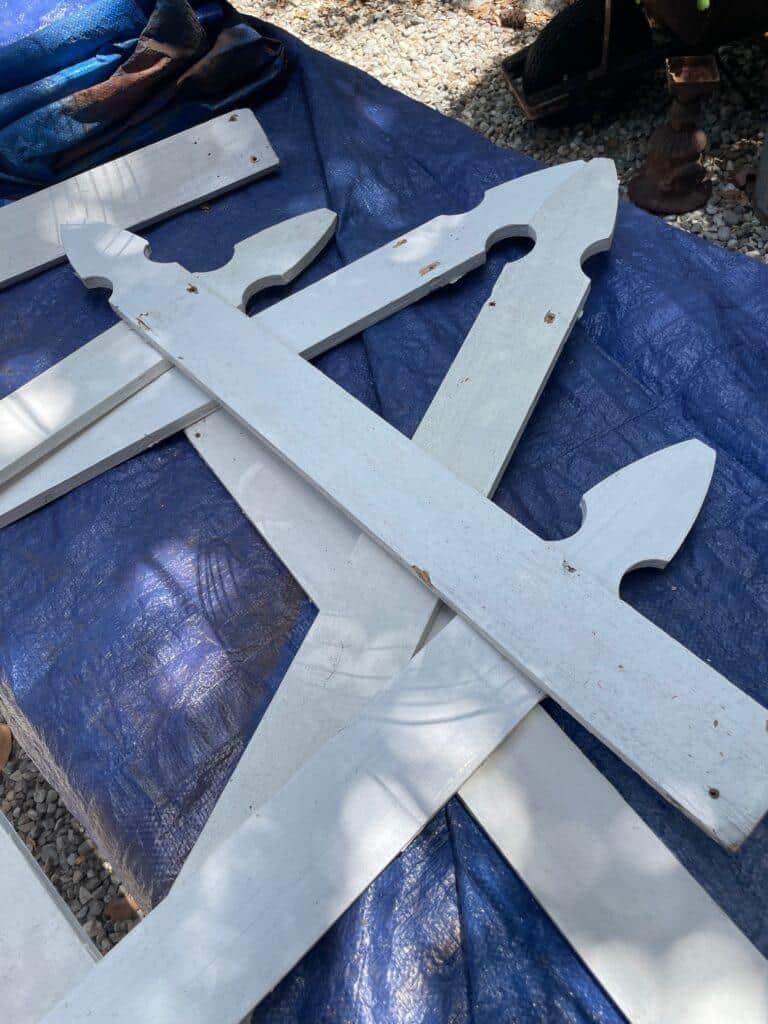
I had the vision in my head (and laid it out on the tarp), but now we had to think it through and put it together.

Supply list to upcycle a picket fence
- Old fencing
- Wood screws
- Power tools – drill and screwdriver
- Outdoor paints
- Measuring tape
- Planter box for the shelf
- Some plants for the box
- Wood glue
- Hinges
- A few L brackets
- Approx. 2.5′ of small chain and 2 eye screws
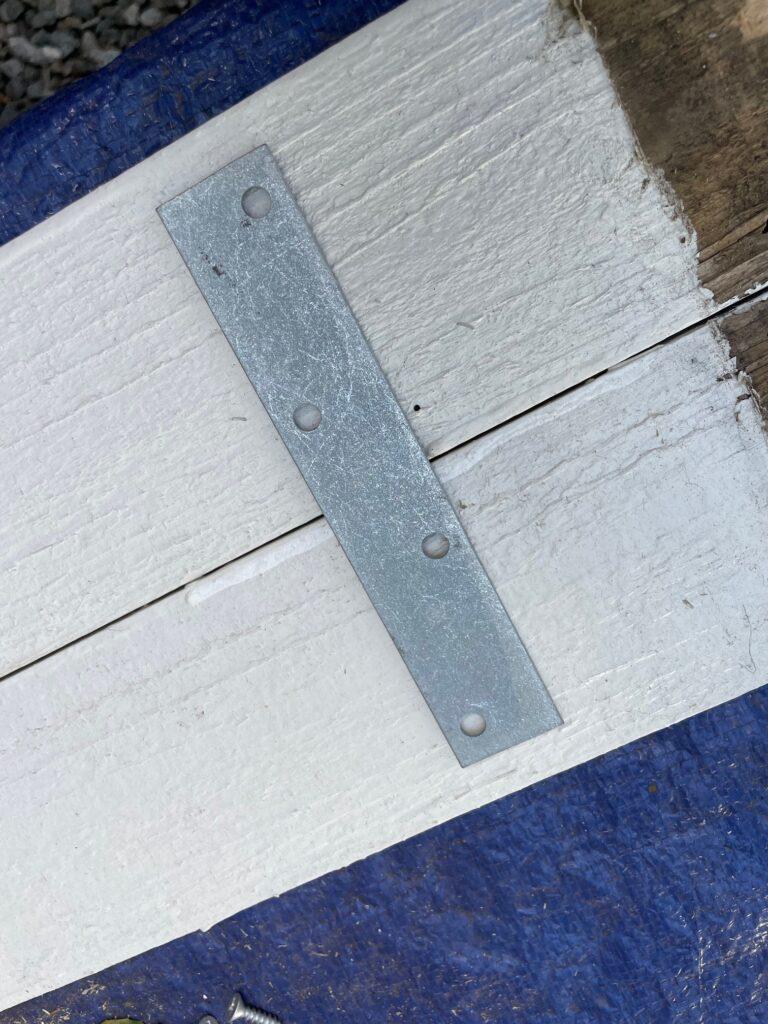
- Flat metal bar pieces to connect boards
Where can I get old picket fence boards?
I was fortunate to find my old fence boards on the side of the road.
If you are not quite as fortunate, you can try shopping at a thrift store, yard sale, or flea market. These are all great places where you may find old fencing.
In addition, you could always make this easel using new fence boards if you cannot find any to upcycle.
How to upcycle a picket fence into a garden easel
We started by deconstructing the fence and trying to save each picket.
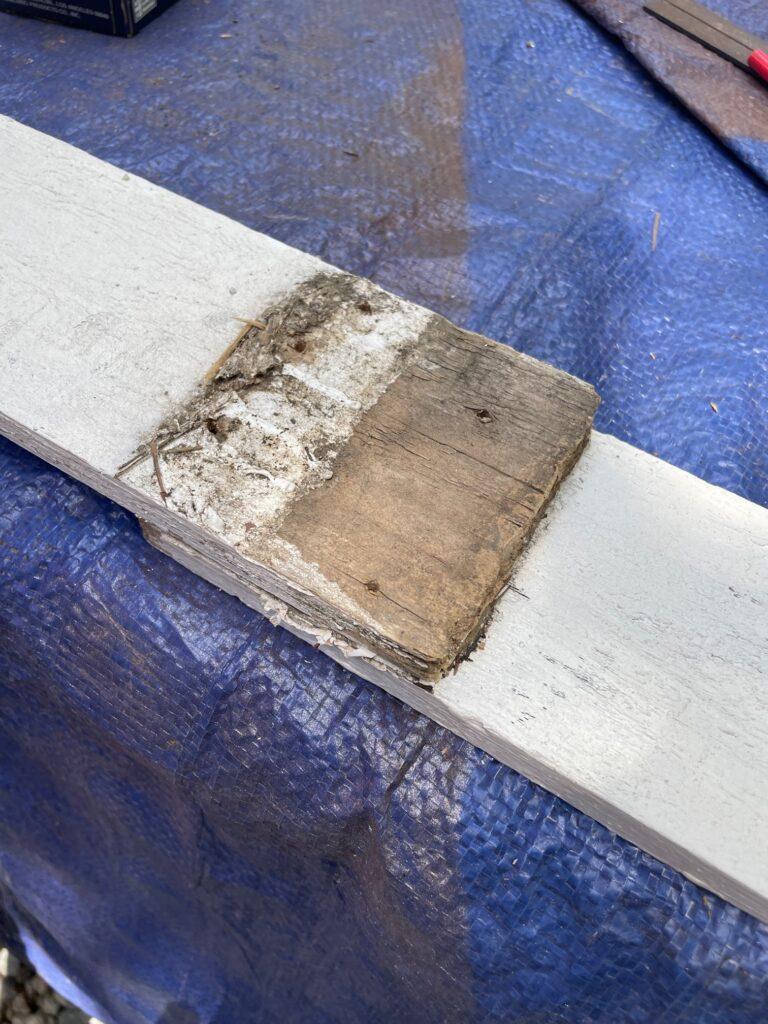
The good news was that the pickets were in good shape; only the runner boards were a bit beat up.
I have seen several styles of pickets, but I think this shape and style is my favorite.
We took a quick trip to Home Depot and loaded up the cart with what we needed to purchase to complete this project.
A hinge to attach the back leg, a few L brackets, chains to keep the legs together, and flat bar pieces allow us to connect a few scrap boards.
Constructing the legs
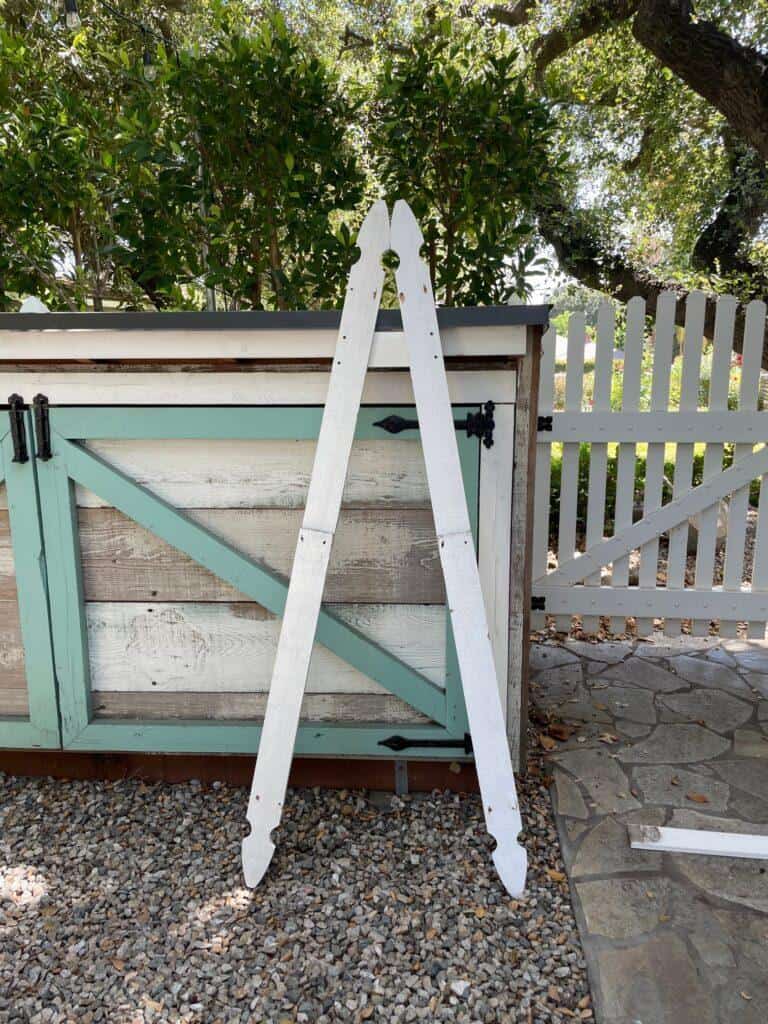
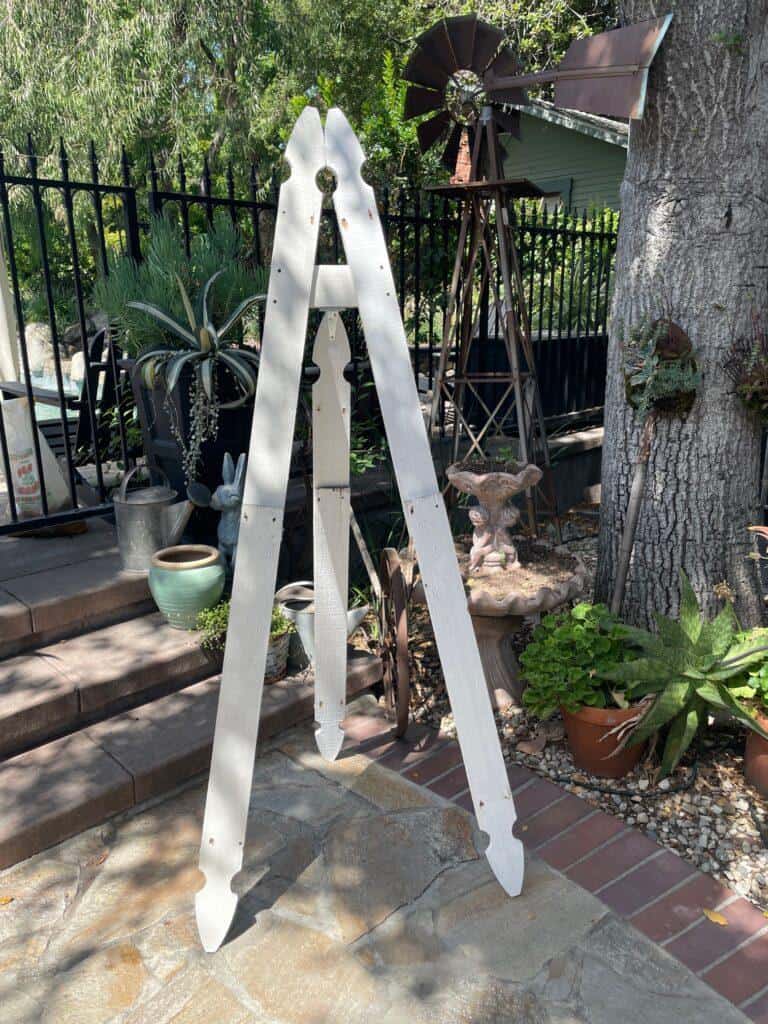
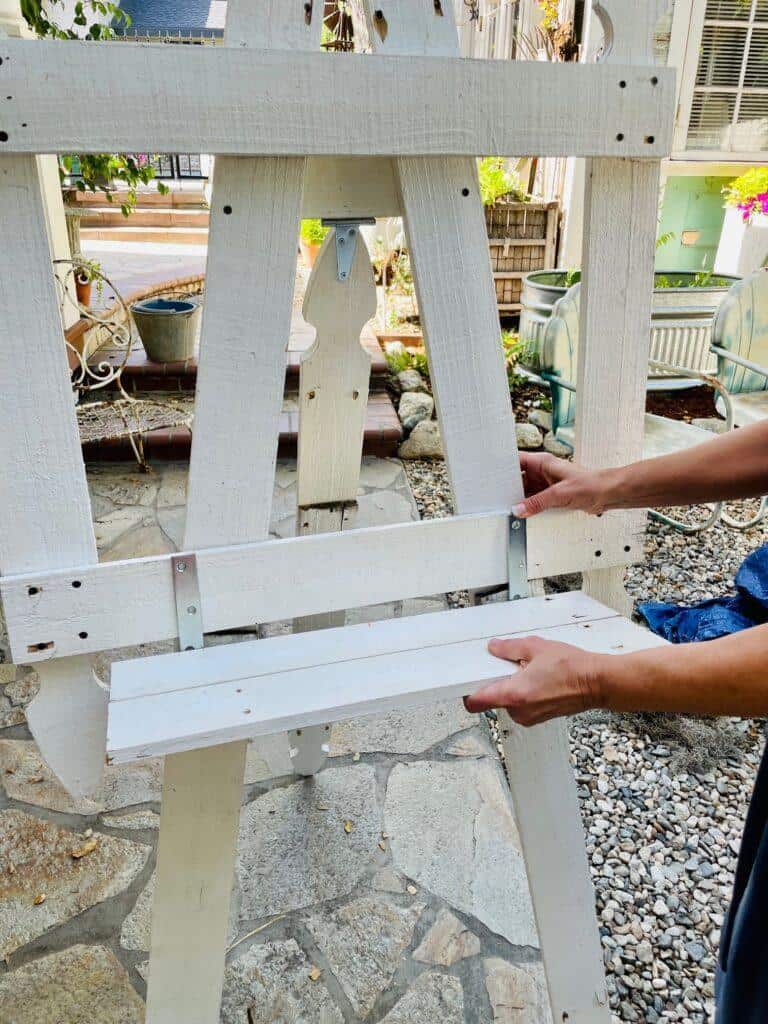
Next, we needed to construct the two front legs of the garden art easel.
We connected two pickets in the opposite direction and screwed them together in the middle to form each leg. We wanted the point of the picket end pieces to be on the top and the bottom of each post.
Next, we made the back leg approximately 12″ shorter than the front two legs. You can see in the image we attached a small crossbar to the two front legs approximately 6″ down from the top.
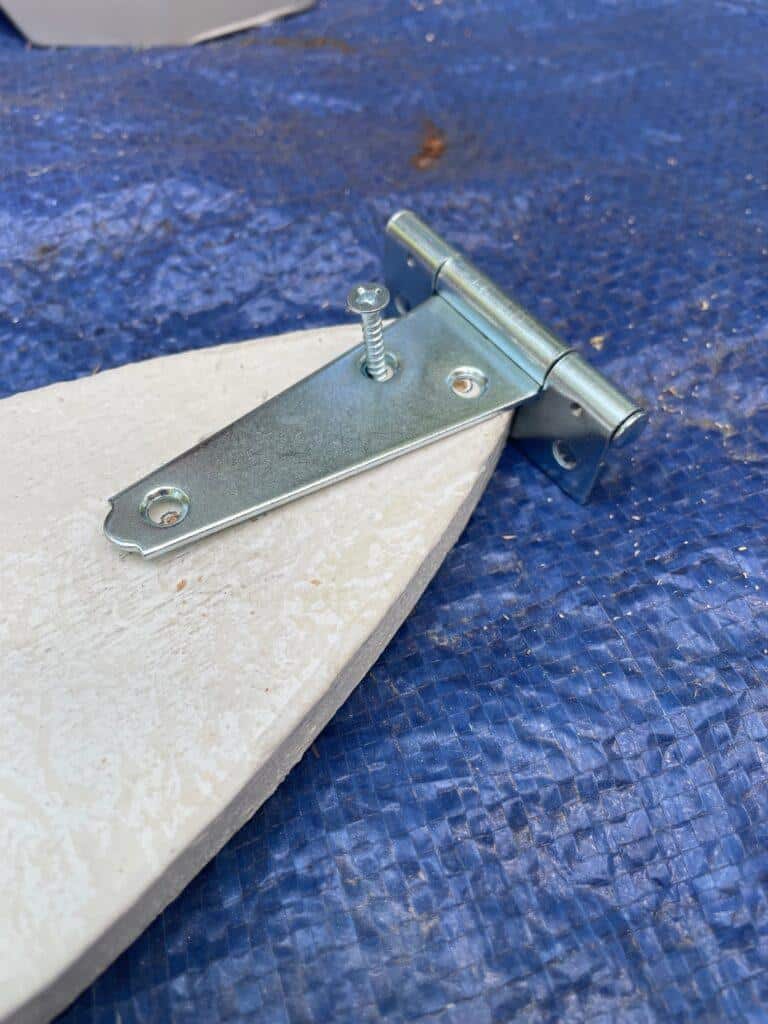
We attached the back leg to the crossbar using a small hinge.
The easel would sit like this, but to give it extra support, we added an eye screw to the back, middle of one of the front posts, and middle of the back post.
We then attached a small piece of chain to connect the two legs. This way, the easel is stable and will not move with the chain’s support.
Creating a frame to upcycle a picket fence
Next, we created a frame to attach to the front. David (my husband) wanted mitered corners. Me, not so much!
I wanted there to be the point of a picket on each corner, so we cut off the ends of the two pickets going east and west and attached them to the other end of the pickets going north and south by screwing in the flat metal plates that connected the two pieces of wood together.
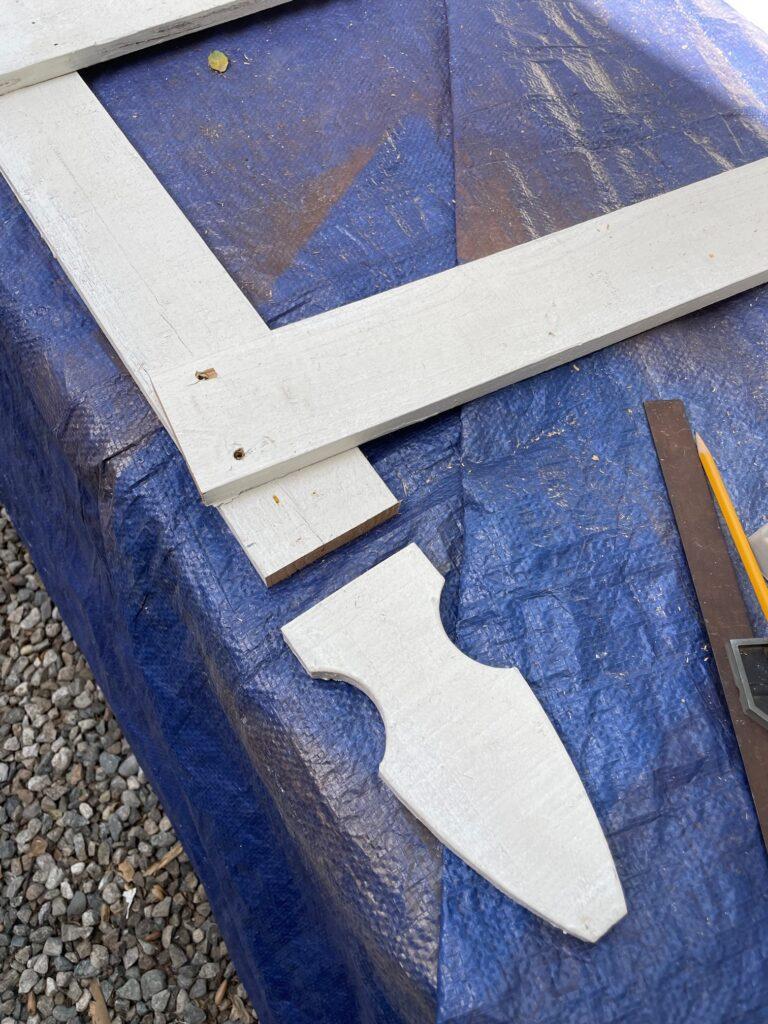
Once we had the four pieces of wood screwed together to create the frame, we attached it to the legs of the easel with a few screws from the back.

Adding a Shelf and Flower Box
Now we needed to create a shelf for the flower box.
We cut two pickets to 22″ long, cut off the point, and attached them with these metal straps.
Next, we added L brackets to the shelf and attached it to the easel.
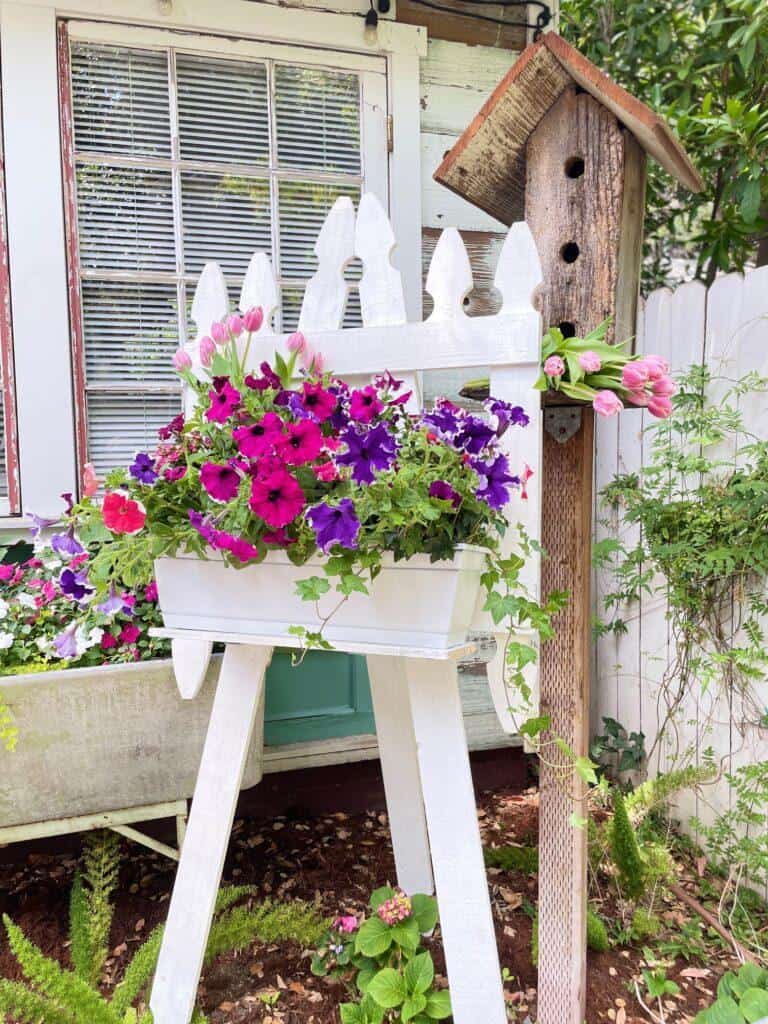
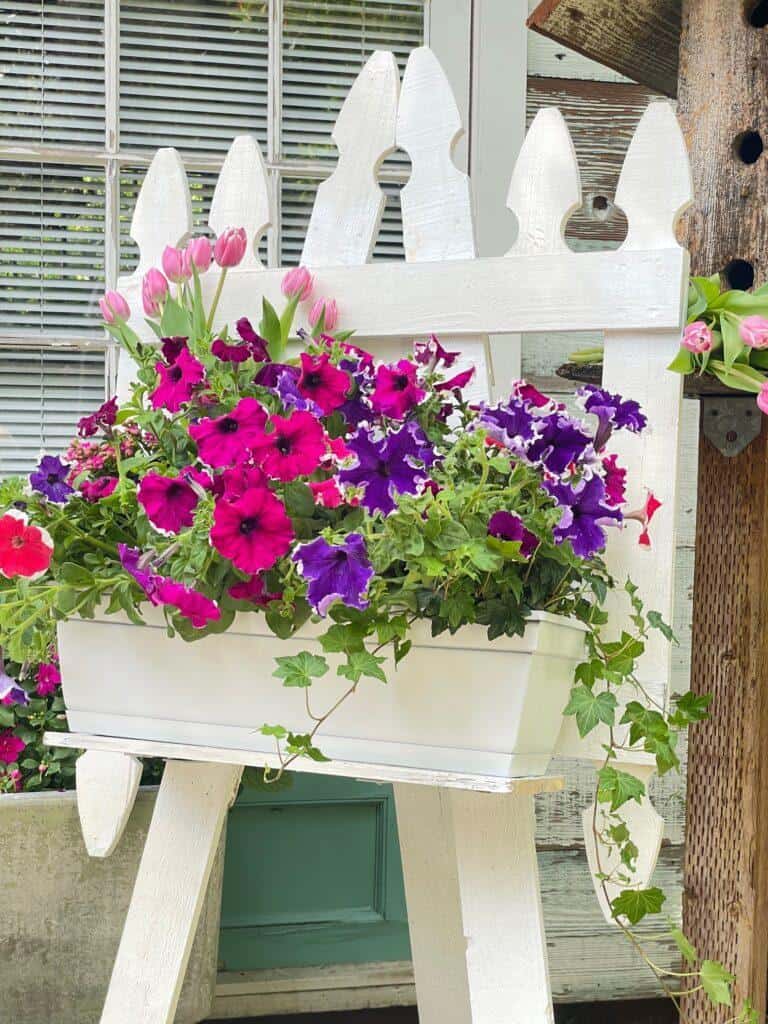
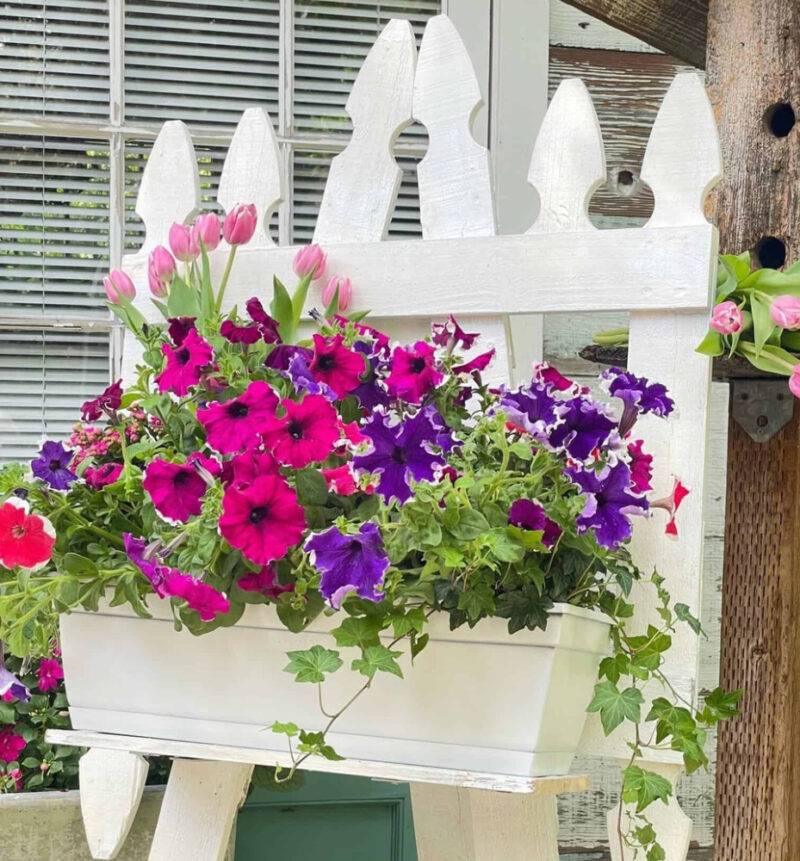
Finally, we added a simple flower box to the shelf. It was just begging for some beautiful flowers to be planted!
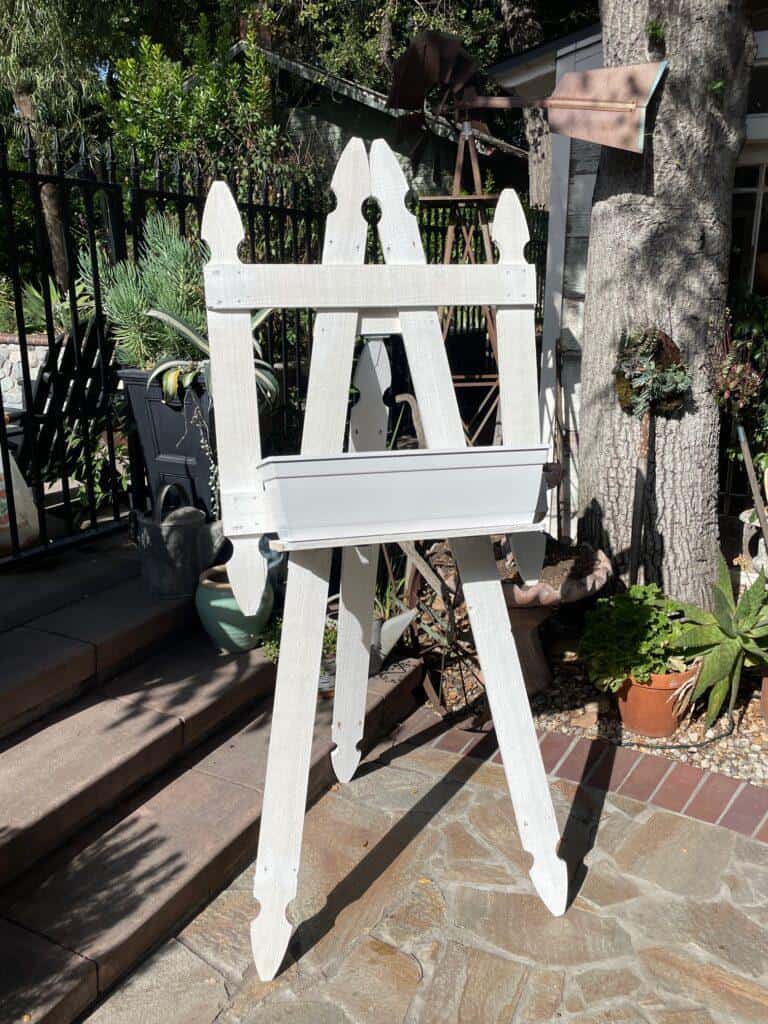
The Final Product: An upcycled picket fence turns into a beautiful garden art easel
I love how this idea came together all from finding an old picket fence on the side of the road. There is something so satisfying about giving someone’s junk a repurposed life, turning it into something beautiful and new.
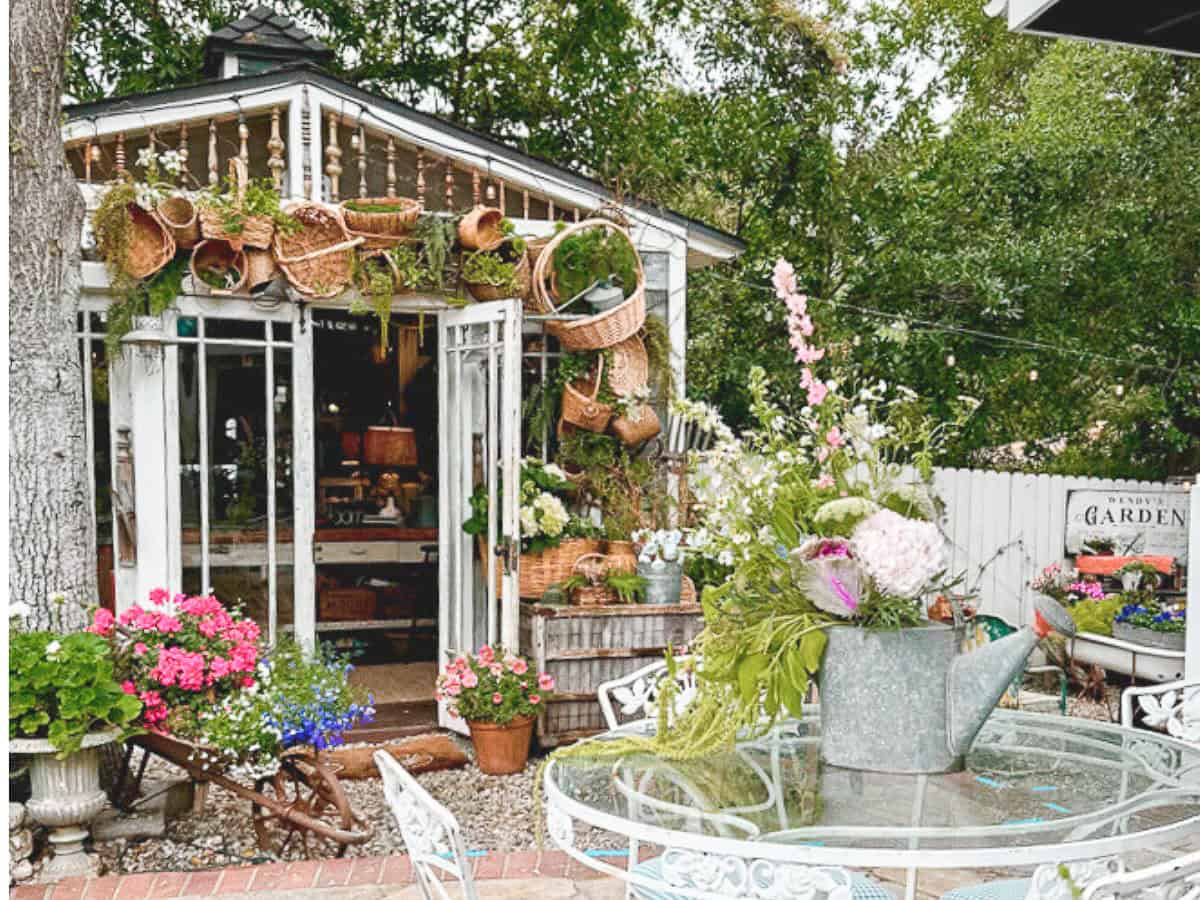
My new garden easel found the perfect home near the She Shed. I added beautiful flowers and fresh ivy vines for the perfect touch to the garden. This piece is a blank canvas, so I can change the flowers and plants seasonally to create a new masterpiece for every season.
I hope the next time you see an old fence in someone’s trash, you might think about what you could make with it. Thanks for following along. I hope you enjoyed this almost FREE project. Just don’t get caught digging in the trash. 🙂
If you loved this post, check out my guide, All About DIY and Crafts, for more ideas!


Don’t forget to see what my friends are up to creating this summer……………………………………..

Bluesky at Home – Celebrate the Perfect Piña Colada
Peacock Ridge Farm – Summer Garden Tour
Thistlekey Lane – Summer Coastal Tablescape


Saved from Salvage – Grilled Summer Pizza
Everyday Edits – Perfect Summer Strawberry Yogurt Bars
WM Design House – Summer Garden Design Easel


Fantastic, what a brilliant idea. This is a feature over at this week’s Handmade Monday 🙂
Such a clever and creative DIY, Wendy! It is so pretty! Thank you so much for sharing at this week’s Tuesday Turn About Link Party!
Thank you, Lynne. I appreciate you hosting the link party.
Your easel is absolutely darling. I just love a good upcycle and this on rang the bell!
Thank you so much, Ann, I appreciate your kind comment.
Thank you so much KariAnne! You are a doll.
This is beyond clever, Wendy! I love the easel and I love the window box and flowers that you attached to it!
Thank you Missy! Happy Saturday
What an adorable idea Wendy, isn’t it funny how things come to you when you look at someone else’s trash in a new light? I love a good upcycle, and this one is a keeper~ you are so clever!
Thank you so much Cara. Have a wonderful weekend.
This would be too cute displayed at a garden wedding, I will be sharing this tomorrow at Whimsy Home Wednesday. Have a great week Wendy.
Thank you, Cara, you are so sweet. It would be the perfect easel for a garden wedding.
Wendy, what a precious project. I’ll never look at picket fences in the same way. So creative to recycle. I love reusing things that would end up in the landfill. You all did a great job figuring out out to make your vision come to life. Thanks so for sharing this great summer project on Celebrate the Summer.
Thank you, Carol. Have a great weekend.
Thank you, Renae! Happy almost Friday.
This is the cutest idea Wendy! So clever and creative. Pinned!
Thank you Michele.
I love this idea.
Thank you, Rachel!
HI Wendy!
What a great repurposed project for the summer! It is adorable!
Thank you, Lora. It was a fun project.
I don’t know how you do it, but I’m always amazed at your creative projects Wendy! Your garden easel with flowers is just gorgeous!
Lol, I am a bit tired today… just saying. :)))
Wendy, what a beautiful and clever project! It’s so striking in your garden with the colorful petunias! Thanks so much for the inspiration! Just lovely! I’d love to share this in my weekly roundup post this weekend!
This is so pretty and clever! I’m featuring this on the Sundays on Silverado link party tomorrow! Thanks for sharing.
Niky @ The House on Silverado
Thank you NIky, I am honored to be featured on your LInk party.
This is such a fun idea, Wendy. I love old picket fences and have a section I found years ago at a junk yard/dump. I love them, and actually this fencing is still in good shape. Love your creativity to turn this into an adorable easel. Great job. Thanks so much for sharing this at All About Home, I’ll be sharing this at the Link Party on Monday evening!
Hi Debra, I am glad you enjoyed my post about the old fence. I hope you can find some time to create one for yourself. I am honored to be shared on your Monday’s link party. I will be sure to link up again tomorrow.
Wendy, this is beautiful and a great way to upcycle.
Unfortunately, we rarely have any good pieces for picking like this in our neighborhood.
The flowers are so pretty.
Thank you, Cindy. It is not often that I run across such a great find. Thank you for your sweet comment.
This project pretty much blew my mind! So creative, Wendy!
You crack me up, girl. I can’t wait to hang out with you in two weeks!
Thank you so much, Diane. You are always such a supportive friend! I appreciate you.
This is the cutest thing since the color pink! I love it and can hardly wait to make it. Thank you for linking up on Farmhouse Friday. I’ll be featuring this tomorrow. Hope you link up again soon. pinned
Thank you so much Cindy, I love your comment, you are so cute. Such a pleasure to post for your link party. I will be back.
Woo hoo! I am so excited to feature this post on the Fabulous Friday Link Party this week. I love this idea. Hugs to you.
Thank you Renae, I am so excited. Love your link party!!!!
Wendy, this is such an adorable planter! You are so creative. I need one of these for my garden. Thanks for sharing the tutorial.
Thank you Mary! I hope you find an old fence to whip one up real soon. If not, you could always use new posts.
Thank you so much for the share. Happy Fourth of July.
Wow Wendy – that’s a great idea, and it turned out so darling! Thanks for the detailed tutorial, and hope you have a lovely long weekend!
Thank you so much, Barbara. I am excited to join your beautiful blog. Your friend’s birthday party was truly unique—what a lucky friend.
I hope you have a wonderful long weekend—happy 4th of July.
Omgoodness, be still my picket lovin’ heart!! We have made many picket fence projects over the last few years because I just love them! In fact, just today a new picket fence project post is going live! Your idea is so unique Wendy – I have enough pickets to make one for our yard! Thanks so much for the idea!?
You are so cute! I cannot wait to see your picket fence project. I am headed over to your blog right now.
I assume you are going to Haven. I cant wait to see you!
Wendy, you are amazing! This is so cute! I love seeing all of your beautiful projects!
Thank you so much, Elizabeth, same here. I love reading your blog posts.
I love this Wendy. You are so clever. I’d like to share on my Sunday post.
Hi Rachel, thank you so much. I would appreciate the share. I am so close to 10K. I can taste it. However, it seems to be moving very slowly lately.
I was going to reach out to you as well as I would like to share your easy 4th of July decorations on Saturday. I know I am late, but I have had a rough month, happy to be feeling better and back in the swing of things.
Love this idea, Wendy! Very creative. ♥️
Thank you, Kathy, it was good trash to treasure for sure!
Wendy, this project is so adorable. You can do so much with it. I love how you have a flower box on the shelf. Darling!
Thank you so much, Tammy. It is a fun project that I can do a lot with. There is just something about upcycling that I love.