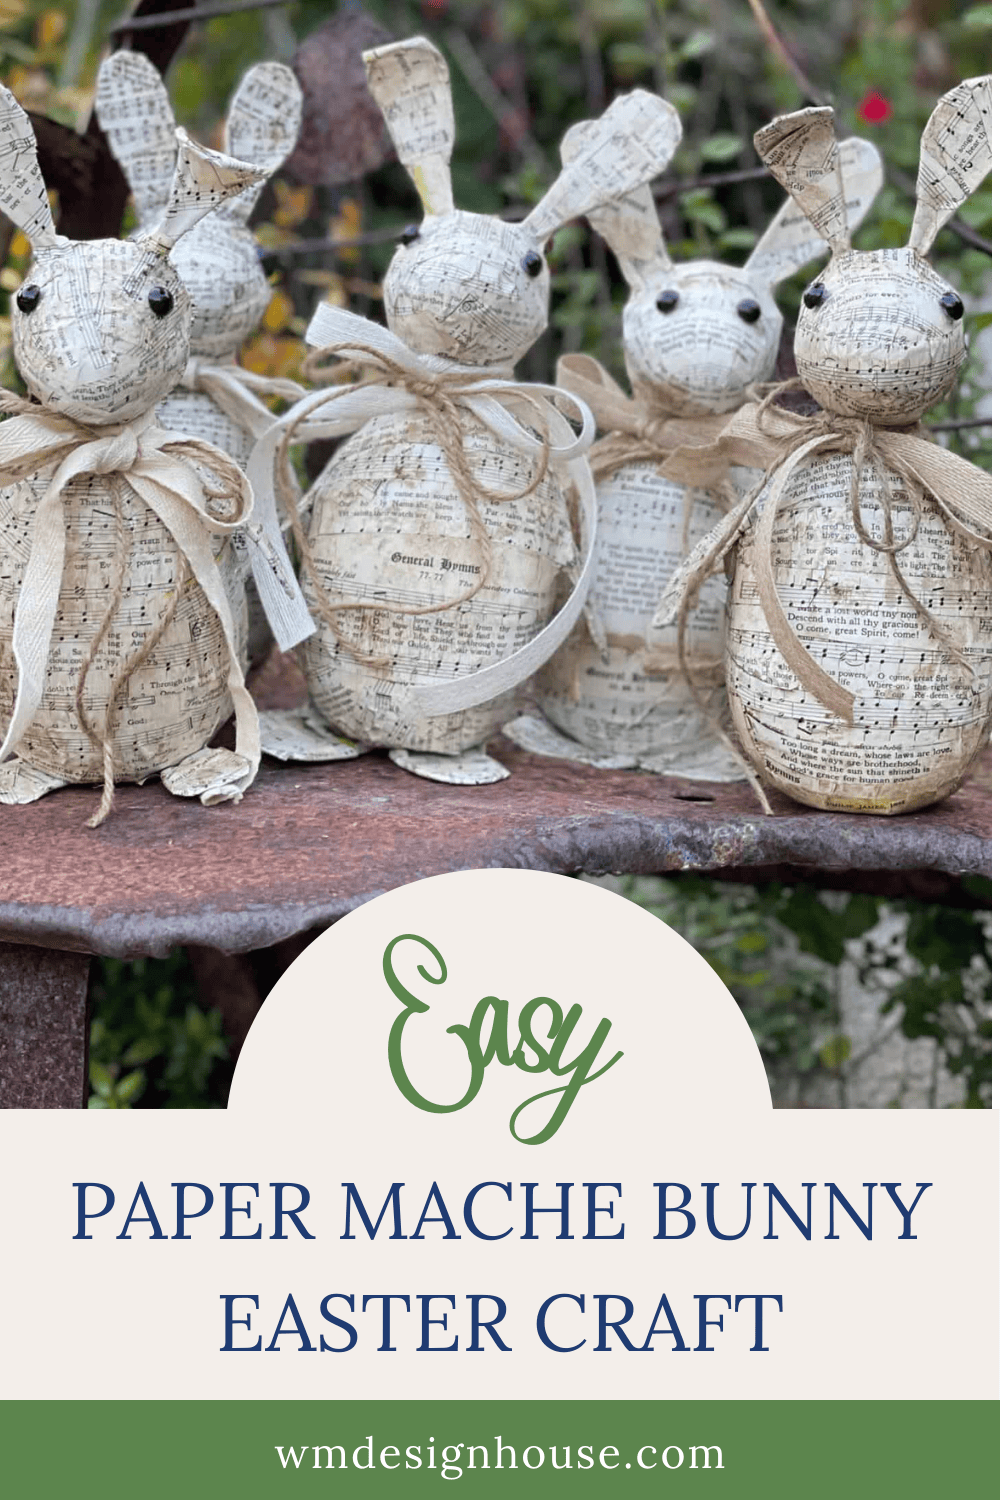
How to Make an Easy Paper Mache Easter Bunny with Vintage Sheet Music
Learn how to make a charming paper mache Easter bunny using hymnal sheet music, wire, and Mod Podge.
On my blog WM Design House, I may sometimes use affiliate links, which means a small commission is earned if you purchase via the link. The price will be the same whether you use the affiliate link or go directly to the vendor’s website using a non-affiliate link. Read my full disclosure policy here.
DIY Paper Mache Easter Bunny with Hymnal Sheet Music
With Easter quickly approaching, it’s time to start thinking of ways to spruce up your home for the holiday.
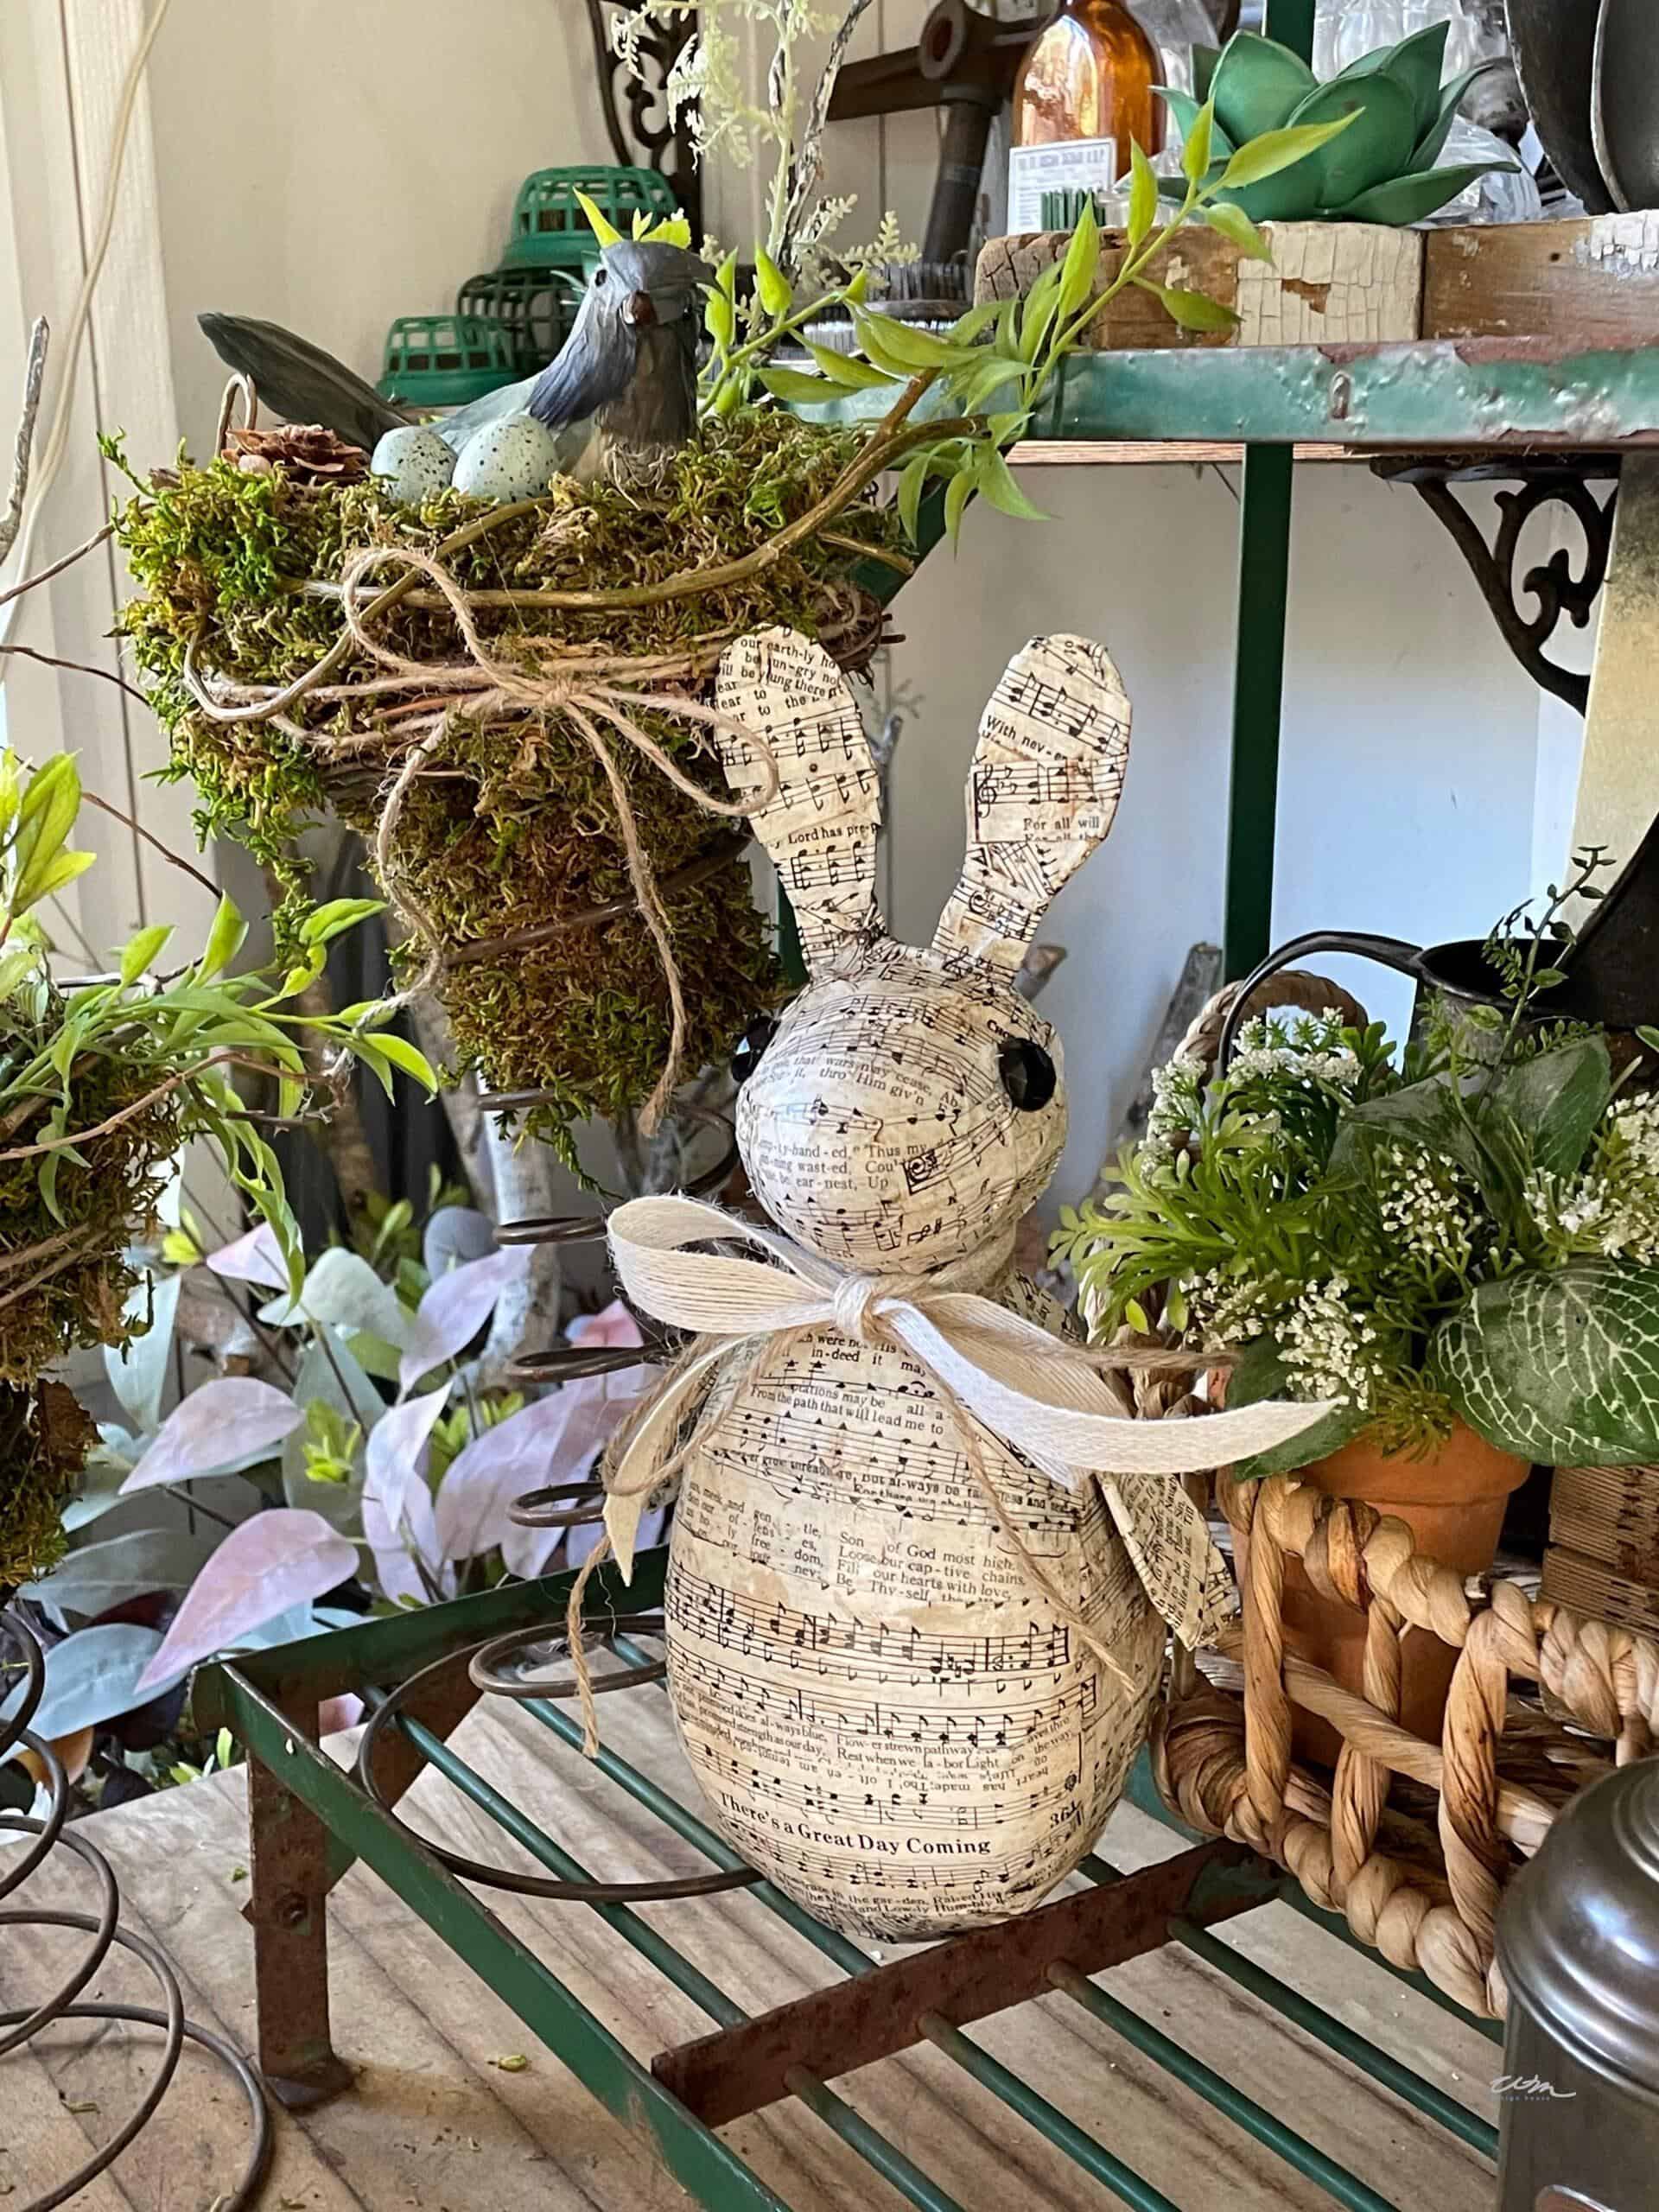
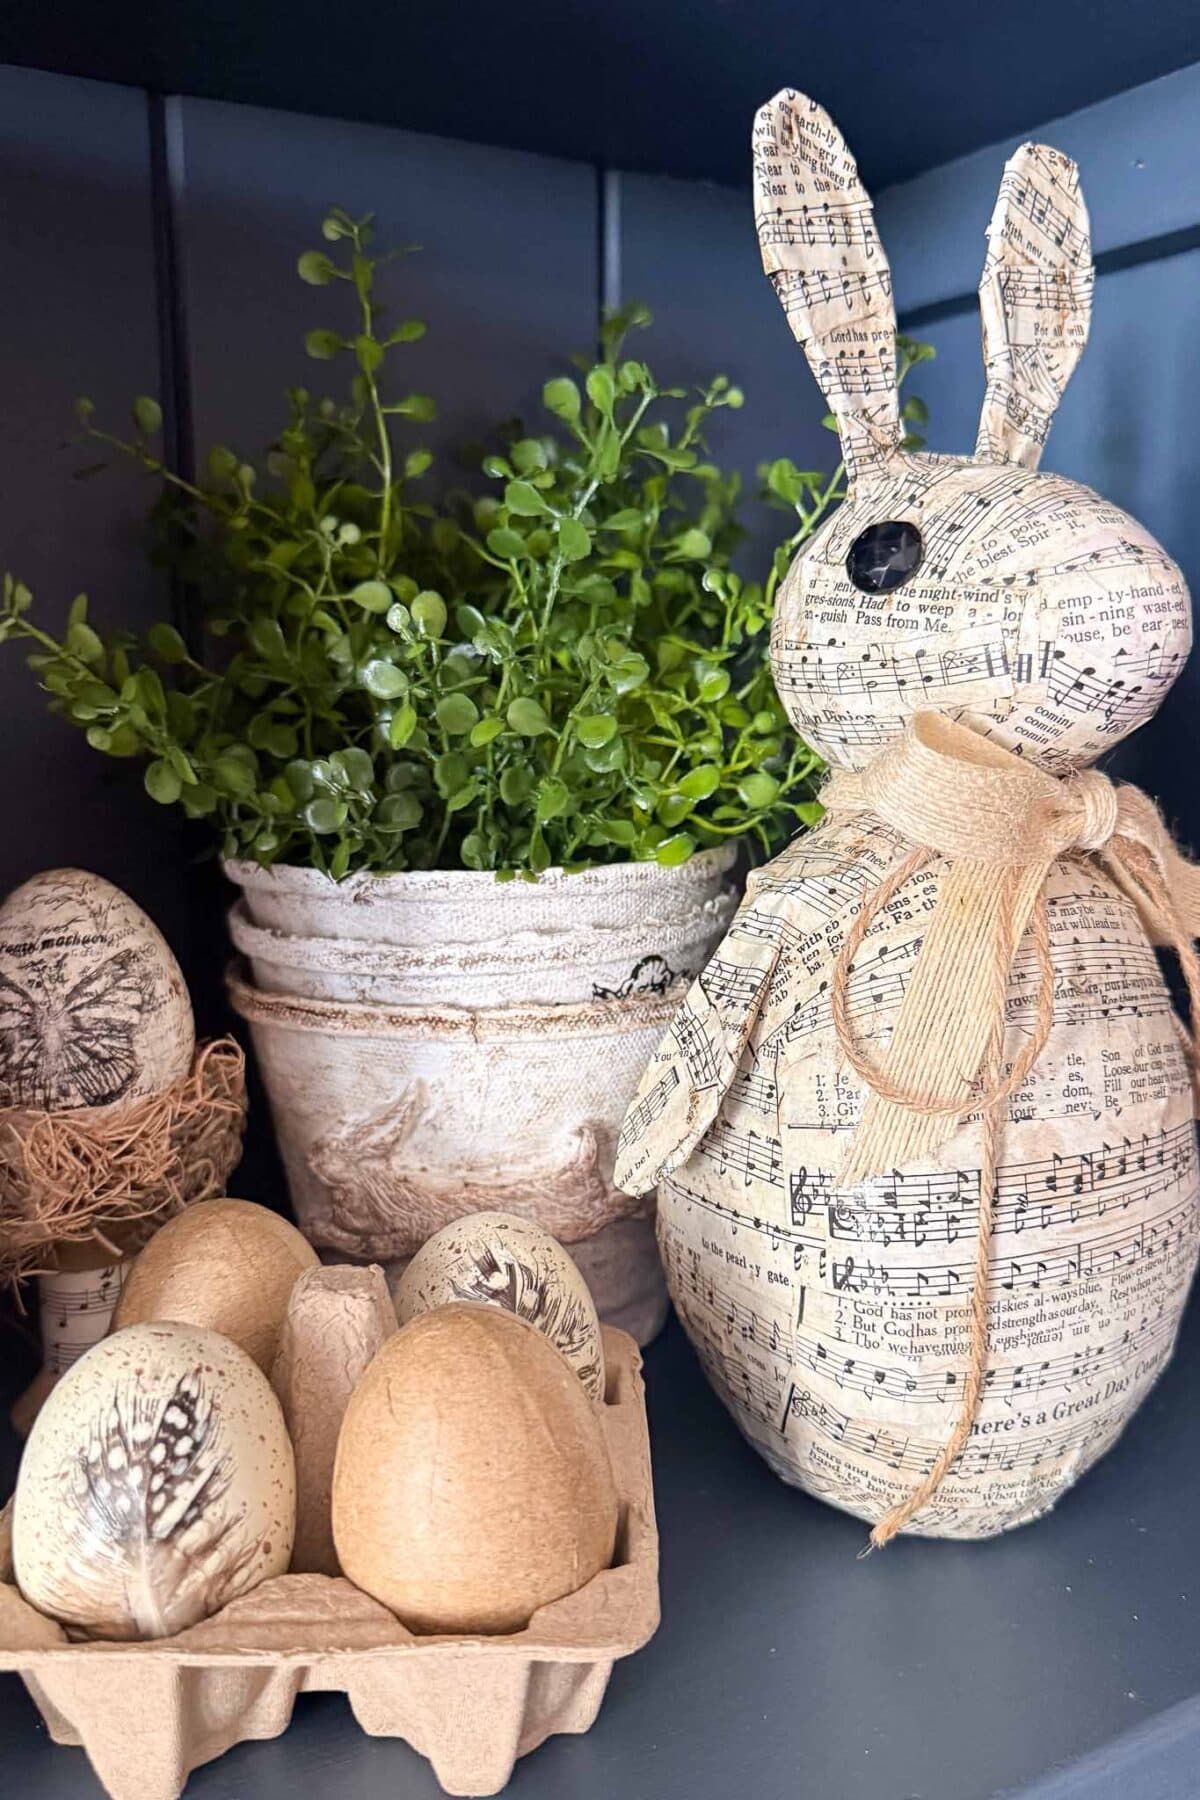
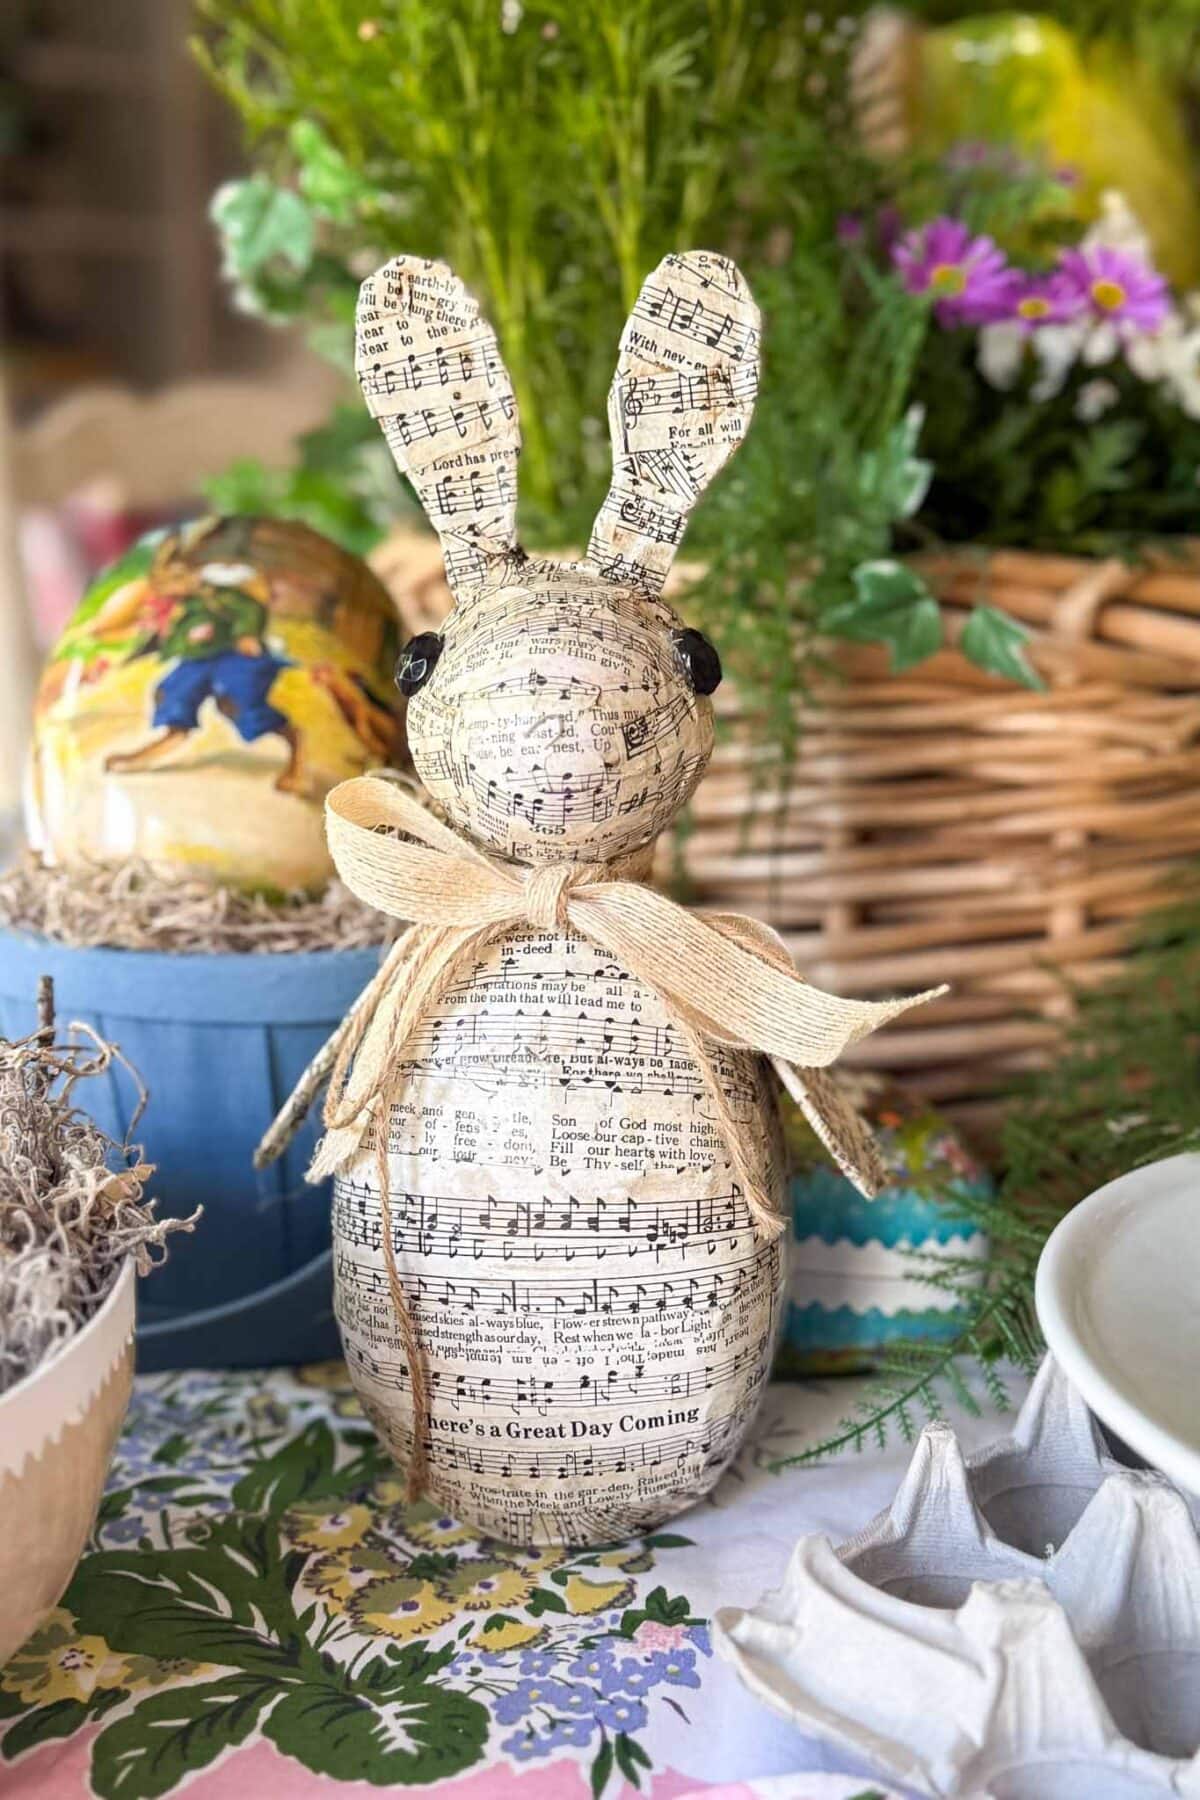
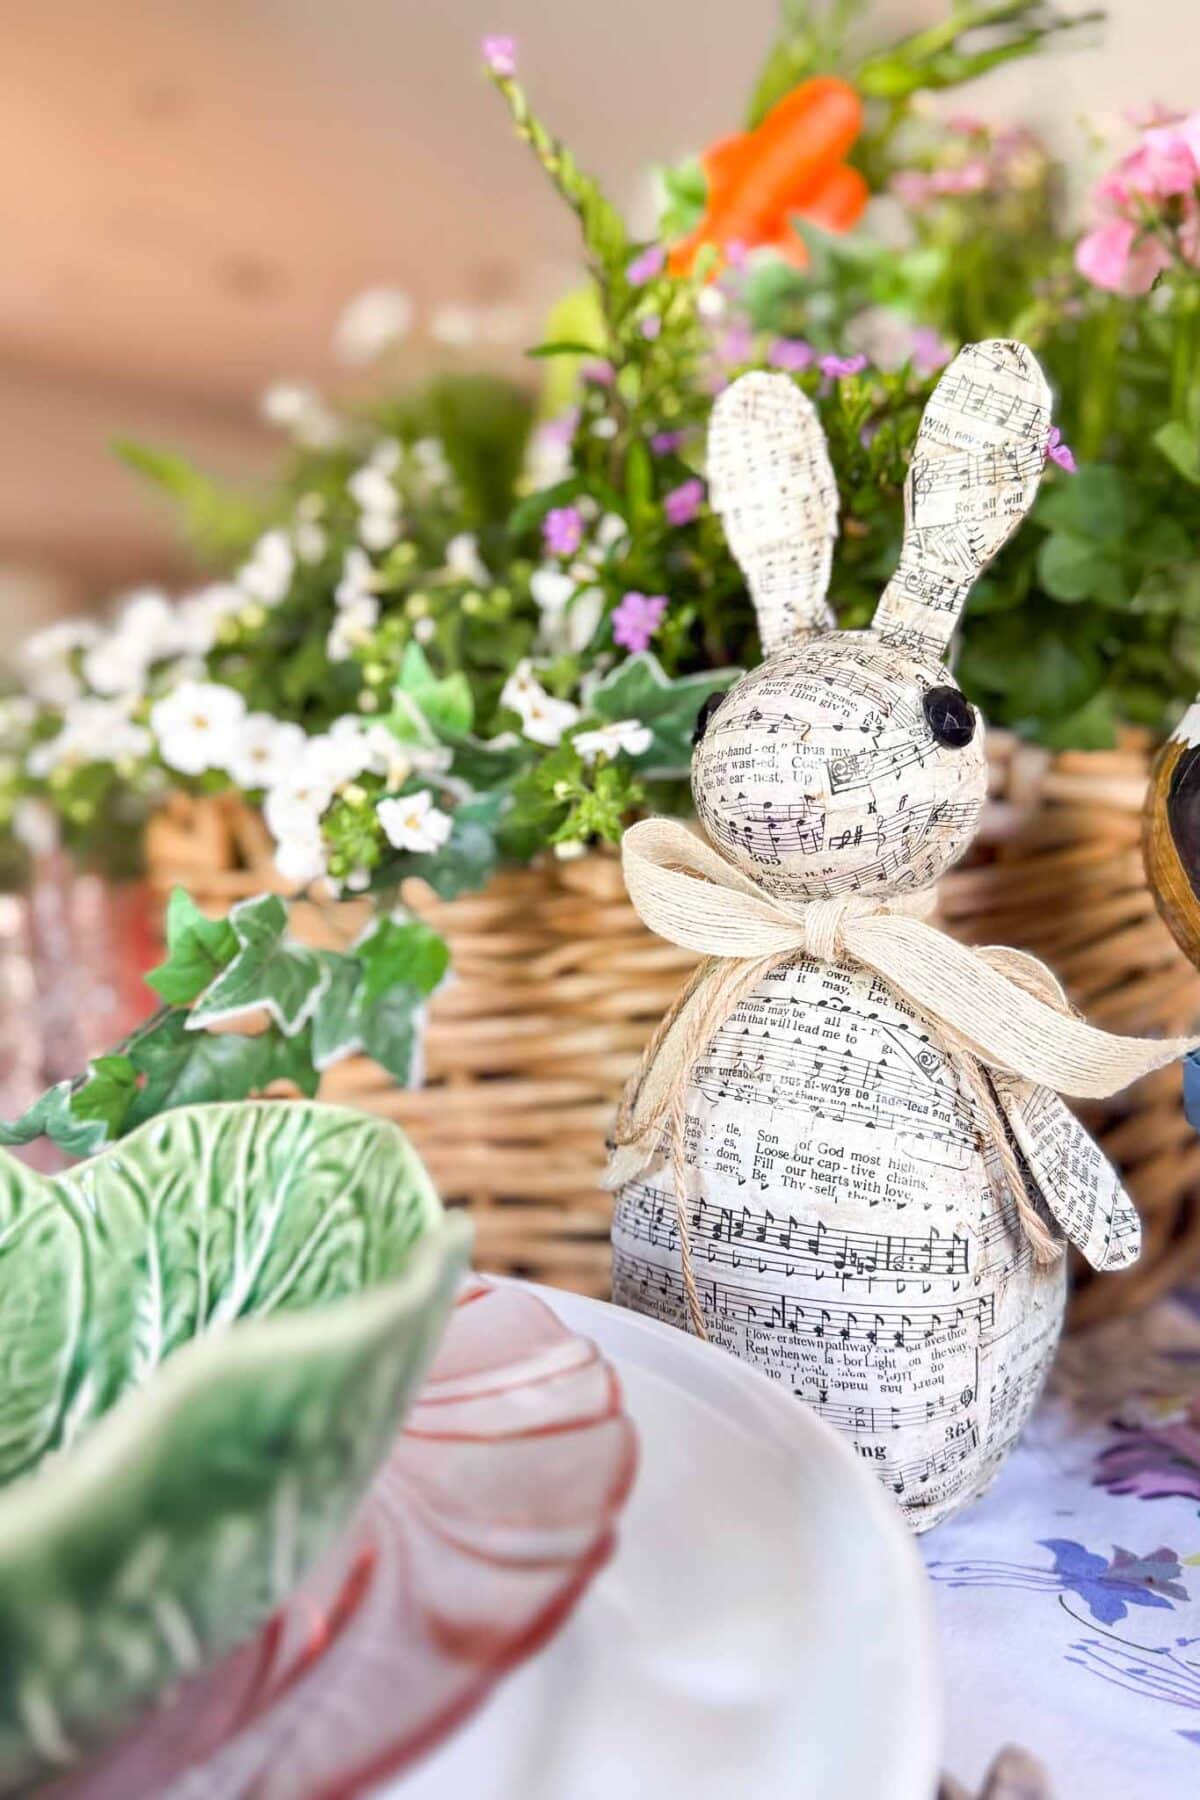
If you’re looking for a truly unique Easter craft this spring, this paper mache Easter bunny is the one. Made from simple paper mache egg forms, soft craft wire, and pages torn from an old hymnal, this little bunny has the most wonderful vintage feel. Like something you’d find tucked away in a charming antique shop.
The best part? You don’t need any sculpting skills or special art training to pull this off. If you can tear paper and dab on some Mod Podge, you can make this. The hymnal sheet music gives the finished rabbit a warm, sepia-toned look that fits beautifully into spring and Easter decorating, and the dark wax finish makes it look like a treasured piece you’ve had for years.
Keep reading on for all the steps needed for this cool craft that’s sure to make some hoppy additions around your house this Spring!
Why You’ll Love This Paper Mache Easter Bunny Craft
It looks store-bought, but costs almost nothing
Most of the supplies for this paper mache bunny are dollar store finds or things you may already have on hand. The result looks like expensive vintage dé\ecor without the price tag.
No special skills required
This is a truly beginner-friendly papier mache project. The steps are simple and forgiving.
The vintage look is timeless
Unlike bright pink or pastel Easter crafts, this hymnal sheet music bunny has a neutral, aged look that works with farmhouse, cottage, and classic home styles. You can even display it beyond Easter as general spring decor.
Supplies Needed to Make a Paper Mache Easter Bunny
- 1 large paper mache egg (approximately 6 inches). I found mine at IKEA, but you can also find unfinished paper mache shapes at Michaels or on Amazon
- 1 large plastic egg (approximately 3 inches). Dollar Tree works perfectly
- Soft craft wire
- Masking tape
- Pages from an old hymnal or sheet music
- Mod Podge
- Foam brush or paintbrush
- Hot glue gun and glue sticks
- 2 small black buttons (for eyes)
- Ribbon to tie around the bunny’s neck
- Dark wax for antiquing. I used Annie Sloan’s furniture wax

Tip from wendy’s craft room:
One of my favorite places to find old hymnal music is eBay. Just search “vintage hymnal,” and you’ll find plenty of affordable options. You can also check your local thrift store, vintage shop, or estate sale. You never know what you’ll discover!
How to Make a Paper Mache Easter Bunny with Sheet Music
Step 1: Prep and Assemble Your Egg Body
Start by taping the seam of your large paper mache egg with masking tape all the way around.
Then, gently press down on the bottom of the egg to flatten it slightly so your finished bunny will sit upright on a shelf or table without tipping.
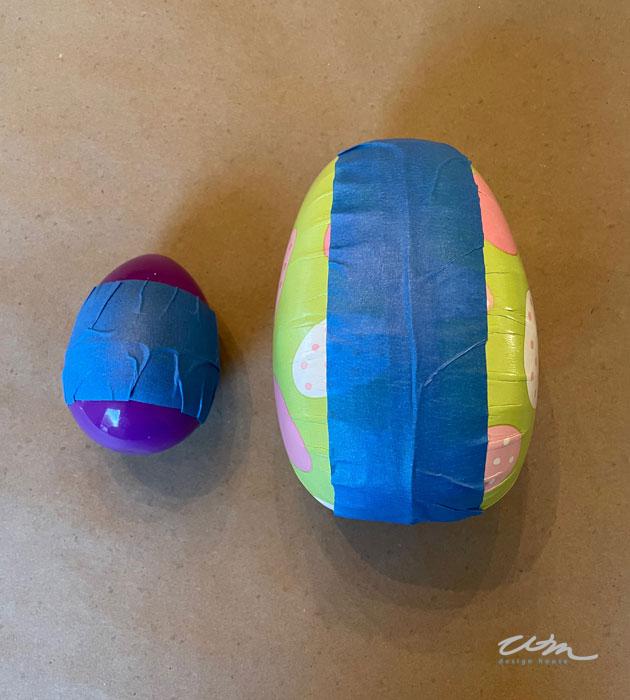
Next, wrap your smaller plastic egg with masking tape. This will help the Mod Podge and paper strips adhere to it later.
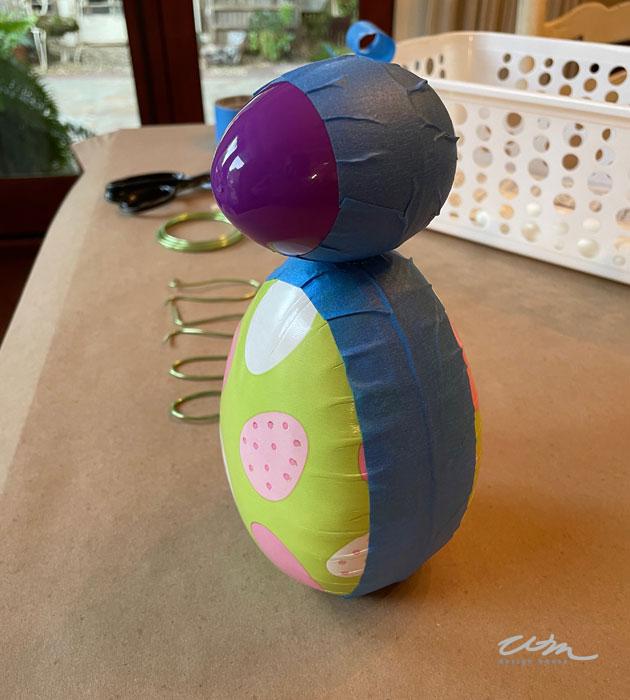
Hot glue the small plastic egg onto the narrow top end of the large egg to form the bunny’s head. Once the glue is set, reinforce it with additional strips of masking tape for extra security.
Tip from wendy’s craft room:
Don’t stress too much about making the two eggs look perfectly proportioned at this stage. Once you build up the paper mache layers, it will all come together.
Step 2: Shape the Wire Ears, Arms, and Feet
Cut a length of soft craft wire and bend it into an ear shape. Make sure to leave about a half-inch of extra wire on each end so you can glue and tape the ears securely to the top of the bunny’s head.

Make both ears before attaching them so you can compare sizes and adjust as needed.
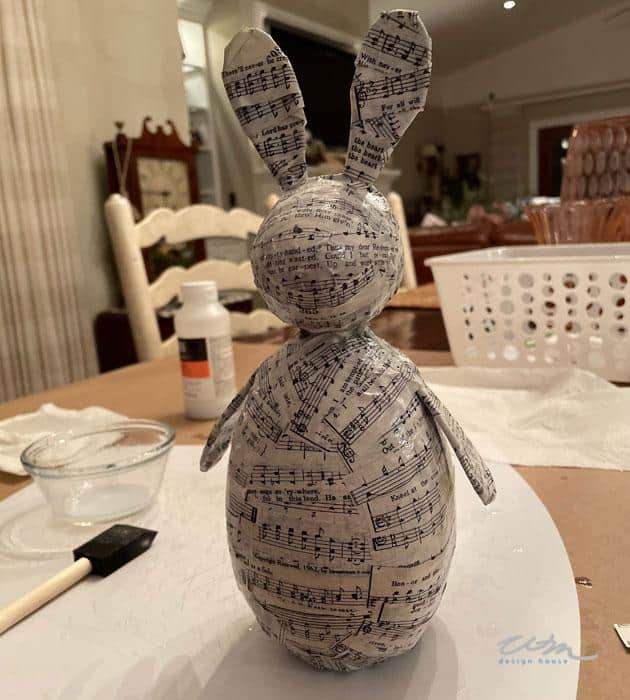
Using the same method, shape two arms to attach to the sides of the body. If you’d like, you can also add two small feet at the base — these are optional but add a lot of personality to the finished bunny.
Hot glue each piece in place, then reinforce with masking tape.
Step 3: Tear and Prep your Sheet Music
Tear or cut your hymnal pages into strips approximately 3 inches long and about half an inch wide.
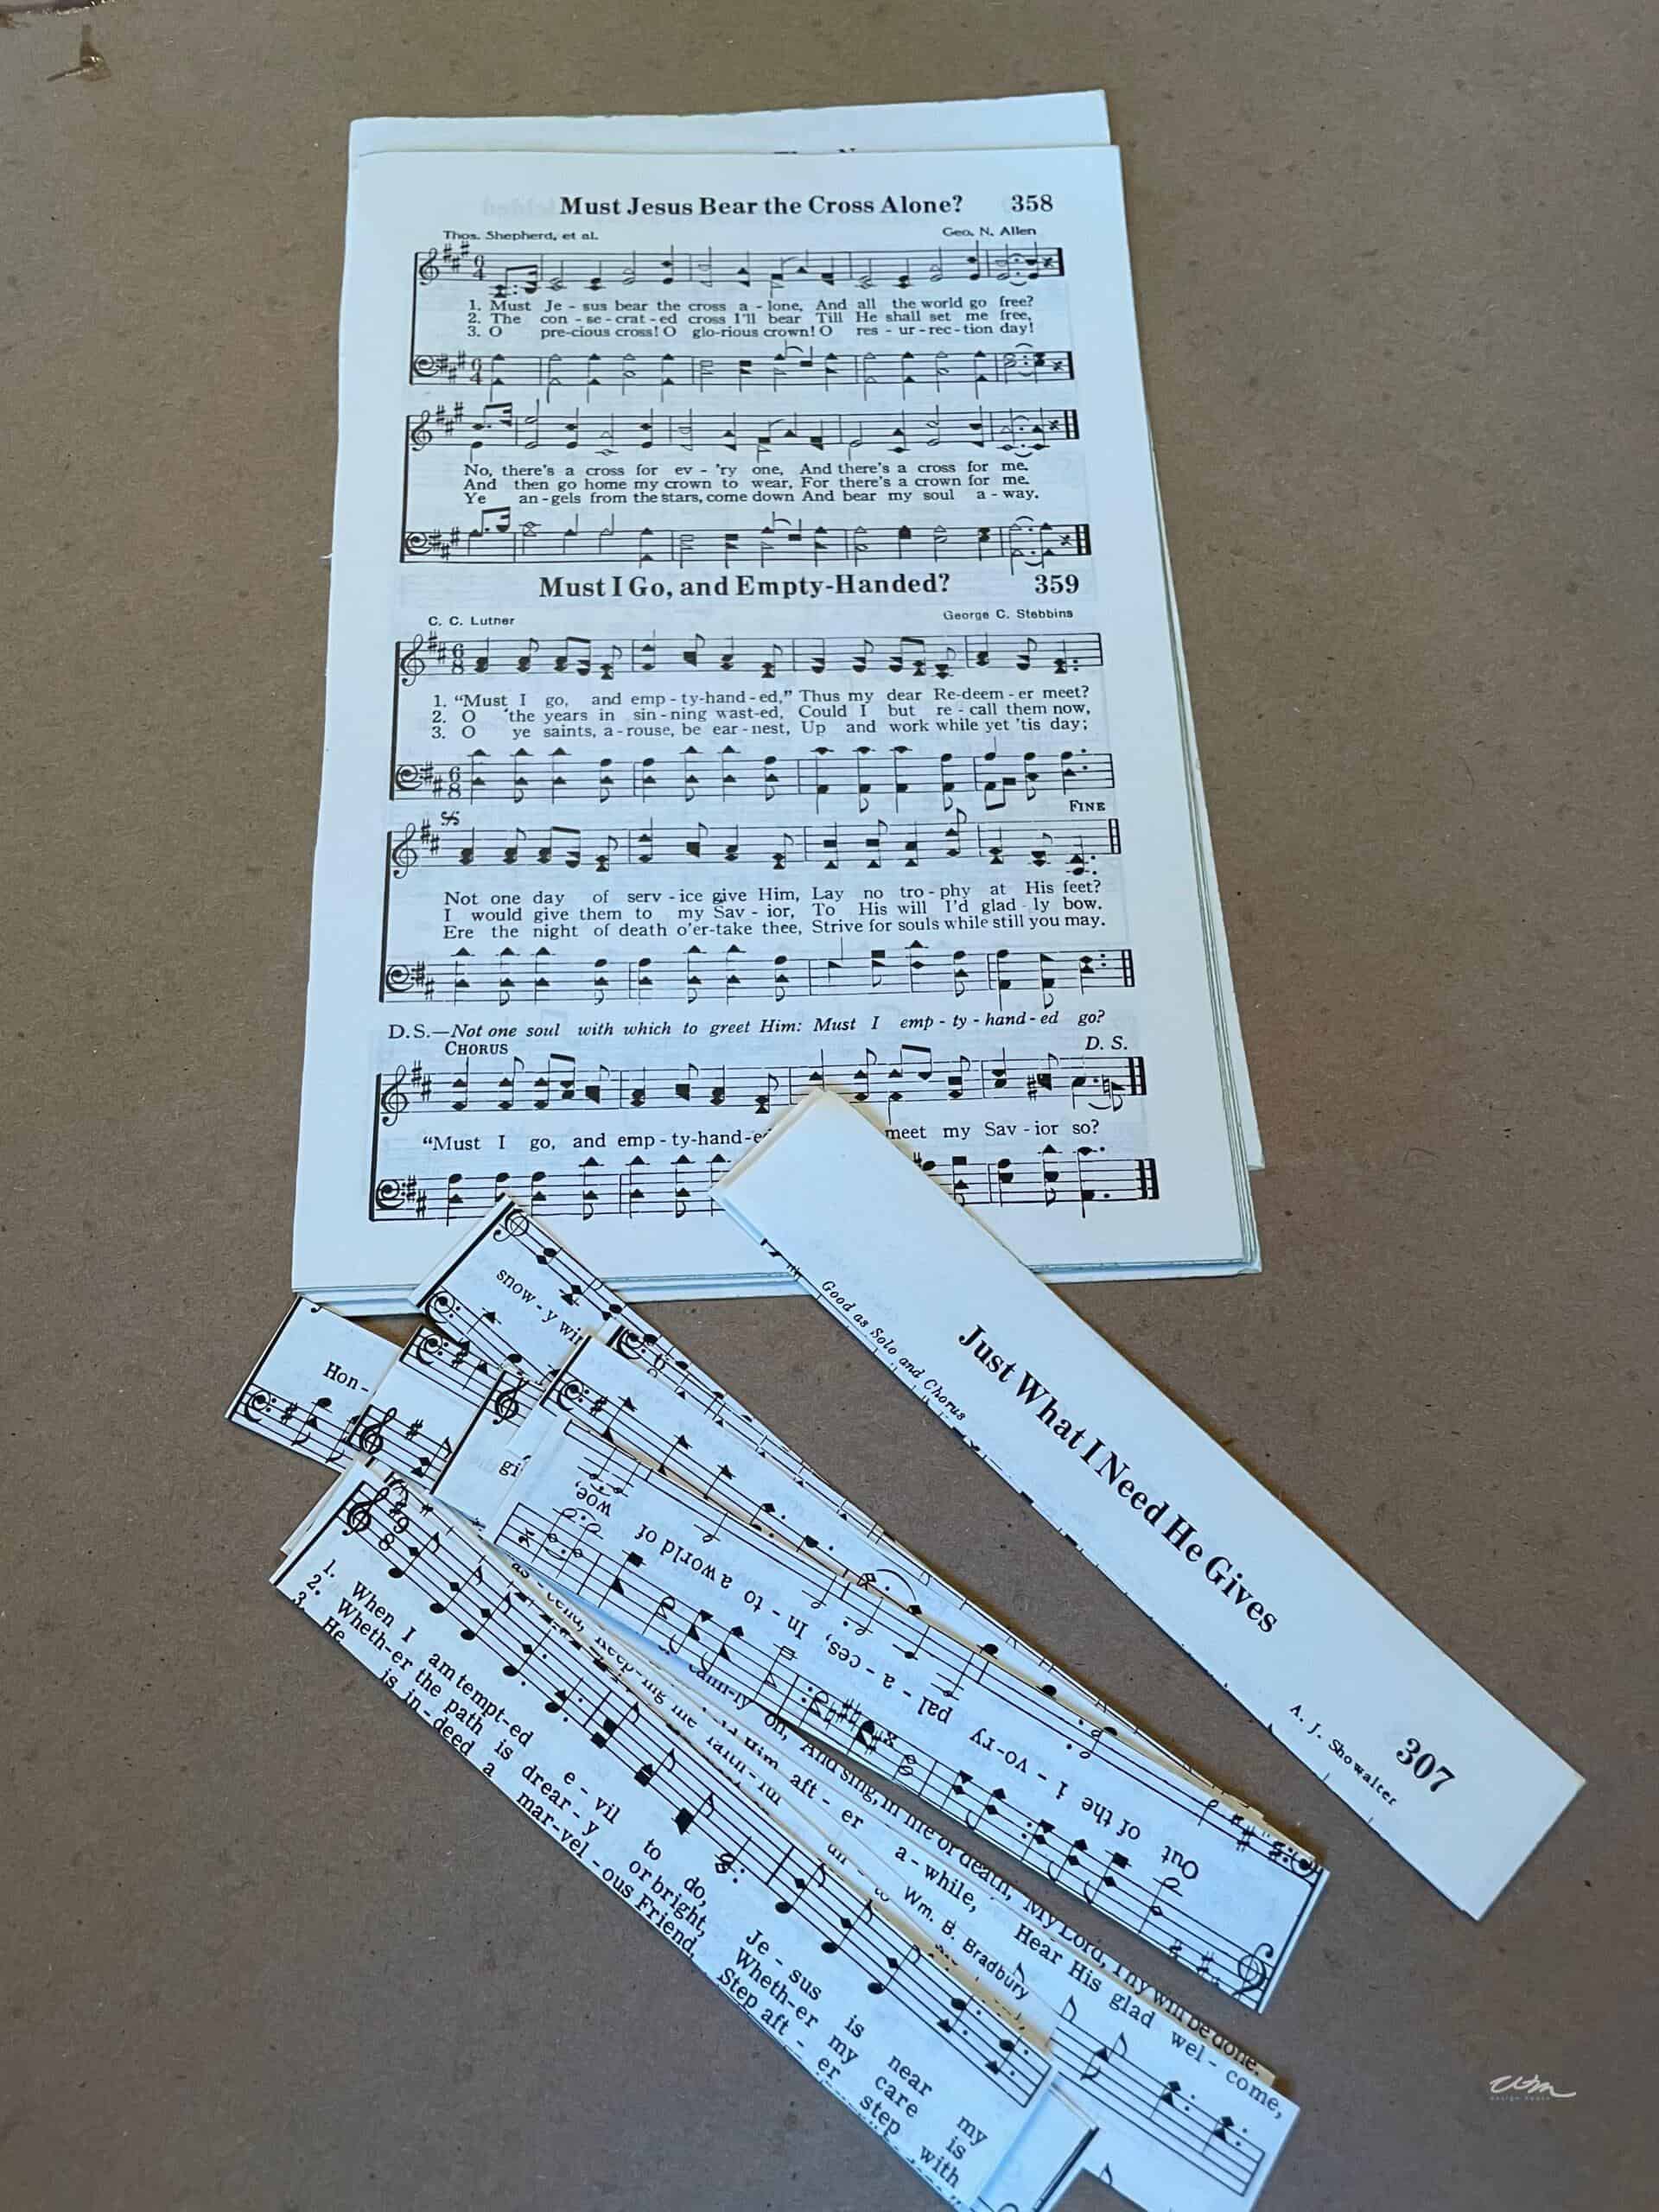
Having a good pile of strips ready before you start will make the next step go much more smoothly.
Step 4: Apply the Paper Mache Strips
Using your foam brush, paint a layer of Mod Podge directly onto the bunny’s body, then lay a strip of sheet music over it. Brush another coat of Mod Podge over the top of the strip to seal it down.
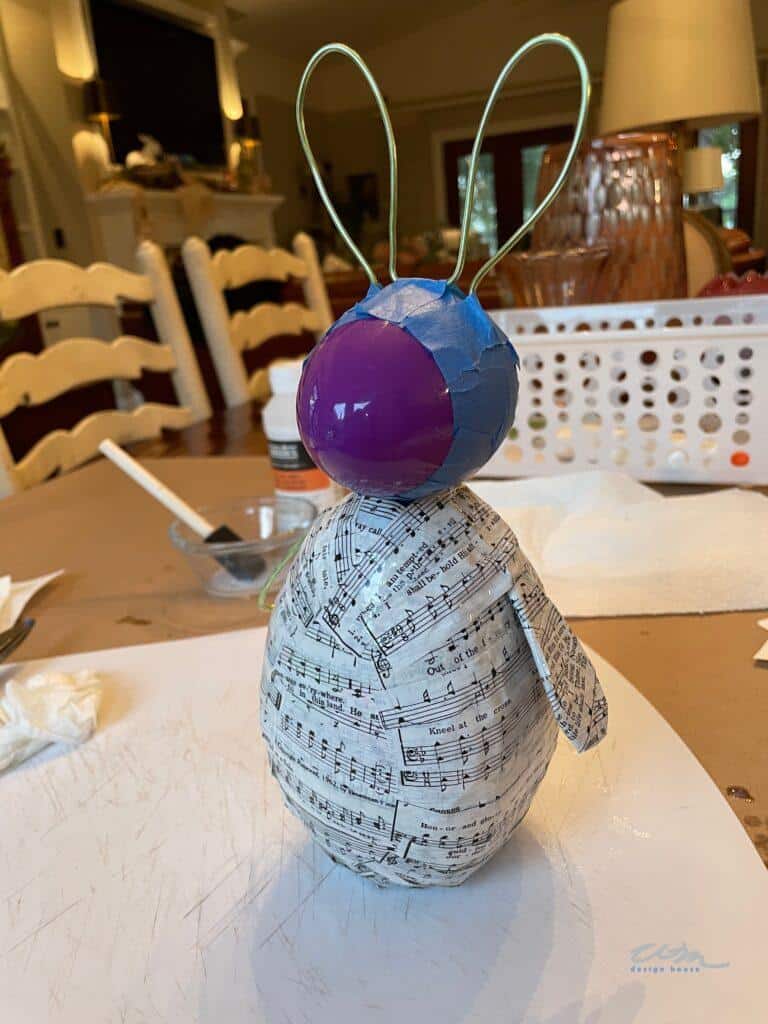
Work in sections. Do the front and back of the body first, then the sides. For the ears, arms, and legs, coat the paper strip with Mod Podge on both sides and wrap it tightly around the wire until none of the wire is showing.
For the head and neck area, use a mix of longer strips and shorter pieces. To build up the cheeks a bit, add a couple of extra layers of paper in that area. It gives the bunny such a sweet, rounded face.
Add a second layer of paper strips anywhere you can still see color from the egg or plastic showing through.
Once you’re happy with the coverage, set your bunny aside to dry completely.
Step 5: Add the Antique Finish to Your Paper Mache Easter Bunny
Once your paper mache rabbit is fully dry, it’s time to give it that gorgeous vintage look with a little dark wax.
Using a dry brush with just a small amount of dark furniture wax, lightly paint the wax onto the surface of the bunny.
Then, using a clean, dry cloth, rub and blend the wax until you get the depth and aged look you love.
If you choose to antique him, use a dry brush with very little dark wax and paint it onto the rabbit. Using a clean dry cloth, rub the wax until you get the look you want.
Tip from wendy’s craft room:
Less is more with the dark wax. You can always add more, but it’s trickier to remove. If you do get too much in one spot, dab a tiny bit of clear wax onto a rag and gently buff it back. Once the wax has dried, you can buff the surface lightly for a soft, subtle sheen.
Step 6: Add the Finishing Touches
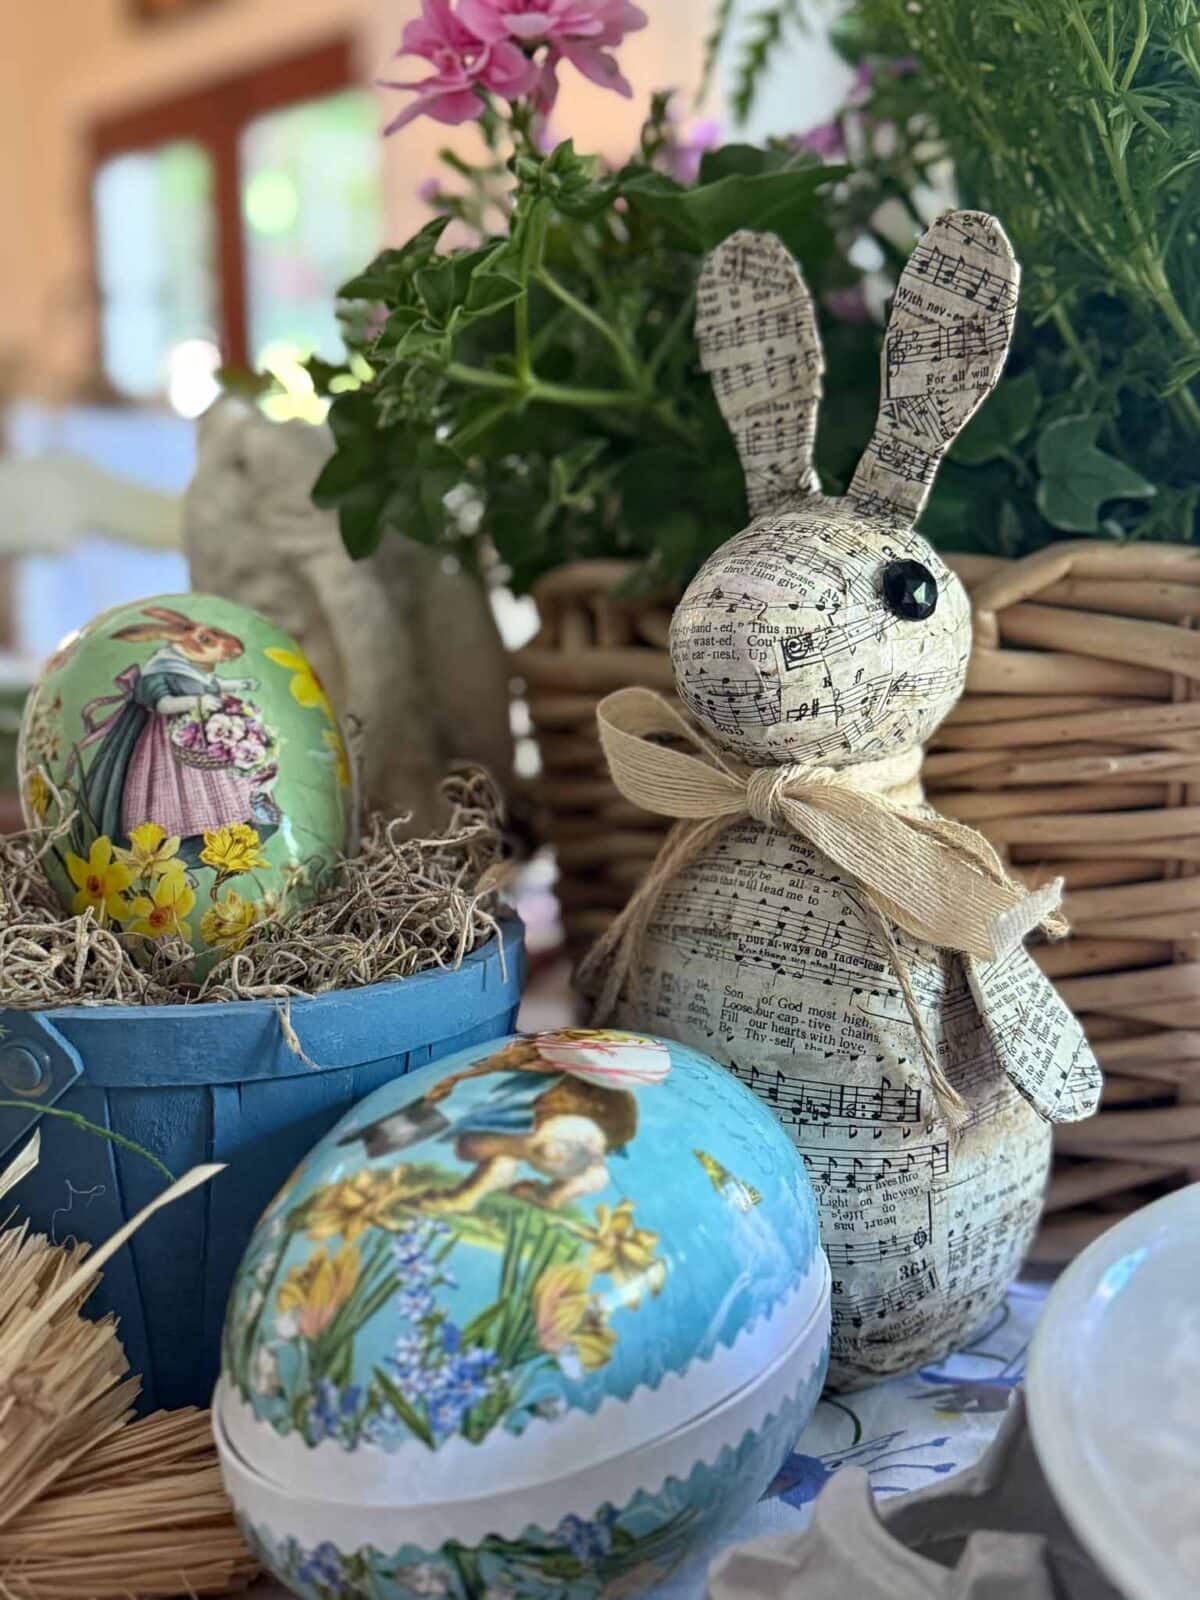
Hot glue your two small black buttons onto the sides of the bunny’s head for eyes. Tie a pretty ribbon around his neck. I love using a simple bow with a slightly worn or natural-fiber ribbon to keep the vintage feel going.
And just like that, your vintage paper mache rabbit is complete!
Creative Ways to Display Your Paper Mache Easter Bunny
This vintage-style papier mache rabbit is so versatile when it comes to decorating. Here are a few ideas to style him in your home:
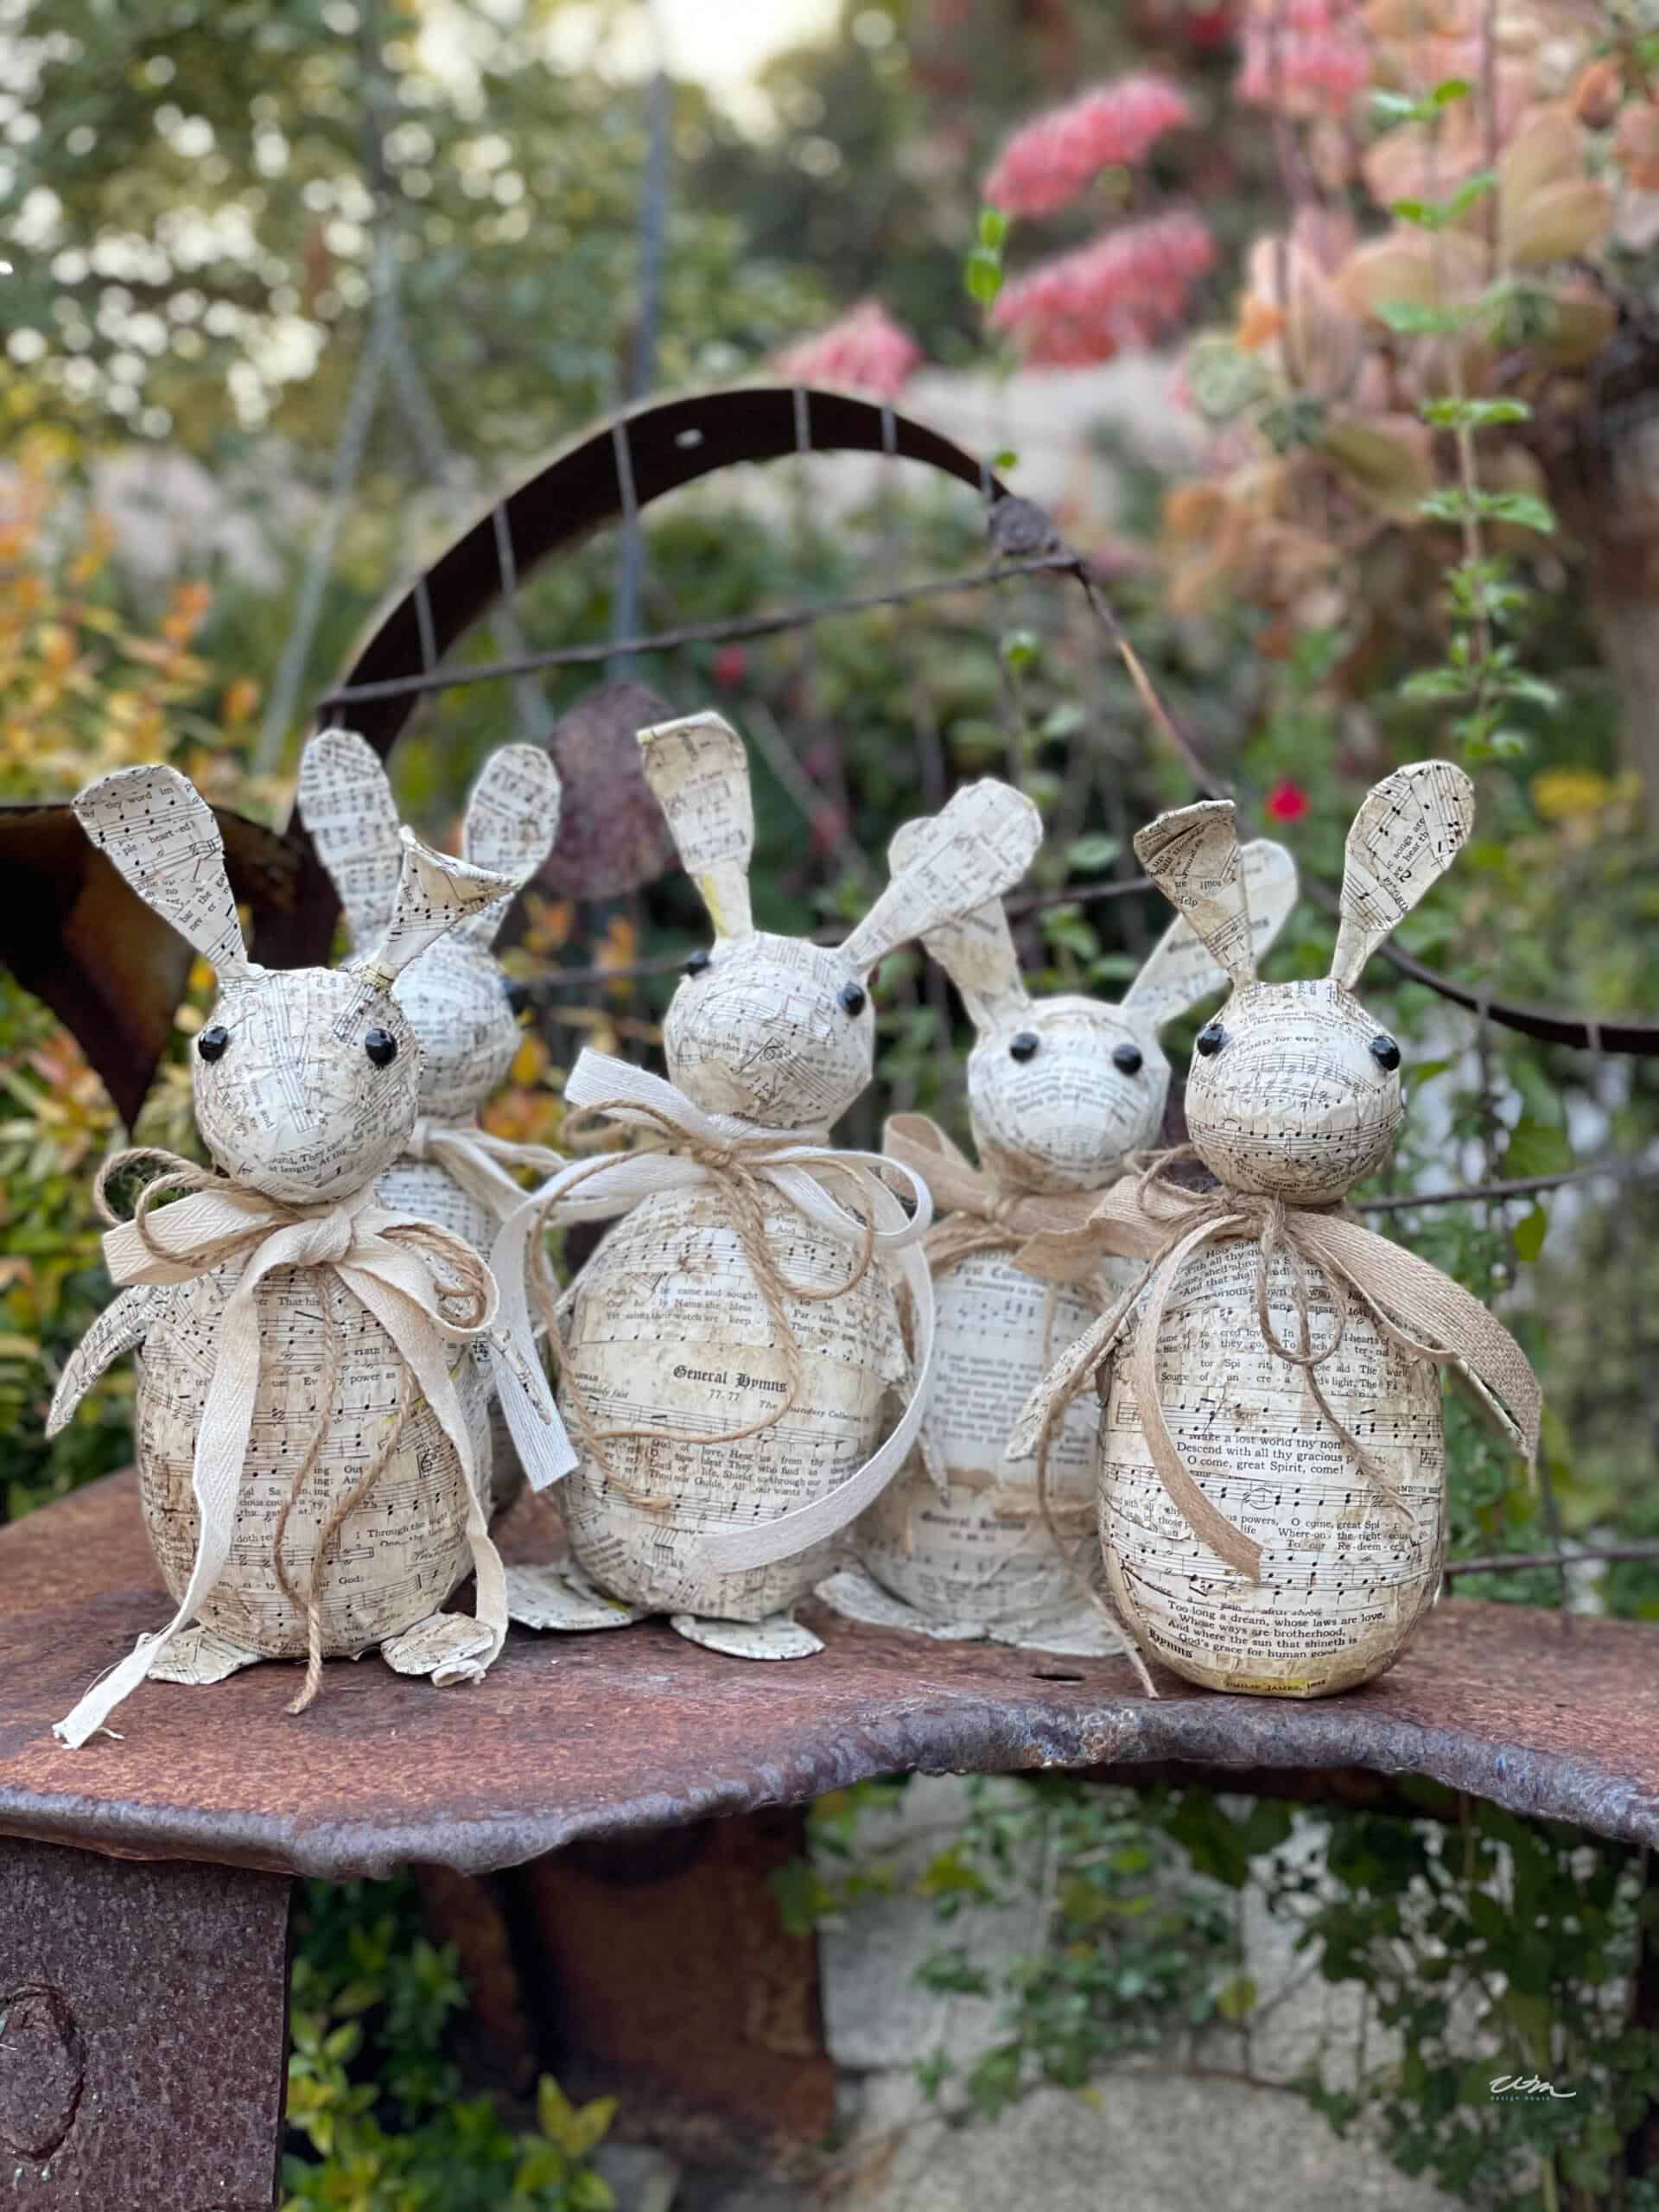
- On a bookshelf or mantel: Tuck your Easter bunny between some spring greenery or a few small potted plants for a simple, elegant vignette
- Inside a basket: Nestle your bunny inside an Easter basket filled with moss, eggs, or dried flowers for a charming tabletop display
- As part of an Easter tablescape: This paper mache bunny makes a beautiful centerpiece surrounded by candles, eggs, and seasonal flowers
- On your front porch: Pair him with potted spring blooms for a welcoming entryway display
FAQ
What kind of paper can I use besides hymnal sheet music?
Vintage sheet music, book pages, newspaper, kraft paper, or even brown paper bag strips all work well for paper mache projects. The hymnal music just has a particularly beautiful look for Easter because of its meaningful text and aged paper tone.
Do I have to use dark wax to antique the bunny?
No. You can leave your paper mache Easter bunny unfinished for a lighter, more natural look. You could also use a light wash of brown or tan craft paint to add subtle aging if you don’t have furniture wax on hand.
How long does this paper mache Easter bunny take to make?
Plan for about two to three hours of active crafting time, plus drying time between steps. The Mod Podge layers need to dry fully before applying the wax, so I like to make this over the course of a day or an evening and the next morning.
How to Make an Easy Paper Mache Easter Bunny with Vintage Sheet Music
Materials
- 1 large paper mache egg approximately 6 inches. I found mine at IKEA, but you can also find unfinished paper mache shapes at Michaels or on Amazon
- 1 large plastic egg approximately 3 inches. Dollar Tree works perfectly
- Soft craft wire
- Masking tape
- Pages from an old hymnal or sheet music
- Mod Podge
- Foam brush or paintbrush
- 2 small black buttons for eyes
- Ribbon to tie around the bunny’s neck
- Dark wax for antiquing. I used Annie Sloan’s furniture wax
Instructions
- Tape the seam of the large egg and flatten the bottom so the bunny sits upright. Tape and hot glue the small plastic egg on top to form the head.
- Bend wire into ear shapes, leaving a half inch on each end to attach. Create two arms the same way. Hot glue and tape all pieces securely in place.
- Tear sheet music into strips approximately 3 inches long and a half inch wide.
- Brush Mod Podge onto the bunny, layer on strips, and brush over the top to seal. Cover the body first, then the head, ears, and arms. Add extra layers to the cheeks. Allow to dry completely.
- Apply dark wax with a dry brush and blend with a clean cloth until you reach the desired antique look. Buff lightly once dry.
- Hot glue button eyes in place and tie a ribbon around the neck.
More Easter Crafts You’ll Love
If you love this easy paper mache Easter bunny, you might also enjoy some of my other favorite Easter and spring DIY projects.

Wrapping Up
I hope you enjoyed this tutorial for how to make a DIY paper mache Easter bunny with vintage hymnal sheet music. He truly is one of my favorite Easter crafts; simple to make, beautiful to display, and full of that cozy, old-world charm I love.
If you make your own, please send me a picture at [email protected]. I’d love to see your version.
Happy Easter!


Did you make this craft?
We would love to see what you have created, so mention us @wmdesignhouse or tag us using #wmdesignhouse so we can see your creations!
More about me!

Hello, I’m Wendy – a dedicated homemaker with a deep passion for decorating, gardening, cooking, and crafting. I find joy in harmonizing beautiful elements to fashion a space that is both comfortable and inspiring. I will help you create a beautiful home, one project at a time.


Omgosh Wendy. This is adorable. I love sheet music projects & this is so creative. If I find a paper mache egg I might give this a go. Thanks for the inspiration. XO- MaryJo
How creative! I bought some old sheet music to do projects like this but haven’t done anything! I might try this one. It’s adorable!
This is so cute Wendy!! A fun project to make with kids.