Box Spring Upcycle: ( giving old mattress springs new life)
Ten creative old bed spring craft ideas to turn rusty springs into fabulous treasures for your home.
Do you have a rusty old bed spring you aren’t sure what to do with it? There’s no need to throw them away! I have a great idea, actually ten creative ideas to show you how to put them to good use.
Whether you’re a crafter looking for a DIY project or just want to find a great way to decorate your home, these ideas are sure to inspire you. So take a look and see how you can create an easy project with these old bed spring crafts!
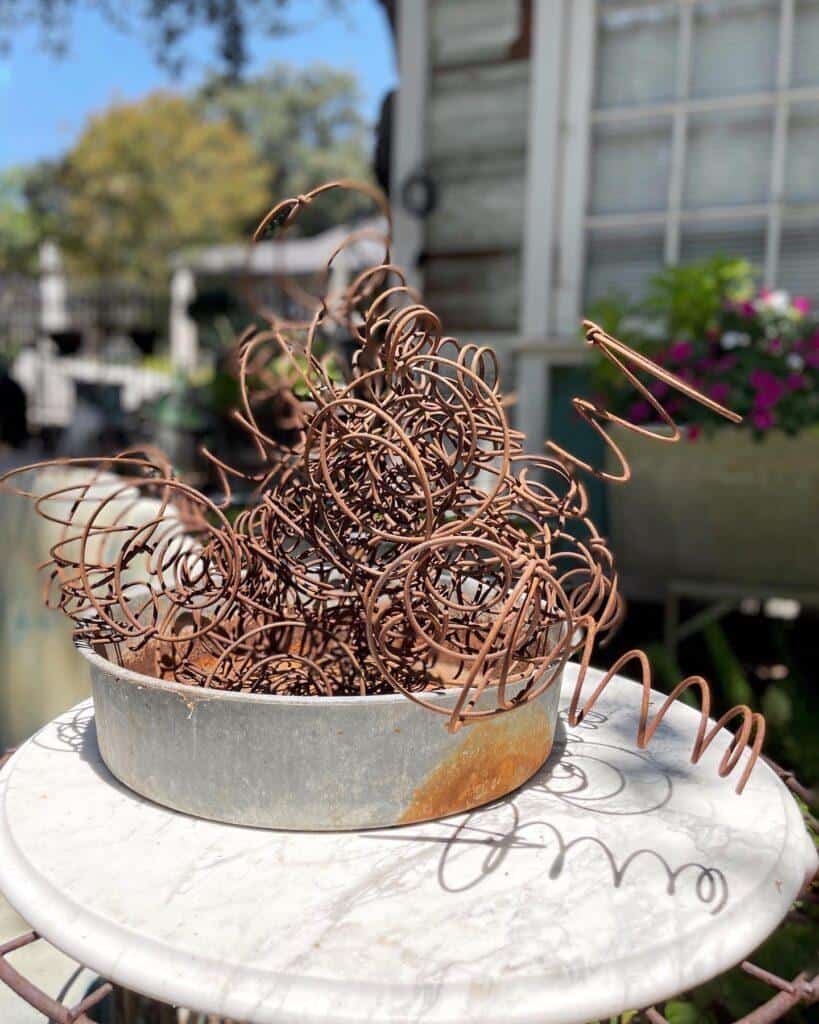
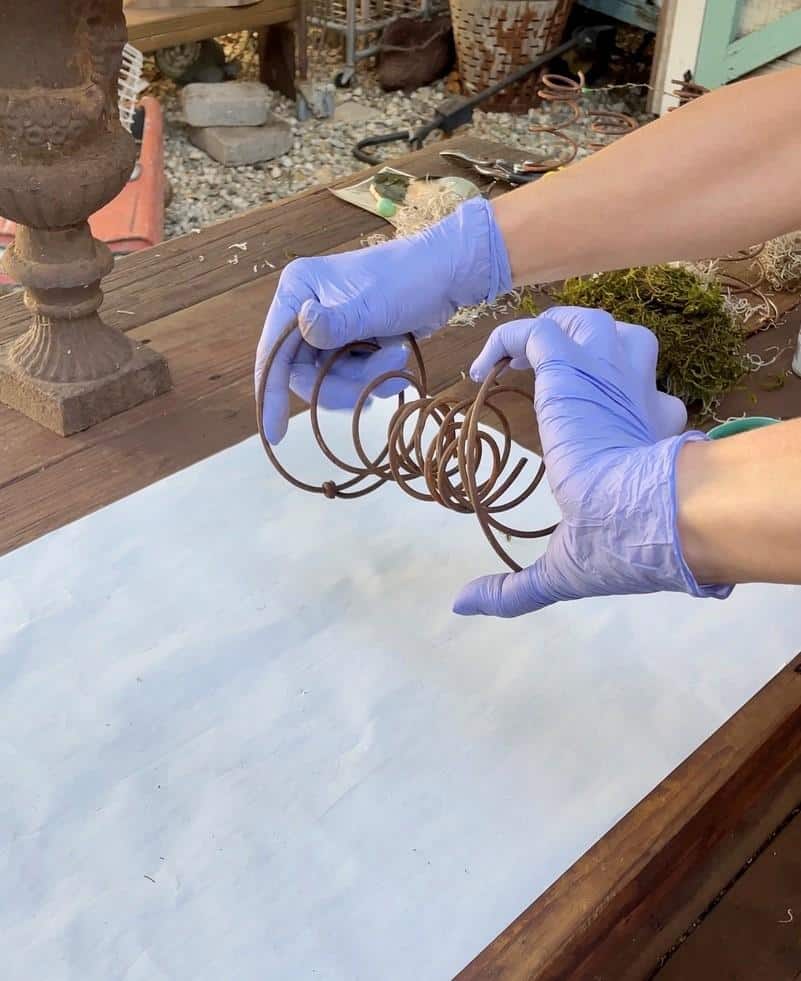
I love thrift stores, you can find the most unusual thing and it is always a joy for me to give old items a new life. I happened upon a bunch of used box springs. You have no idea how excited I was!
Do you know that box spring coils are called Bonnel Coil? such an interesting name. I did not know that until I was doing some research. These metal springs are what support us when we are sleeping. Who ever knew there were so many creative ways to upcycle them?
Where can I find old bed springs for pennies?
There are several places to look for these old springs, but here are a few suggestions.
- Local recycling center. You can find an old mattress and remove the exterior fabric and memory foam. Then you can easily soak them to become rusty, see the recipe below from farmwifecrafts.com

Rusting Solution
Equipment
- Plastic Container
Materials
- 1 Cup White Vinegar
- 1 Cup Hydrogen Peroxide
- 2 tbsp Salt
Instructions
- In a plastic container (preferably one you can throw away when finished) combine the vinegar, salt, and hydrogen peroxide.
- Add the item to the mixture.
- Let it sit in the mixture for up to 3 days, rotating if needed.
- Remove to a paper towel in a sunny location and allow to dry.
Ingredients
- 1 Cup White Vinegar
- 1 CupHydrogen Peroxide
- 2 Tablespoons salt
- plastic container
Instructions
- In a plastic container (preferably one you can throw away when finished) combine the vinegar, salt, and hydrogen peroxide.
- Add the item to the mixture.
- Let it sit in the mixture for up to 3 days, rotating if needed.
- Remove to a paper towel in a sunny location and allow to dry.
Additional places to find box springs
- Junk removal services may also have old mattresses you could take apart.
- Thrift stores are one of my favorites, you never know what you are going to find.
- Etsy- I know you can purchase them here.
- Metal Scrapyard might be another place to look for these box springs.
Giving old box springs a second life?
Here is some craft room inspiration to try.
- Make a wreath
- Put a test tube into the spring and use it as a vase
- Use the spring as a lampshade on outdoor market lights
- Use a flowerpot inside the spring
- Make Christmas trees
- Make a letter holder
- Create a bird’s nest in the spring
- Use springs for photo holders
- Place a glass votive in the spring and use it as a candle holder
- If you are lucky enough to find an old mattress of springs, use it in the garden as a trellis
- Place a spring over wine bottles and add a tag, and give it as a gift.
- Use the spring to hold a snow cone or French fries in a paper cone.
- Make a wine rack out of the box springs
Let me share three different ways I used box springs in my home.
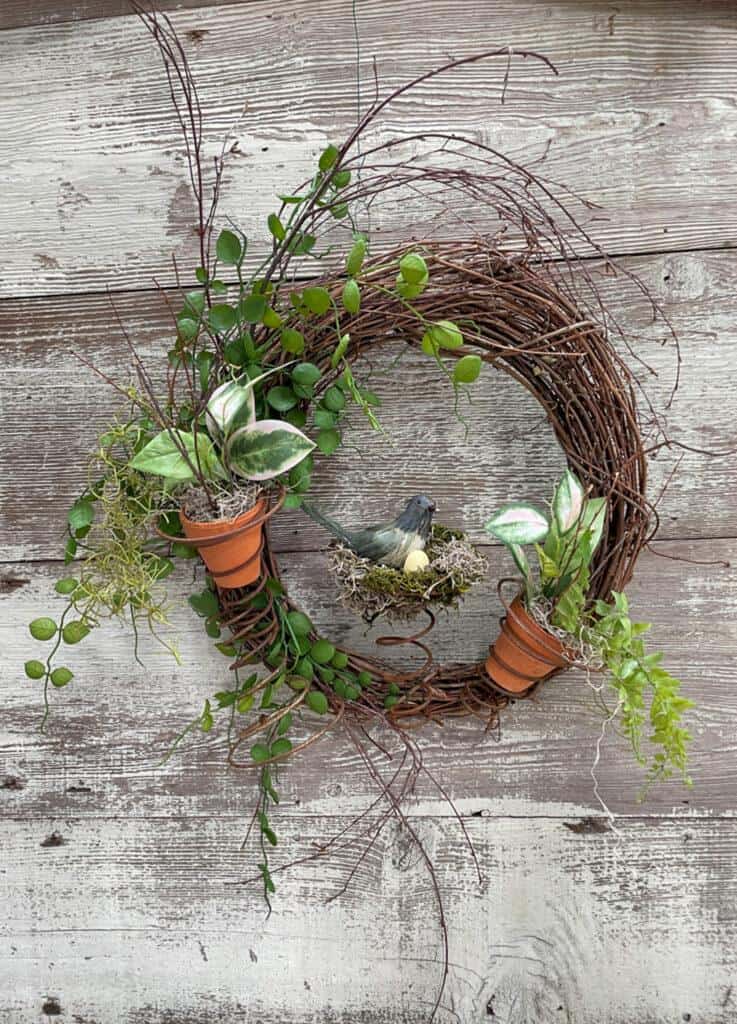
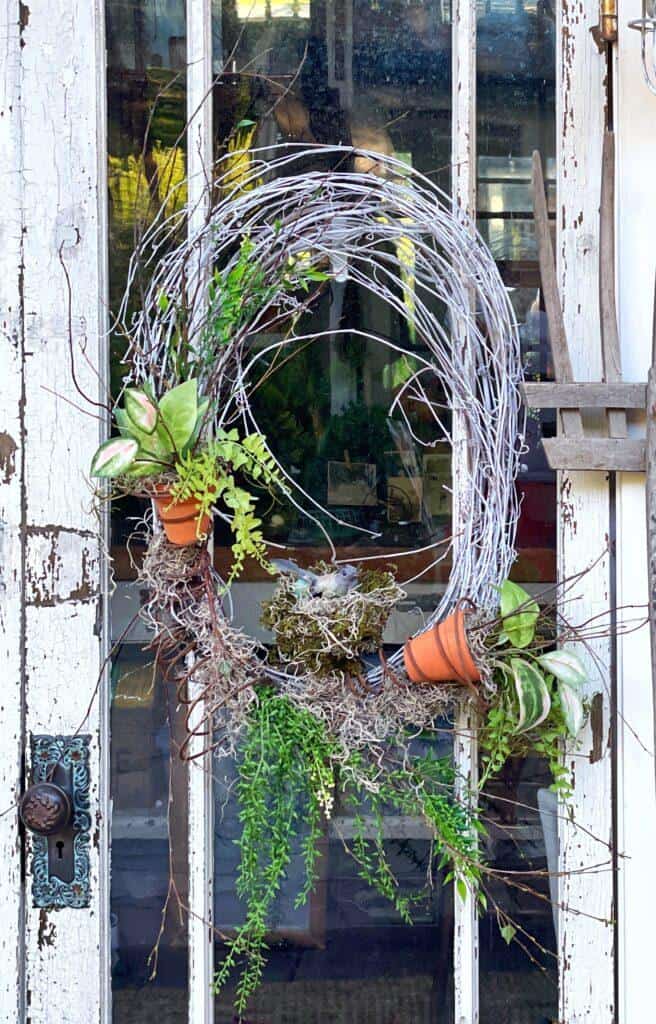
Create a Spring Wreath
Let’s make a spring wreath for our first craft idea to repurpose old bed springs. You can pick your shape and color.
Supplies to make a spring wreath:
- Grapevine wreath
- White spray paint (if you choose to paint it)
- Some birch branches (I trimmed my tree)
- Some faux greenery
- Four-bed springs
- Wire
- Wire cutter
- Glue gun
- Spanish moss
- Green moss
- Faux bird
- Faux bird’s eggs
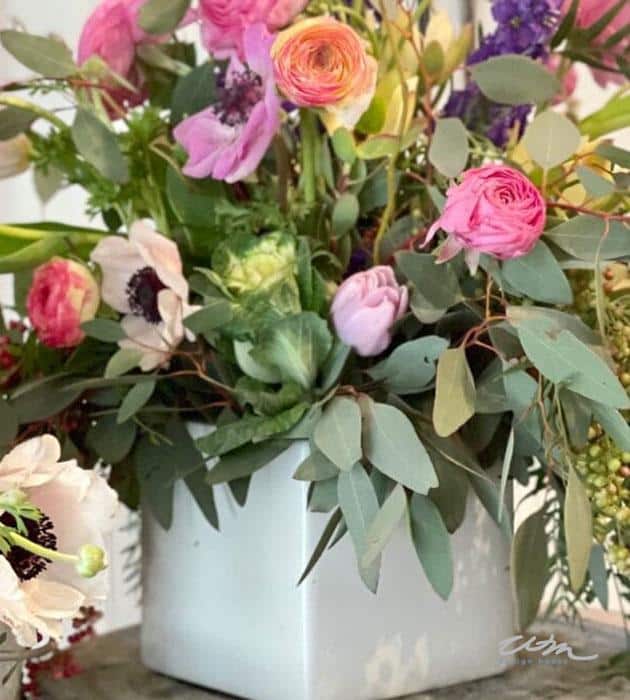
- Two small flowerpots
- Spray glue
- Two small pieces of Styrofoam
- More greenery for pots
Step-by-step tutorial to make a front door wreath
- If you would like your wreath to be white, use spray paint to cover your grapevine wreath.
- Attach the birch branches on the left side going up and along the bottom, hanging over on the right side.
- Add some faux greenery over the top of the branches in the same positions.


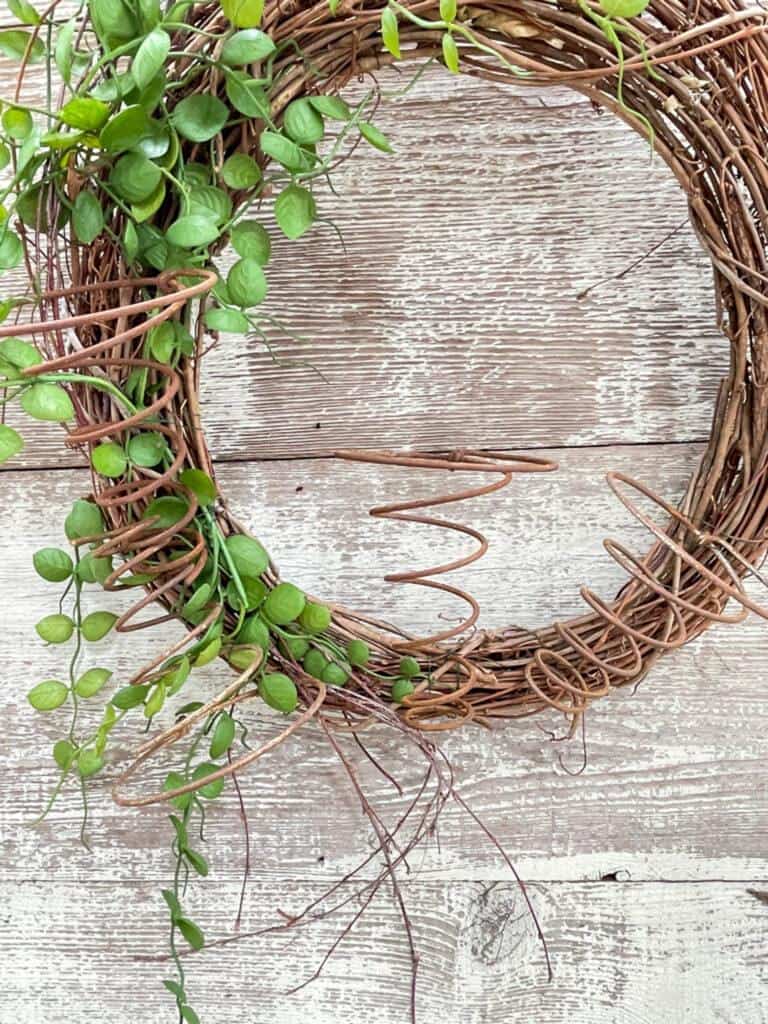
- Attach the four-bed springs. See my placement of mine in the image below. Be sure they are facing the proper direction so you can place the pots and the nest in them.
- The first spring goes on the left side, and the largest end needs to face up.
- The second spring faces down right below the first spring.
- The third spring goes directly in the center with the large end facing up.
- The fourth spring goes on the right, with the large end facing the right side.
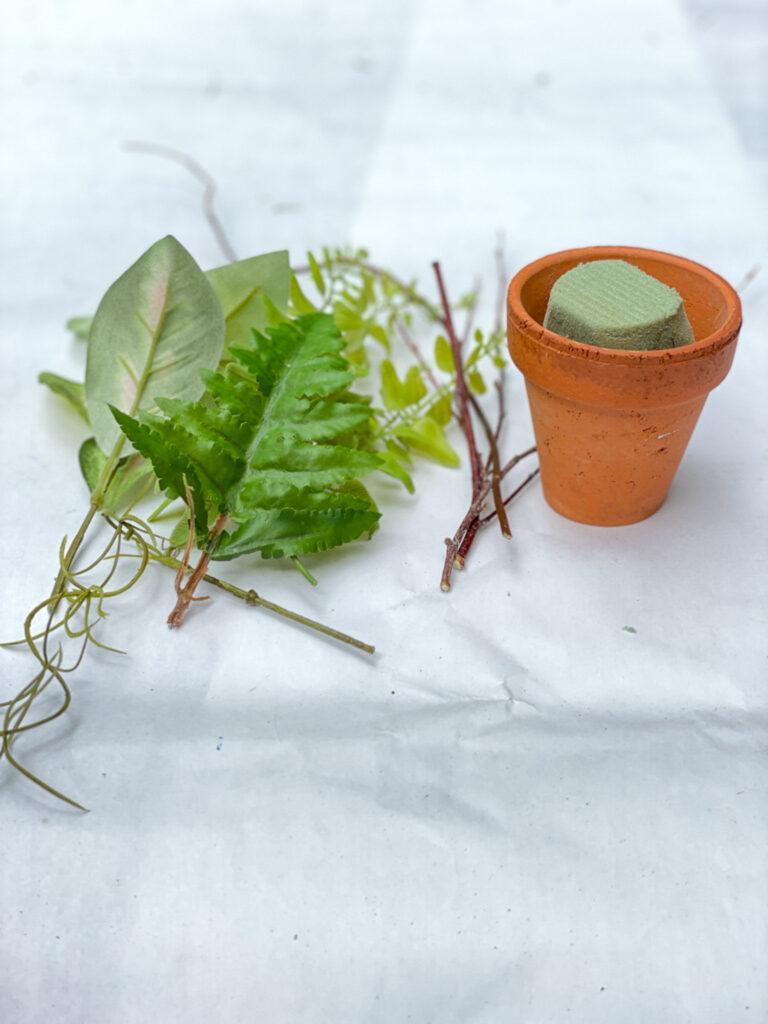
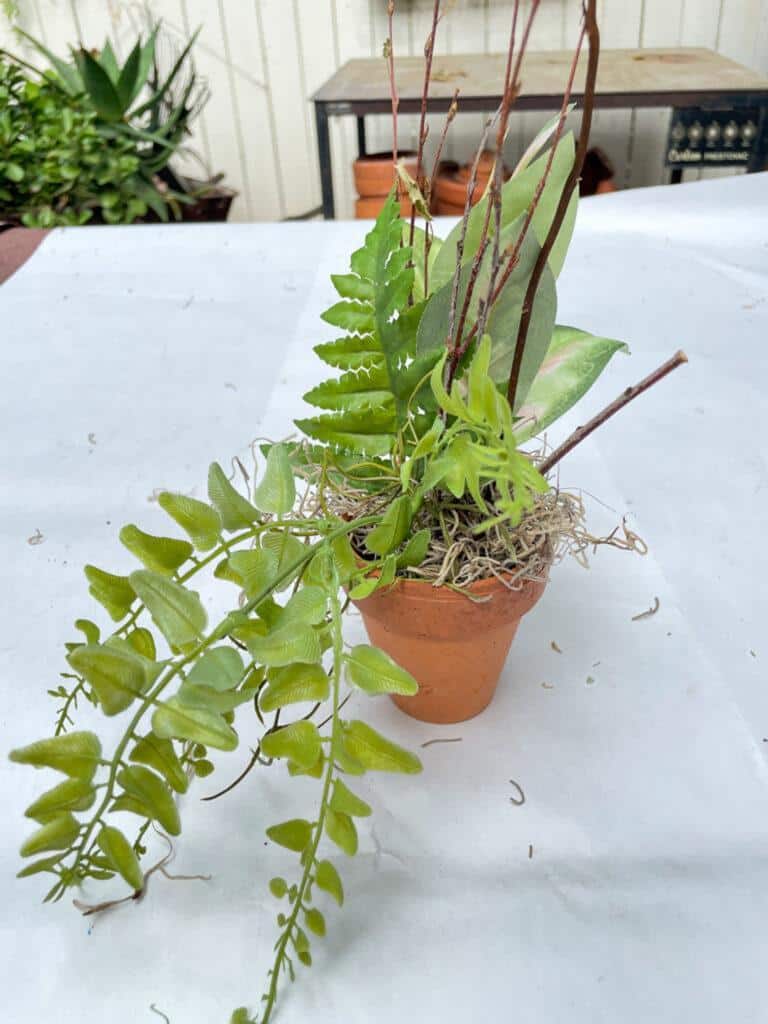
Next step- create tiny planters in clay pots for your spring wreath
- Place a small piece of Styrofoam in each flowerpot.
- Poke the faux greenery into the Styrofoam.
- Hot glue some Spanish moss around the greenery.
- Place the pots inside the two springs. They will stay in place just fine, there is no need to glue them in
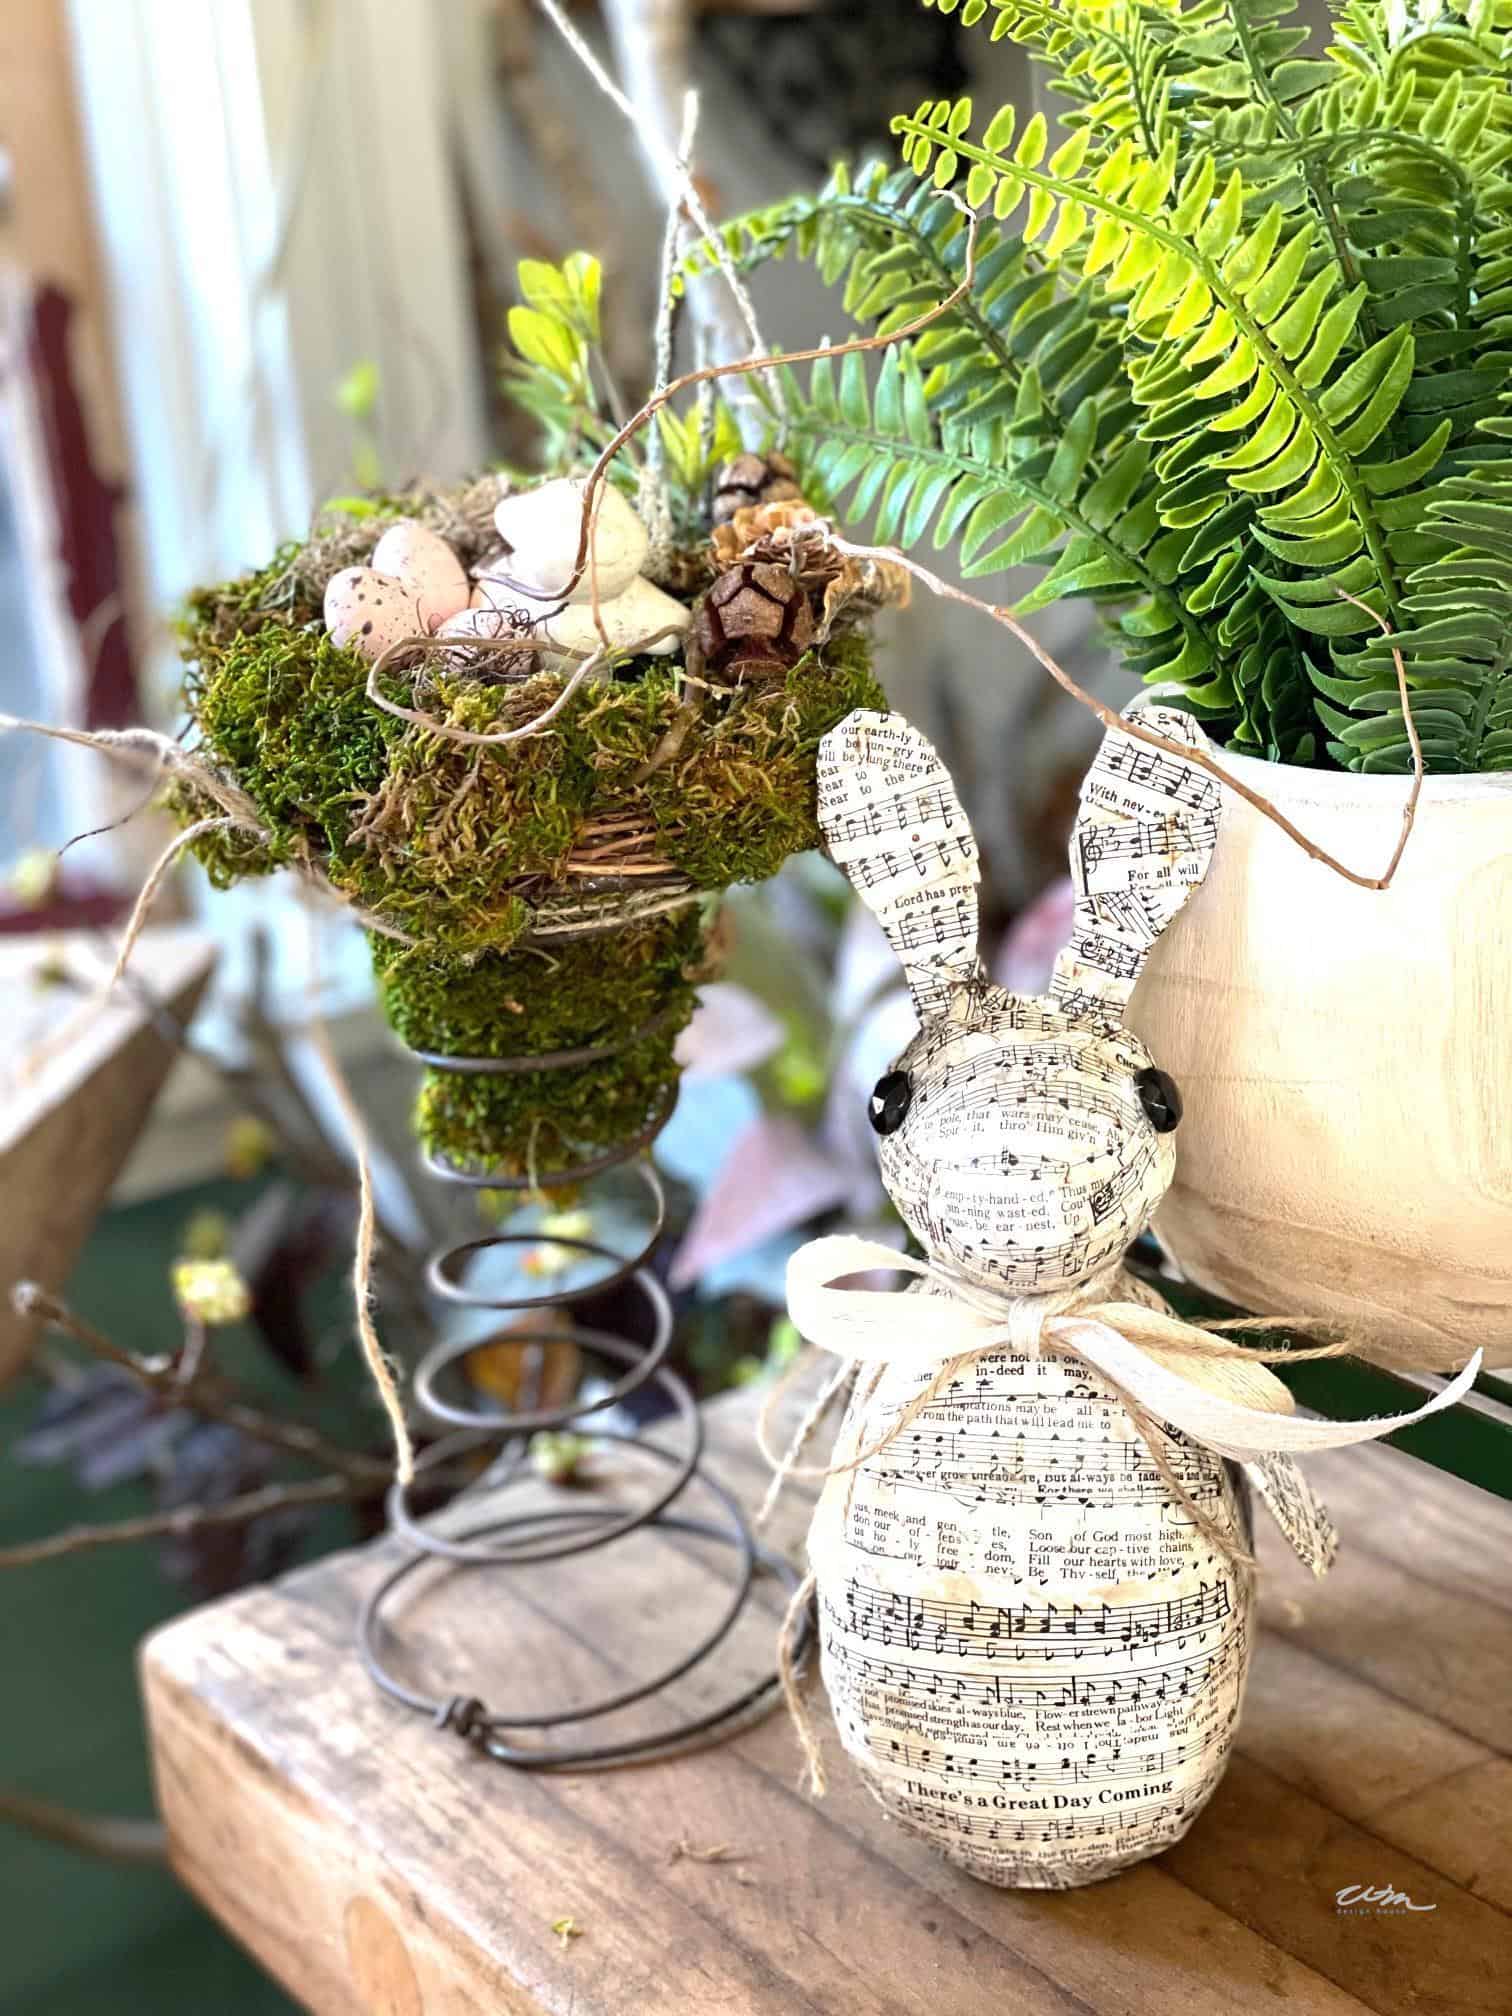
Craft Supplies for the bird nest in your spring wreath
- 1 4-6″ flowerpot (one that fits your spring)
- Two-bed springs
- Spanish moss
- Green moss
- Spray glue
- One Faux bird
- A few faux birds’ eggs
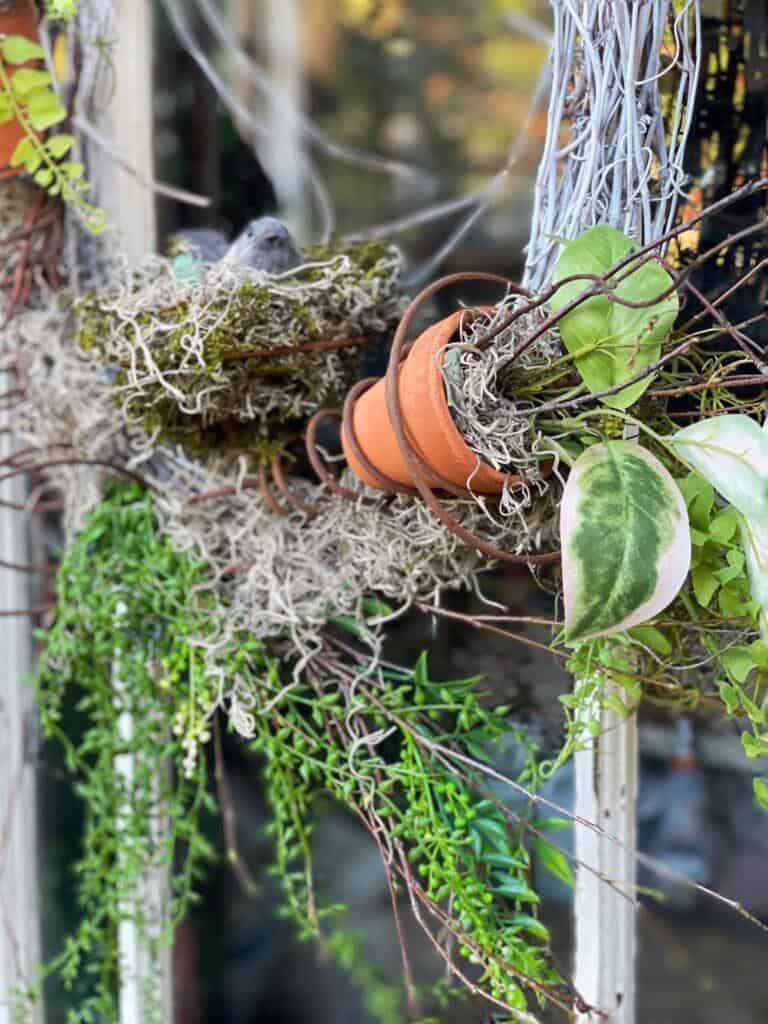
Directions to make the bird nest
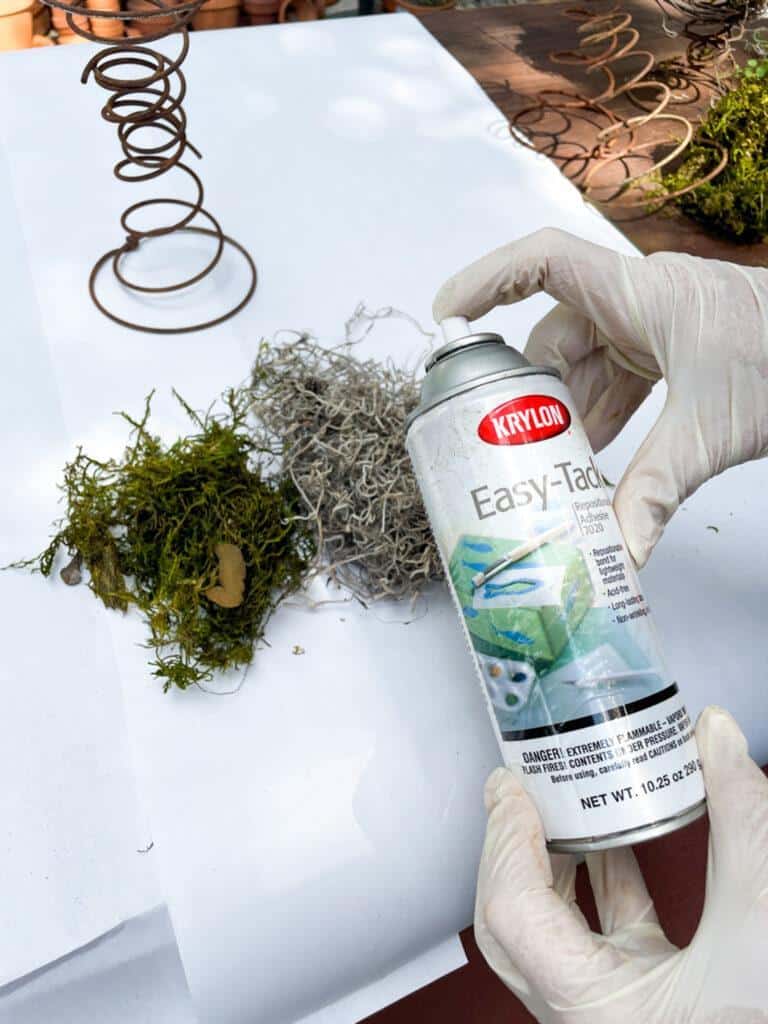
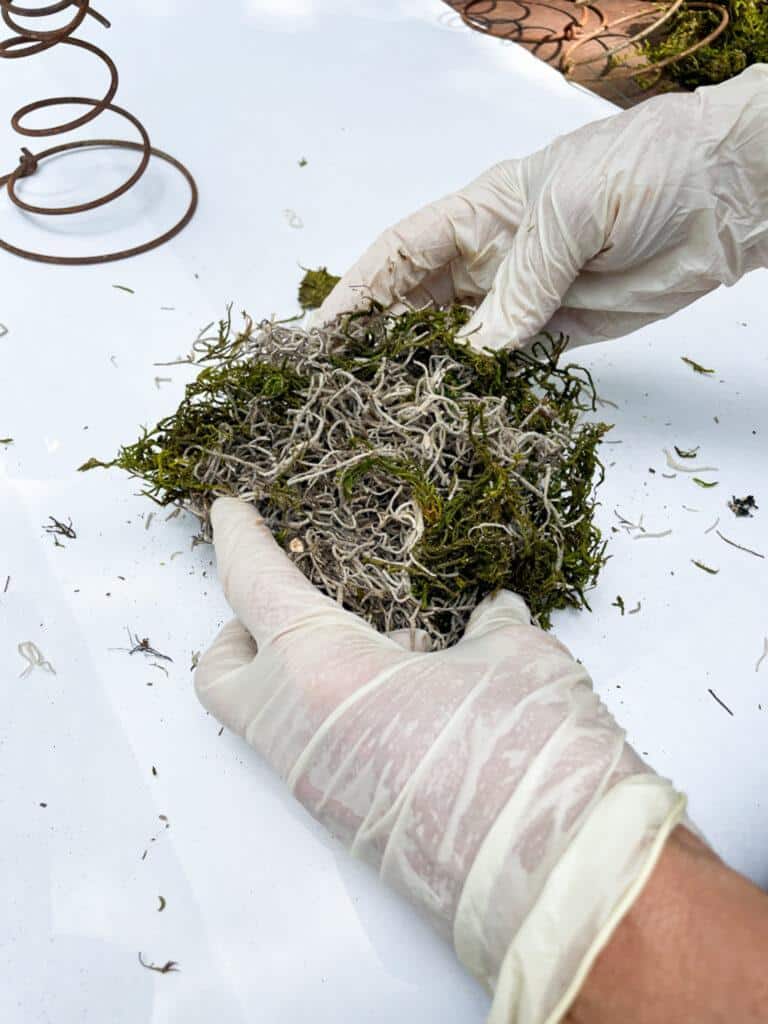
- You will want to wear gloves for this step.
- Take a few handfuls of the green moss and the Spanish moss.
- Spray it with the spray glue and mold it with your hands into a bird’s nest.
- Insert the moss nest into the large end of the box spring.
Use old bed springs as photo holders
Lastly, Let’s make a bird’s nest on top of an old bed spring in a flowerpot.
Supplies:
- 1 4-6″ flowerpot (one that fits your spring)
- Two-bed springs
- Spanish moss
- Green moss
- Spray glue
- One Faux bird
- A few faux birds’ eggs
Directions:
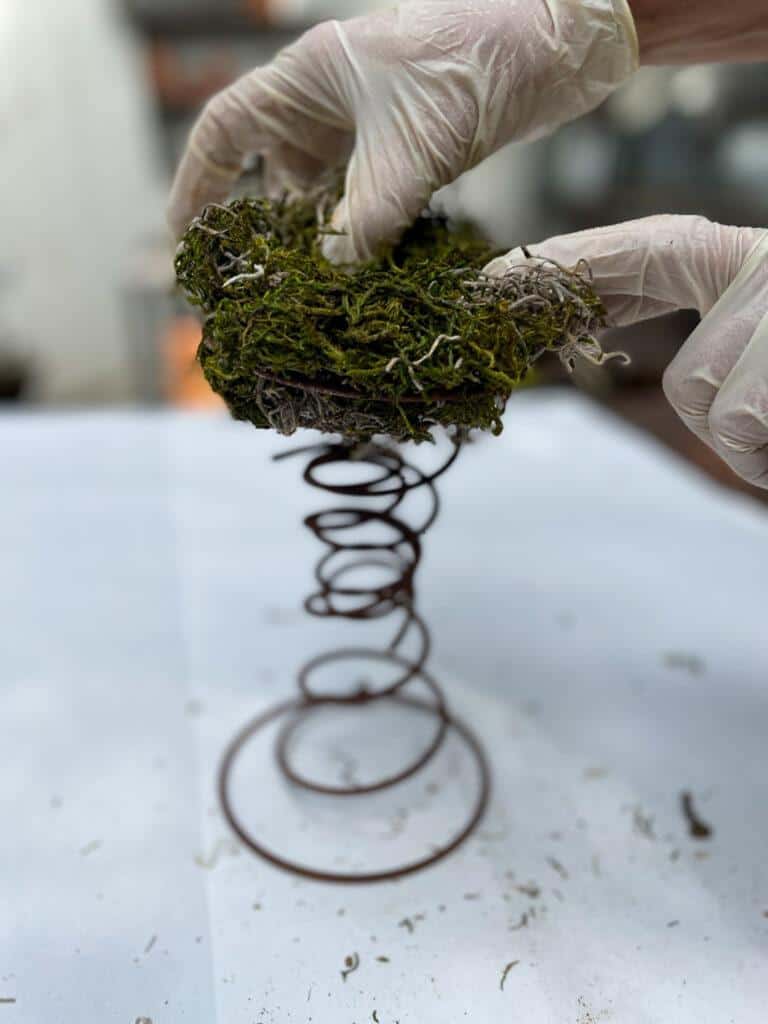
1. Starting with the two springs, screw the two small ends together.
2. Wear gloves, and take a few handfuls of green and Spanish moss.
3. Spray them with spray glue and mix well to mold a bird’s nest onto one end of the spring. ( see the images earlier in the post)
4. Add your bird and hot glue to a few birds’ eggs.
5. Place the other end of the spring inside your flowerpot.
6. Place some green moss over spring’s top around the pot’s edge.
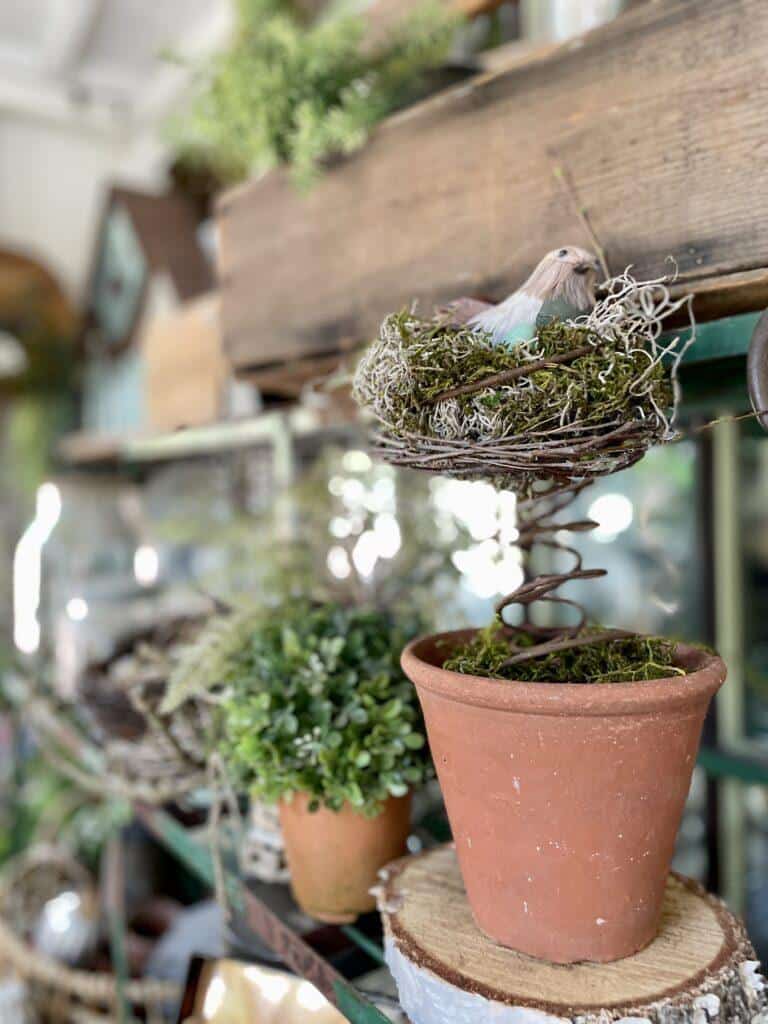
Now you have the cutest bird’s nest crafts to decorate with!
Do you love these old bed springs crafts? than follow my blog for more inspiration on how to take something old and make it new again!
These ten ideas are just the beginning – there are many ways to repurpose bed springs. With a little bit of creativity, you can turn trash into treasure and give your home a unique look that everyone will love. So, what are you waiting for? Get started today!

If you enjoyed this DIY Crafting blog post, you will love these posts.
Learn how I turned an old picket fence into a piece of garden art.
Create a garden clock for your yard out of vintage garden tools
And here is a blog post with 9 Upcyled craft projects from my blogger friends and me.
Believe it or not, I’ve got my grandmother’s OLD box springs in my She Shed, trying to decide what to do with it. These are great ideas!
Susan, how wonderful is that! Are the springs still tied together? One time I used an entire box spring, hung it on a wall, and
planted a few of the springs with succulents, it was so cute. Someone loved it so much that they bought it from me.
Beautiful ideas! I love that wreath– it just exclaims Spring!
Thank you so much Angie, I appreciate your kind words.
I have a large fondness for old bed springs so these ideas are fabulous! Thank you for sharing them with us on Farmhouse Friday. I’m featuring this tomorrow. Hope you link up again! pinned
Thank you so much Cindy and I apologize for the late response. We were on vacation and I was trying to stay away form the computer.
Wendy, I LOVE how you’ve used these bedsprings!!! I have seen them used as vase holders but not as a sweet bird’s nest! I love how you’ve photographed each design, too. Really fun ideas!! I am happy to share them this evening at Share Your Style #378 for you. <3
Hope you had a lovely Valentine's Day,
Hugs,
Barb 🙂
Hi Barbara! Thank you so much. My apologies for the late reply. We were on vacation and then came home with Covid, so I am struggling to get back on track.
I appreciate the share so much. I hope you are doing well my friend.
LOVE this Spring has SPRUNG wreath, Wendy!! We will be featuring you starting Wednesday at the Creative Crafts Linky Party! Pinned and shared!
Creatively, Beth
Hi Beth, thank you so much. I am on vacay, but will stop by to visit asap.
Wow-love these box spring ideas especially the nest! Visiting from Imparting Grace!
Wendy – you had me at “rusty”. Love them in your wreath and appreciate the instructions on how to make something rusty that wasn’t.
Thank you Regina, a little rust is always good.
Who knew there were so many things you could do with old bed springs? Love them all and your wreath is so cute!
Thank you Michele, It was so fun to share with you today.
Such cool ideas!! I love how you upcycled these.
Thank you Jennifer.
Wendy what a beautiful wreath idea! Love this!
Thank you so much, Stacy!
Wendy,
I love this idea. The wreath is so unique and fresh. Thanks for sharing.
Thank you, Rachel, I always enjoy sharing with you.
So creative, Wendy. I love how your wreath turned out. I pinned it to my spring craft board and now I’m on the hunt for some old bed springs!
Thank you Jen, I am so glad you are feeling better. Thank you for Pinning.
Thank you sweet friend, That was a birthday gift to me and you did not even know it! XOXO
Love the bed spring wreath! Now I am on the hun to find some to make something. Have a wonderful day Wendy, thank you for always sharing your beautiful creative ideas.
Thank you so much Elizabeth, you are so sweet to come by and visit my blog post.
I had a crazy weekend with the grandkids. So I need to do some catch up this week.
Oh, that wreath is gorgeous!! I’m linking it in my weekly roundup.
Thank you, my friend. I appreciate that so much. I hope you have a great week..
Who knew rusty old bed spring could look so good in home decor. My favorite is that adorable wreath. I may need to make one. I will be on the look out for some springs.
Oh, Wendy! So many beautiful ideas! I am in love with the wreaths and photo holders! So much inspiration in this post!! Loved it!
Thank you sweet Leslie, that means so much to me. I can’t wait to read your beautiful post later today. I did not realize you used to be a teacher.
Have a wonderful weekend.
I love these ideas!
Thank you for stopping by and checking my blog out today Susan. I cannot wait to visit yours.
How creative! I love that wreath you made! Bed springs…who knew that could look so great!!
Thank you, friend! You are so kind to stop by.
Wendy,
I love all these ideas. I plan to share a link on my Sunday, Dirt Road Adventures. You are so talented and you inspire me to be more so. Thanks so much for your inspiration.
You did such an amazing job on your wreath! I love how you used the rusty bed springs to hold the little flower pots and to make a small nest. I too am attracted to old rusty things. Such a great post.
Thank you Meagan that is so kind of you. I appreciate you stopping by to visit.
Love rusty bed springs and you shared some great inspiration!
Thank you Regina, the older and rustier the better!
Love your ideas for the springs. Adding them to a wreath and a flower pot make it an extra fun vintage piece!
Thank you so much Debra. I really appreciate you stopping by today. XO