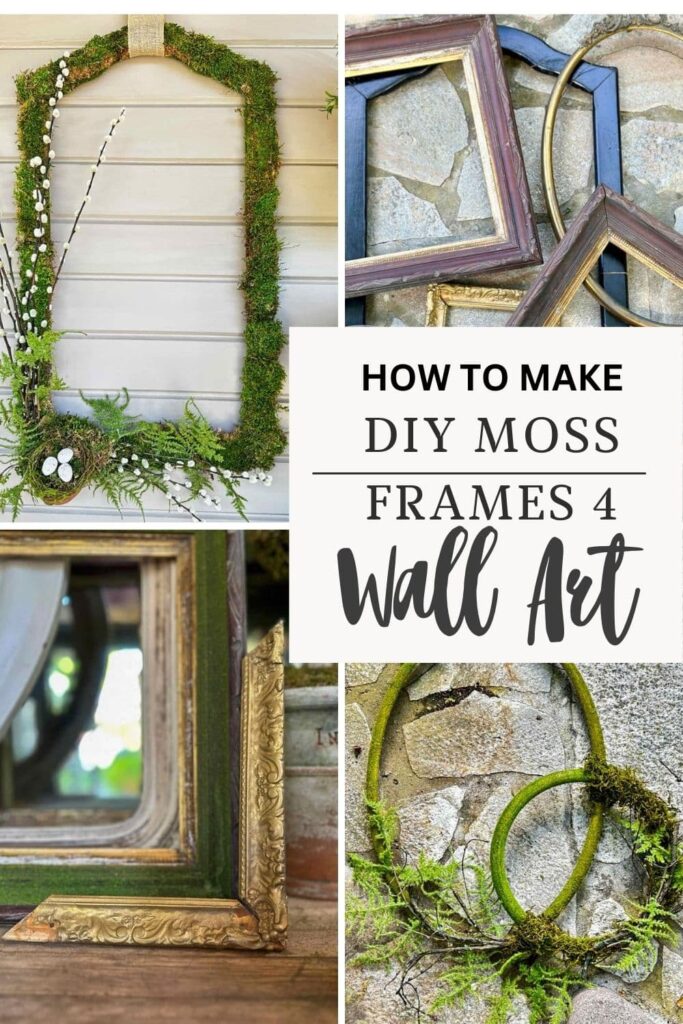
How to Make A DIY Moss Frame Art Gallery
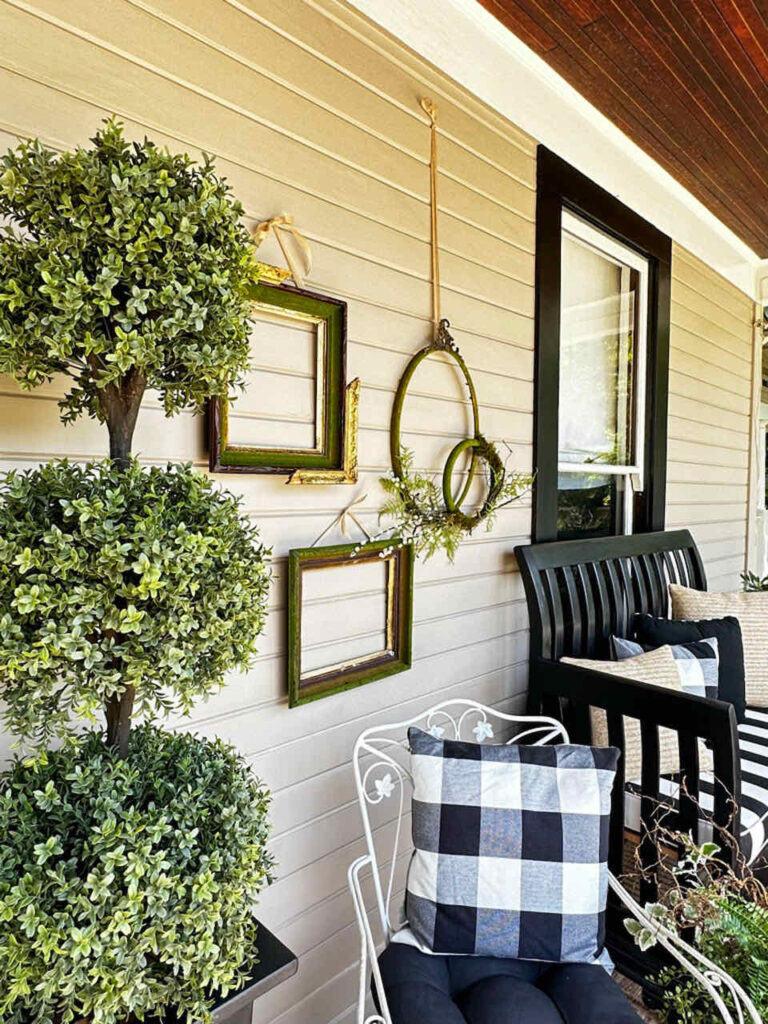
Let’s reuse some old picture frames into a DIY moss frame art gallery. I wanted to create my version of a green wall for my front porch.
I have beige siding on my home and it needed a pop of color on the porch. As much as I would love a living wall, it was just not practical for our home. The watering would be a nightmare, so I decided that I could still use real moss that is dried to create a similar look.
Today is a special day, I am joining four of my friends for an adventure of Thrifting With The Gals.
Thrifting with the Gals
If you are new to this series, this group of friends share a love for vintage and thrifted decorating.
These gals all live in different parts of the country, but come together once a month to share thrift store shopping ideas and how to decorate with your treasures.
- Ann from Dabbling and Decorating
- Kristin from White Arrows Home
- Robyn from Robyn’s French Nest
- Rachel from The Ponds Farm House
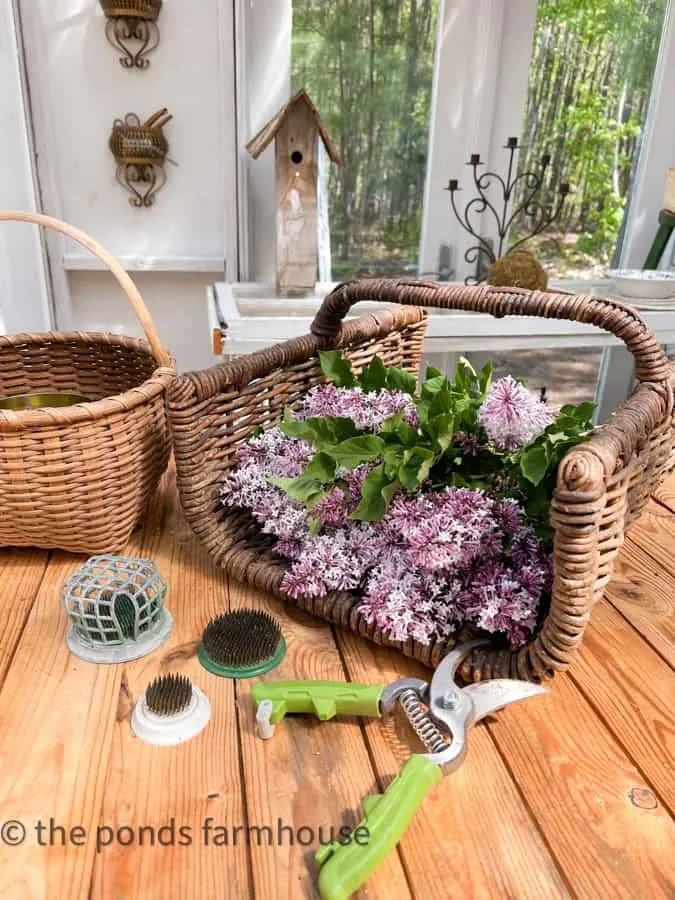
If you have come over from Rachel’s Blog @thepondsfarmhouse, welcome. I am sure you loved all of her gorgeous vintage baskets and how she has styled them.
My name is Wendy from WM Design House and I have the pleasure of being a guest of the Thrifting Gals today.
On my blog, I may sometimes use affiliate links, which means a small commission is earned if you purchase via the link. The price will be the same whether you use the affiliate link or go directly to the vendor’s website using a non-affiliate link.
DIY moss wall art
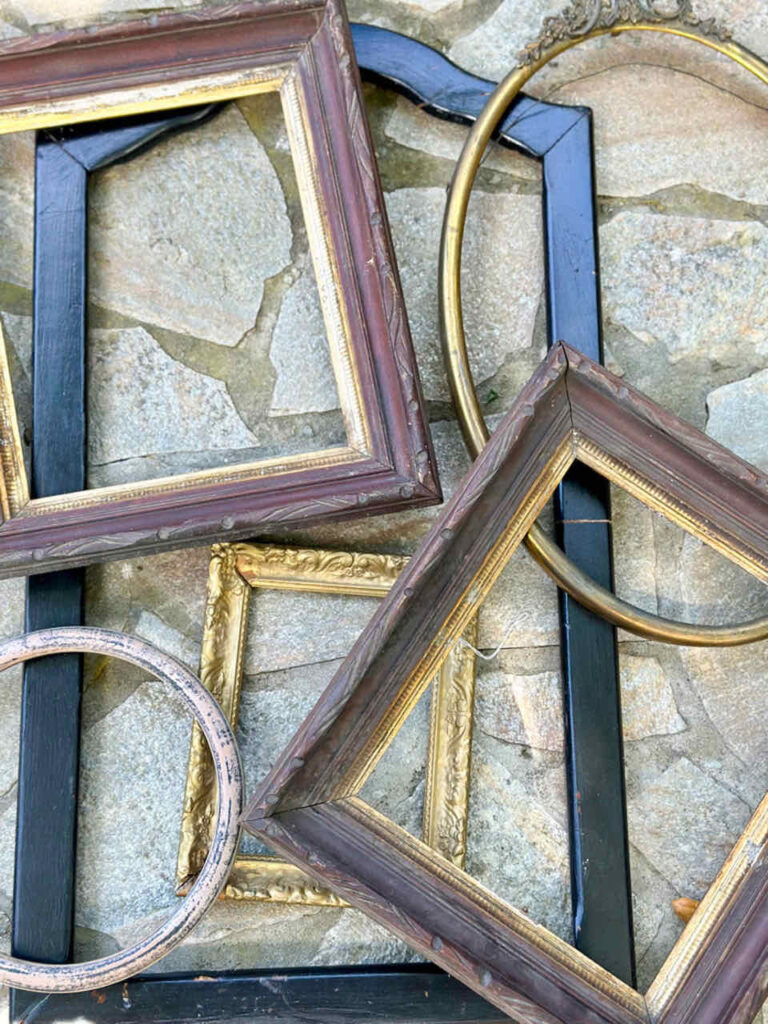
While I was thrifting in the historic West Bottoms of Kansas City, Missouri this month, I came across some fabulous vintage frames at a great price. I had a great idea of what I wanted to upcycle these beauties into a preserved moss wall gallery with a slant.

Of course, getting them home was the challenge, I even had to cut the large frame in half to fit into my suitcase. I had not paid much for the frames, and I knew that my plan to cover them in sheet moss would help to cover the wood glue when I put the frame back together. I knew this would be a great way to add some color to the walls of my front porch.
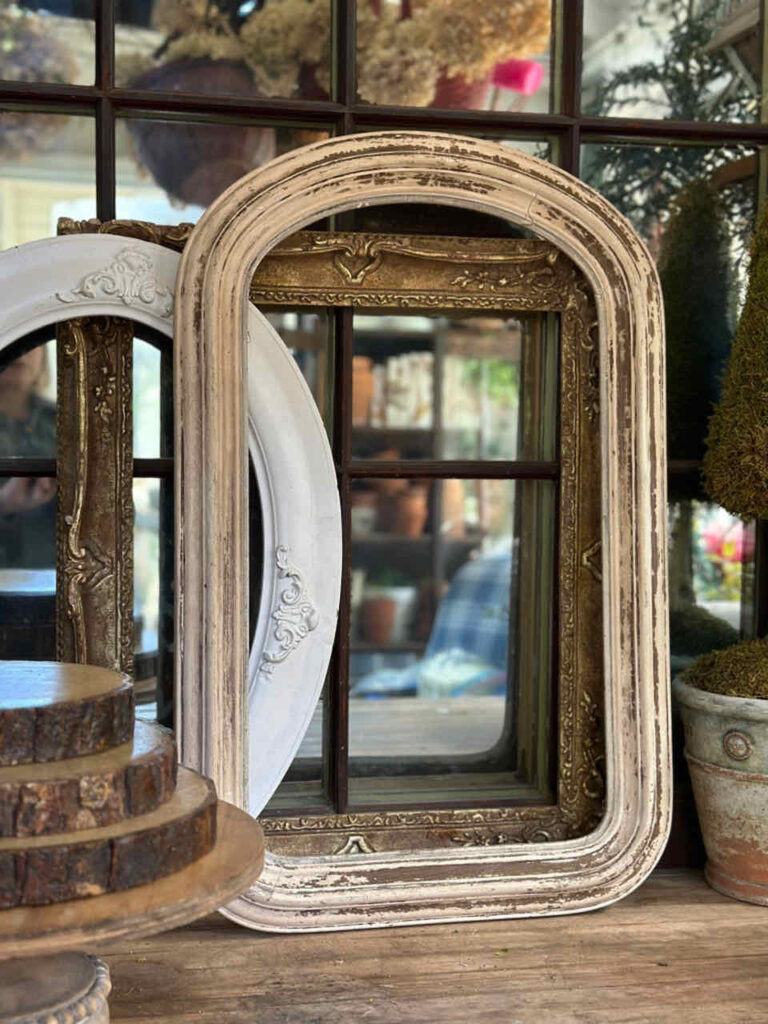
You can create many types of moss wall gardens by purchasing a DIY kit, or you can create your own as I have. You can choose to use a frame and fill the entire frame with moss to create a true living moss wall or add touches of dried moss for a similar look like I created.
Watch this short video of how I upcycled these old frames
Supplies needed to create a DIY moss frame art gallery
- A collection of different sizes of vintage picture frames
- Sheet moss
- Different colors of sphagnum moss
- Spanish moss
- Reindeer Moss
- Blended turf (powder turf in a jar)
- Natural elements
- Air plants (if you would like to use them)
- Hot glue gun
- Mod Podge
- Wood glue (if you need to glue any of your frames)
- A clear matte finish varnish spray
- faux plants or branches
- Small red clay flowerpot
- Bird’s nest
- Bird eggs
- Fresh pussy willow branches (I picked these up at Trader Joe’s)
- Wire to connect frames and flowerpot
- Ribbon to hang the frames
- Command strips or nails to hang the empty frames on the wall
- Staple gun
Creating DIY moss frames with different textures
When selecting your frames, keep this in mind:
- Purchase different shapes of frames.
- Find frames with plain molding and others with fancy molding.
- Choose frames that are made of different materials such as wood, metal, or resin.
- Think outside of the box, put two frames together, take a frame apart and use the pieces of molding to add to another frame.
- Collect a variety of sizes to create interest in your moss wall decor.
- Do not be put off by artwork that may be in the frame, you can always get rid of the artwork.
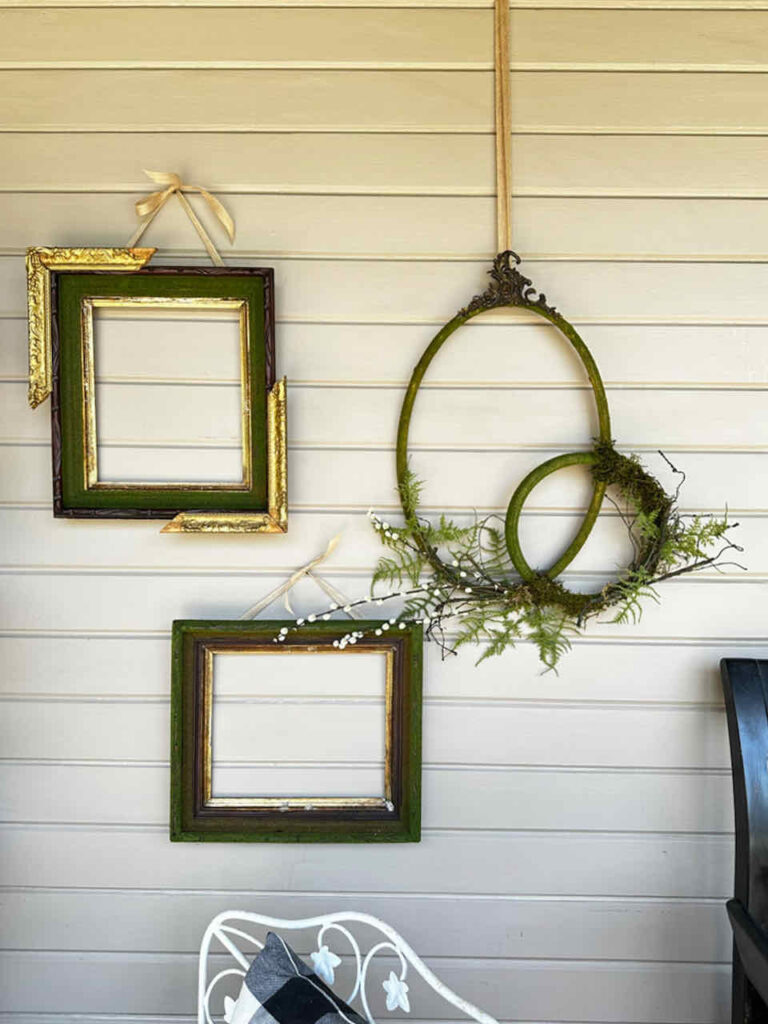
Once you have collected all of your frames, plan out the placement of the frames on your wall. You can use these frames on an interior space or exterior wall as long as it is not in the direct sunlight. You can use one frame or multiple frames. I do believe in the theory of using odd numbers when designing a gallery wall.
Odd numbers of details can make a room more visually captivating. It’s true! Odd numbers force your eyes to explore and move around a room, creating a unique and engaging experience. That’s why one or a set of three is more appealing and memorable – they have just the right amount of oddness to capture your attention. Plus, who wants to be stuck in pairs!
The best part is using your creativity and thinking outside of the box. So let’s get started.
Directions to make DIY Moss Frames
- Gather all of your supplies from the supply list that you will be using.
- Decide what treatment you will create on each frame.
- Using wood glue, glue any pieces of the frame that may be coming apart.
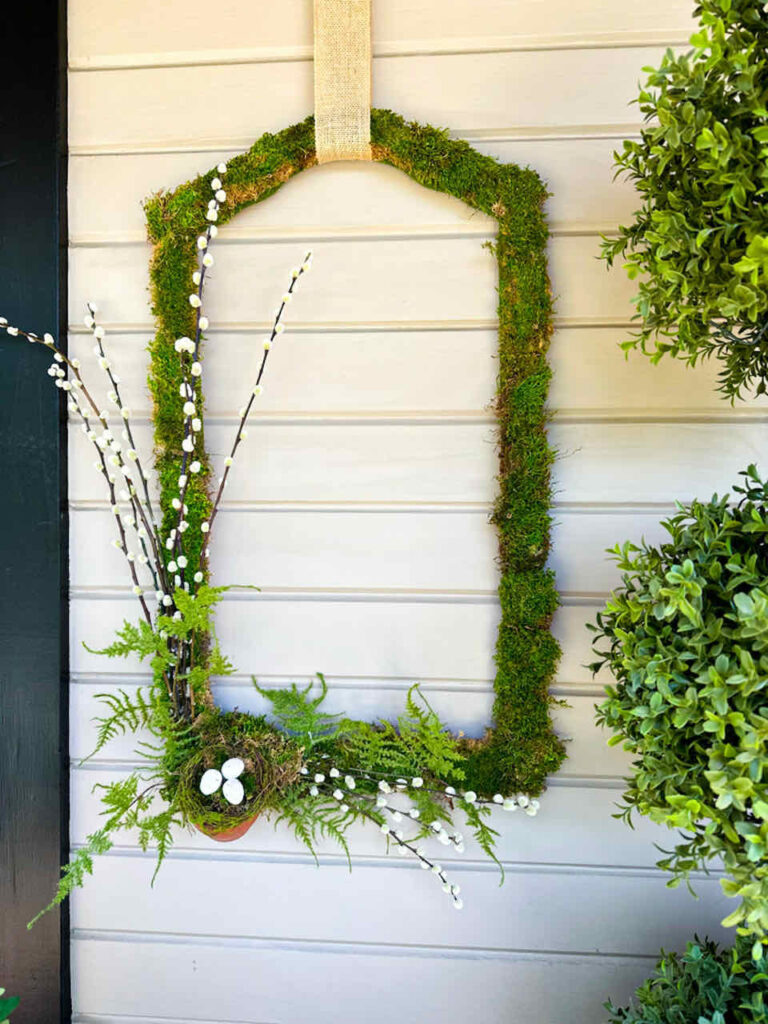
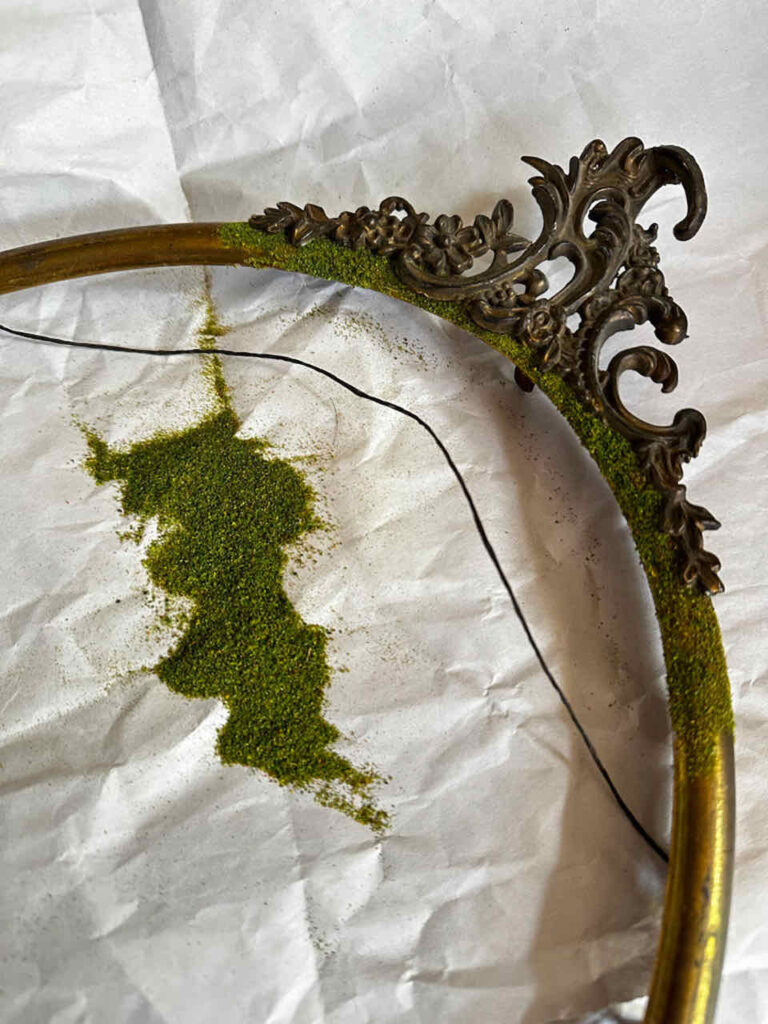
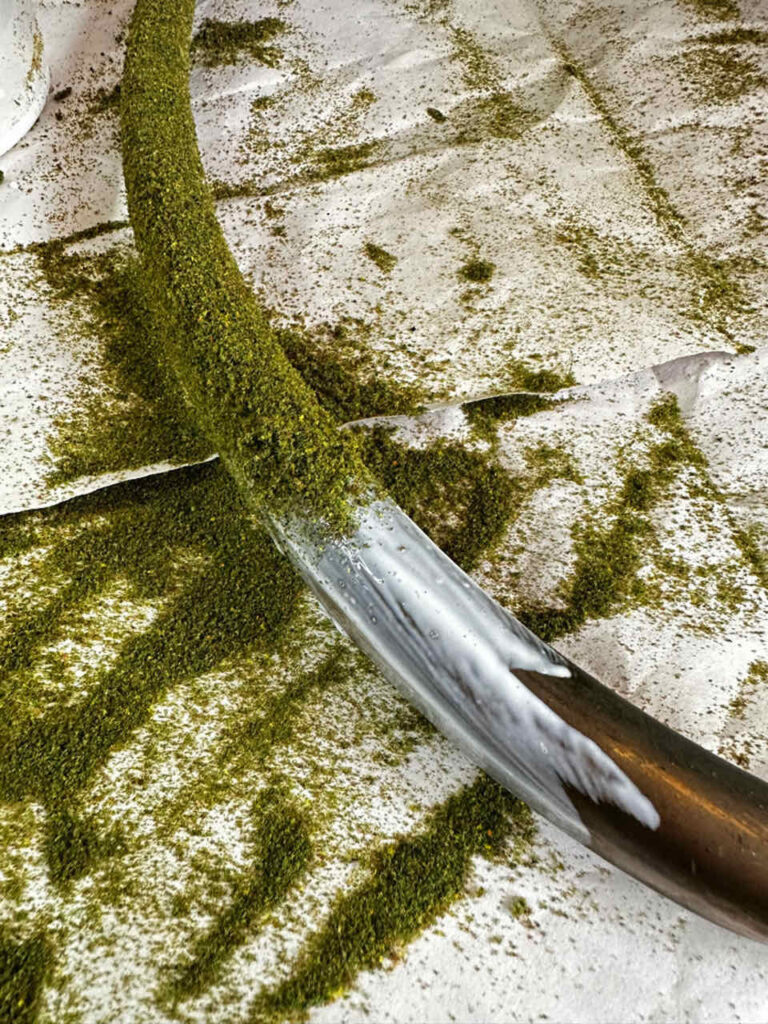
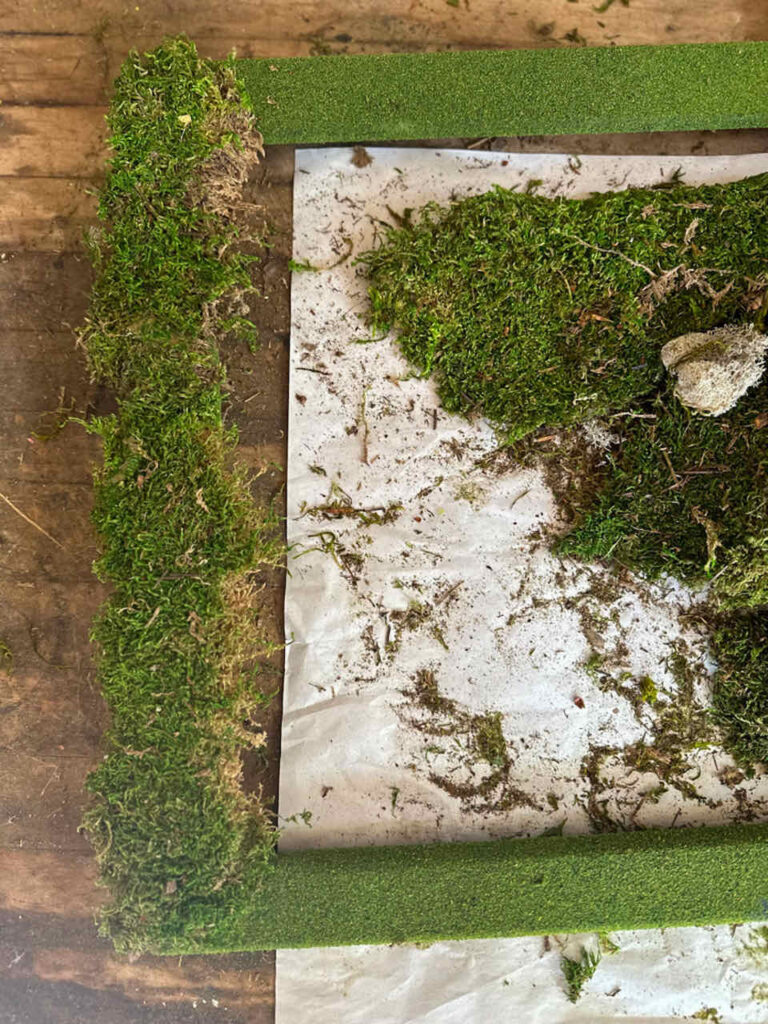
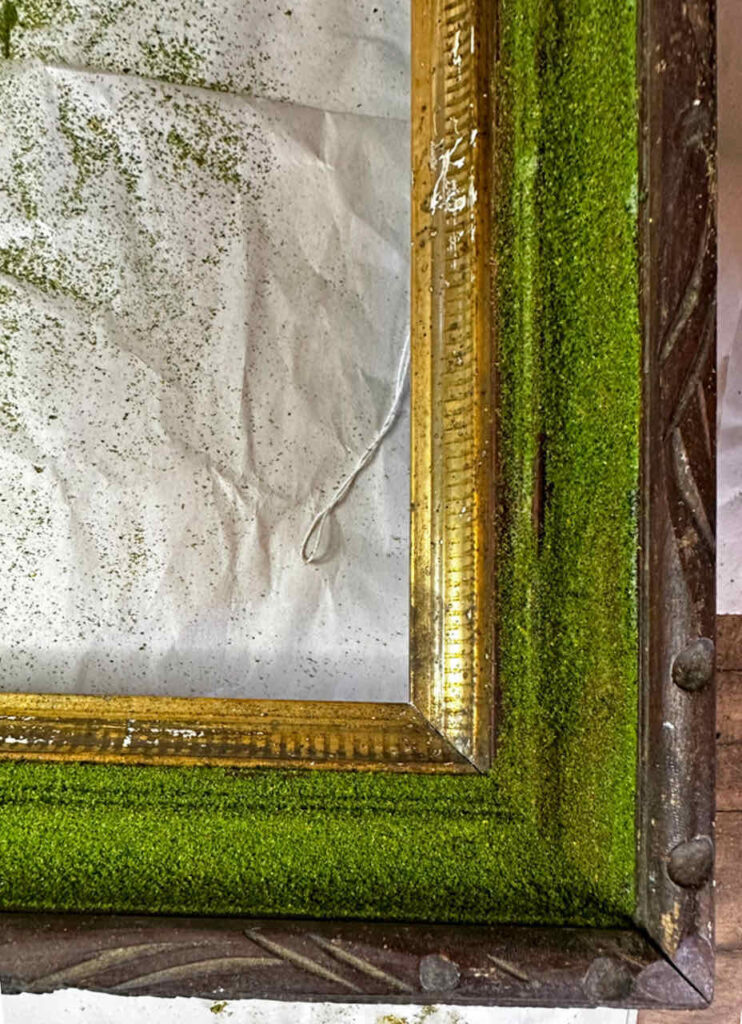
- Cover each frame using a layer of Mod Podge and then sprinkle the blended turf onto the frame. I used a mix of both brown and green.
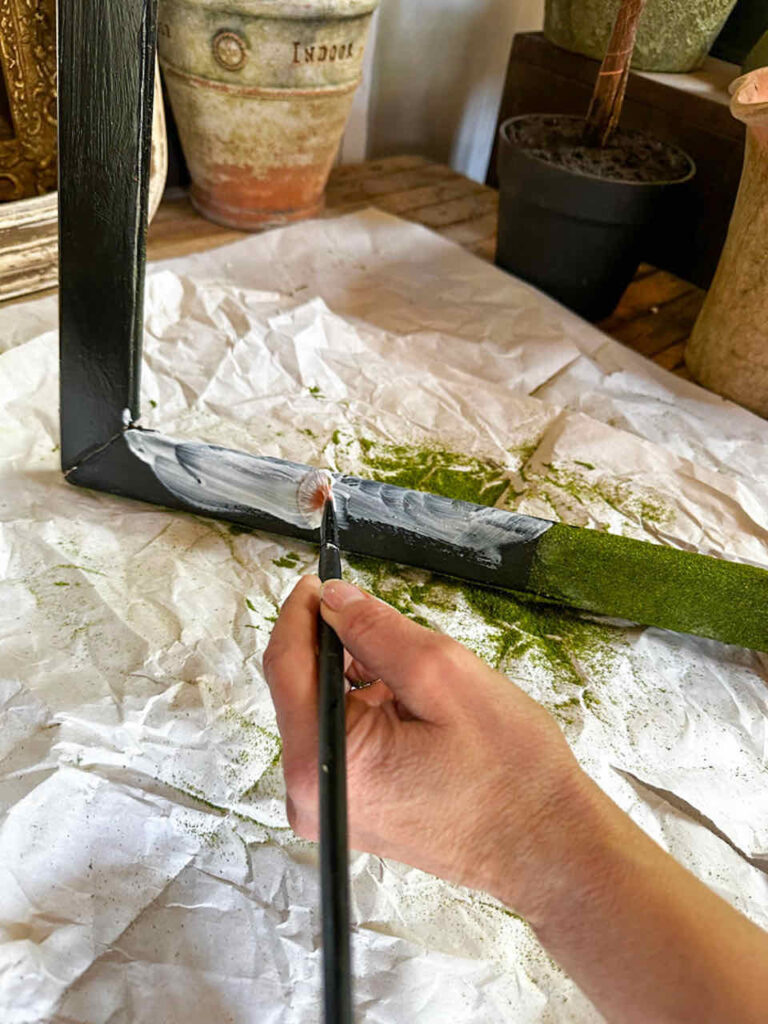

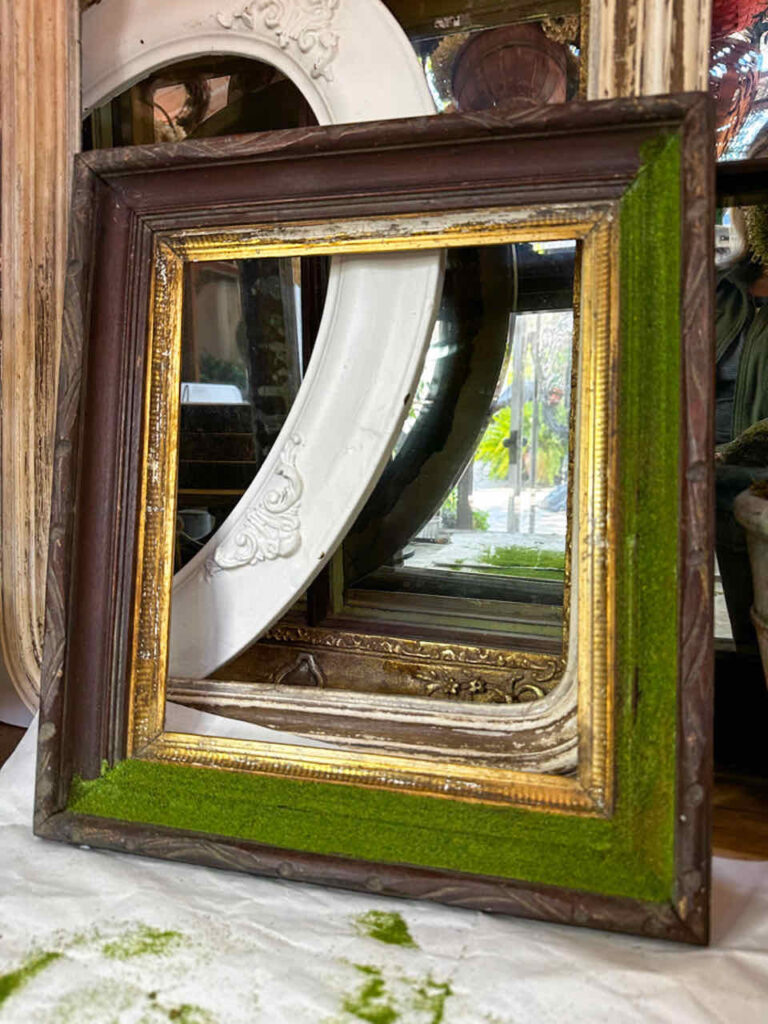
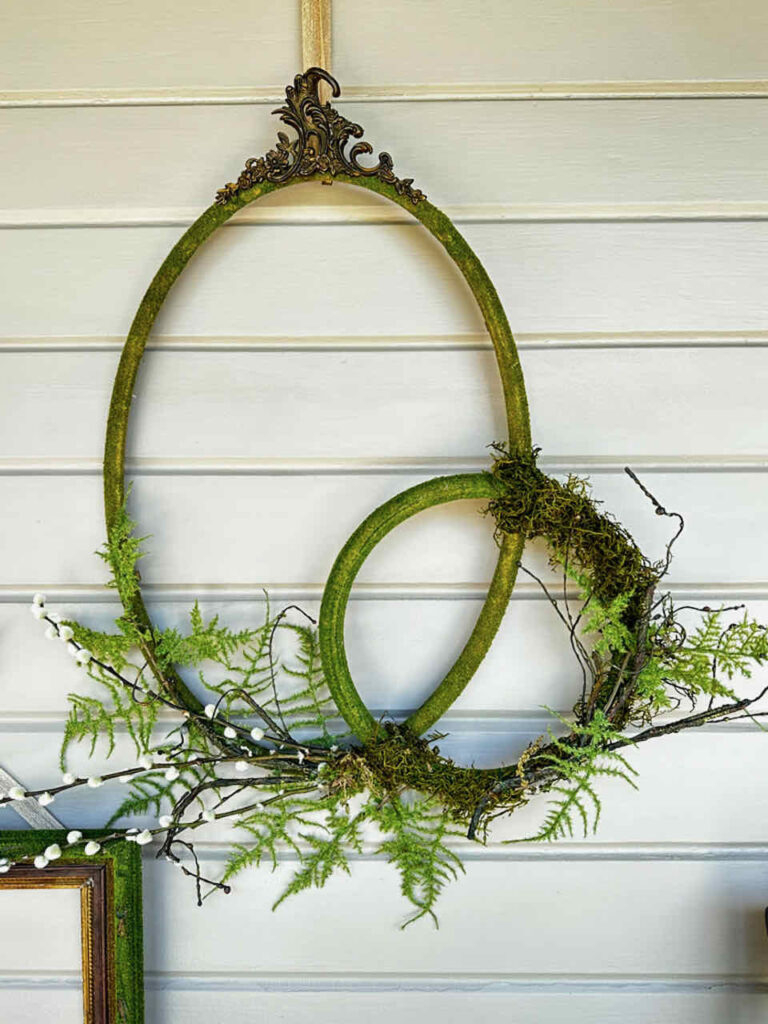
- For my largest piece, I added moss to the entire frame. I loved the gold patina on the smaller frames and wanted to show that off, so I only added a strip of moss within the interior of the frame.
- Once I let this dry, I went on to add a second layer of sheet moss to the frame using a hot glue gun.
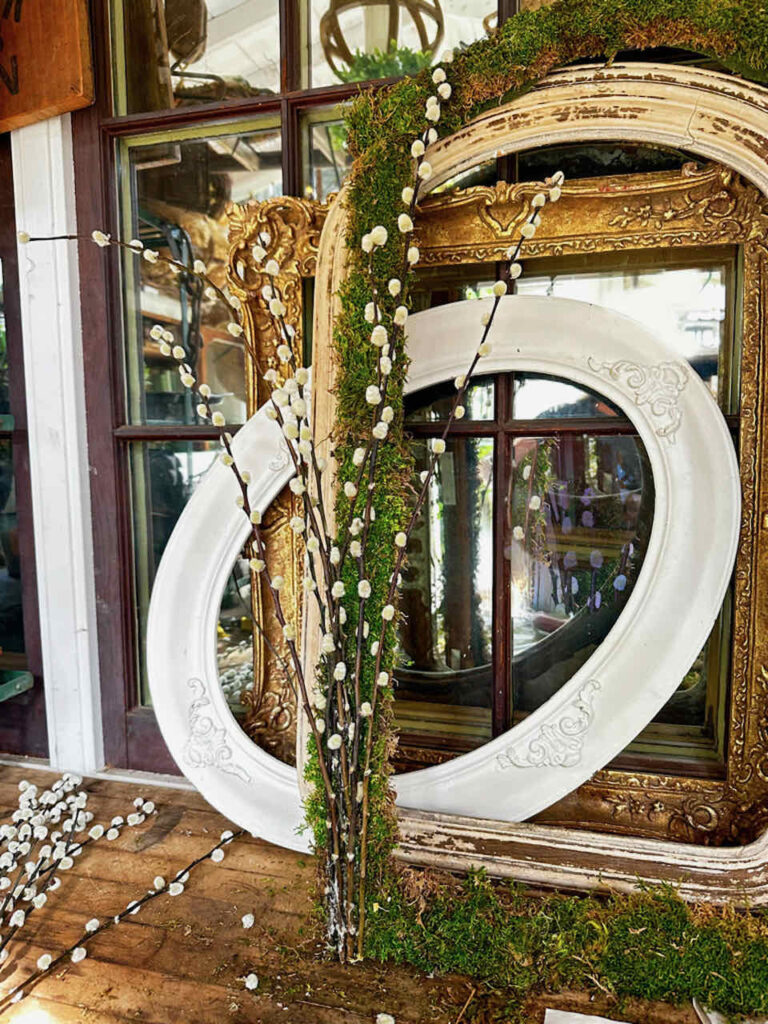
- Add any natural elements or pussy willows and greenery using a hot glue gun.
- Next, I put a piece of wire through the hole of a small clay flower pot and wired it to the bottom of the frame.
- Lastly, I added some Spanish moss and hot glued a small birds nest onto the top of the flowerpot. Add a few bird’s eggs if you desire.
Directions for completing the set of three DIY moss frames
- Allow your frames to dry.
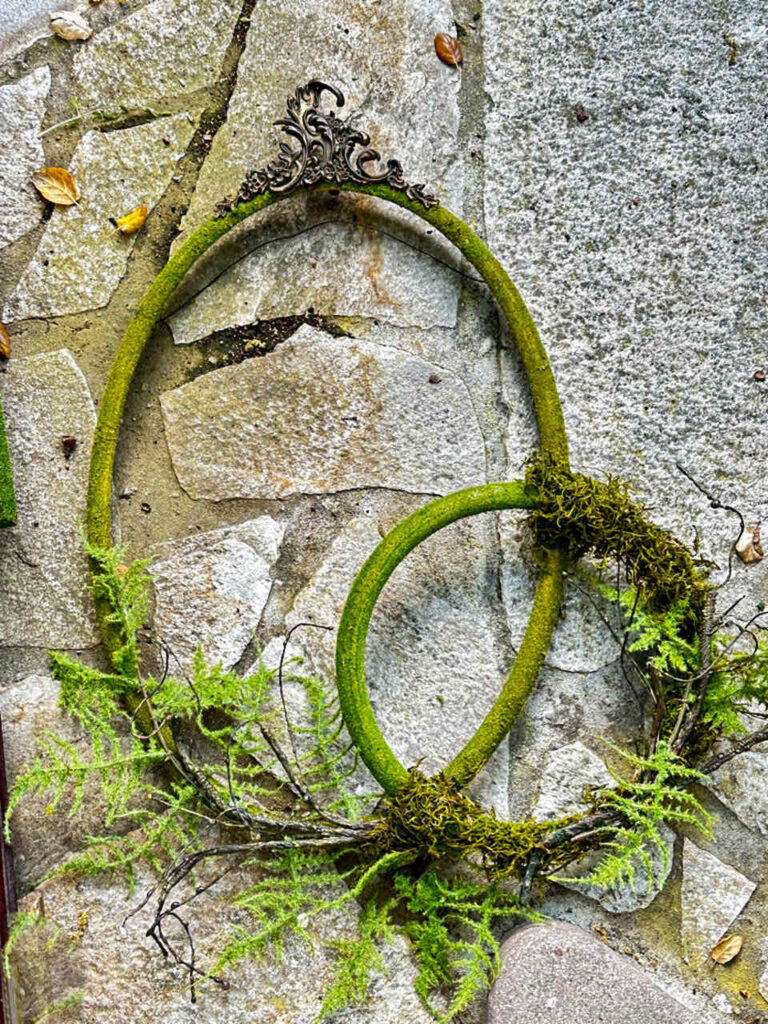
- I added the smaller round frame to the larger oval frame using a small piece of wire.
- You can take smaller pieces of molding (I broke up this gold small frame) and hot glued the pieces onto the larger frame for an added touch.
- Add some moss to cover any wire you may have used to attached the frames together.
- Using a hot glue gun, attach some faux greenery and pussy willow branches.
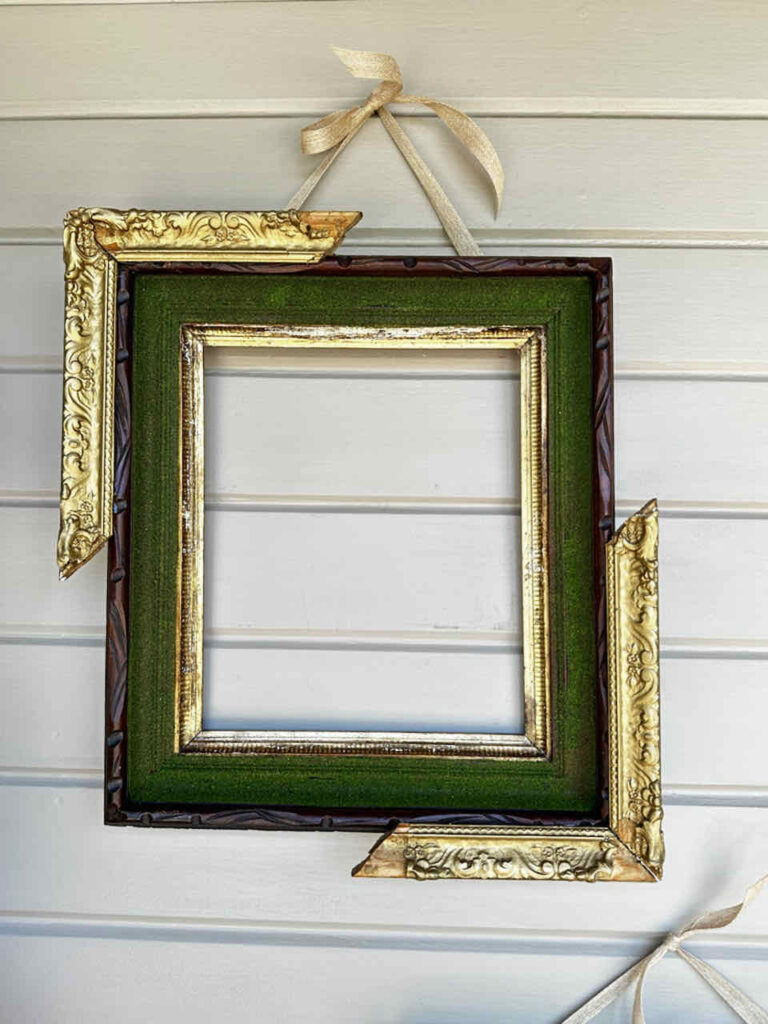
Hanging your picture frames
There are several ways you can hang your picture frames.
You can use Command Strips or put a nail in the wall if you choose.
I used a very small nail and then added ribbon to the frames to hang them. I liked the additional charm that the ribbon added to the wall.
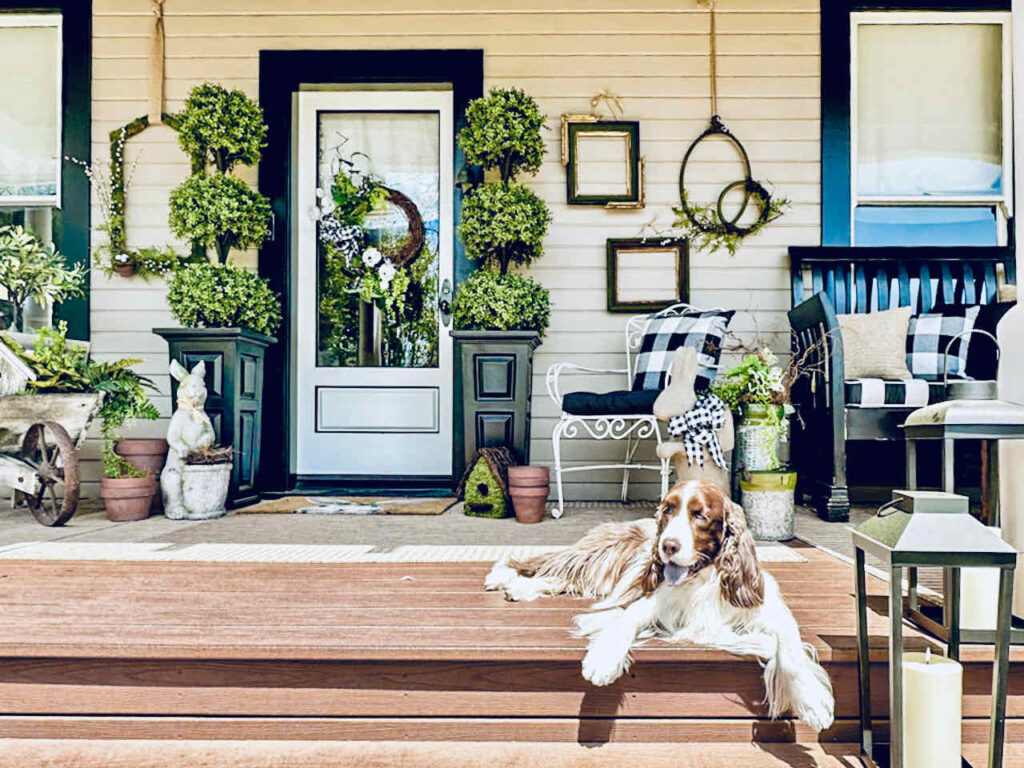
Creating DIY moss frames using old picture frames from the thrift store can make for a unique and stylish wall gallery. Not only does it add a stunning design element to your home, but it also has a positive impact on the environment, as you are reusing previously owned items.
If you loved this project and want to learn more, check out my guide All About DIY and Crafts for more ideas.
More Thrifting With The Gals
Next up is my friend Ann @dabblinganddecorating, wait until you meet the newest member of her family, you will be so impressed.
Be sure to also stop by to visit the other gals below as well, you won;t want to miss what they have found thrifting.
Ann- Meet Ann’s newest treasure Miss Mannequin / Kristin – 20 Things To Look For At The Flea Market This Spring
Rachel-How To Decorate With Vintage Baskets / Robyn – How To Decorate With Yard Sale Finds
Thanks for stopping by, I hope you enjoyed this fun adventure today of Thrifting With The Gals!


Wendy – these are fabulous. Love them so much, especially the variety.
Thank you, Regina, It was a fun project to create.
Thank you for sharing this on Farmhouse Friday! I love it, can’t wait to try it and featuring it tomorrow. pinned!
Thank you so much, Cindy! I appreciate the feature very much.
What a fun and unique project idea Wendy. These would be so neat as displays for an outdoor wedding too. You are always full of so many wonderful ideas.
A BRILLIANT solution to a living wall, Wendy! We will be featuring you starting Wednesday at the Creative Crafts Linky Party! Pinned and shared!
Creatively, Beth
Thank you so much Beth!
I am honored.
This is just lovely, what a beautiful idea.
Thank you so much Julie!
Wendy! This is such a creative and fun idea. Perfect for spring and summer. Thanks for sharing the inspiration and the step by step instructions.
Thank you so much Anna! I appreciate your kind comment.
This is such an amazing DIY, Wendy!! I love it. The frames are brilliant and the way you covered them with moss is nothing short of spectacular. They add such charm to your porch! Pinned!
Thank you so much Rachel, I am glad you liked it.
Thank you so much for dropping in and sharing at SSPS 258. Tweeting for now, but revert back on Monday to see if you’re listed in the top 15 posts.
That blended turf stuff is too cool; never seen that product before. Adding it to my shopping cart; totally going to do this with some of my frame stash. Beautiful and brilliant, Wendy!
Oh I absolutely love this! I love all things moss and who can pass up an old frame, right? Thank you for the inspiration. Pinning. XO- MaryJo
Thank you so much MaryJo. I am glad you enjoyed my project of Thrifting with the gals.
Thank you, Renae. You are so kind. Feel free to share.
What a fun post, Wendy! Love the moss frames!
Thank you, Kim! I am sorry you missed the frame purchase while we were in Kansas. we need more shopping time next trip.
Thanks for linking to SSPS #257. See you again at the new one this coming Monday.
Beautiful and inspiring – digging out the frames now
Yeah!!!! I cant wait to see them. Please send me pics at [email protected]
Hi Wendy!
I love what you did with the vintage frames! So cute and I great pick-me-up for a blank space!!
Thank you so much Susan! I appreciate you stopping by to read my latest blog post. Have a wonderful weekend.
Oooh! I love this idea, Wendy! Thanks for joining us!
Thank you, Robyn. It was a pleasure joining you today.
Wendy I’ve never seen this done before. Your frames are amazing. Loved this idea????
Thank you, Ann. It was an easy and fun project. Perfect for springtime. Thank you so much for stopping by.
Wendy,
You are so clever. I love all your moss projects this Spring. These frames are stunning and look great on your porch.
Thank you Rachel, It was a fun project and I was so happy to share it with you talented ladies.
I love this idea#seniorsalonpitstop
Thank you so much Karen, I appreciate your kind comment. Thanks for stopping by.