How to Make the Easiest Outdoor Pumpkin Topiary
Learn how to make the easiest outdoor pumpkin topiary. I will take you step by step to create this darling tier of pumpkins for your porch.
On my blog WM Design House, I may sometimes use affiliate links, which means a small commission is earned if you purchase via the link. The price will be the same whether you use the affiliate link or go directly to the vendor’s website using a non-affiliate link. Read my full disclosure policy here.
How to Make an Outdoor Pumpkin Topiary
Fall is officially here, and that means one thing – pumpkin everything! So this year, skip the tired old jack o’lanterns and try something a little more creative. Transform ordinary buckets into a creative outdoor pumpkin topiary using nothing but paint and some cinnamon. It’s easy to do, and the finished product will wow your guests.
So get ready to get crafty, and read on for instructions on how to create your very own rusty jack o’lantern topiary.
Why You’ll Love This Project
- Customizable for any style – Keep it rustic with cinnamon and aged paint, or add flowers, greenery, or other embellishments to match your fall decor.
- Beginner-friendly – If you can paint, glue, and stack, you can make this pumpkin topiary.
- Perfect for outdoor decor – Style it on your porch, by your front door, or even in the garden for a fun fall statement piece.
Supplies Needed to Make Pumpkin Topiaries
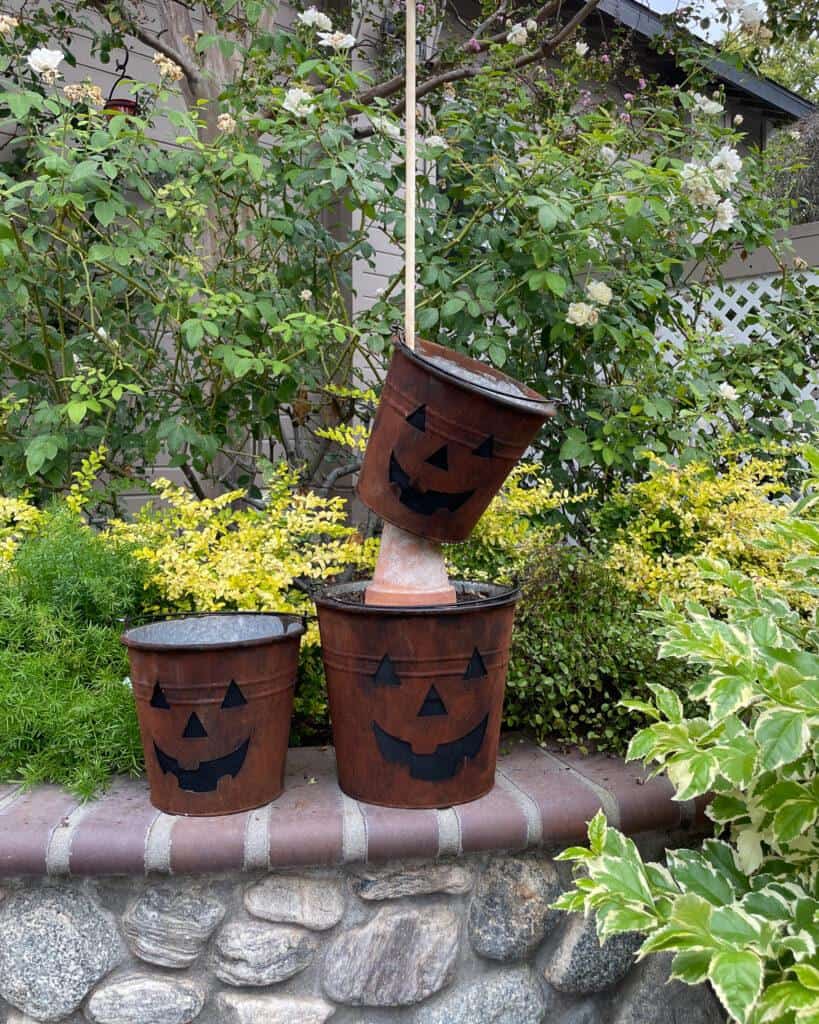
This is not your average stacked pumpkin topiary. Instead of real pumpkins, I used a set of buckets I grabbed at Michael’s for 90% off. I knew I’d dream up a project for them, and this was it. You could also use plastic pumpkin buckets and get the same look for this DIY outdoor topiary.
- One large bucket or pumpkin
- 3 smaller buckets or pumpkins
- 1 4-inch clay pot
- Black fabric (If your buckets have cutout faces)
- Duct tape
- Black Acrylic Paint
- Rust color acrylic paint
- Cinnamon
- 1 1/2″ wooden dowel
- Plaster of Paris
- Plastic container (to hold the dowel and plaster of Paris)
- Gravel
- Soil
- Plants or flowers to decorate your topiary
- Glue gun
- Matte clear acrylic spray
Step-by Step Guide to Create Outdoor Pumpkin Topiaries
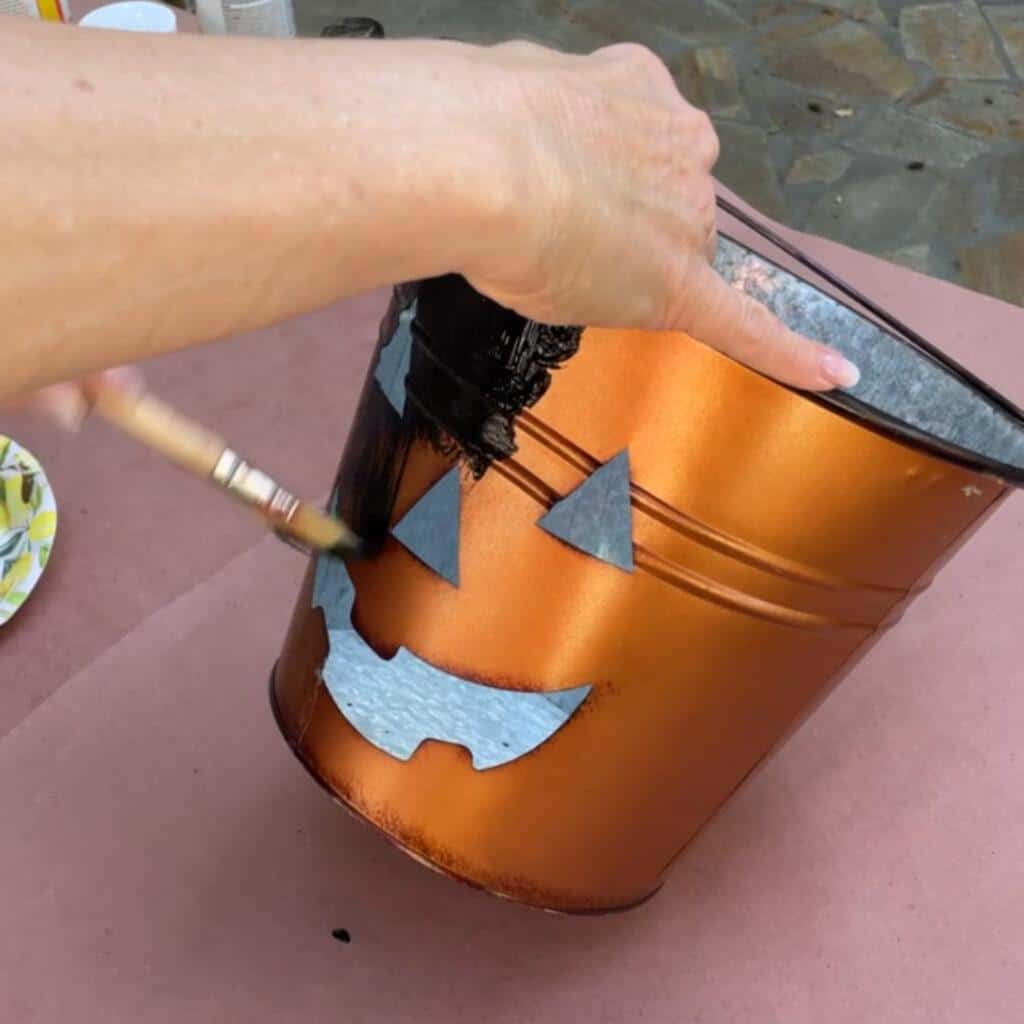
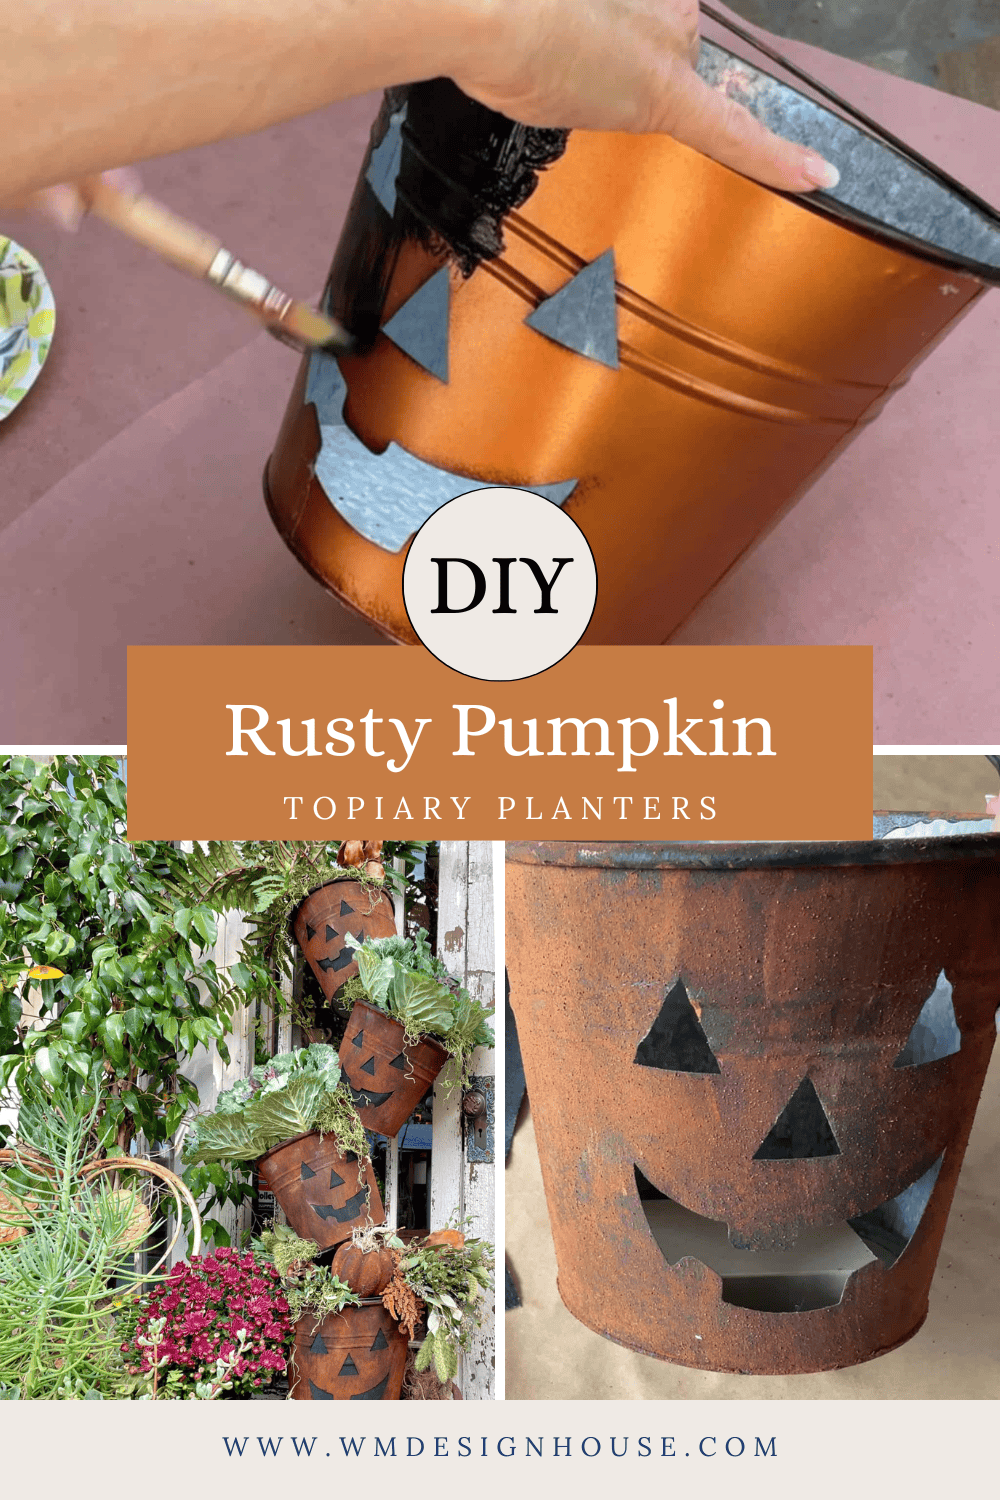
Step 1: Paint Your Buckets
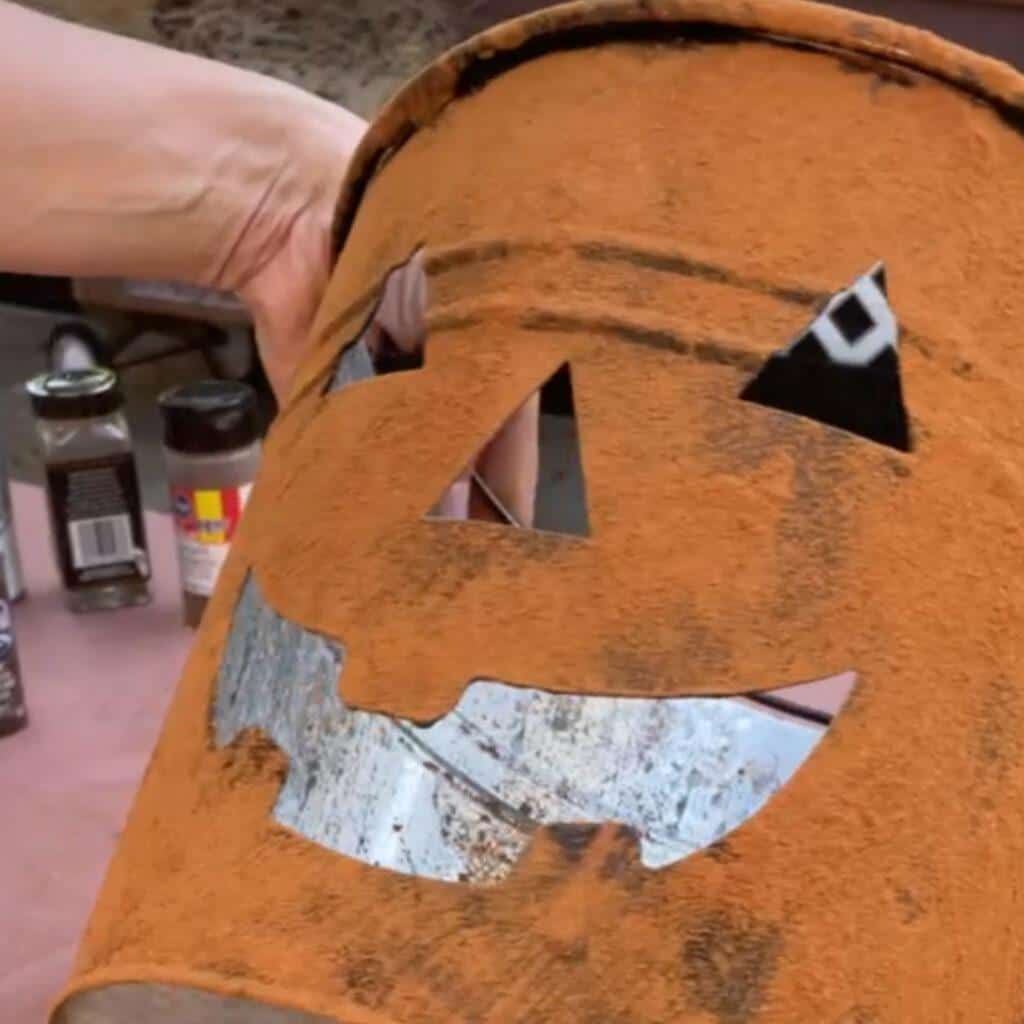
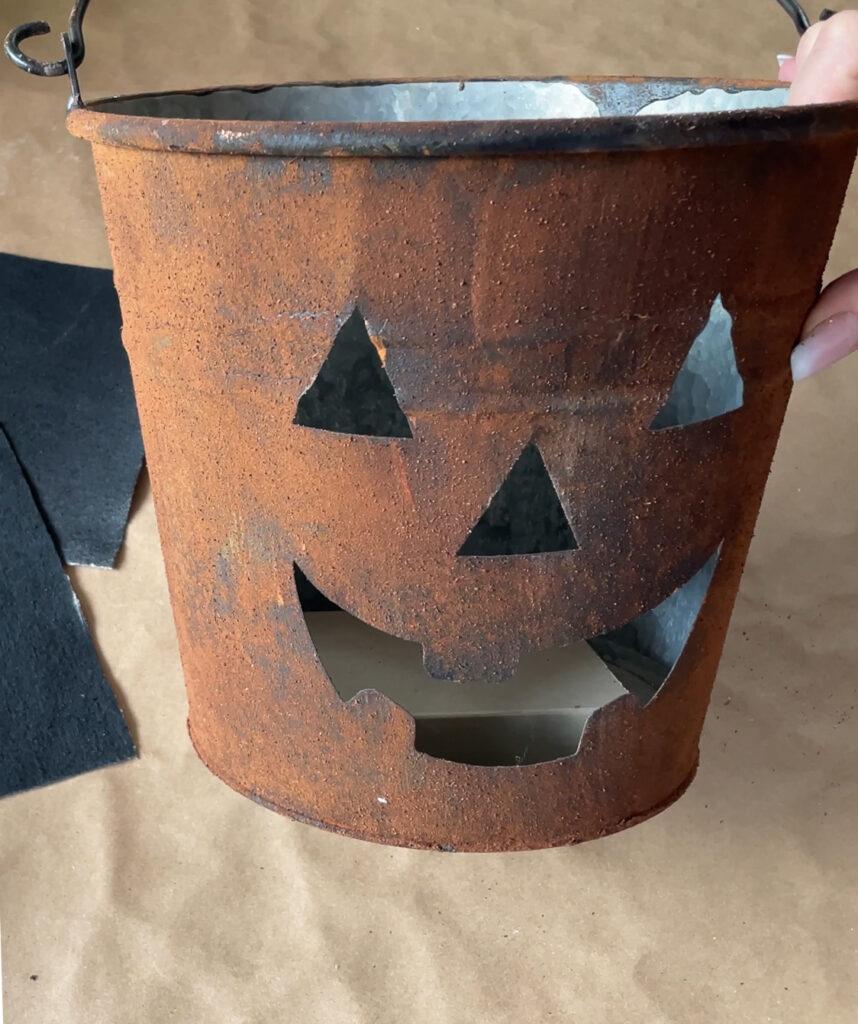
I loved these buckets, but not the finish on them. I wanted them to look old and rusty, so here is how I created that look.
First, you want to paint the bucket using black and then add in some orange or rusty-colored acrylic paint.
There is no need to be tidy or precise here as we are wanting an aged look.
Second, while the paint is still wet, sprinkle cinnamon all over the bucket. Tap off the excess cinnamon and let the bucket dry. Repeat this same process on the other three buckets.
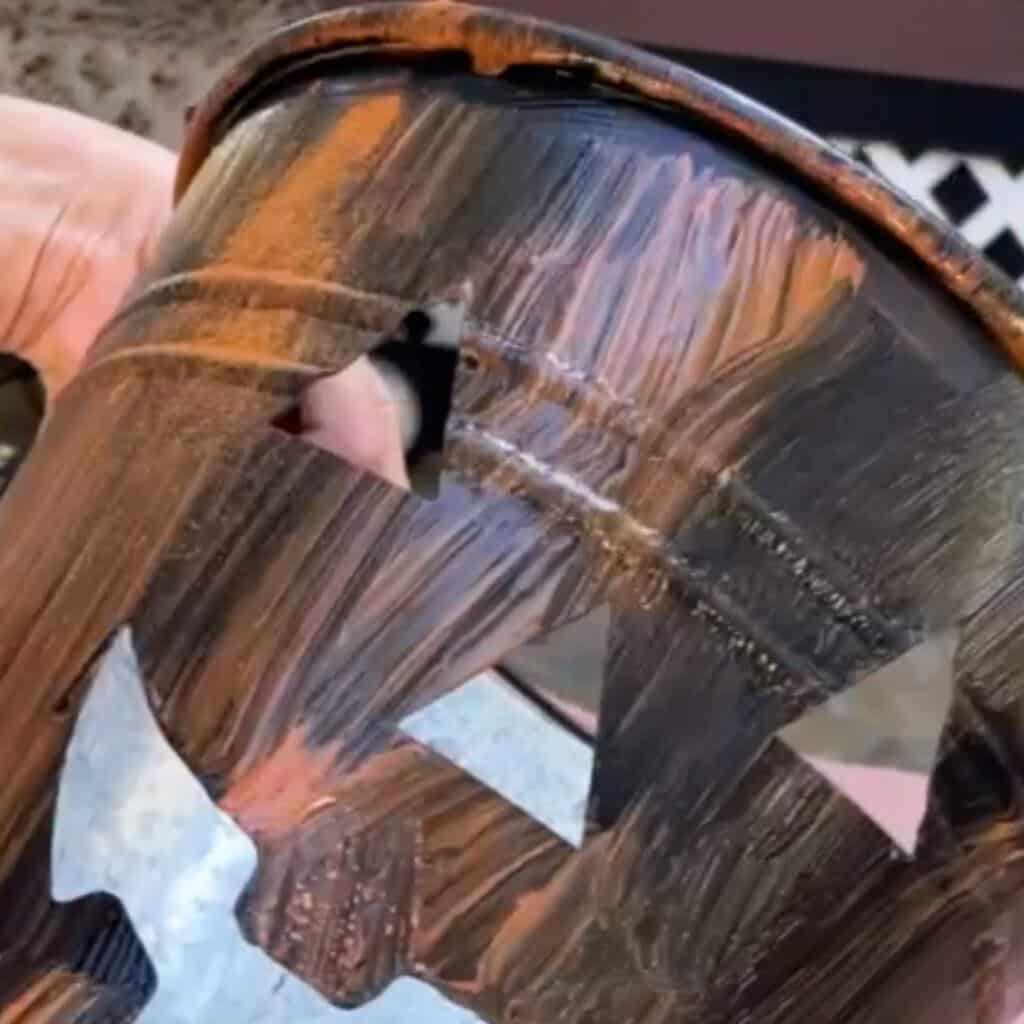
Step 2: Apply a Clear Coat of Acrylic Spray
Since you have worked so hard to create these buckets, you want to be sure to spray them with a clear acrylic matte spray. I gave mine a few coats. By doing this, you will seal the finish on the buckets, but keep in mind that it will darken the cinnamon to be a deep rusty color. (Just what I was after)
Step 3: Cover the Face Cutouts
My first thought was to plant these buckets with real mums, however, the weight of the buckets filled with dirt would be really heavy. So, I moved on to plan B.
I knew I needed to cover the face cutout so that you could either fill the bucket or not see through the holes.
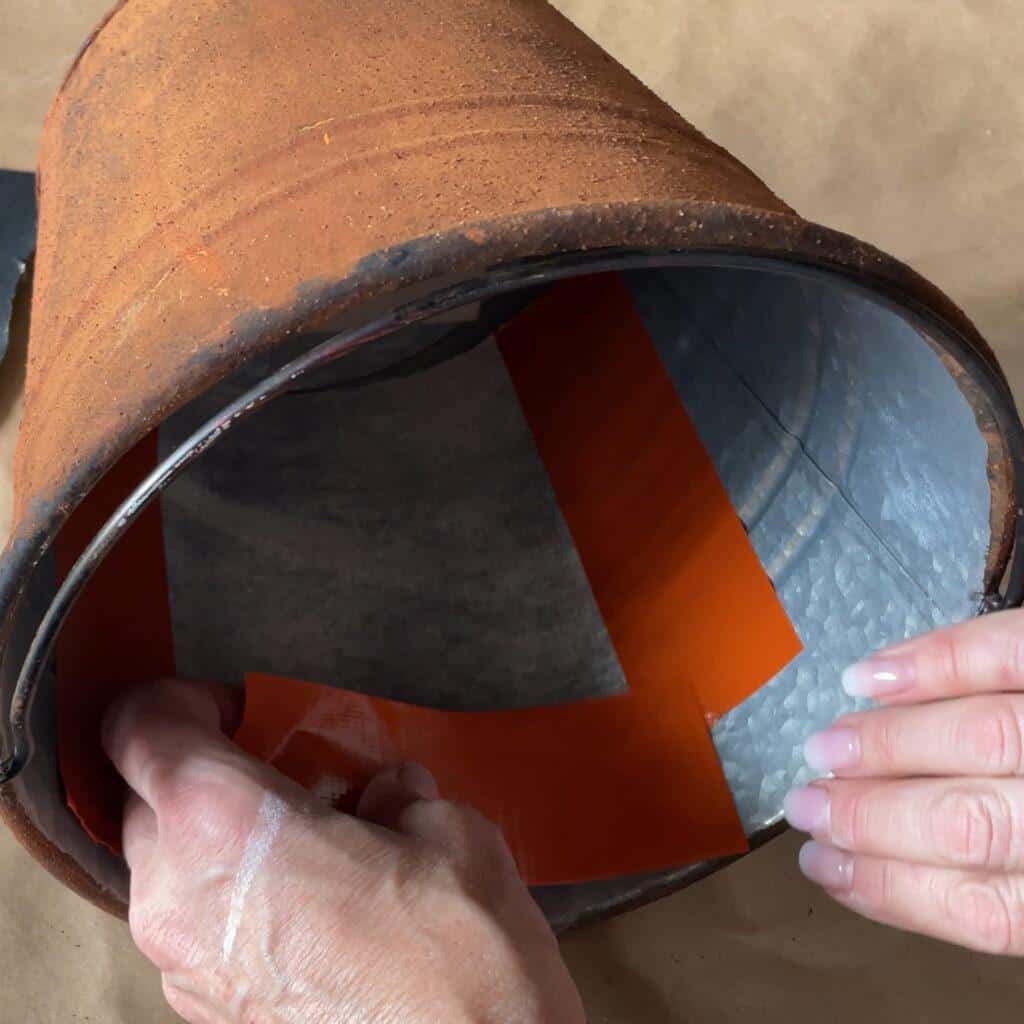
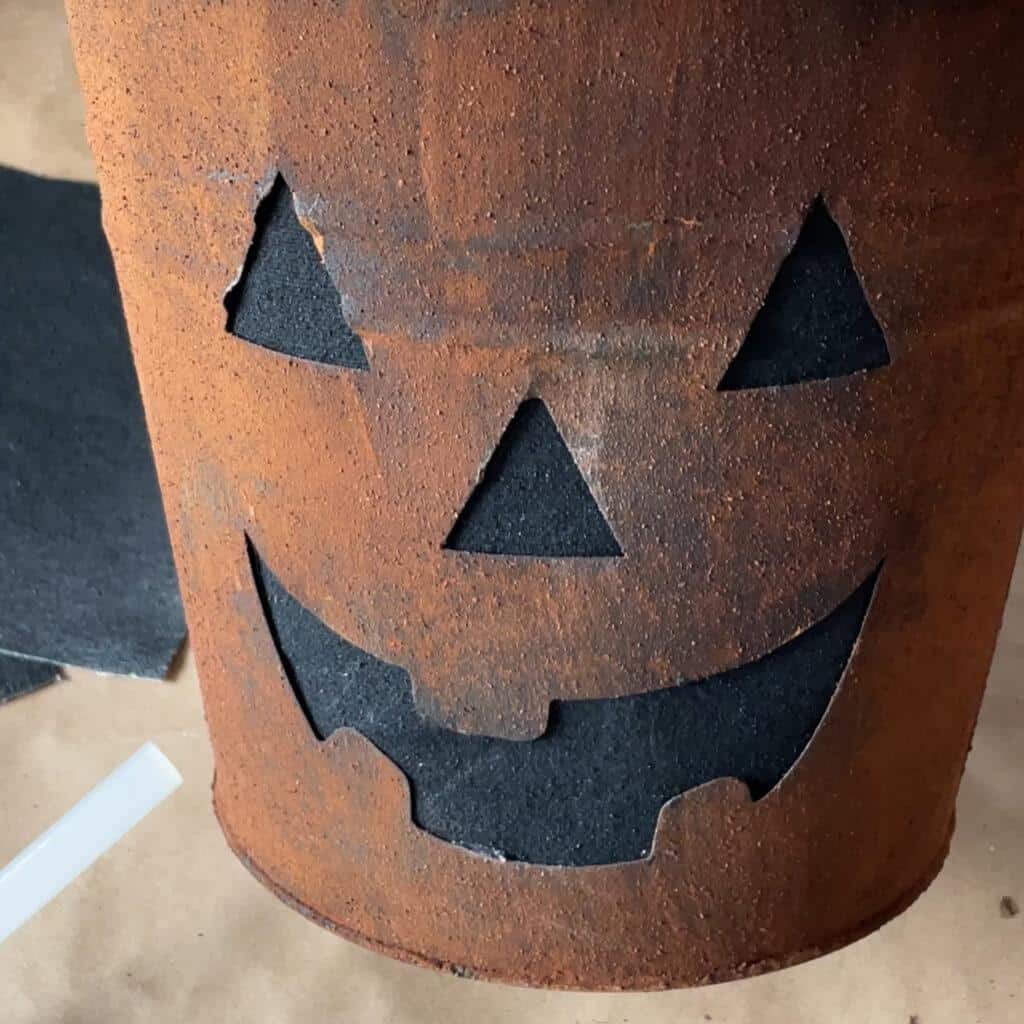
First, I cut a few pieces of an old drop cloth and spray-painted them black. Secondly, I glued them into the bucket with a glue gun and then used duct tape on the inside of the bucket around the edges.
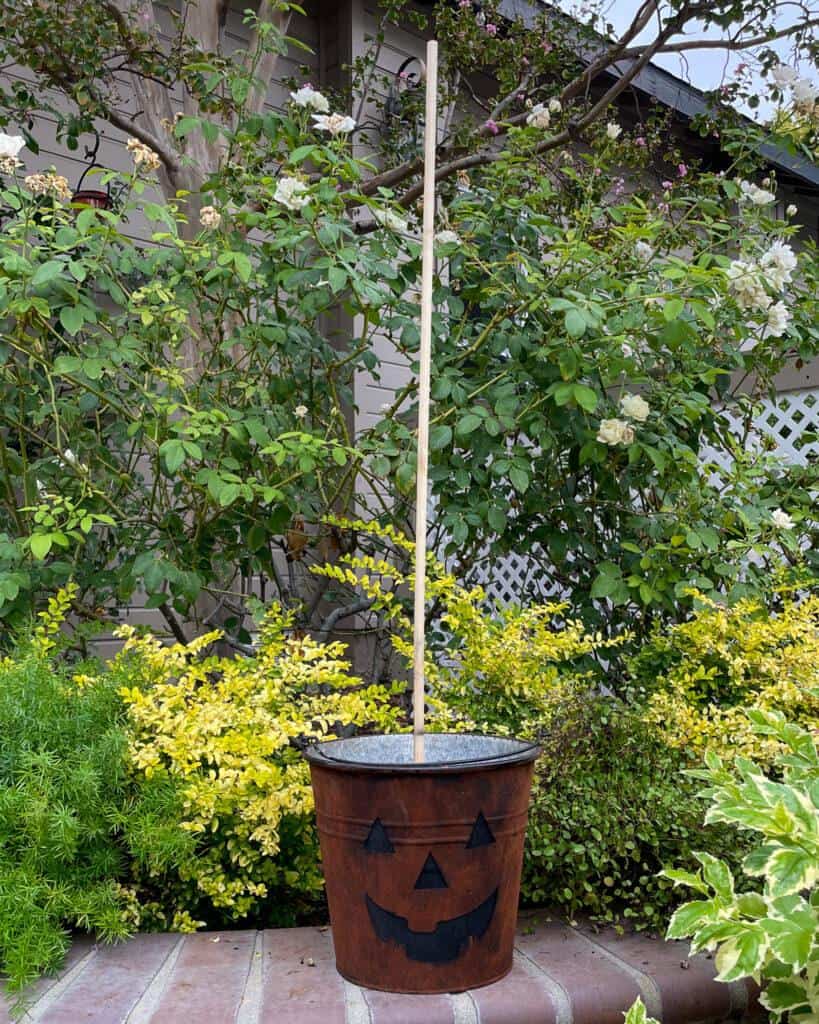
Step 4: Create a Sturdy Dowel Base
You need to have a solid base to hold the buckets for this fall topiary.
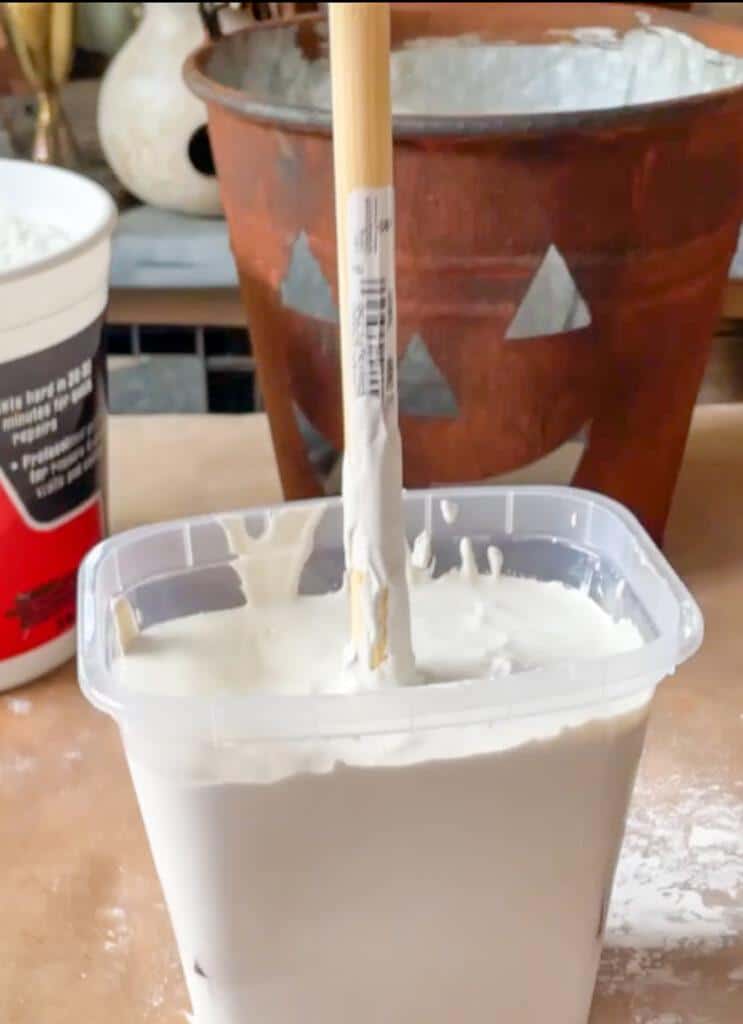
I used an old plastic container I had in the kitchen and a 1/2″ wood dowel that was approximately 36 inches long.
First mix up a batch of plaster of Paris, place the dowel in the center of your plastic container and pour the plaster of Paris all around the dowel. We use two small pieces of wood inside of the plastic container to hold the dowel in place.
Let this sit for about 30 minutes to dry.
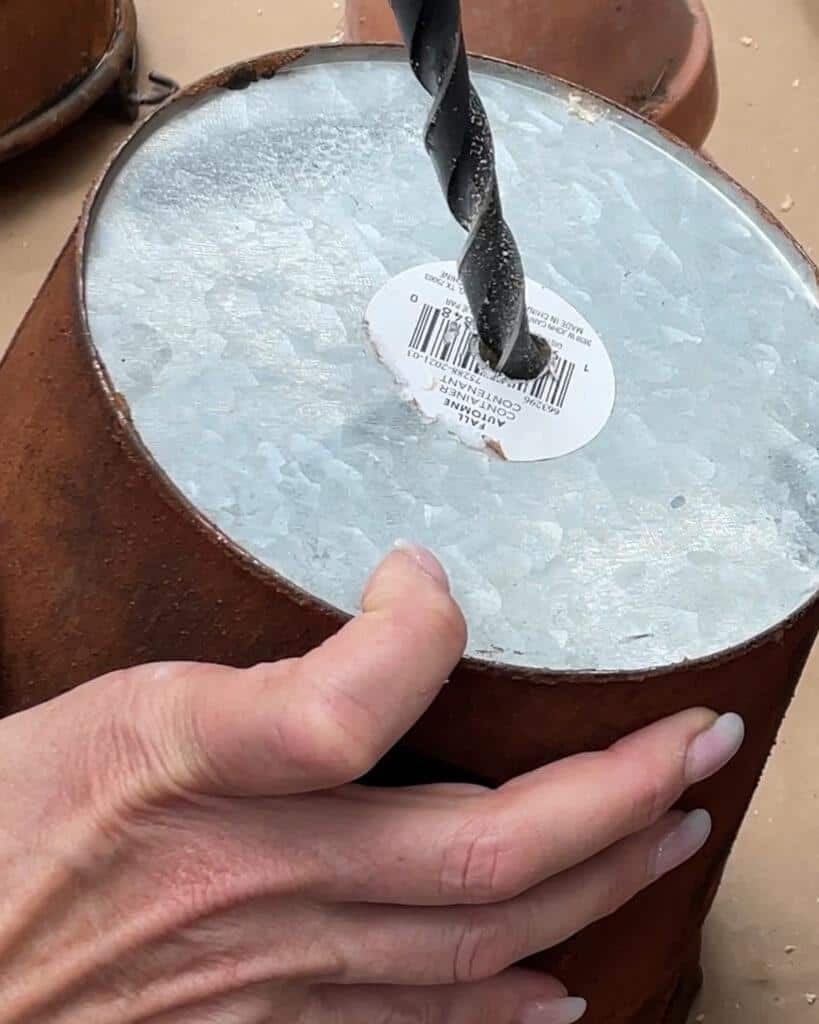
Step 5: Prepare the Buckets for Stacking
You can also see a few images above where we glued a small piece of wood into the bottom of the three smaller buckets. We did this for support when we drilled the hole in the bottom of the bucket.
We drilled the holes at a slight angle, knowing that we wanted them to tilt. I am not sure you have to do this, as they naturally wanted to tilt when we put them on the dowel.
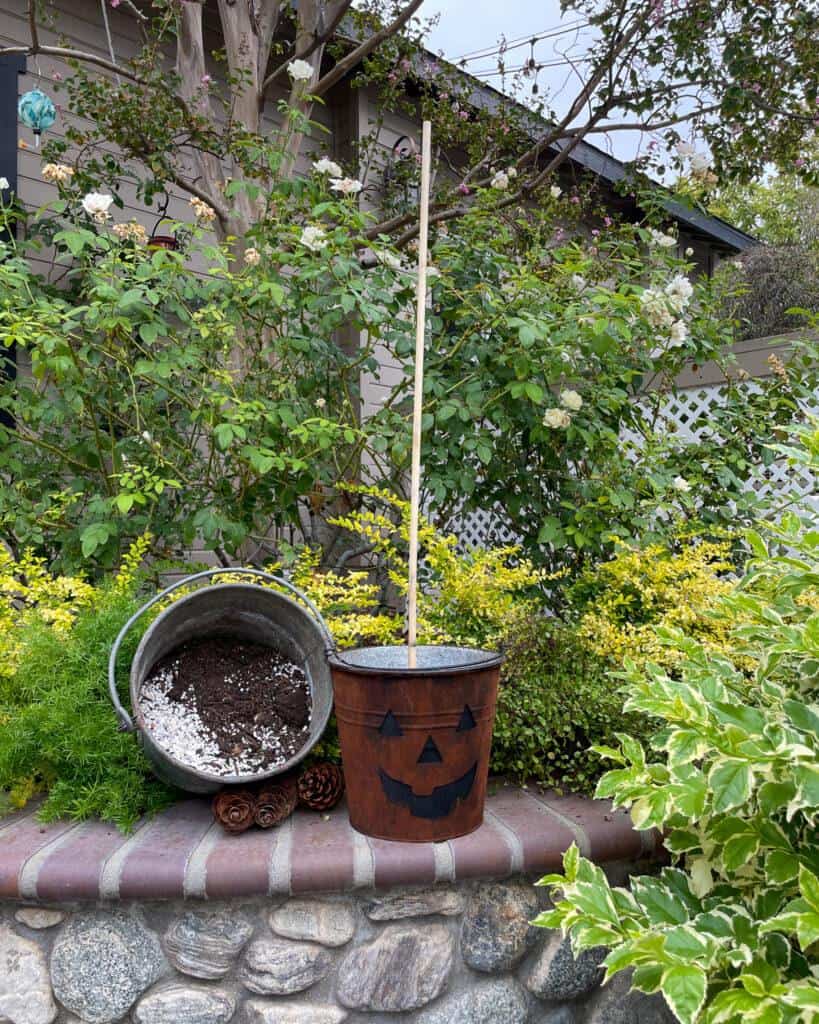
First, place the bucket with the dowel inside of the largest bucket.
Second, Fill around the dowel with gravel and soil. You need weight on this bottom bucket to support the upper buckets.
Third, place one 4″ clay pot over the dowel upside down to give a bit of space to place some flowers or greenery in the large bucket.
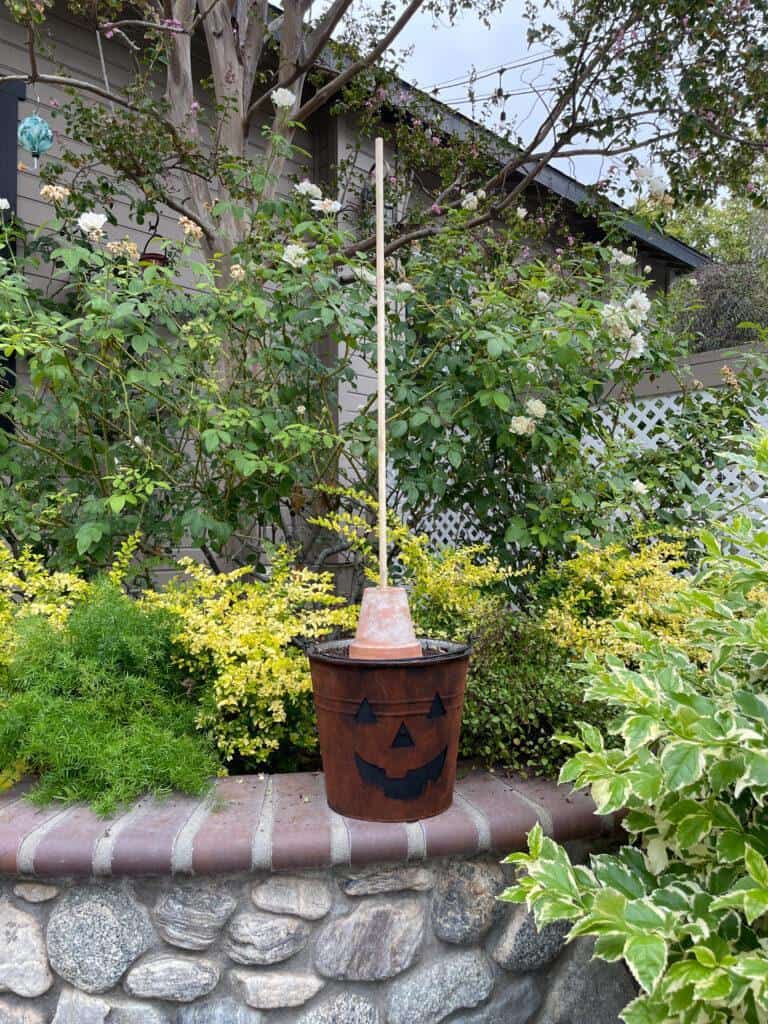
Step 6: Stack the Buckets into a Topiary
Now it’s time to put together your outdoor stacked pumpkin topiary. Put one bucket at a time onto the dowel and slide it down until it reaches the bucket below.
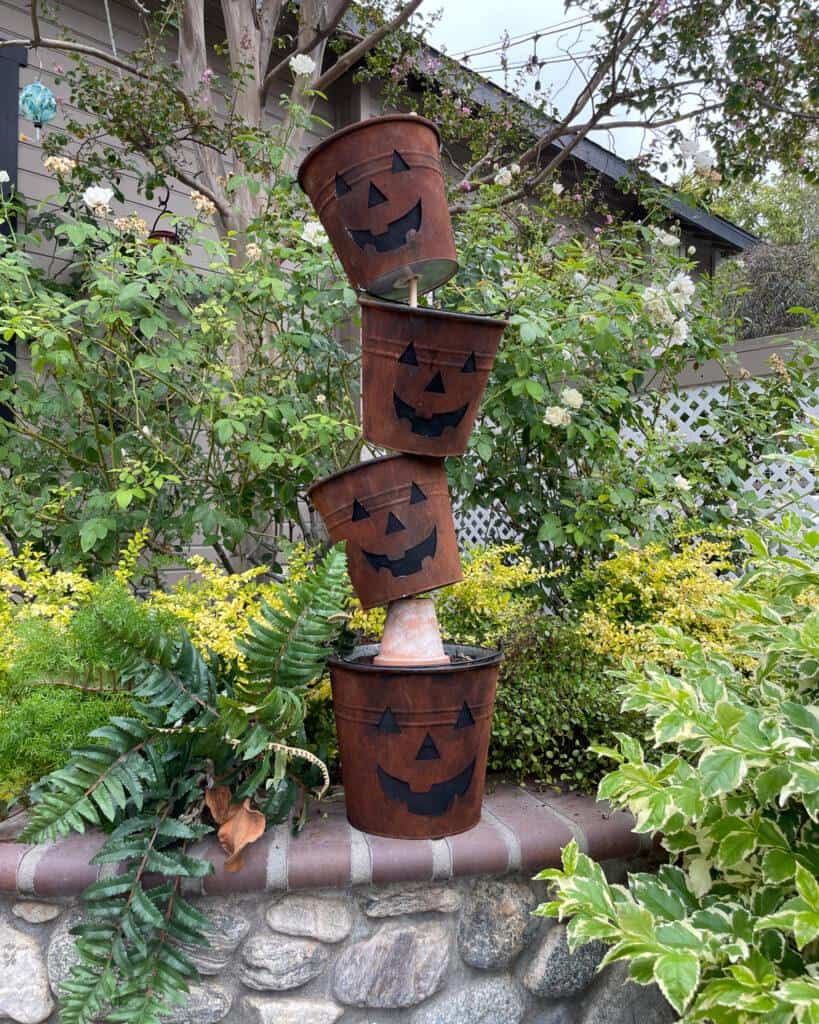
Continue this process until all three of your buckets are on the dowel. Trim the dowel if needed.
Styling Your Outdoor Pumpkin Topiary
Like I said earlier, I chose to use faux plants to decorate my topiary for two reasons. One was the weight of dirt and real plants would be very heavy. The second reason was I did not want water to get onto my buckets as I want to preserve them for years to come.
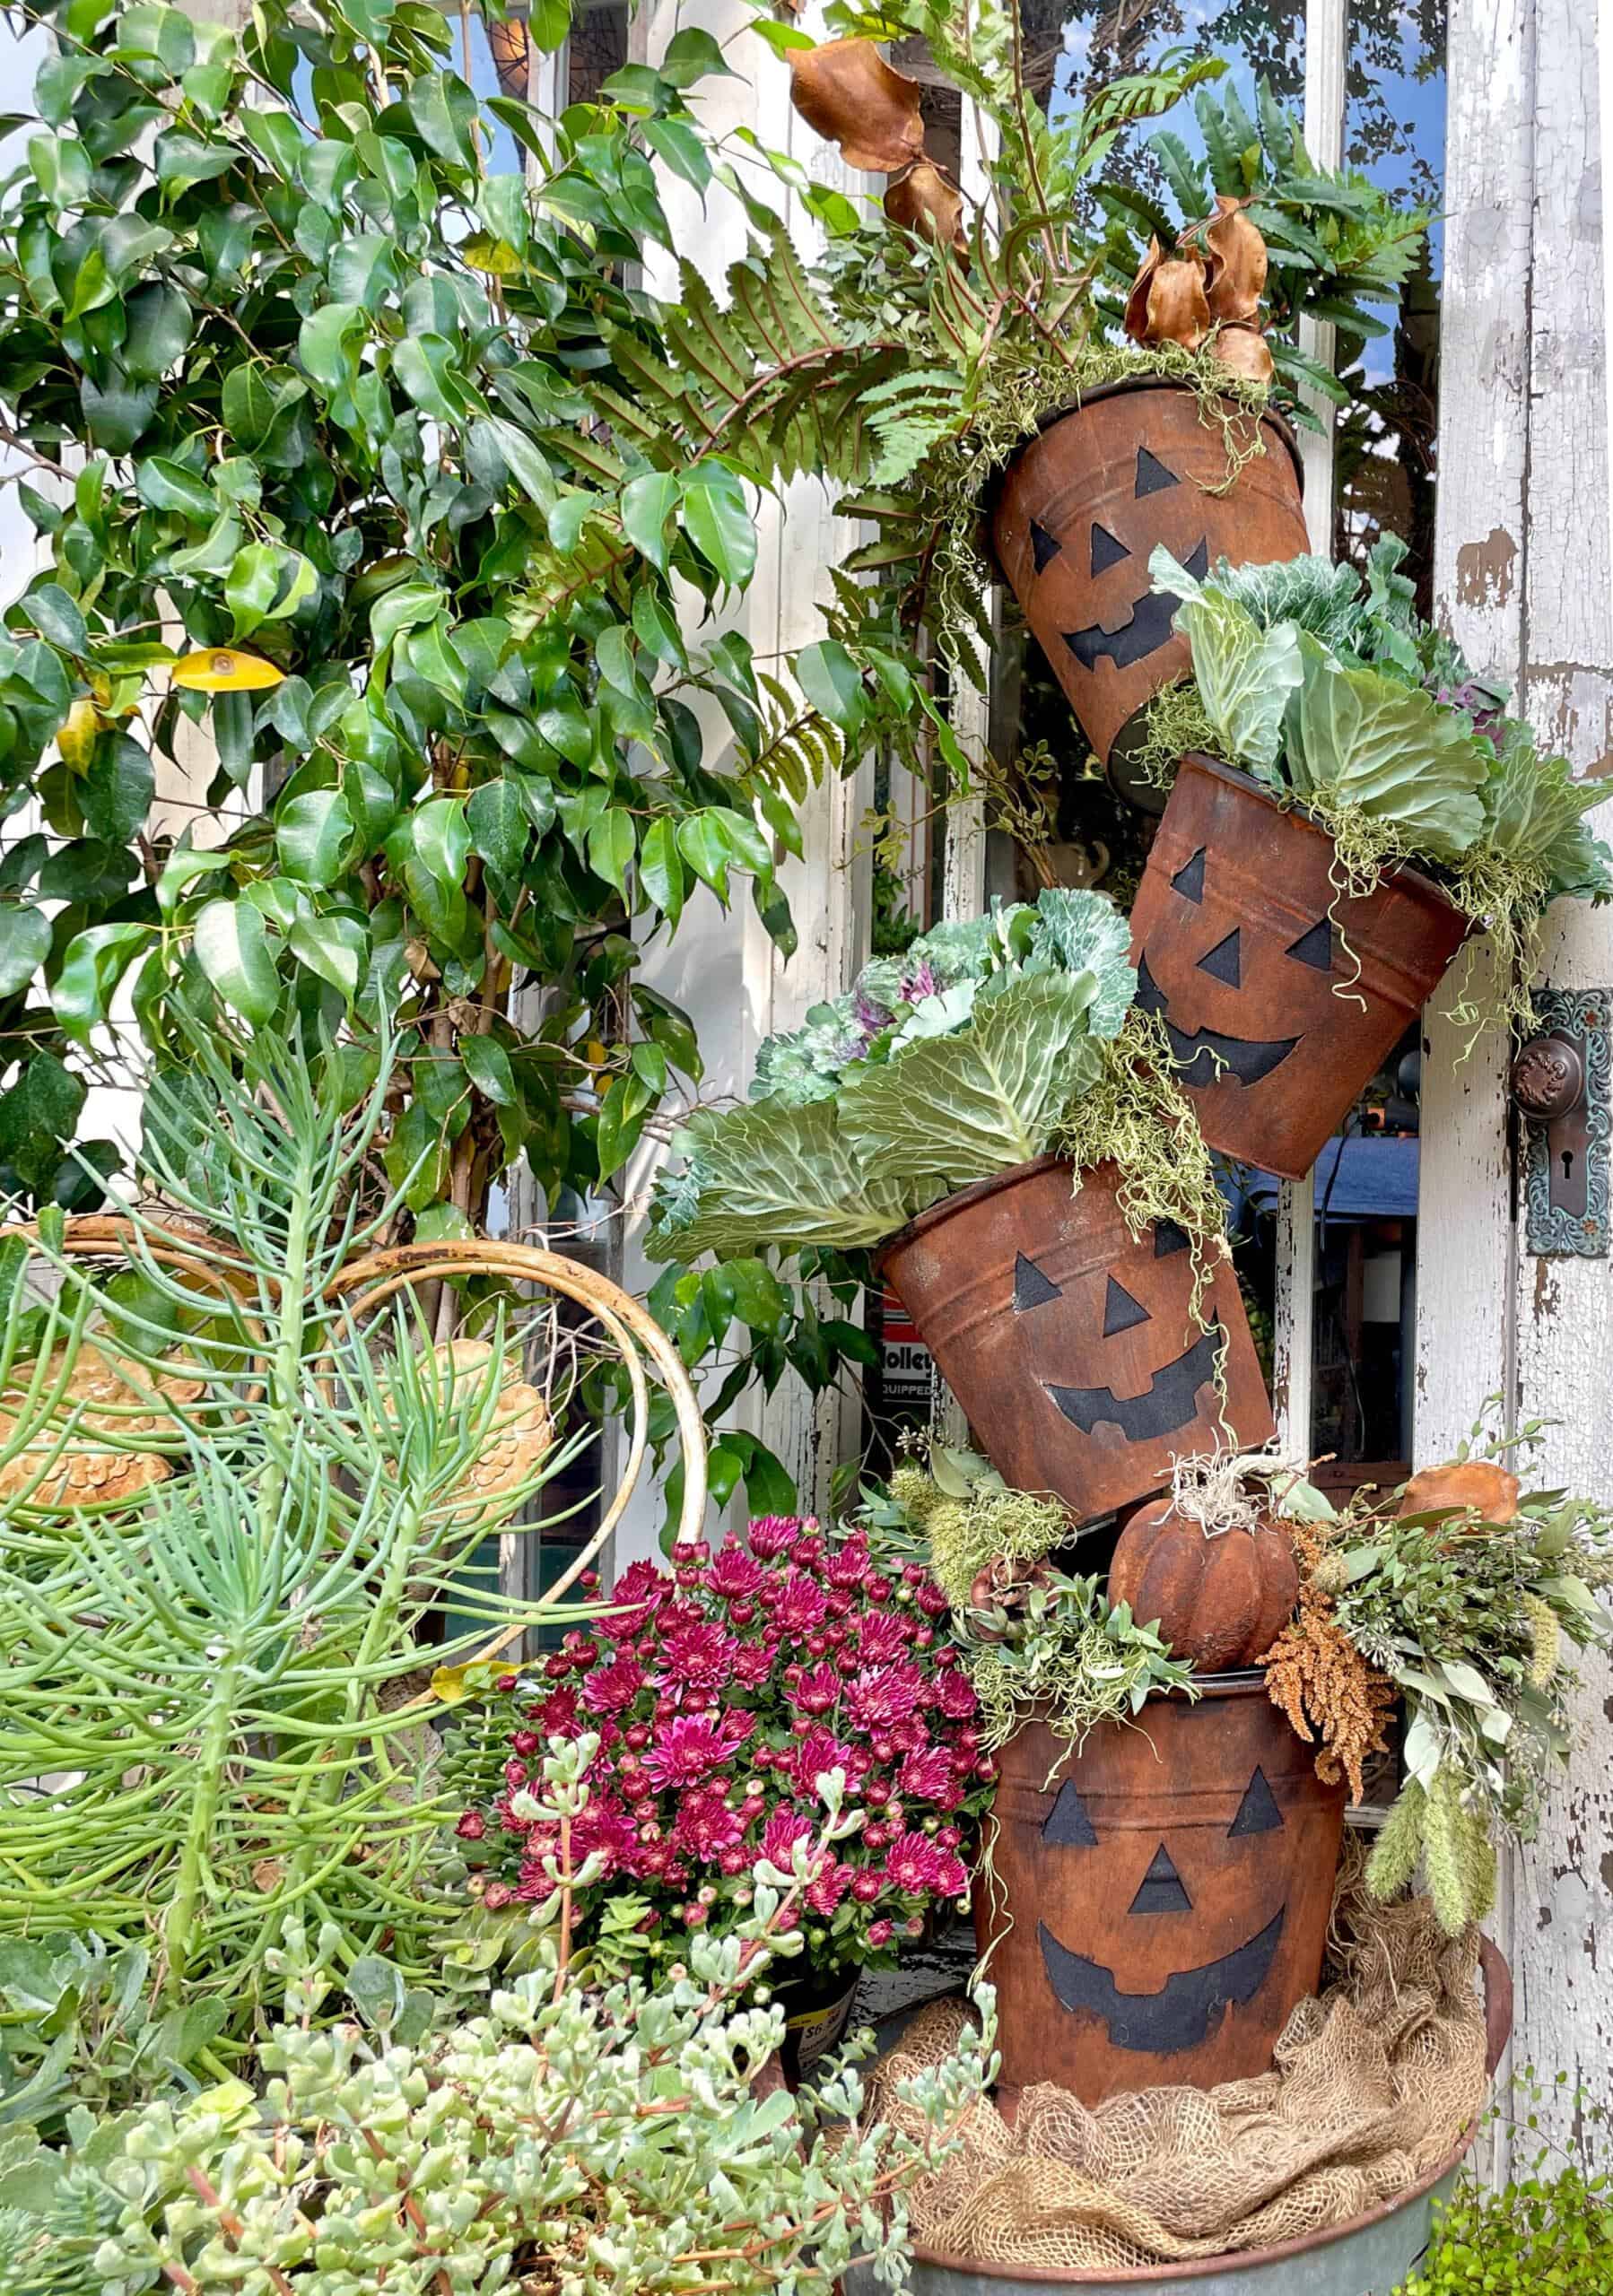
I simply added some faux and dried greenery, including some very large faux cabbage, some ferns, and even a small pumpkin I made rusty with the same method as the buckets. I even added some pods from my jacaranda tree and a bit of Spanish moss.
You can literally use anything you like to add to your outdoor pumpkin topiary, think outside of the box, and use your imagination. I did add a small block of dried flower foam to hold my greenery in place. I simply placed the block inside of the bucket and tucked my greens into the foam.

Other Fall Posts from WM Design House
If you love this post, you might also enjoy some of my other fall decor and DIY projects


Wrapping Up
And that’s it, your very own outdoor pumpkin topiary. It’s such a simple project, but it makes a big impact and adds instant charm to your fall porch.
I love how easy it is to customize with greenery, flowers, or a splash of color. However you style it, this topiary diy sure to make your home feel warm and welcoming this season.
I hope you’ll give this adorable halloween topiary a try, and I’d love to see how you make it your own.
More Fall Craft Ideas from My Friends
Printable Instructions Card for an Outdoor Pumpkin Topiary

How to Make a DIY Velvet Ornaments
Equipment
- 1 Hot glue gun
- 1 Pair of clippers
Materials
- Clear plastic or glass ornaments
- Acrylic paint
- Baking soda
- Wood skewers
- Masking tape
- Chip paint brushes
- Flocking powder in colors of your choice
- Mod podge
- Gold spray paint
- 3/8 ” velvet ribbon
- 1 bunch dried flowers or hops
Instructions
DIY Velvet Ornaments — Method 1: Baking Soda + Cinnamon
- Remove ornament cap and insert skewer or pencil; secure with masking tape.
- Spray paint the ornament in your chosen color.
- While the paint is still wet, sprinkle lightly with cinnamon, then baking soda.
- Rotate to cover evenly and let dry 2–4 hours.
- Gently brush off excess powder for a smooth, velvety finish.
- Optional: Seal lightly with a matte clear sealer.
DIY Velvet Ornaments — Method 2: Flocking Powder
- Spray paint ornaments in a color similar to your flocking; let dry completely.
- Attach a skewer or dowel to each ornament using masking tape.
- Apply Mod Podge or spray adhesive evenly over the surface.
- While tacky, sprinkle flocking powder generously over the ornament.
- Gently press the flocking in and let dry overnight.
- Tap or brush off excess powder for a soft, velvet-like texture.
- Replace the ornament cap and tie with velvet ribbon.
Did you make this craft?
We would love to see what you have created, so mention us @wmdesignhouse or tag us using #wmdesignhouse so we can see your creations!

More about me!

Hello, I’m Wendy – a dedicated homemaker with a deep passion for decorating, gardening, cooking, and crafting. I find joy in harmonizing beautiful elements to fashion a space that is both comfortable and inspiring. I will help you create a beautiful home, one project at a time.
How cute are these rusty pumpkins! I love this!
This is one of the cutest Autumn decor projects I’ve ever seen! What a fun and charming display.
Thanks so much for joining the Grace at Home party at Imparting Grace. I’m featuring you this week!
Thank you so much, Richelle, I am so honored to be featured on your link party. I apologize for getting back to you so late as I was at a conference all day. I hope you had a wonderful day.
This is so beautiful! Using cinnamon is a great idea. I’ll be featuring it on tomorrow’s Crafty Creators Link Party.
Hi Niki, Thank you so much for your sweet comment. I am honored to be featured on your link party.
I apologize for getting back to you so late, I was at a conference all day. I hope you have a great weekend.
This is just adorable! It really caught my eye! Thank you for the inspiration!
Thank you so much. I hope you get a chance to try it.
Such a fun pumpkin topiary. Love the tutorial on how to create it. Thanks for sharing. I am happy to feature your cute pumpkin topiary at Love Your Creativity.
Wendy this came out so cute! I’m sharing in my Nesting post this morning! Have a great weekend!
Thank you so much Nicolle, I appreciate that so much. I hope you have a great weekend.
I love this! A great tutorial and fabulous result!
Wendy
This project is just the cutest ever. I’m sharing a link on my Dirt Road Adventures.
Hi Rachel, thank you so much. I am glad you liked it. Have a wonderful weekend my friend.
Wendy, you are amazing!!! I love these little rusty buckets! I am going to try this technique on a few little buckets and will let you know how it goes! Thanks for the tips!
Thank you Elizabeth, I hope you enjoy the process, I was putting cinnamon on everything, LOL
Oh my gosh, this is the cutest topiary ever! Such a darling idea, Wendy! I love the idea of using cinnamon to “age and rust” the pumpkin buckets. I may have to hunt down some similar buckets to try my hand at this!
Thank you Kristy! It is very easy and fun to make. The bonus is that it smells divine as well. Happy Fall and thanks for joining me on my first hop.
Such an awesome project! I love how kind of tipsy they are – like pumpkins having fun! I also adore that cinnamon finish – it looks like rust and so real. Another amazing project Wendy…hmmm can you for once not do sooooo good ahahaha I am getting a serious inferiority complex! Thanks for letting me join this hop – it was fantastic!
Thank you so much, Crystal, it was a very fun project to create. I too love how tipsy they are, LOL
I love this project, Wendy! The cinnamon is genius; it looks so real. With artificial plants, it could be used inside, too, but of course it’s adorable by your vintage SheShed. Thanks so much for hosting this fun hop!
Thank you Lora. You are right, it certainly could come inside and it smells so good. Thank you for joining us today.
This is a stunning project!! Also, your video editing is on point Wendy!! Amazing job!
I love this Wendy. Its such a cute idea. Would look great at the front door?
Thank you Anita, it was really fun to make. I did move it to my back porch for now and I am loving it. It smells so good everytime I walk by it.
This is freakin’ awesome!! I have to add the cinnamon trick to my DIY toolbox…also cannot believe that the cabbages are fakes!! They look so real. Thanks for organizing!!
Thank you, friend! I tell my husband to beware. I may cinnamon him if he gets in my way! Thanks for hopping with me today.
I absolutely love how this project turned out, Wendy! It’s so creative and simply beautiful! I am in awe!
Thank you Meredith, so kind of you. I too am in awe of your darling terra cotta pumpkins. Im head to your blog now to see how you made them.
Such a clever project, Wendy! And your instructions are so clear! You have put together an amazing group of bloggers for this hop. I feel so honored to be included! Thank you, my friend! ~Missy
Thank you Missy. It was a very fun project to build. Thank you for joining me on this fun venture. We will do it again soon.
Wendy, I just love this idea! Loving the rust look! So unbelievably creative my friend! Great to hop with you today! Thank you so much! Susan
Thankyou Susan. The best part is the smell when you walk by it. Happy FAll!
Thank you Susan. The best part is the smell when you walk by it. Happy FAll!
This is super cute Wendy!
Thank you so much Kim, it was a very fun project to create.
This is such a great idea Wendy! I recently discovered cinnamon for creating and love the rusty, grungy results that smell good!
Thank you Cindy. It indeed smells yummy and perfect for fall. Thank you for joining us today on the blog hop.
Your topiary is so cute and looks beautiful decorated for fall! I would never think to use cinnamon! Thanks for sharing and organizing our hop today! Pinned?
Thank you Kim! Thank you for hopping along with me today.