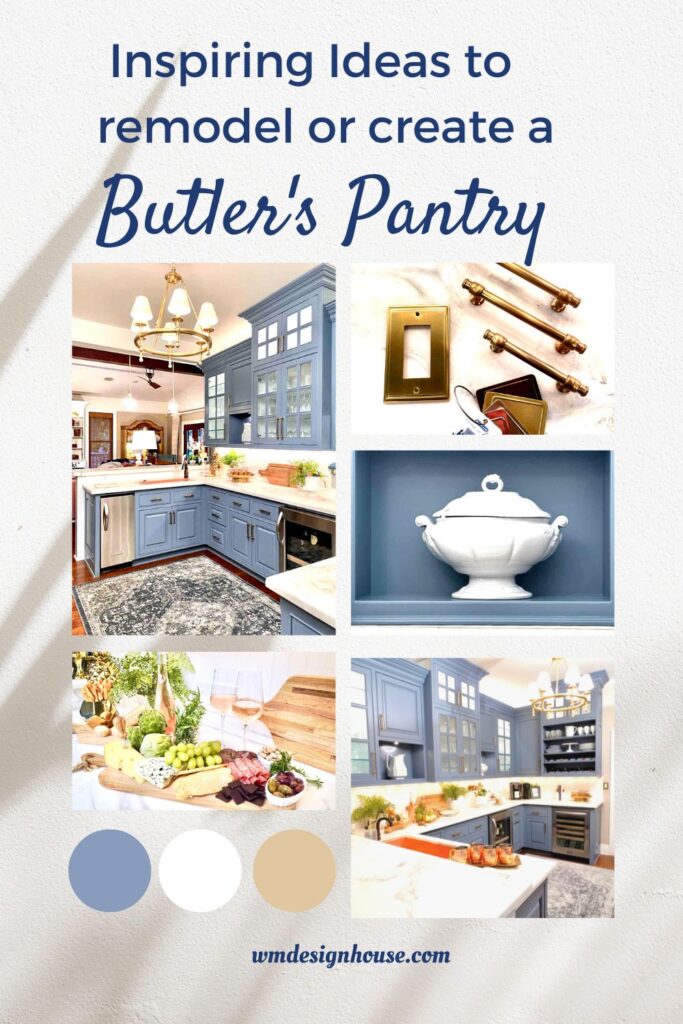
Butler’s Pantry Design Ideas and Tips for Your Home
Our Butler’s Pantry desperately needed new design ideas, and I wasn’t sure where to look for inspiration.
I had several ideas but needed to narrow down some of my options.
Before we get to the makeover of our Butler’s pantry, let’s talk about some of the basic things you must consider before designing your space.
On my blog, I may sometimes use affiliate links, which means a small commission is earned if you purchase via the link. The price will be the same whether you use the affiliate link or go directly to the vendor’s website using a non-affiliate link.
What is a butler’s pantry?
Discover the fascinating history behind the butler’s pantry, a unique space once dedicated to storing and guarding the valuable possessions of the wealthy. From delicate china to precious silver, this narrow room was coveted for its ability to house the finest serving pieces of the household. Interestingly, it was not uncommon for butlers to sleep in the pantry to safeguard these cherished items. In addition to the butler’s pantry, many English and European homes from the Victorian era featured a traditional food storage pantry for washing up and food prep.
While we do not have a butler (I am the butler, or I should really say my husband is:)))), we live in an old home with a butler’s pantry.
Gone are the days when the butler’s pantry was a mere extension of the main kitchen or dining room. Today, these clever spaces are often placed strategically between these two entertaining hubs, offering a functional and stylish solution for hosting dinner parties.
This room typically has built-in cabinets and open shelves and is an extension of the kitchen space for additional storage. The butler’s pantry is also used for serving and staging food for entertaining.
Benefits of a butler’s pantry
A butler’s pantry has many benefits and ways to utilize this great space.
- Use it for extra storage space for your fine china
- Storage area for small appliances
- Use the additional countertop space for food prep
- Use it for a wet bar
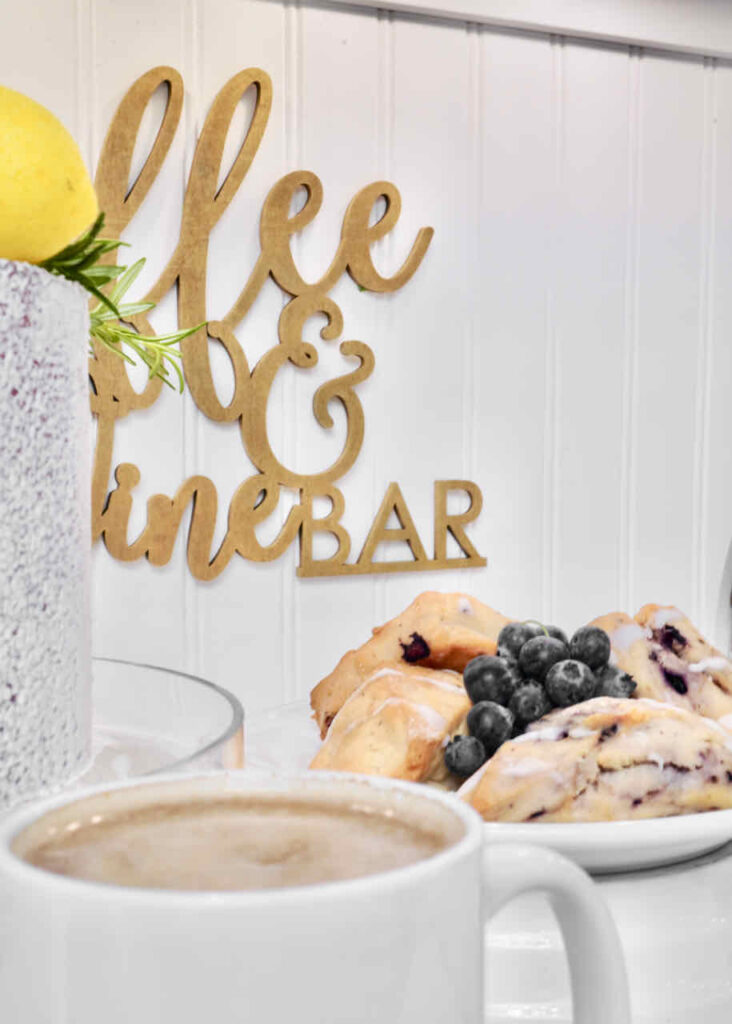
- Create a coffee station in your pantry
What kind of appliances do you need in a butler’s pantry?
You will choose your appliances once you decide on your pantry’s main function.
Our pantry serves as a second kitchen where we do a lot of food and drink prep.
Here is a list of the appliances I have in my pantry.
- Wine cooler
- Ice maker
- Coffee maker
- A second sink
- Drink refrigerator
Some other options you may want to include:
- A second dishwasher
- A warming drawer
- A trash compactor
Butler’s pantry design ideas and tips
Let’s talk about some pantry design ideas and tips to help make your butler’s pantry work for you.
- Create a coffee station
- Leave a hot water pot out for tea
- Create an area to use as a home bar when entertaining
- Use your counter space to create a dessert bar
- Use your sink as an ice bucket
- Use the counters as a staging area to serve food
- Invest in a wine refrigerator
- Don’t over clutter your counter space
- Take advantage of verticle space adding cabinets to the ceiling
- Add open shelving
- Leave those small kitchen appliances that you use daily out on the counter
- Add a pocket door if you want to close off your space
- Add task lighting for food prep areas
Take a look at my butler’s pantry re-model
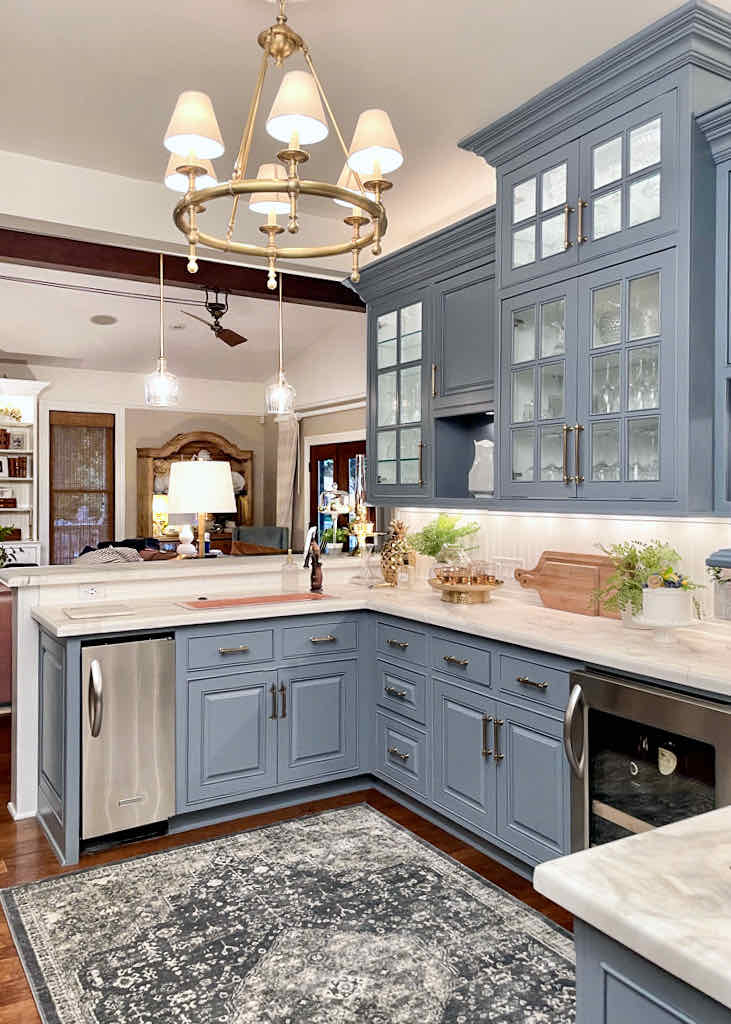
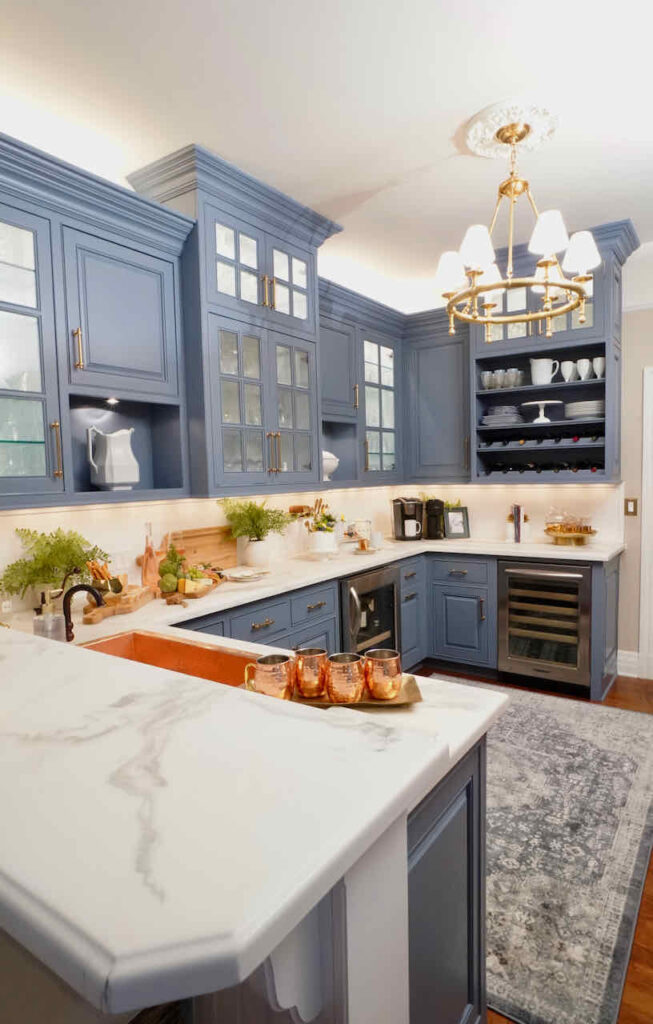
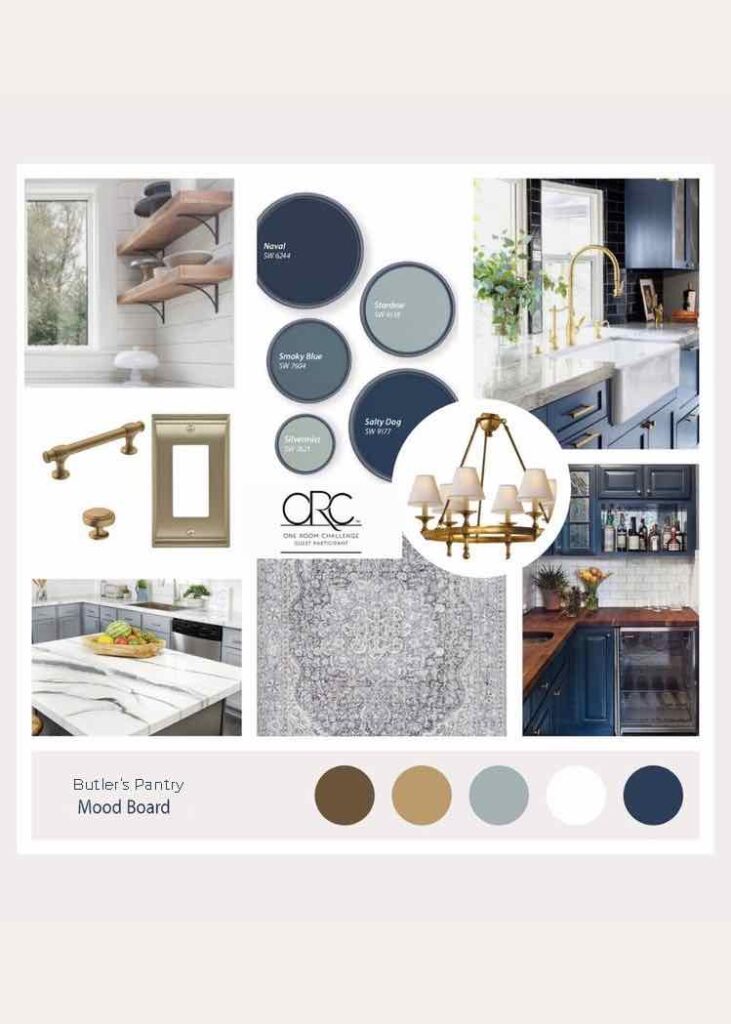
I started with a Pinterest board to develop ideas I liked, to create a more modern butler’s pantry. Our home is not new, so I needed to be careful with my choices to ensure I followed the original style and design of our 1898 home.
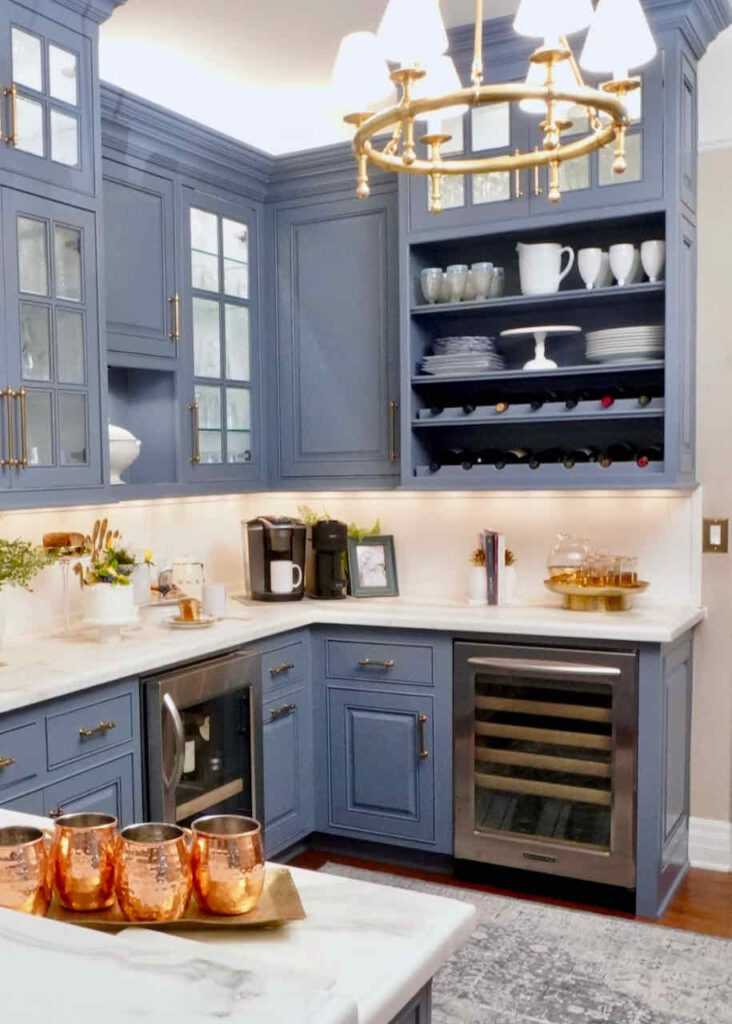
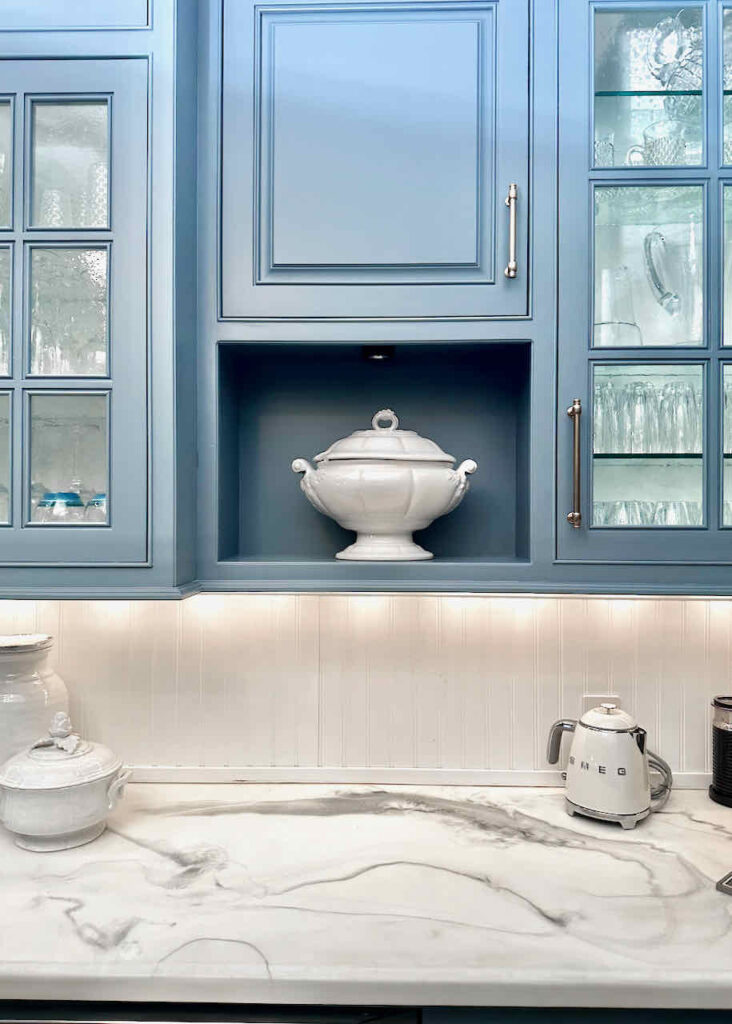
We had good bones to work with as we already have high ceilings and beautiful kitchen cabinets in the pantry. Several of the cabinets have glass doors for displaying many of my serving pieces and extra wine glasses. These cabinets had enough space so that I would able to organize my collections well. In addition, the placement of the dining area is close by, so there was no need to move any walls.
I had an existing wine rack that was the perfect place to add some open shelves.
Once I narrowed down my design choices, I created a mood board. This was my guide to start the update of the butler’s pantry.
A little history of our butler’s pantry
This room was very dark and dreary. It needed more natural light and a design makeover.
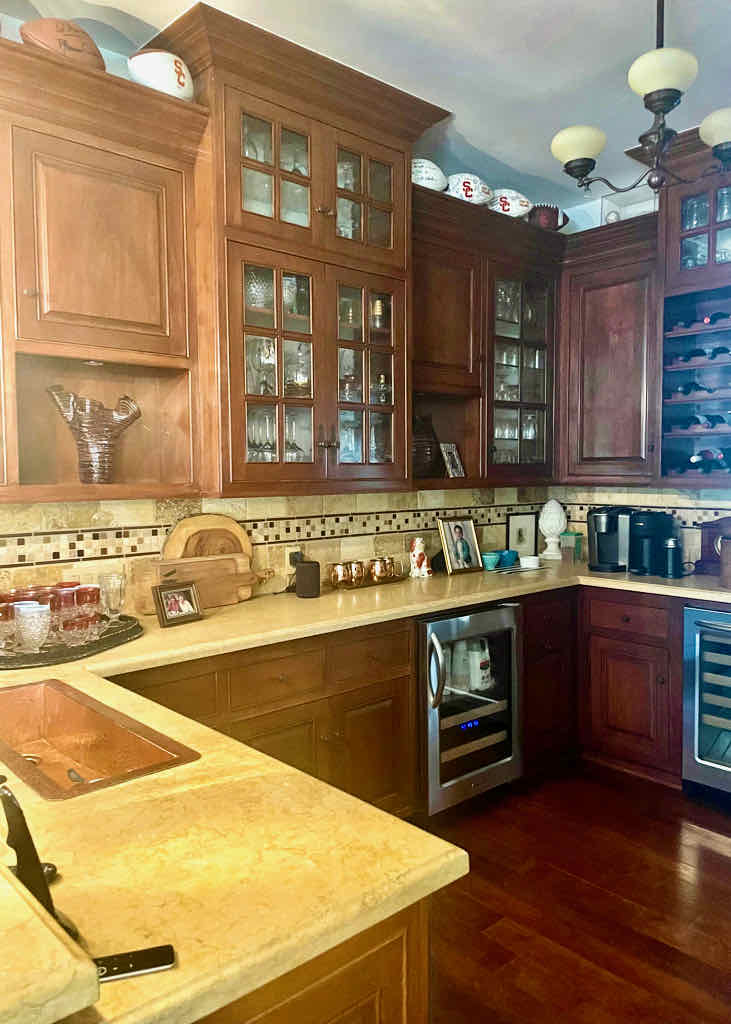
An interesting fact, our home is a historical landmark, and a lot of the history of our home happened in this room. The city Postmaster lived here, and they used the butler’s pantry as the postal room. This is where you would come to collect your mail and pay your taxes.
We have lived here for 25 years and did the first remodel of this room 15 years ago.
The Butler’s Pantry is between the family, kitchen, and dining room, so the location is perfect and works well for entertaining. This room is a great place for our friends and family to gather when they are visiting. Its easy accessibility makes it the perfect area to serve hors d’oeuvres and drinks.
Butler’s pantry ideas
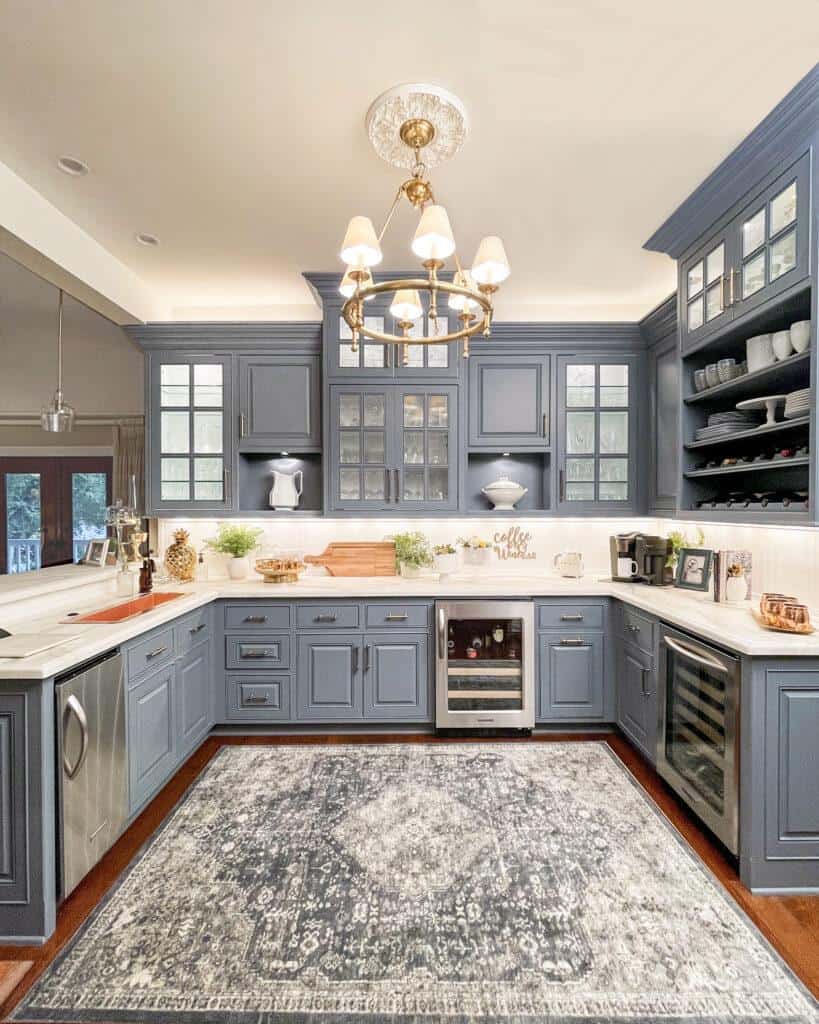
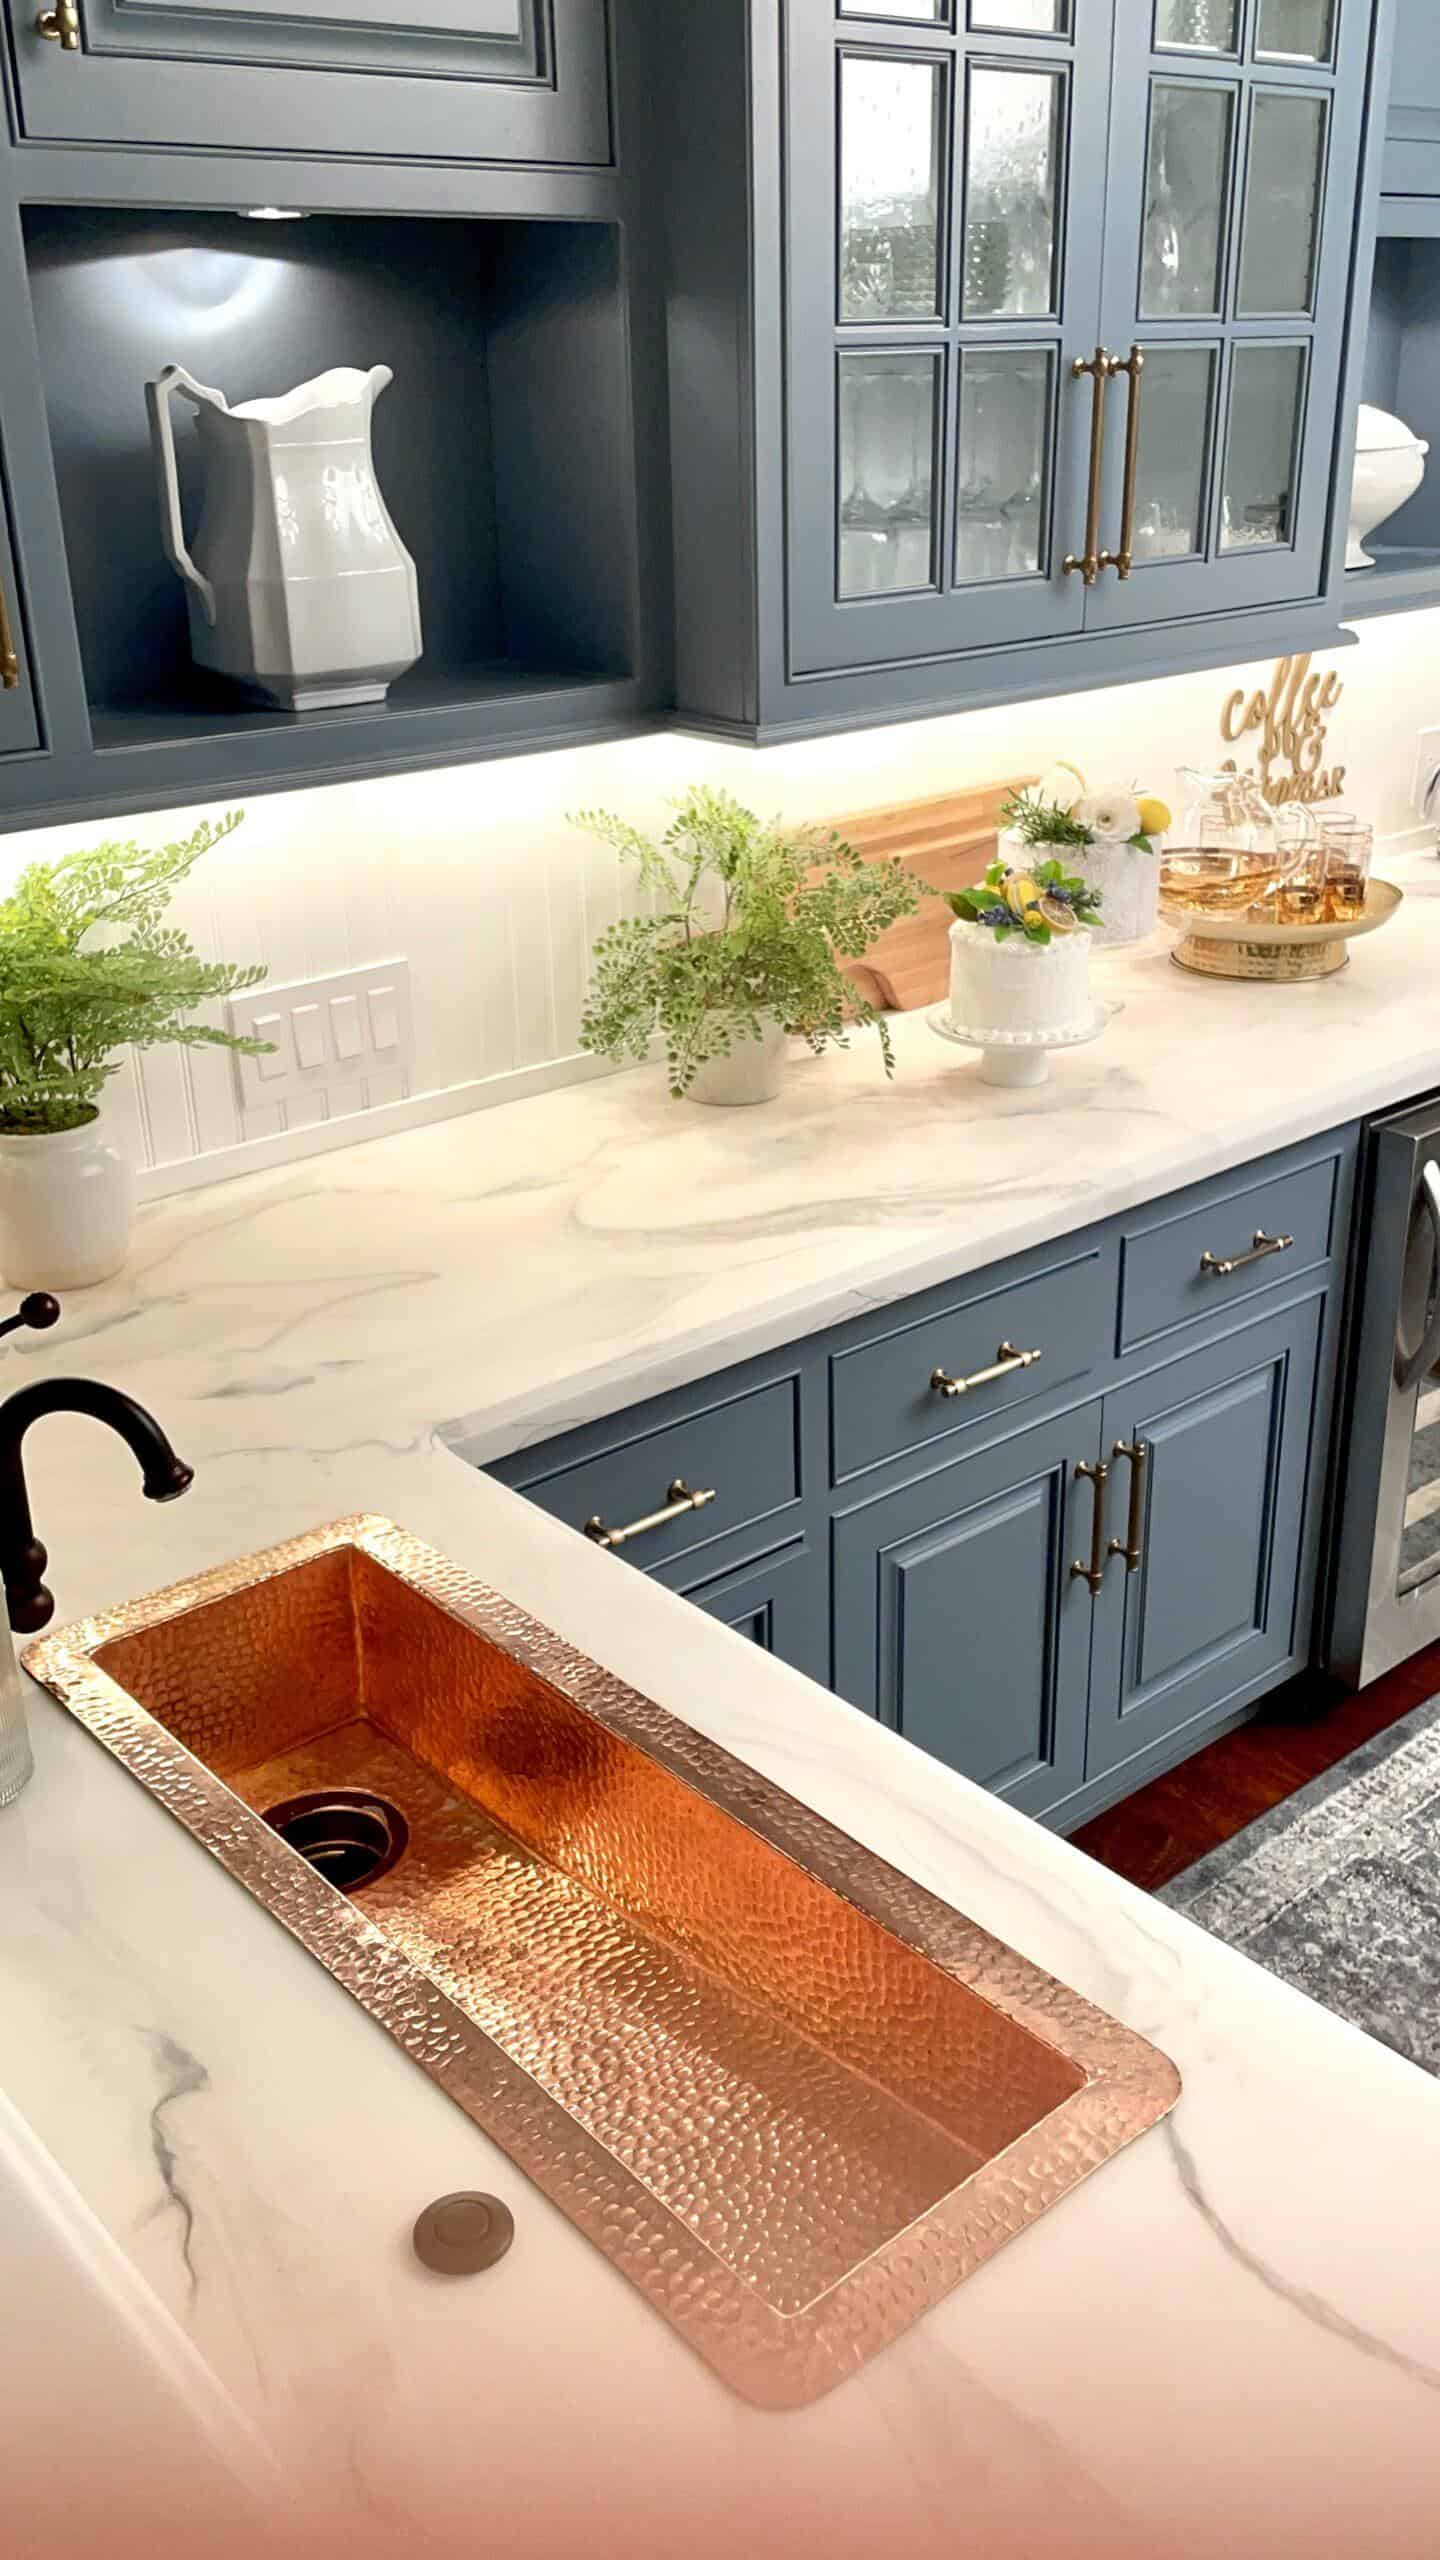
Here is a list of the ideas we have implemented to update our butler’s pantry. I did not want to replace the backsplash or the countertops, so we had to develop creative ideas.
- Paint the cabinets
- Overlay a new backsplash using beadboard
- Pour epoxy to look like a white marble countertop
- Replace all of the hardware on the cabinets
- Replace the light fixture
- Add an area rug
- Update my decor on the countertops
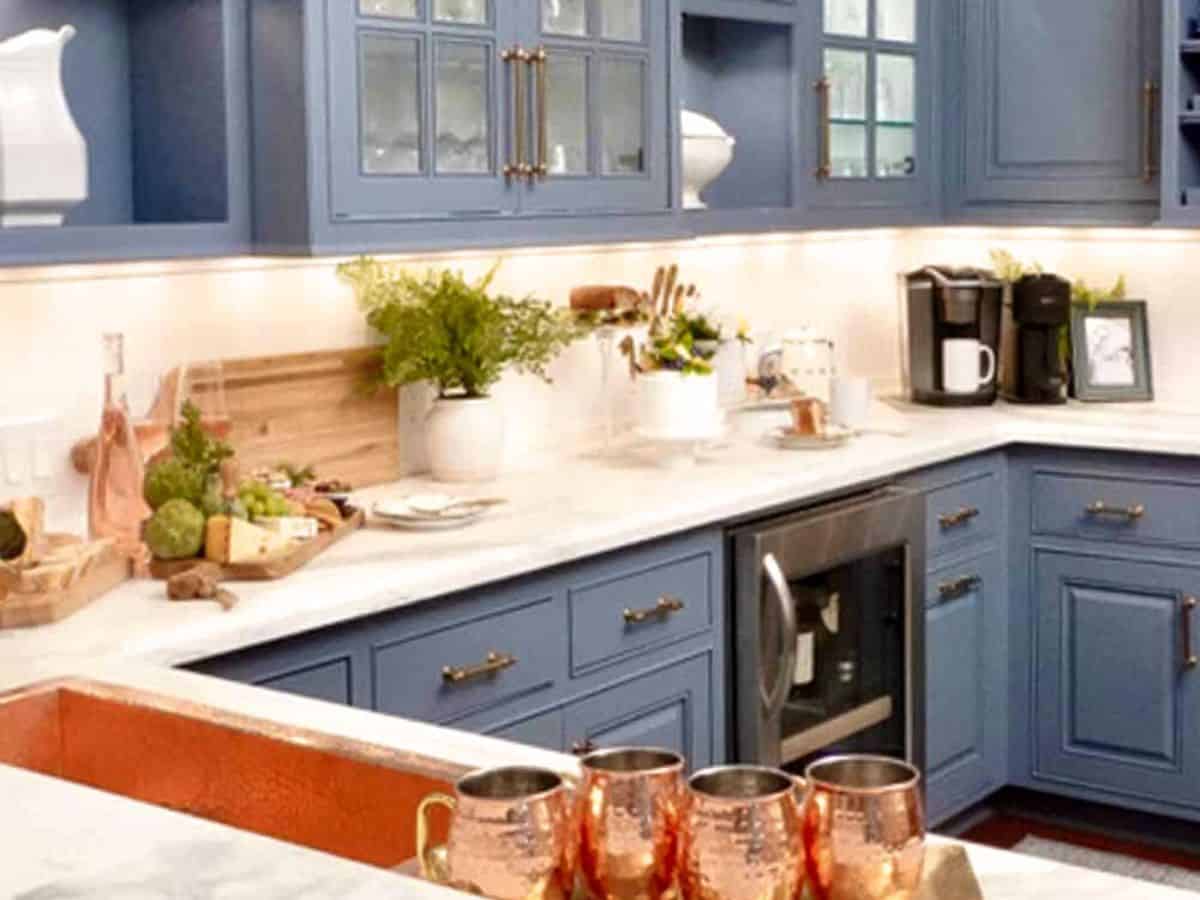
Painting the cabinets
Painting cabinets is a big job, not one I wanted to tackle, so I brought in professionals.
I know white cabinets would have added a lot of light to this room. However, my kitchen and family room have white cabinets, and I wanted a contrasting color. I would incorporate the white in the backsplash and the countertops.
The hardest part of the painting process for me was choosing the color! Do you struggle with this too?
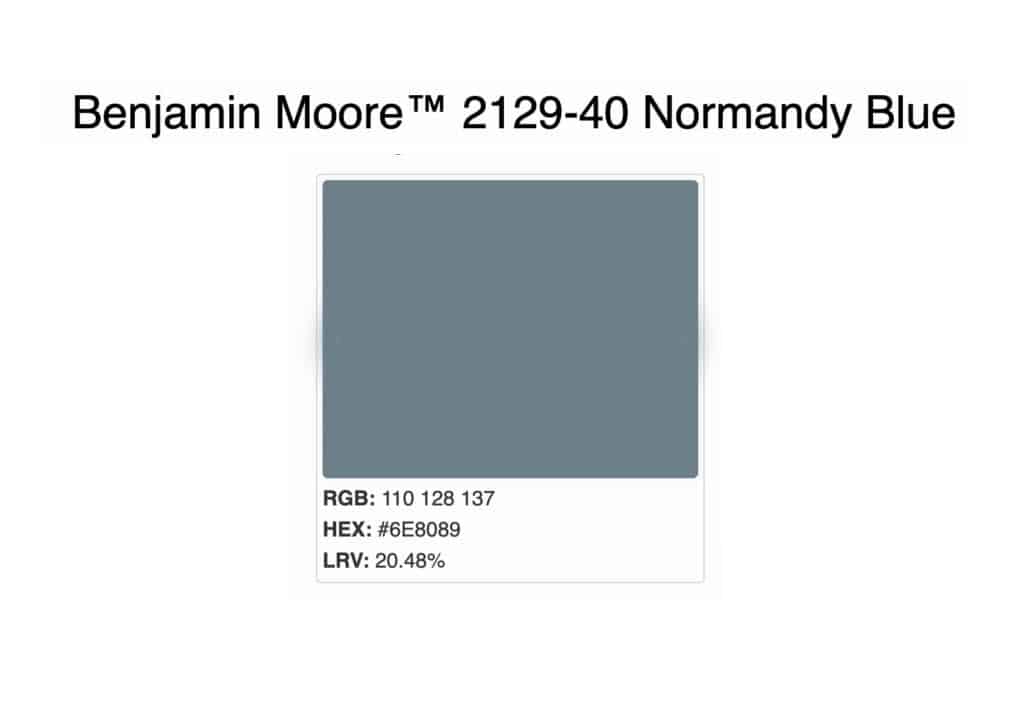
I bought twelve small cans of paint before I narrowed it down to Normandy Blue from @BenjaminMoore.
I know this sounds like a lot of paint samples to purchase. However, you must try the colors and see how they work in your space. This is a great way to get the correct color.
This was a perfect blue, not too light or dark, and just the right amount of grey.
New lighting ideas for the butler’s pantry
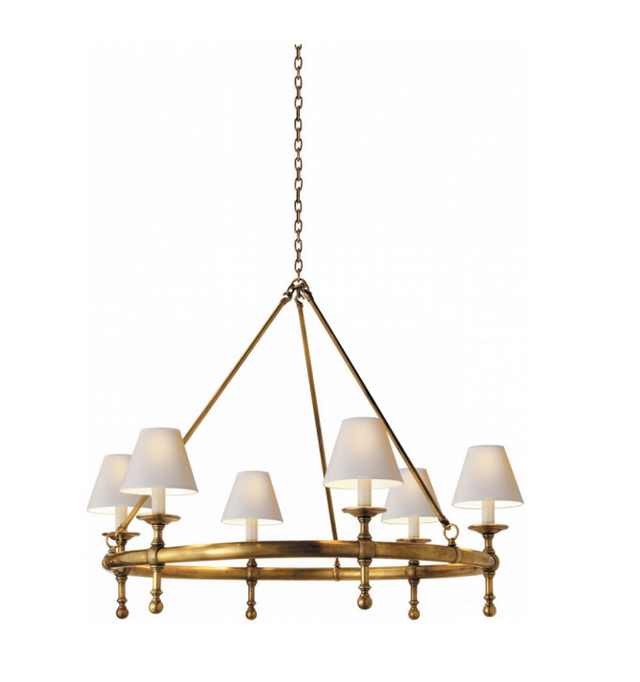
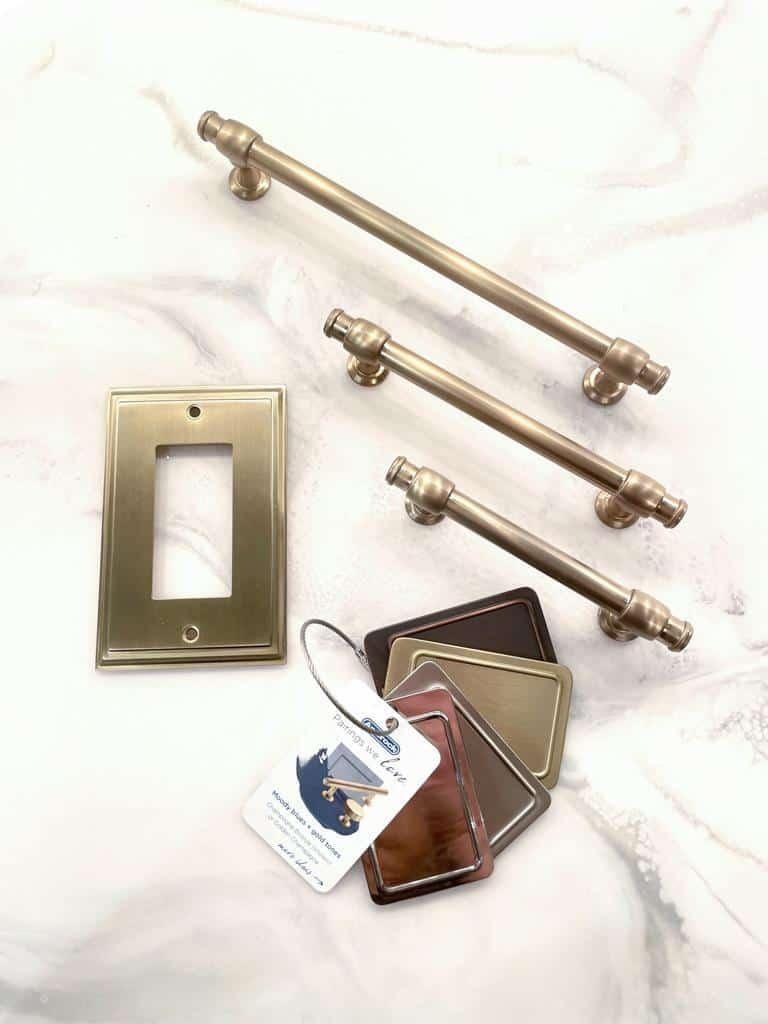
I had decided to use light gold hardware from Amerock on the cabinets and wanted my light fixtures to match.
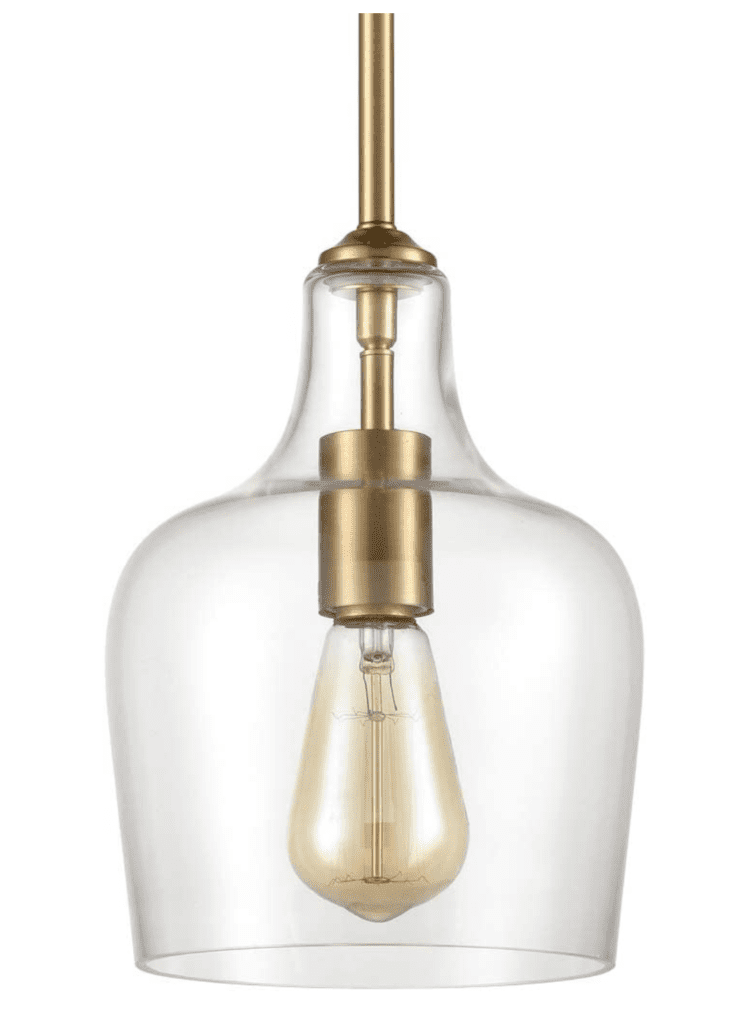
We replaced the two pendant lights over the bar area that goes into the family room. They were a great update and added additional light to the area.
We also replaced the old light fixture with this 6-light chandelier hanging in the center of the butler’s pantry.
Know when to save and when to splurge
I should have listened to my own advice.
I had researched epoxying countertops and thought it was the perfect remedy for our small butler’s pantry. However, I have learned that epoxying the countertops was not ideal.
It was a big job! The initial outcome was fantastic. However….. over time, the epoxy has yellowed, and I will have to either replace the countertops or find an alternative to remedy this situation.
I was trying to save money and thought this was a great option for my counter space. This was a great lesson: You can’t always cut corners when doing a big project like this.
Especially in a functional space that we use for a prep area.

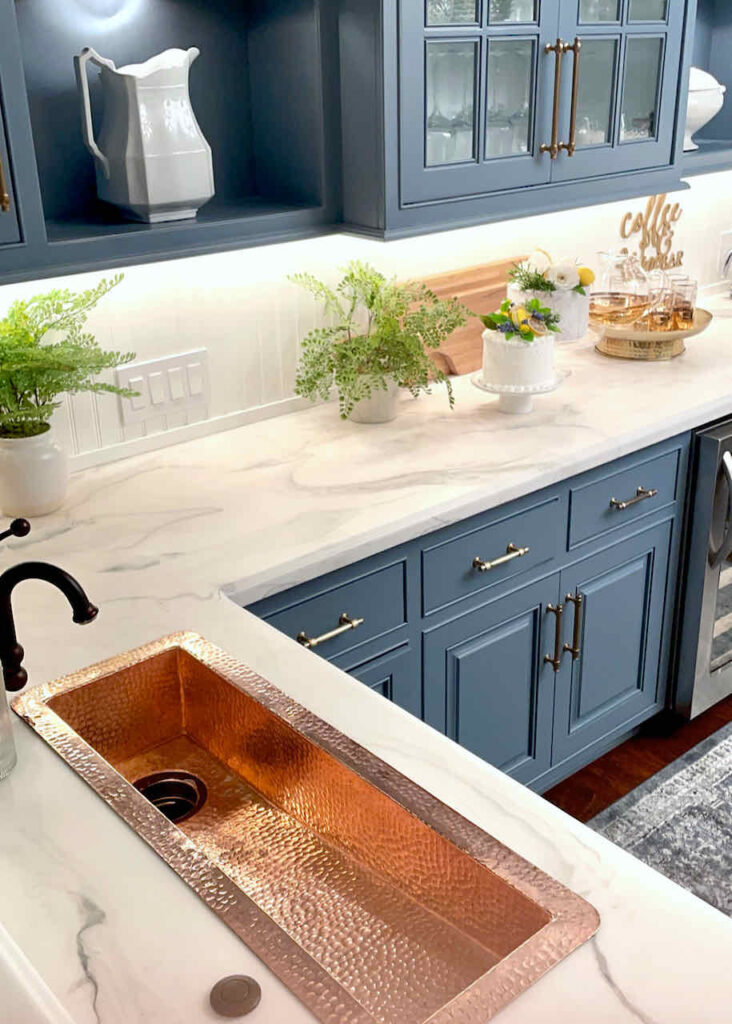
Adding a sink
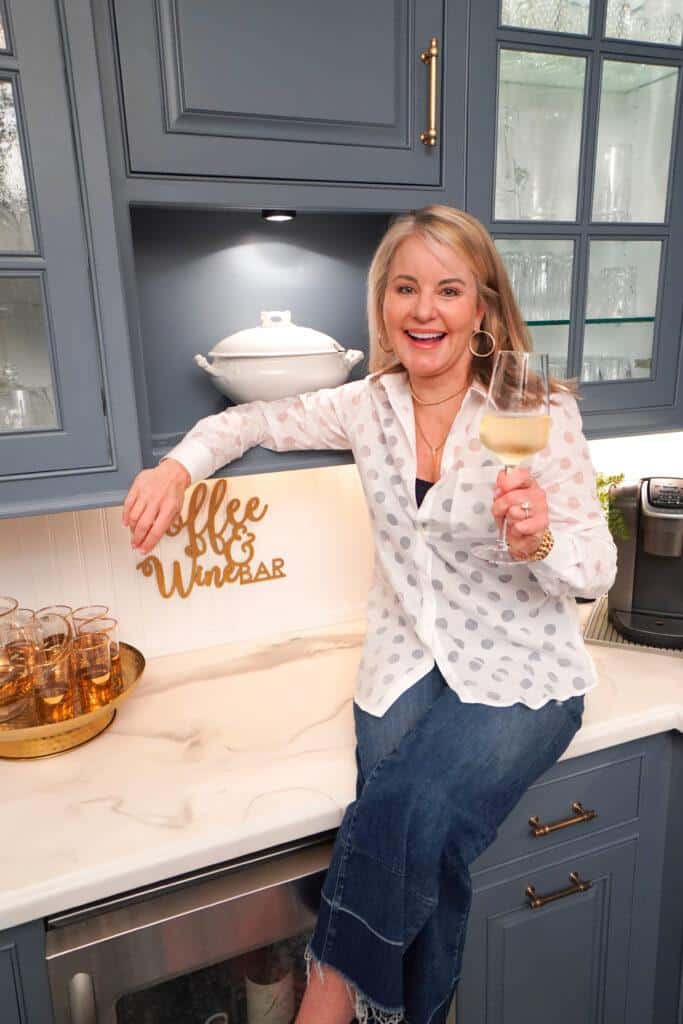
We already had a fabulous long, narrow copper sink in this area, so I chose to keep this sink. It not only serves as a sink, but we love to fill it with ice and keep wine chilled in it for entertaining.
Installing the back splash
We placed beadboard panels over the tile on the existing backsplash. This was also a big undertaking.
We are thankful to our dear friends who came from Northern California to help with this project.
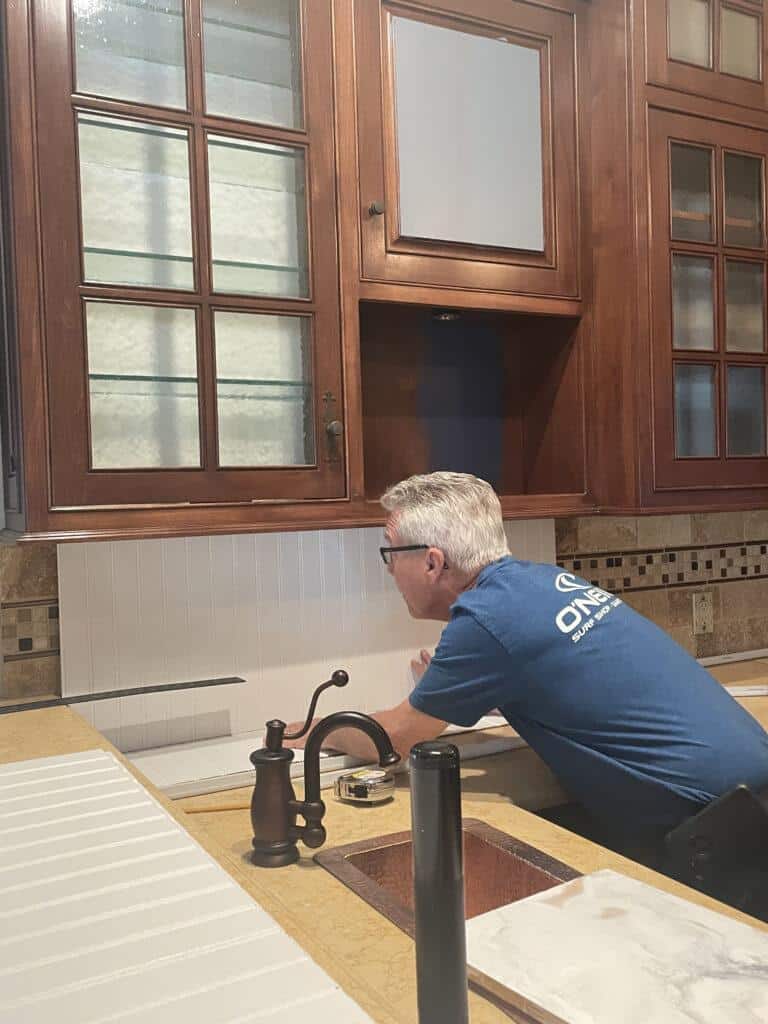
My husband and I had purchased the materials the week before and pre-painted everything.
Our friends arrived, and the work began. There were several challenges, but the finished results are gorgeous.
Final touches to our butler’s pantry
The icing on the cake was adding the new hardware to our cabinetry. I used this beautiful light gold hardware from Amerock. It adds a modern touch to the cabinets.
I was fortunate to have collaborated with @Amerockhardware for this project.
I chose the Winsome pulls in three different lengths and the Candler Wallplates. You won’t believe how easy they are to install. Check out my IG live, where I show you exactly how easy they are to install yourself.
Creative butler’s pantry design ideas
Adding special touches will make your butler’s pantry look beautiful and function well too.
If you have added open shelving, style your shelves with a few of your favorite dishes or glasses.
I chose to add an area rug to my butler’s pantry. I like the warmth it adds to the narrow room. In addition, it feels good under your feet.
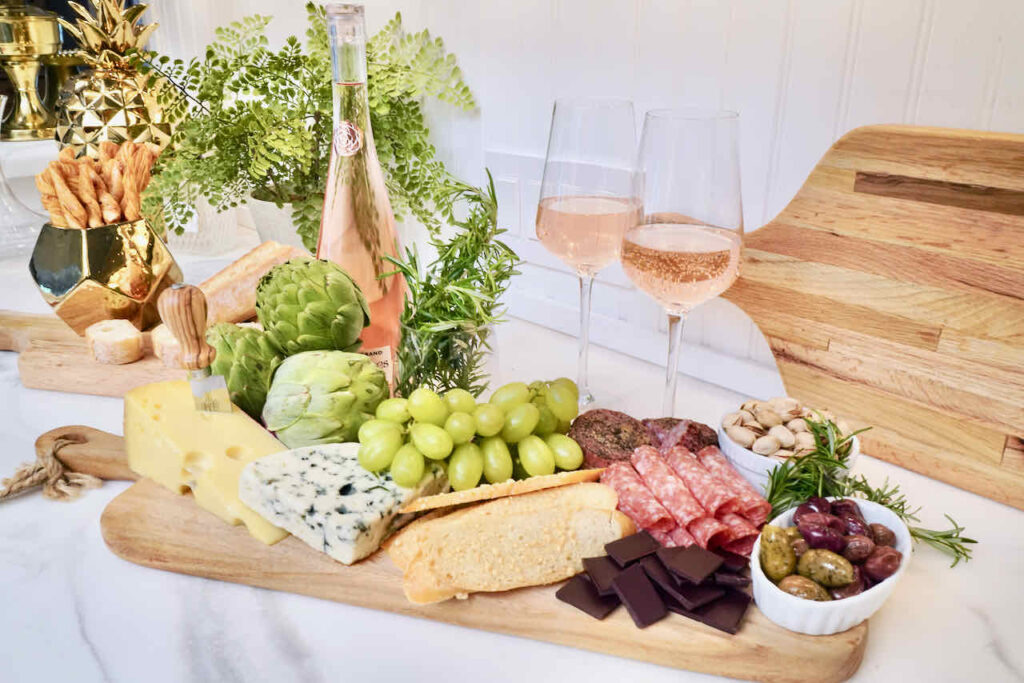
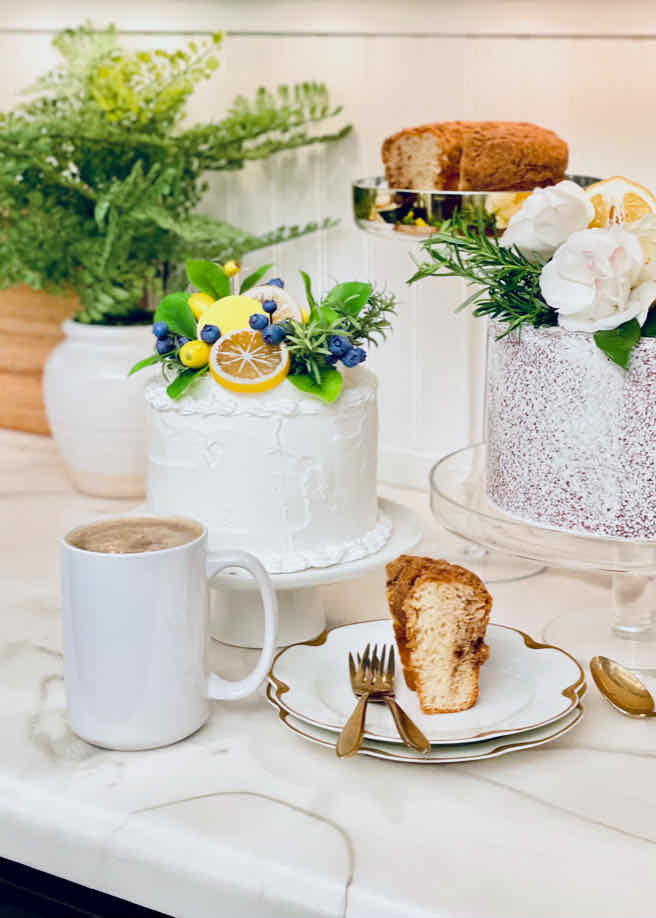
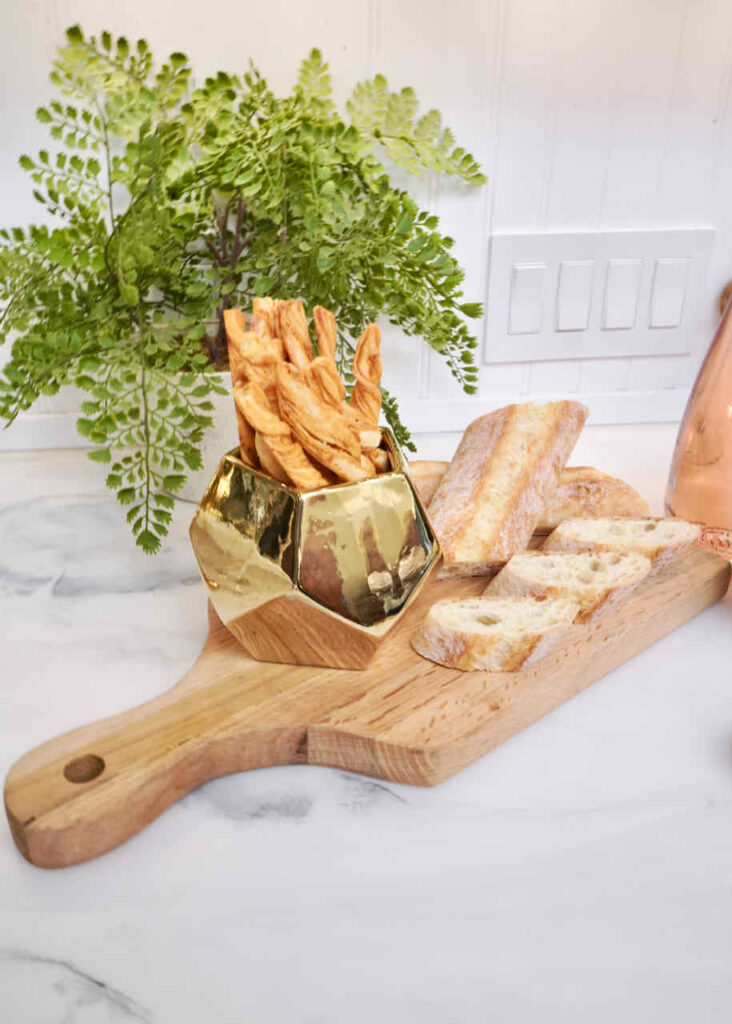
Create small decorative vignettes on the countertop using fresh greens, old books, and decor of your choice.
Display a tray of vintage glasses and barware.
Put your coffee condiments in decorative jars on the counters.
Change out the decor for different seasons.
The finished butler’s pantry
We could not be happier with our finished room except for the darn countertop. I have a few ideas and will explore them soon, so stay tuned to hear what we decide to do.
Cheers to you all!

Stop by to see my spring home tour today!


Your butler’s pantry is much larger than mine (more like a kitchen). The whole thing is beautiful, but I especially love the upper cabinets! That’s exactly the look that I’m going for when we redo our kitchen!
Thank you Cindy. The entire process of planning a new kitchen is so much fun. Enjoy every moment.
Wow, epoxy counters! Who knew? The one thing I have always wanted was a butler’s pantry, and searched for homes having them, but then we found our cozy cottage and the butler’s pantry went out the window… darn it. Love it, and your remodel looks amazing!
Wow Wendy what an incredible transformation!
Thank you so much!
What an amazing transformation my friend! Wow! First of all, I love the color you have chosen. It is stunning. And your gorgeous countertops. Love this post, Wendy.
Thank you so much, Kim. I hope you are feeling much better.
Wendy, this is an amazing transformation. It looks completely different. It’s a stunner, my friend! Love the color choice on the cabinets. It’s a win win!
Thank you so much Tammy!
Wow! Such an incredible transformation Wendy.
It looks beautiful and I love the cabinet color.
Thank you so much Michelle!
I could not love your pantry more Wendy! It is absolutely stunning!!! You did such a great job designing a beautiful & inviting space. I think I could just live in your pantry!
Thank you so much, Heidi. We are enjoying the new space.
I love the way this came together, Wendy! It literally doesn’t even look like the same space. Picking out the cabinet color, countertops and finishes is not an easy thing to do but you make it seem like a breeze. It’s such a beautiful place to hang out and enjoy company! Hugs, CoCo
Thank you so much, Coco! I appreciate your kind words so much.
Wendy, your blue cabinets are absolutely stunning! This transformation is amazing, you did such a good job, I love this new space!
Thank you so much! great to hp with you today.
Oh my goodness, Wendy! Your Butler’s pantry is beyond amazing. I love the details that you added! I pinned your Butler’s Pantry to my kitchen to share 🙂
xoxo
Thank you Jen!
Thank you, Jennifer. So glad you stopped by.
I love these ideas and can’t wait to share this on Tuesday.
Thank you, Rachel. Always great to share with you.
Wendy, This was such a fantastic project and so well done. I love how you incorporated the metal door hardware and backsplash. Looks great! Plus the countertops, such an amazing job!
Thank you, Susan!
Gorgeous makeover Wendy and I’m so glad you shared the process of the project with before photos!
Thank you, Michelle.
I love your transformation! I would really like more information on how you did your backsplash. It looks beautiful and so much better than just painting the tile.
Hi Sandra, thank you so much for your kind comment. We used the MDF bead board from Home Depot. We cut all of the pieces, and then I had them sprayed in the paint shop.
We used tile glue to glue the boards to the tile, so we did not remove the old tile. We then framed the entire backsplash with 1 1/2″ wide trim. I may have some other images I could sent to you.
Wowza! It looks aaaahhhhmazing! I so need to do this. How did you cover the edges of the bead board? Hoping to get to this soon!
Hi Cindy, I am not sure I understand your question. The beadboard does not have any epoxy on it. Do you mean the edges of the countertops?
My jaw is hanging open after seeing this transformation! Like the rest of us, the epoxy countertops are unbelievable. I’ll shut my mouth now and just say I’m featuring your space for next Monday’s All About Home. Thanks so much for coming by to share all the beauty. Hope you’re feeling better now.
Hi Debra, thank you for you wonderful news and your kind comments. It was such a fun project and I loved the epoxy pouring.
Also, I am posting a full tutorial on the epoxy process tomorrow. I am feeling much better from my surgery, and then I got covid. Ugh, can’t seem to catch a break, but I do believe the worst is behind me. Have a great week end.
Wendy, do you have a detailed blog post about the epoxy treatment on your countertops? Is it necessary to have an epoxy expert like your friend? I would LOVE to try this but would like more information~level of difficulty? What would you do differently to prepare, during the process, etc? I am so amazed over the transformation of your coffee and wine bar….wow.
Hi Mary, I am so sorry for the late reply. Many of my comments went to spam. Then I caught the Covid bug and am down for a while. Funny you should ask, I am posting a tutorial on how to pour the epoxy on Saturday. I am also happy to help answer any questions. are you planning to pour inside or outside? How many square feet?
Wendy, I am speechless. The transformation is amazing, particularly the countertops and backsplash. Who knew you could even do that? Wow. Such an impressive renovation. Thank you so much for sharing.
Thank you so much, Mary. We love this new look. I am happy to chat with you if you are interested in doing this. It takes a little practice, but I am glad to share what I know. You can text me or e-mail me if you would like. 626 484 0652, [email protected]
What an amazing transformation, Wendy… and what an amazing space! I can’t even! Thanks for sharing at Tuesday Turn About. I’m delighted to be featuring your post at this week’s party! Pinned!
Thank you so much Julie, I am so honored. It was a very fun project with lots of DIY, we are certainly enjoying the end results. I cant wait to pin again to your party.
Oh my gosh, it’s beautiful. Congratulations on a great job.
Thank you, Rachel, it was a lot of work, but I am so happy with the outcome!
Wendy when you said you were going to epoxy the countertops, I have to be honest – I was worried they wouldn’t turn out well but my goodness they are gorgeous and look absolutely perfect! The way you got it to work on the edge too is amazing. The whole project is beautiful, I love it all and I still can’t believe this is just your coffee bar…wow!!! I promise I will never have even the slightest bit of of doubt in you going into the future.
Crystal, you are so sweet! I have to laugh as I, too, had no idea what those countertops would turn out like, but I love trying new things and learning new skills.
It also took some convincing my husband as he was not sure either, but he sure loves it now. LOL Have a great weekend.
Wendy, this is the most amazing transformation! I’m blown away by so many things. The cabinet paint color … gorgeous. And the epoxy countertop transformation. Wow. Who knew?! I adore the new backsplash and of course your glorious hardware. I love this space in your home. It’s the size of my entire kitchen. I’m sure you, your family and friends are enjoying it all the more now. Beautifully done! xo
Thank you so much Juliet. It was a very fun, yet challenging project. I enjoyed learning so many new skills. I am looking forward to having friend over to enjoy very soon.
It looks so good! Does not even look like the same space! I love every single thing you pIcked!
Thank you Danielle. It makes my entire house feel so much lighter. I can’t wait to see your kitchen.
Wendy this is absolutely gorgeous! Congratulations on a fabulous job!
Thank you so much Suzanne! I can’t wait to see yours too!
This is truly an astounding makeover!!! But, of course I knew it would be with you at the helm! It’s truly fabulous in every way! Super congrats!
Thank you so much Diane. I am so glad we have each other to carry us through these challenges. I cannot wait to see your bathroom reveal. I know it will be fabulous. I need to talk to you about that gorgeous finish on the countertop. I love the color and want to put it on a mirror.
The transformation is simply amazing! What a fun spot to hang out on a bar stool and chat with others. I can’t wait to see how you did the epoxy countertop. That’s very intriguing. You did a terrific job! Enjoy!
Thank you Lynn, it was a very fun project. I especially loved doing the countertops. that post will be coming soon. Thank you my friend for always being so supportive. You were truly one of the first to welcome me to this blogging world with open arms.
Wow what a transformation. Love it.
Thank you so much, I appreicate you taking the time to stop by and check out my blog.