Yield: 2 trees
How to Make Marshmallow Trees for Decoration
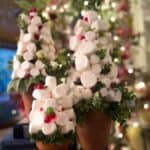
Create these charming marshmallow trees for ornamentation or as a thoughtful gift. They will endure for several years.
Equipment
- Hot glue gun
- Wire cutters
Materials
- Extra large and regular-size marshmallows
- Toothpicks
- A container for your tree. I used a clay pot but you can choose any container you would like to use.
- One Styrofoam cone to fit into your container.
- Faux small greenery
- An assortment of candy: Red hots cherry round candy, mini M&M candies, mini candy canes, star sprinkles, or some faux berries
Instructions
- Glue the Styrofoam cone into the pot (or whatever container you use). Make sure the cone sits inside your container a little bit, but you want most of it exposed.
- Arrange greenery around the base of the cone where it meets the pot. Then, add a little bit of hot glue so the foliage will stay in place where it pokes into the Styrofoam.
- Trim your toothpicks to about 3/4 of their length. (I find that full-sized toothpicks are too long for decorating these small trees). Poke one end of the toothpick into the Styrofoam at the base of the pot and leave the other end sticking out far enough to attach a marshmallow.
- Put a small dab of hot glue onto the end of a marshmallow and slide it onto the toothpick until it meets the Styrofoam cone. Hold it in place for a minute until it stays firmly in place.
- Continue working your way around the little tree, working from the bottom to the top of the cone. It's OK if you have small gaps where the Styrofoam shows, as you can go back and add tiny marshmallows and other decorations in those spaces. Be sure to add a marshmallow to the top of the tree.
- Once your tree is completely covered, it's time for the finishing touches. You can add a few pieces of small greenery between the marshmallows and fill in any remaining gaps with mini marshmallows.
- Lastly, attach your "berries" using the candy of your choice.