How to Embroider a Garden Apron
A full tutorial on embroidering a garden apron with Free vegetable patterns.
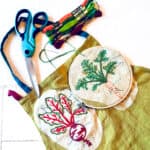
Materials
- One apron You could use almost any kind of apron: cotton, linen, or canvas apron. The embroidery stitching is easy on the linen material for me.
- Embroidery hoop
- Embroidery needles metal needle, no plastic
- Scissors
- Colorful embroidery thread
- Pattern
- Magic Paper
Instructions
- Step 1: Preparing Your Apron and Print the Pattern
- Wash and dry your apron before starting.
- I chose to print my patterns on magic paper. This paper is easy to work with and washes off like a dream after finishing your embroidery project.
- Print the pdf on your home printer.
- Cut around the pattern.
- Decide where you want the pattern, peel the backing off, and place the pattern on the fabric, sticky side down.
- Embroidery Patterns
- In my quest for colorful embroidery patterns, I stumbled upon some lovely hand-drawn vegetable illustrations by DMC. These patterns, along with their instructions, are available for instant download. This is a perfect embroidery pattern for a beginners. DMC also offers a DIY embroidery kit, complete with the bright colour thread for those looking to dive straight into the craft.
- Several sites have free patterns with great beginner embroidery projects. Here are a few of my favorites: They make it easy to download and go.
- Step 2: Placing your pattern
- Decide where you want the pattern, peel the backing off, and place the pattern on the fabric, sticky side down.
- Step 3: Placing the Embroidery Hoop
- Disassemble the Hoop: Your embroidery hoop consists of two rings, one smaller inner ring and a larger outer ring with a tightening screw. Unscrew the outer ring to loosen it enough to separate the two rings.
- Position the Inner Ring: Place the inner ring on a flat surface. Lay your fabric over the inner ring, covering it entirely with some excess around the edges. If you're using a pattern, position the fabric so the area you want to embroider is centered over the ring.
- Secure the Outer Ring: Place the outer ring over the fabric and inner ring, ensuring the fabric is where you want it to be embroidered. Press down so that the fabric and inner ring snugly fit inside the outer ring. The fabric should be sandwiched evenly between both rings.
- Tighten the Screw: Once the outer ring is in place, tighten the screw at the top of the hoop. This action secures the fabric between the rings. Stay under-tightened, as this could damage the fabric or the hoop.
- Step 4: Embroidering
- Only four basic embroidery stitches are used for these vegetable patterns: They are all basic and easy stitches.
- The PDF includes full instructions on where to stitch each type of stitch, how many strands of thread to use, and what color thread to use.
- I suggest that you print out the instruction page to make it easy.
- Step 5: Removing the Magic Paper
- Once you have finished your embroidery, it is time to wash away the Magic paper, and it is truly magical.
- Rinse your apron in cold water and watch the fabric totally disappear.
- It is that easy!
- Hang to dry and press before wearing.