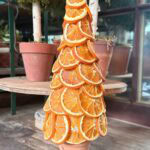
Dried Orange Slice Christmas Tree
A simple orange sliceChristmas tree made with a foam cone, a small terracotta pot and dried orangeslices glued on in overlapping rows. Swap in dried persimmon slices for asecond look.
Servings 1 Tree
Cost $5.00
Equipment
- 1 Glue Gun
- 1 pair of scissors
- 1 Hairdryer optional
Ingredients
- 1 Styrofoam cone 6-10" tall
- 45 dried orange slices or dried persimmon slices
- 1 small terracotta pot
- Glue sticks

Instructions
- Sort the slices. Group the dried slices by size: large, medium and small.
- Set the base. Stand the terracotta pot right side up and set the foam cone on top so it sits level.
- Glue the first slice. Run hot glue across the back of a large slice and press it to the bottom edge of the cone, letting it hang slightly over the rim of the pot.
- Finish the bottom row. Add slices around the cone, overlapping each one by about a third.
- Build the rows. Start each new row over the seams of the row below and overlap the row underneath. Use smaller slices as the cone narrows.
- Cap the top. Wrap two or three small slices around the tip and glue one slice upright on top.
- Fill the gaps. Cut a slice in half and tuck it into any spot where foam shows.
- Remove glue strings. Pull them off by hand or melt them with a hair dryer on low.
Notes
- For a persimmon tree, use dried Hachiya slices and overlap them a little more than orange slices.
- Slices must be fully dry before gluing. A soft slice can mold.