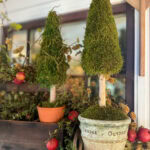
Yield: 1 Moss Tree
: DIY Moss Cone Christmas Tree
A simple garden-inspired Christmas tree made from a Styrofoam cone, sheet moss, and a clay pot. Each tree takes under 30 minutes and looks like it came from a high-end garden boutique.
Equipment
- 1 Low temperature glue gun
- 1 Pair of garden sheers
- 1 pair of scissors
Materials
- 1 Styrofoam cone form 8 inch (or a mix of sizes if you are making a set)
- 1 Styrofoam ball sized to fit snugly inside the clay pot
- 1 clay pot 6 inch
- 1 birch branch or cinnamon stick 8 to 10 inches long
- 1 bag sheet moss
- 1 bag reindeer moss optional
- 1 pack floral pins
- Hot glue sticks
- 1 can clear matte sealer
- Optional: velvet ribbon fairy lights, dried hops, small pinecones, lichen

Instructions
- Set the base in the pot. Press the Styrofoam ball into the clay pot so it sits snugly just below the rim. If it shifts at all, run a ring of hot glue where the ball meets the inside of the pot.
- Add the trunk. Push one end of the birch branch or cinnamon stick straight down into the center of the ball, about 2 inches deep. Trim with wire cutters if it is too long.
- Attach the cone. Press the bottom of the cone onto the exposed end of the branch. Check that it stands straight before you glue anything else.
- Cut the moss into working pieces. Break or trim the sheet moss into pieces about 3 to 4 inches across. Smaller pieces curve around the cone much more easily than one large sheet.
- Glue the moss in layers. Working from the bottom up in small sections, apply low temperature glue and press the moss firmly into place. Overlap each piece slightly so no white foam shows through.
- Pin down any lifted edges. Push a floral pin through any spot where the moss curls away. Pins hold better than glue on thick or dry pieces.
- Cover the base. Wrap moss around the bottom edge of the cone, then continue across the top of the ball in the pot so the tree and pot read as one piece.
- Fill gaps and fluff. Tuck small scraps into the seams, then fluff the surface so the texture stays full and organic rather than flat.
- Seal the moss. Mist the whole tree lightly with clear matte sealer from about 12 inches away. Dry 20 minutes. This is what stops the shedding.
- Add finishing touches. Tuck in reindeer moss, lichen, dried hops, or snowy branches. Tie on velvet ribbon, or leave it plain.