Yield: 1 Centerpiece
4th of July Basket Centerpiece
A quick and easy centerpiece you can make in under 10 minutes. Gather a few goodis from around the house and lets get started.
Equipment
- 1 pair of scissors
- 1 Glue gun with glue sticks
Materials
- 1 Woven or wire basket any size
- 2 Mini American flags
- 6 Flowers white, and blue faux or fresh flowers
- 1 Small mason jars or vase
- 1 yard Ribbon striped, burlap, or gingham optional
- Assorted red white and blue plates or pinwheels
- 6 Boxes Cracker Jacks 6 boxes
- 1 bag Moss
- 3 large pieces of Styrofoam I used round balls and cut them in half.
Instructions
Step 1: Build the Base for Your 4th of July Basket Centerpiece
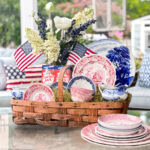
- Start by choosing a vintage basket with character—a well-loved picnic or woven basket adds instant charm. You can often find beautiful options at your local thrift store, flea market, or even in your own attic. This gives your DIY 4th of July centerpiece a nostalgic and rustic feel.
- To give your arrangement height and structure, create a simple riser inside the basket. I used two small wood rounds stacked together, but you could also use an inverted bowl or a stack of coasters—anything to elevate your design.
- Next, cut an 8-inch round styrofoam ball in half and hot glue it to the top of the wood round. Then take a 4-inch styrofoam ball, slice it in half, and glue both pieces on top to form a tiered, dome-like base. This gives you a sturdy form to hold flags, florals, and other patriotic decorations securely in place.
Step 2: Make a Cracker Jack Vase with Vintage Charm
- Hot glue six Cracker Jack boxes together to form a square, creating a fun, nostalgic vase with classic Americana style. Place a clear glass or mason jar inside to hold your flowers.
- Set the vase on top of a few old books to give it extra height and vintage character.
- Then, position your largest plate toward the back of the basket to anchor the arrangement. (If the centerpiece will be viewed from all sides, center the plate instead and add a second large plate on the back side.
Step 3: Layer Vintage Plates and Collectibles for Added Charm
- Continue layering plates in graduating sizes, placing the largest at the back and working forward. This creates depth and allows the beautiful patterns and designs to shine through.
- I used a mix of vintage transferware, but you can personalize your look with any plates that match your style—classic white, patriotic prints, or even mismatched thrifted finds.
- If you don’t have the right plates on hand, you can easily substitute with adorable 4th of July pinwheels. I simply added a popsicle stick to the center when assembling the pinwheel, making it easy to insert directly into the styrofoam base. It’s a cute, festive, and budget-friendly alternative that adds a playful pop of color to your patriotic centerpiece.
- To add even more character, tuck in bowls, teacups, saucers, or a few novelty pieces for a whimsical, curated touch.
Step 4: Description of Fourth Step
- Add moss or burlap to cover your styrofoam and create a finished look.
Step 5: Add Red, White & Blue Flowers and Patriotic Finishing Touches
- Now it’s time to bring your DIY 4th of July centerpiece to life with festive blooms! Add a small arrangement of red, white, and blue flowers to your Cracker Jack vase. You can use fresh flowers from the garden or faux stems you have on hand—both work beautifully.
- I used faux flowers in patriotic colors for easy styling and long-lasting charm, but feel free to mix in greenery or seasonal blooms to suit your style.
- To finish it off, tuck in a few mini American flags for that classic patriotic centerpiece look. It’s a simple detail that adds a big dose of charm and holiday spirit.